🧶 Beautiful ✨ Detailed 💝 Adorable

Nemo Clown Fish Amigurumi Pattern

Nemo Clown Fish Amigurumi Pattern
4.1★ Rating
2-3 Hours Time Needed
3.4K Made This
✂️

Intermediate Level

Ideal for those with basic knitting experience, featuring slightly more advanced stitches and techniques to expand your skills.

⏱️

Bite-Sized Project

Complete in under 2 hours—quick, fun, and perfect for a little creative escape.

🐾

Pocket Pal

A mini friend to carry anywhere, providing comfort and companionship in a perfectly portable size.

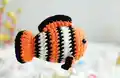
About This Nemo Clown Fish Amigurumi Pattern

Nemo Clown Fish Amigurumi Pattern crochet pattern - detailed view of completed project

The strategic placement of safety eyes and the careful shaping from round body to flat tail creates an instantly recognizable clownfish silhouette. This pattern showcases how thoughtful construction techniques can minimize finishing work while maximizing visual impact.

Why You'll Love This Nemo Clown Fish Amigurumi Pattern

I'm absolutely in love with this clown fish pattern because the no-sew construction is pure genius and makes the whole process so much more enjoyable! There's something incredibly satisfying about watching those color changes create Nemo's iconic stripes as you work, with no loose ends to weave in along the way. I appreciate how quickly this project comes together with super bulky yarn—you can literally finish an entire fish in one sitting and still have time to admire your work. The technique of picking up stitches for the fins is such a clever detail that eliminates the tedious sewing process most amigurumi requires. Plus, the finished result is so recognizable and charming that it always gets enthusiastic reactions from both kids and adults who instantly see Nemo come to life in your hands!

Nemo Clown Fish Amigurumi Pattern step 1 - construction progress Nemo Clown Fish Amigurumi Pattern step 2 - assembly progress Nemo Clown Fish Amigurumi Pattern step 3 - details and accessories Nemo Clown Fish Amigurumi Pattern step 4 - final assembly and finishing

Switch Things Up

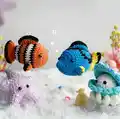
I love experimenting with this clown fish pattern by creating different species variations using alternative color combinations! Try swapping the orange for yellow and white to create a different clownfish species, or go wild with bright pink and purple for a fantasy tropical fish that looks like it swam straight out of a coral reef dream.

For a more realistic touch, consider adding surface crochet details or embroidered scales along the body sections using contrasting yarn colors. Some crafters even add small pectoral fins on the sides by picking up just a few stitches and working tiny fan shapes, giving the fish more dimensional detail and movement.

You could create an entire Finding Nemo collection by adapting the basic body shape—make Dory by using blue and yellow yarn with a slightly flatter body shape, or create Marlin with deeper orange tones and more prominent fins. I've seen gorgeous versions where makers added glitter or sparkle yarn during the color changes for fins that shimmer like they're underwater. Don't forget you can also adjust the size dramatically by using different yarn weights—try fingering weight yarn with a tiny hook for adorable keychain versions, or go even bulkier for a huge statement pillow fish!

Common Mistakes & How to Fix Them

✗ Forgetting to stuff the body before crocheting the two sides together in row 18 leaves you unable to add filling later ✗ Not counting stitches carefully during color changes causes the stripe pattern to shift and become misaligned throughout the body ✗ Pulling yarn too tightly during color transitions creates puckering and visible gaps between the orange, black, and white sections ✗ Positioning dorsal fins incorrectly or unevenly on the body disrupts the clownfish silhouette and makes it look unbalanced

Nemo Clown Fish Amigurumi Pattern

Dive into the underwater world with this adorable Nemo-inspired clown fish crochet pattern! This charming amigurumi captures the vibrant orange, black, and white stripes of everyone's favorite animated fish. Perfect for Disney Pixar fans and ocean lovers alike, this pattern features a clever no-sew construction technique that creates the body and tail in one continuous piece. The distinctive dorsal fins and expressive safety eyes bring Nemo's personality to life, making this a delightful project for creating gifts or adding a splash of oceanic charm to your handmade collection.

Intermediate 2-3 Hours

Materials Needed for Nemo Clown Fish Amigurumi Pattern

— Main Fabric

  • 01
    Super bulky yarn (Category 6) in bright orange for main body and fins
  • 02
    Super bulky yarn (Category 6) in black for stripe details
  • 03
    Super bulky yarn (Category 6) in white for stripe details

— Tools Required

  • 01
    3.5mm (E) crochet hook
  • 02
    Stitch markers for tracking rounds and placement
  • 03
    Sewing needle for weaving ends
  • 04
    Scissors
  • 05
    8mm plastic safety eyes
  • 06
    Hot glue gun for securing eyes
  • 07
    Fiberfill stuffing

Progress Tracker

0% Complete

— Body to Tail (No Sew Construction) :

Info:

Begin with Orange yarn

Row 1:

6 SC in an MR (6)

Row 2:

6 INC (12)

Row 3:

(SC, INC) 6 times (18)

Row 4:

(2 SC, INC) 6 times (24)

Row 5:

(3 SC, INC) 6 times (30)

Row 6:

30SC (30)

Info:

Change to Black yarn

Row 7:

30SC (30)

Info:

Change to White yarn

Row 8-9:

30SC (30)

Info:

Change to Black yarn

Row 10:

30SC (30)

Info:

Change to Orange yarn

Row 11:

30SC (30)

Row 12:

(3SC, DEC) 6 times (24)

Info:

Change to Black yarn

Row 13:

24SC (24)

Info:

Change to White yarn

Row 14:

24SC (24)

Row 15:

(2SC, DEC) 6 times (18)

Info:

Change to Black yarn

Row 16:

18SC (18)

Info:

Change to Orange yarn

Row 17:

(SC, DEC) 6 times (12)

Info:

Stuff the body firmly before continuing

Row 18:

Crochet 2 sides together with 6SC

Row 19:

Turn, 2CH, DC-INC 6 times (12)

Info:

Change to Black yarn

Row 20:

Turn, CH, 12SC (12)

Info:

Weave in the yarn end and cut

— Dorsal Fins :

Part 1 (Make 2):

Begin with Orange yarn. Pick up the yarn from row 8, spaced 8 stitches apart

Row 1:

(Chains 1, HDC, 3DC, HDC) in one stitch (5)

Info:

Change to Black yarn

Row 2:

Turn, CH, 5SC (5)

Info:

Weave in the yarn end and cut

Part 2:

Begin with Orange yarn. Pick up the yarn from R7 to R16, in the vertical line from head to tail

Row 1:

(Chains 1, SC, 7DC, SC) in one stitch (9)

Info:

Change to Black yarn

Row 2:

Turn, CH, 9SC (9)

Info:

Weave in the yarn end and cut

— Eyes :

Eye Placement:

Attach the eyes at R5-R6, spaced 8 stitches apart

Assembly Instructions

  • Position and secure 8mm safety eyes between rows 5-6, spacing them 8 stitches apart for proper clownfish expression
  • Use hot glue gun to permanently secure safety eye backs if needed for extra durability
  • Pick up stitches for Part 1 dorsal fins from row 8, ensuring they are symmetrically placed 8 stitches apart
  • Create Part 2 dorsal fin by picking up stitches along the vertical line from row 7 to row 16 for proper spine placement
  • Weave in all remaining yarn ends securely and trim excess for clean professional finish

Important Notes

  • 💡Remember to stuff the body firmly before row 18 as you cannot add stuffing after crocheting sides together
  • 💡Maintain consistent tension during color changes to ensure smooth transitions between orange, black, and white stripes
  • 💡Super bulky yarn works up quickly but can be harder to see individual stitches, so count carefully
  • 💡When picking up stitches for fins, insert hook under both loops of the stitch for secure attachment
  • 💡The tail is created by crocheting two sides together in row 18, flattening the tube shape into a fish tail
  • 💡Hot glue gun is recommended for securing safety eyes as the bulky yarn may not hold them tightly enough
  • 💡Leave long tails when changing colors to make weaving in ends easier at the finish

This adorable Nemo clown fish pattern brings Finding Nemo magic to life with a clever no-sew construction technique! Perfect for Disney fans and ocean enthusiasts, this quick-working pattern uses super bulky yarn and seamless color changes to create Nemo's iconic striped appearance. The innovative approach of picking up stitches for the dorsal fins eliminates tedious assembly, making this an enjoyable and satisfying project from start to finish. Just keep crocheting! 🐠🧡✨

You ask,

we answer.

FAQs

Why does the pattern specify super bulky yarn?

Super bulky yarn (Category 6) creates a plush, cuddly texture and allows the project to work up very quickly—often in just 2-3 hours. If you prefer to use a lighter weight yarn, simply adjust your hook size accordingly and expect a smaller finished fish with more detailed stitching.

What does 'crochet 2 sides together' mean in row 18?

This technique flattens the tube-shaped body to create the tail. Flatten the opening so you have two layers, then insert your hook through both layers at once as you single crochet across, effectively sealing them together to form the flat tail shape.

How do I pick up stitches for the dorsal fins?

Insert your hook under both loops of the specified stitch on the body, pull up a loop with your new yarn color, and begin crocheting according to the fin instructions. This attaches the fin directly to the body without any sewing required.

Can I make this pattern without safety eyes?

Absolutely! You can embroider eyes using black yarn or sew on felt circles instead. This makes the finished fish safer for young children and eliminates the need for a hot glue gun.

How can I make the color transitions look cleaner?

Complete the last stitch of the old color until you have two loops on your hook, then pull through with the new color to complete the stitch. This hides the color change more effectively than cutting and joining at the beginning of rounds.