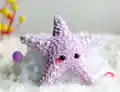
About This Peach the Starfish Amigurumi Pattern
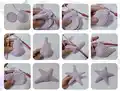
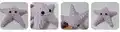
The symmetrical five-arm structure requires careful attention to evenly spacing the attachment points around the body circles. Once you master the first arm construction, the remaining four follow the exact same pattern for consistent results.
Why You'll Love This Peach the Starfish Amigurumi Pattern
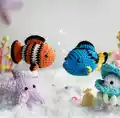
I'm absolutely fascinated by this starfish pattern because the construction method is so clever and unexpected—it feels like solving a fun puzzle as you join the belly and back pieces to create each arm! There's something incredibly satisfying about watching a flat circle transform into a dimensional, multi-armed sea creature right before your eyes. I love how forgiving this pattern is with super bulky yarn making it work up quickly, yet the finished result looks impressively complex and professional. The embroidery details give you complete creative freedom to customize your starfish's personality, from sweet and shy to bold and sassy. Plus, this starfish pairs perfectly with handmade Nemo and Dory to create a complete Finding Nemo underwater scene that's absolutely enchanting. It's the kind of pattern that makes you want to experiment with different colors and expressions to build an entire starfish family!
Switch Things Up
I love experimenting with this starfish pattern by creating an entire rainbow reef of different colored sea stars! Try working with bright orange or coral for a traditional Pacific starfish look, or go bold with hot pink and turquoise for a tropical fantasy creature. You could even create ombre effects by gradually changing yarn shades from the body center out to the arm tips for stunning dimensional color.
For added texture and realism, consider surface crocheting bumpy dots across the back and arms to mimic the natural tubercles found on real starfish. Some crafters add small pom-poms or French knots in contrasting colors for a more playful, cartoon-style appearance that kids absolutely love. You might also embroider different facial expressions on each starfish—happy, surprised, sleepy, or sassy—to create a whole family of personalities.
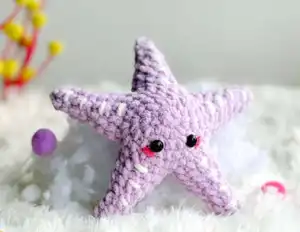
Don't be afraid to adjust the arm length by adding or subtracting rows in the arm section (rows 7-13) to create lankier or stubbier variations. I've seen gorgeous versions where makers add wire inside each arm before stuffing to create poseable starfish that can wave or bend for photography and display. For a complete Finding Nemo tank scene, make your starfish in purple like Peach and display it alongside your handmade Nemo, Dory, and other underwater friends. You could even create a whole ecosystem with different sized starfish using various yarn weights—imagine a mama starfish with tiny babies scattered around!
Common Mistakes & How to Fix Them
✗ Not counting stitches carefully when dividing belly and back pieces for arms causes uneven arm placement and lopsided starfish shape
✗ Stuffing the arms too firmly or not firmly enough creates inconsistent texture and arms that either stick out stiffly or droop limply
✗ Forgetting to mark the starting points for each arm on both belly and back pieces results in misaligned arms that don't radiate evenly
✗ Crocheting the arms too loosely during decrease rounds creates floppy tips that lose the characteristic pointed starfish arm shape