🧶 Beautiful ✨ Detailed 💝 Adorable

Sleeping Pink Puff Kirby Amigurumi Pattern

Sleeping Pink Puff Kirby Amigurumi Pattern
4.4★ Rating
4-5 Hours Time Needed
2.5K Made This
✂️

Intermediate Level

Ideal for those with basic knitting experience, featuring slightly more advanced stitches and techniques to expand your skills.

⏱️

Bite-Sized Project

Complete in under 2 hours—quick, fun, and perfect for a little creative escape.

🧸

Cute Companion

An adorable friend to cherish, handcrafted with love to bring comfort and joy for years to come.

About This Sleeping Pink Puff Kirby Amigurumi Pattern

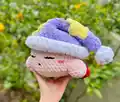
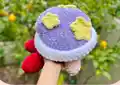
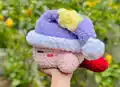
This Sleeping Kirby pattern captures the iconic video game character in his most peaceful state, complete with a removable nightcap adorned with decorative stars and a soft pom pom. Working with bulky weight yarn and an 8mm hook means this project stitches up remarkably fast while creating a substantial, huggable finished piece. The pattern features clever construction techniques including a unique knotted mouth detail and embroidered facial features that bring personality and charm. The customizable hat allows you to choose your favorite color combinations and decorative elements, whether you prefer classic yellow stars or playful polka dot circles.

Sleeping Pink Puff Kirby Amigurumi Pattern crochet pattern - detailed view of completed project

Special attention is given to stuffing guidance to ensure Kirby maintains his signature round shape while still being able to lay flat on his stomach naturally. The removable hat design means you can change up the look or wash pieces separately, adding practical functionality to this adorable design.

Why You'll Love This Sleeping Pink Puff Kirby Amigurumi Pattern

I absolutely adore this pattern because it combines nostalgia with practical crafting techniques that make you feel accomplished quickly. The bulky yarn means I can finish Kirby in just one afternoon, yet the attention to detail in the facial features and hat decorations makes him look professionally crafted and store-worthy. I especially love the removable hat feature—it adds an interactive element that makes this more than just a static plush, and kids absolutely delight in taking it on and off. The customization options mean I've made several versions with different color schemes, and each one brings smiles to everyone who sees them. The satisfying speed of working with chunky yarn combined with the adorable end result makes this one of my go-to patterns for gifts.

Sleeping Pink Puff Kirby Amigurumi Pattern step 1 - construction progress Sleeping Pink Puff Kirby Amigurumi Pattern step 2 - assembly progress Sleeping Pink Puff Kirby Amigurumi Pattern step 3 - details and accessories Sleeping Pink Puff Kirby Amigurumi Pattern step 4 - final assembly and finishing

Switch Things Up

I love experimenting with different color schemes for Kirby's nightcap to create unique character variations. Try making a galaxy-themed hat with dark blue or black base and silver or white stars, or go pastel with soft lavender and cream for an ultra-dreamy aesthetic. You could even create seasonal versions—orange and black for Halloween with tiny pumpkin appliqués, or red and green for Christmas with holly leaf decorations instead of stars.

For an extra special touch, I sometimes add tiny embroidered details like closed eyelashes using black embroidery floss, or add a subtle smile at the corners of the mouth for a more content expression. You can also play with the blush placement and intensity—using multiple shades of pink creates more dimensional rosy cheeks that really pop.

Consider making the hat permanently attached if this is for a young child, or create multiple interchangeable hats in different colors so you can swap them based on mood or season. I've made matching sets with different hat themes—star hat, moon hat, and cloud hat—that create a whole sleepy-time collection. The body could also be made in different Kirby colors like yellow, blue, or green to represent different Kirby powers from the games, giving each one a unique personality while maintaining that iconic sleeping pose we all adore.

Common Mistakes & How to Fix Them

✗ Overstuffing the body prevents Kirby from laying flat naturally on his stomach, so stuff moderately and test the sleeping pose ✗ Forgetting to try on the hat while stuffing can result in poor fit, always check hat placement around row 10 during assembly ✗ Making the mouth knot too tight pulls it inside the face instead of creating visible dimension, keep tension gentle and controlled ✗ Using the same hook size for all stars creates monotonous decoration, vary hook sizes between 4mm and 8mm for visual interest

Sleeping Pink Puff Kirby Amigurumi Pattern

Bring Nintendo's beloved pink character to life with this adorable Sleeping Kirby amigurumi pattern! This cuddly design features Kirby peacefully resting with closed eyes, rosy cheeks, and a charming removable nightcap complete with stars and a fluffy pom pom. Standing approximately 7 inches tall and 8.5 inches wide, this plush creation uses soft bulky yarn that works up quickly and feels wonderful to hold. The pattern includes customizable options for decorating the sleepy hat with stars or polka dots, making each Kirby uniquely yours. Perfect for gaming enthusiasts, Nintendo fans, or anyone who appreciates kawaii-style handmade treasures.

Intermediate 4-5 Hours

Materials Needed for Sleeping Pink Puff Kirby Amigurumi Pattern

— Main Fabric

  • 01
    Bulky weight yarn in light pink, purple, white, yellow, black, and red (Bernat Blanket or Bernat Baby Blanket recommended)
  • 02
    Worsted weight yarn in dark pink for blush details (Big Twist Value Worsted or similar)
  • 03
    Approximately 100-150 grams total of various colors needed

— Tools Required

  • 01
    Crochet hook 8mm
  • 02
    Crochet hook 4mm (optional, for smaller stars)
  • 03
    Polyester fiberfill stuffing
  • 04
    Stitch markers
  • 05
    Embroidery needles
  • 06
    Yarn needle for assembly
  • 07
    Scissors

Progress Tracker

0% Complete

— Sleepy Hat :

Info :

Use purple yarn (or your chosen hat base color) and white yarn. Start with purple yarn.

Round 1 :

MR 5 (5)

Round 2 :

INC x 5 (10)

Round 3-5 :

10 SC (10)

Round 6 :

(1 SC, INC) x 5 (15)

Round 7 :

15 SC (15)

Round 8 :

(2 SC, INC) x 5 (20)

Round 9 :

20 SC (20)

Round 10 :

(3 SC, INC) x 5 (25)

Round 11 :

25 SC (25)

Round 12 :

(4 SC, INC) x 5 (30)

Round 13 :

30 SC (30)

Round 14 :

(5 SC, INC) x 5 (35)

Round 15-16 :

35 SC (35)

Round 17 :

(6 SC, INC) x 5 (40)

Round 18 :

40 SC (40)

Round 19 :

(7 SC, INC) x 5 (45)

Round 20 :

45 SC (45)

Round 21 :

(8 SC, INC) x 5 (50)

Round 22 :

50 SC (50)

Round 23 :

(9 SC, INC) x 5 (55)

Round 24-25 :

55 SC (55)

Info :

Change to white yarn.

Round 26-30 :

55 SC (55)

Info :

Finish off. Optional: flip hat inside out for different texture look. Fold white border between rows 25-26 to create raised border.

— Hat's Pom Pom :

Info :

Use white yarn.

Round 1 :

MR 4 (4)

Round 2 :

INC x 4 (8)

Round 3 :

(1 SC, INC) x 4 (12)

Round 4-5 :

12 SC (12)

Round 6 :

(1 SC, DEC) x 4 (8)

Info :

Begin stuffing the pom pom.

Round 7 :

DEC x 4 (4)

Info :

Finish stuffing. Close hole by weaving yarn through front loops and pulling tight. Sew pom pom onto end of hat.

— Stars on Hat (Make 3) :

Info :

Use yellow yarn. Make 2 big stars with 8mm hook and 1 small star with 4mm hook.

Round 1 :

MR 10 (10)

Round 2 :

(SC, INC) x 5 (15)

Round 3 :

(SLST, [HDC, DC, HDC all in one stitch], SLST) x 5 (25)

Info :

Finish off and sew stars onto hat.

— Optional Circles on Hat :

Info :

Use yellow yarn. Make as many as desired.

Round 1 :

MR 8 (8)

Round 2 :

(SC, INC) x 4 (12)

Info :

Finish off and sew circles onto hat.

— Kirby's Body :

Info :

Use light pink yarn.

Round 1 :

MR 6 (6)

Round 2 :

INC x 6 (12)

Round 3 :

(1 SC, INC) x 6 (18)

Round 4 :

(1 SC, INC, 1 SC) x 6 (24)

Round 5 :

(3 SC, INC) x 6 (30)

Round 6 :

(2 SC, INC, 2 SC) x 6 (36)

Round 7 :

(5 SC, INC) x 6 (42)

Round 8 :

(3 SC, INC, 3 SC) x 6 (48)

Round 9-16 :

48 SC (48)

Round 17 :

(6 SC, DEC) x 6 (42)

Round 18 :

(5 SC, DEC) x 6 (36)

Round 19 :

(4 SC, DEC) x 6 (30)

Info :

Begin stuffing. Try on hat as you stuff to ensure proper fit around row 10. Avoid overstuffing so body can lay flat.

Round 20 :

(3 SC, DEC) x 6 (24)

Round 21 :

(2 SC, DEC) x 6 (18)

Round 22 :

(1 SC, DEC) x 6 (12)

Round 23 :

DEC x 6 (6)

Info :

Finish stuffing. Close hole by weaving yarn through front loops and pulling tight.

— Kirby's Arms (Make 2) :

Info :

Use light pink yarn.

Round 1 :

MR 5 (5)

Round 2 :

INC x 5 (10)

Round 3 :

(SC, INC) x 5 (15)

Round 4-5 :

15 SC (15)

Info :

Stuff lightly. Sew arms onto rows 13-17 of body near outer edge of blush.

— Kirby's Feet (Make 2) :

Info :

Use red yarn.

Round 1 :

MR 6 (6)

Round 2 :

(SC, INC) x 3 (9)

Round 3 :

(2 SC, INC) x 3 (12)

Round 4-8 :

12 SC (12)

Info :

Start stuffing lightly.

Round 9 :

(2 SC, DEC) x 3 (9)

Round 10 :

(SC, DEC) x 3 (6)

Info :

Finish stuffing. Attach feet onto rows 16-17 of body, approximately 4 stitches apart. Do not close hole.

Assembly Instructions

  • Try on the sleepy hat to ensure it fits comfortably around row 10 of Kirby's head before final assembly
  • Embroider eyes with black yarn between rows 12-13, making each eye 4 stitches wide with 3 stitches between them
  • Create mouth using overhand knot technique between rows 14-15, pulling yarn from stomach through face and knotting gently
  • Sew dark pink blush marks between rows 13-14, positioning them one stitch to side of eyes across 2 stitches each
  • Attach arms to rows 13-17 of body near the outer edges of the blush marks for proper positioning
  • Sew feet onto rows 16-17 of body with approximately 4 stitches spacing between them for balanced stance
  • Fold down top of hat to desired flop angle and sew stars or circles in visible positions for best display

Important Notes

  • 💡Pattern is worked in continuous rounds using American crochet terminology without joining unless specified
  • 💡Use stitch markers to track round beginnings and maintain accurate shaping throughout construction
  • 💡Different yarn weights and hook sizes will significantly alter the finished dimensions of your Kirby
  • 💡Stuff body moderately rather than firmly to allow Kirby to lay flat on stomach in sleeping position
  • 💡Hat is designed to be removable, fitting around row 10 of head for easy on and off functionality
  • 💡Consider flipping hat inside out after completion for alternative texture appearance if desired

This enchanting Sleeping Kirby pattern brings one of gaming's most beloved characters into cuddly three-dimensional form, complete with customizable nightcap and adorable sleeping expression. The bulky yarn construction means quick results without sacrificing quality or charm, making this perfect for both experienced crocheters seeking a fun project and ambitious beginners ready to level up their skills. Whether displayed on a shelf, given as a gift to a Nintendo fan, or cuddled during gaming marathons, this peaceful pink puff will bring smiles and nostalgia wherever he rests. 💤🎮✨ Happy crocheting!

You ask,

we answer.

FAQs

Can I make Kirby in his awake form instead of sleeping?

Absolutely! Simply embroider the eyes as open circles instead of straight lines, and position the mouth as an upward curve or small oval rather than using the knot technique. You can also skip the nightcap entirely for an awake Kirby.

What if I don't have bulky weight yarn?

You can use worsted weight yarn with a smaller hook (around 4-5mm), but your finished Kirby will be significantly smaller, approximately 4-5 inches instead of 7-8 inches. Alternatively, hold two strands of worsted weight together.

How do I prevent the hat from falling off?

The hat is designed to fit snugly around row 10. If it's too loose, try adding a few strategic tack stitches on the inside to secure it gently to the head, or adjust your tension when crocheting the hat for a tighter fit.

Can I customize the hat with different decorations?

Yes! The pattern includes options for both stars and polka dots, but you can add moons, hearts, or any small appliqués you prefer. Just ensure decorations are securely sewn and appropriate for the intended recipient's age.

Why won't my mouth knot stay visible on Kirby's face?

The knot might be too small or pulled too tight. Use bulky yarn for better visibility, don't pull the yarn completely tight when creating the knot, and consider doing a double knot if your stitches are looser for more dimension.