🧶 Beautiful ✨ Detailed 💝 Adorable

Spaniel in a Dog Bed Amigurumi Pattern

Spaniel in a Dog Bed Amigurumi Pattern
4.8★ Rating
6-8 Hours Time Needed
1.7K Made This
✂️

Intermediate Level

Ideal for those with basic knitting experience, featuring slightly more advanced stitches and techniques to expand your skills.

⏱️

All-Day Adventure

Requires 8-10 hours, ideal for a full day of immersive knitting.

🧸

Cute Companion

An adorable friend to cherish, handcrafted with love to bring comfort and joy for years to come.

About This Spaniel in a Dog Bed Amigurumi Pattern

This spaniel amigurumi pattern brings together charm and functionality with its coordinating dog bed set. The pattern uses sport weight yarn in a lovely color palette of white, beige, brown, pink, and purple. You'll master techniques like jacquard crochet for the spaniel's distinctive facial markings, creating dimensional ears with inner and outer layers, and constructing a sturdy circular dog bed. The spaniel features movable limbs that are crocheted separately and attached to the body, allowing for adorable posing possibilities.

Spaniel in a Dog Bed Amigurumi Pattern crochet pattern - detailed view of completed project

Each component is carefully designed with clear round-by-round instructions, making assembly straightforward. The finished pieces create a cohesive set that's both decorative and huggable, perfect for display or gifting to dog enthusiasts.

Why You'll Love This Spaniel in a Dog Bed Amigurumi Pattern

I absolutely love how this pattern creates not just a toy, but a complete scene! The spaniel's floppy ears and sweet expression capture that classic cocker spaniel charm perfectly. What makes this pattern special is the attention to detail—from the jacquard technique that creates realistic facial markings to the layered ears with contrasting inner colors. I'm particularly fond of how the dog bed complements the spaniel, with its raised sides and matching pillow. It's incredibly satisfying to watch the circular bed take shape, and the stuffed side wall gives it such a professional, three-dimensional look. This project lets you practice multiple techniques while creating something truly giftable and adorable.

Spaniel in a Dog Bed Amigurumi Pattern step 1 - construction progress Spaniel in a Dog Bed Amigurumi Pattern step 2 - assembly progress Spaniel in a Dog Bed Amigurumi Pattern step 3 - details and accessories Spaniel in a Dog Bed Amigurumi Pattern step 4 - final assembly and finishing

Switch Things Up

I love experimenting with different color combinations for this adorable spaniel! Instead of the classic beige and white, try creating a black and white cocker spaniel by swapping the beige for black yarn—it gives a totally different look while maintaining that sweet expression. You could also make a golden retriever version using shades of golden yellow and cream.

For the dog bed, the possibilities are endless. I've made versions with stripes by alternating colors every few rounds on the side wall, and others with a contrasting color for the pillow. Some crocheters add embroidered paw prints to the pillow using surface crochet or embroidery for extra cuteness.

Consider personalizing the headband too—add small crocheted flowers, bows, or even tiny beads for sparkle. You could skip the headband entirely and create a collar instead using a contrasting color around the neck area.

For an extra special touch, I sometimes add a small crocheted bone or toy ball to place in the bed alongside the spaniel. These tiny accessories take minimal time but add so much character to the finished scene and make wonderful photo props!

Common Mistakes & How to Fix Them

✗ Losing your place during color changes in the jacquard head section—use multiple stitch markers to track each color transition point clearly ✗ Overstuffing the paws and ears making them too rigid—stuff lightly for a softer, more natural drape that enhances the spaniel's floppy ear charm ✗ Misaligning the ears on the head causing asymmetry—pin both ears in place before sewing and step back to check positioning from multiple angles ✗ Attaching limbs too loosely causing them to droop—use doubled thread and sew through multiple times for secure attachment that holds positioning well

Spaniel in a Dog Bed Amigurumi Pattern

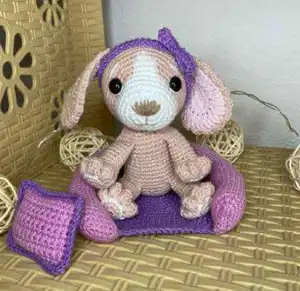
Create an adorable spaniel companion complete with its own cozy dog bed! This charming crochet pattern features a sweet spaniel with floppy ears, expressive safety eyes, and a cute pink headband. The pattern includes detailed instructions for both the spaniel and its matching purple and pink dog bed with a soft pillow. Perfect for dog lovers and amigurumi enthusiasts, this project combines multiple techniques including color changes, jacquard crochet, and piece assembly. The finished spaniel measures approximately 6 inches tall and fits perfectly in its 5.9-inch diameter bed, making it an ideal decorative piece or heartfelt gift.

Intermediate 6-8 Hours

Materials Needed for Spaniel in a Dog Bed Amigurumi Pattern

— Main Fabric

  • 01
    Sport weight 4ply yarn Yarn Art Jeans (50g/160m) in white (N01)
  • 02
    Sport weight 4ply yarn Yarn Art Jeans in light pink (N18)
  • 03
    Sport weight 4ply yarn Yarn Art Jeans in pink (N20)
  • 04
    Sport weight 4ply yarn Yarn Art Jeans in purple (N50)
  • 05
    Sport weight 4ply yarn Yarn Art Jeans in beige (N83)
  • 06
    Sport weight 4ply yarn Yarn Art Jeans in brown (N71)

— Tools Required

  • 01
    2mm crochet hook
  • 02
    Safety eyes 14mm
  • 03
    Stuffing material or fiberfill
  • 04
    Needle for sewing pieces
  • 05
    Stitch markers
  • 06
    Scissors

Progress Tracker

0% Complete

— Tail

Info :

With white yarn

Round 1 :

4 sc in MR (4)

Round 2 :

(1 sc, inc) x 2 (6)

Round 3 :

6 sc (6)

Round 4 :

Change color to beige. 6 sc (6)

Round 5 :

6 sc (6)

Round 6 :

4 sc, dec (5)

Info :

Fold in half and crochet 2 sc through both sides. Fasten off, cut the yarn, weave in the yarn ends

— Paws (make 4)

Info :

With beige yarn

Round 1 :

6 sc in MR (6)

Round 2 :

6 inc (12)

Round 3 :

Change color to white. (1 sc, inc) x 6 (18)

Round 4 :

Change color to beige. (1 sc, 4 dc in one stitch) x 4, 10 sc (30)

Round 5 :

(1 sc, dc4tog) x 4, 10 sc (18)

Round 6 :

(1 sc, dec) x 6 (12)

Round 7-13 :

12 sc (7 rounds) (12)

Info :

Stuff the paws with fiberfill. Fold in half and crochet 6 sc through both sides. Fasten off, cut the yarn, weave in the yarn ends

— Body

Info :

With beige yarn

Round 1 :

6 sc in MR (6)

Round 2 :

6 inc (12)

Round 3 :

(1 sc, inc) x 6 (18)

Round 4 :

(2 sc, inc) x 6 (24)

Round 5 :

(3 sc, inc) x 6 (30)

Round 6 :

(4 sc, inc) x 6 (36)

Round 7 :

(5 sc, inc) x 6 (42)

Round 8 :

You will turn two pieces: body and tail into one: 1 sc, 2 sc with the tail and body together, 39 sc (42)

Round 9 :

42 sc (42)

Round 10 :

You will turn three pieces: body and two paws into one: 13 sc, 6 sc with the paw and body together, 6 sc, 6 sc with the second paw and body, 11 sc (42)

Round 11 :

(1 sc, dec) x 3, 24 sc, (1 sc, dec) x 3 (36)

Round 12-14 :

36 sc (3 rounds) (36)

Round 15 :

(4 sc, dec) x 6 (30)

Round 16-17 :

30 sc (2 rounds) (30)

Round 18 :

(4 sc, inc) x 6 (36)

Round 19-20 :

36 sc (2 rounds) (36)

Round 21 :

You will turn three pieces: body and two paws into one: 10 sc, 6 sc with the third paw and body together, 6 sc, 6 sc with the fourth paw and body, 8 sc (36)

Round 22 :

(4 sc, dec) x 6 (30)

Round 23 :

30 sc (30)

Round 24 :

(3 sc, dec) x 6 (24)

Round 25 :

(2 sc, dec) x 6 (18)

Round 26 :

(1 sc, dec) x 6 (12)

Info :

Stuff the body with fiberfill

Round 27 :

6 dec (6)

Info :

Fasten off, cut the yarn, weave in the ends

— Head

Info :

With white yarn

Round 1 :

6 sc in MR (6)

Round 2 :

6 inc (12)

Round 3 :

3 inc, 3 sc, 3 inc, 3 sc (18)

Round 4 :

(1 sc, inc) x 2, 3 sc, (inc, 1 sc) x 3, 4 sc, inc (24)

Round 5 :

(2 sc, inc) x 2, 4 sc, (inc, 2 sc) x 3, 4 sc, inc (30)

Round 6-8 :

30 sc (3 rounds) (30)

Round 9 :

Change color to beige. Attention! Crochet in jacquard technique from Rnd 9 to 12. Add white yarn (these stitches are highlighted in red). (4 sc, inc) x 3, 4 sc, inc, (4 sc, inc) x 2 (36)

Round 10 :

(5 sc, inc) x 3, 4 sc, sc, inc, (5 sc, inc) x 2 (42)

Round 11 :

(6 sc, inc) x 3, 4 sc, 2 sc, inc, (6 sc, inc) x 2 (48)

Round 12 :

(7 sc, inc) x 3, 4 sc, 3 sc, inc, (7 sc, inc) x 2 (54)

Round 13-20 :

With beige yarn. 54 sc (8 rounds) (54)

Info :

Insert the eyes between rounds 11-12 at a distance of 14-16 stitches

Round 21 :

(7 sc, dec) x 6 (48)

Round 22 :

(6 sc, dec) x 6 (42)

Round 23 :

(5 sc, dec) x 6 (36)

Round 24 :

(4 sc, dec) x 6 (30)

Round 25 :

(3 sc, dec) x 6 (24)

Round 26 :

(2 sc, dec) x 6 (18)

Round 27 :

(1 sc, dec) x 6 (12)

Info :

Stuff the head with fiberfill

Round 28 :

6 dec (6)

Info :

Fasten off, cut the yarn, weave in the ends

— Ears (make 2)

Info :

Crochet 2 pieces in beige and 2 pieces in light pink color

Round 1 :

Chain 13. Start in the second chain from the hook: 11 sc, 4 dc in one stitch, 11 sc, turn (26)

Round 2 :

Ch 1, 7 sc, 4 dc, 4 dcinc, 4 dc, 7 sc, turn (30)

Round 3 :

Ch 1, 4 sc, 7 dc, 8 dcinc, 7 dc, 4 sc (38)

Info :

Cut the yarn on the light pink pieces. Continue crocheting from beige piece. Apply the beige part and crochet with beige yarn: (3 sc in one stitch, sl st) x 19. Leave a long tail for sewing

— Assembly & Details

Info :

Tighten cheeks following pictures provided

Info :

Embroider the corners of the eyes with white

Info :

Embroider the eyebrows with white yarn

Info :

Embroider the nose with brown yarn

Info :

Sew the head to the body

Info :

Sew the ears to the head

Headband :

Crochet with pink yarn. Chain 70. Start in the third chain from the hook: 70 sc. Cut the yarn and fasten off. Tie the headband on the head

Info :

Embroider the mouth with brown yarn

— Dog Bed Base

Info :

With purple yarn

Round 1 :

6 sc in MR (6)

Round 2 :

6 inc (12)

Round 3 :

(1 sc, inc) x 6 (18)

Round 4 :

(2 sc, inc) x 6 (24)

Round 5 :

(3 sc, inc) x 6 (30)

Round 6 :

(4 sc, inc) x 6 (36)

Round 7 :

(5 sc, inc) x 6 (42)

Round 8 :

(6 sc, inc) x 6 (48)

Round 9 :

(7 sc, inc) x 6 (54)

Round 10 :

(8 sc, inc) x 6 (60)

Round 11 :

(9 sc, inc) x 6 (66)

Round 12 :

(10 sc, inc) x 6 (72)

Round 13 :

(11 sc, inc) x 6 (78)

Round 14 :

(12 sc, inc) x 6 (84)

Info :

Cut the yarn and fasten off

— Dog Bed Side Wall

Info :

With pink yarn

Round 1 :

Chain 6. Start in the second chain from the hook: inc, 3 sc, 3 sc in the last chain, 4 sc (12)

Round 2 :

2 inc, 3 sc, 3 inc, 3 sc, inc (18)

Round 3 :

2 inc, 6 sc, 3 inc, 6 sc, inc (24)

Round 4-85 :

24 sc (82 rounds) (24)

Info :

Stuff with fiberfill in the process

Round 86 :

2 dec, 6 sc, 3 dec, 6 sc, dec (18)

Round 87 :

2 dec, 3 sc, 3 dec, 3 sc, dec (12)

Info :

Cut the yarn and fasten off. Sew the side wall in a circle to the bottom of the bed. Cut the yarn and fasten off

— Pillow

Info :

Crochet 2 pieces in pink color

Round 1 :

Chain 15. Start in the second chain from the hook: 14 sc, turn (14)

Round 2-11 :

Ch 1, 14 sc, turn (10 rounds) (14)

Info :

Apply the pink part and crochet with purple yarn: 14 sc, inc in the corner, 11 sc, inc in the corner, 14 sc, inc in the corner, 11 sc, inc in the corner. Stuff with fiberfill in the process. Fasten off, cut the yarn, weave in the yarn ends

Assembly Instructions

  • Sew the head securely to the body using matching beige yarn, ensuring the neck is centered and stable
  • Position and sew the ears on either side of the head, allowing them to drape naturally for that classic spaniel look
  • Embroider facial features including white eye corners, white eyebrows, and brown nose using the pattern's placement guide
  • Create cheek definition by tightening stitches as shown in the pattern photos for added dimension
  • Embroider the mouth with brown yarn to complete the sweet facial expression
  • Attach the pink headband by tying it around the head between the ears
  • Sew the stuffed side wall to the purple base in a circular formation to complete the dog bed, then add the pillow inside

Important Notes

  • 💡Use stitch markers consistently to track your position, especially during the jacquard color work on the head
  • 💡When working the jacquard technique in rounds 9-12, carry the white yarn loosely behind to avoid puckering
  • 💡Stuff all pieces firmly but not overly tight to maintain the soft, cuddly appearance
  • 💡The side wall requires 82 rounds of consistent crocheting—consider this project for multiple sessions
  • 💡Pin all pieces before sewing to ensure proper placement and symmetry, especially the ears
  • 💡Leave longer yarn tails when changing colors to use for seaming matching sections together
  • 💡Insert safety eyes before stuffing and closing the head—they cannot be added later

This charming Spaniel in a Dog Bed pattern creates a complete miniature scene that's perfect for display or gifting. With its sweet expression, floppy layered ears, and coordinating bed set, this project showcases intermediate techniques like jacquard crochet and dimensional construction. The finished pieces work beautifully together as a decorative set that celebrates the lovable nature of cocker spaniels. Whether you're a dog lover or simply enjoy creating detailed amigurumi, this pattern offers a rewarding challenge with an absolutely adorable result. Happy crocheting and enjoy bringing this precious pup to life! 🐶💕

You ask,

we answer.

FAQs

What is jacquard crochet technique mentioned in the head pattern?

Jacquard crochet involves working with two colors in the same round to create color patterns. In this pattern, you'll carry the white yarn behind the beige stitches during rounds 9-12 to create the spaniel's distinctive facial markings. Keep the carried yarn loose to prevent puckering.

Can I use different yarn weights for this pattern?

While you can experiment with different yarn weights, using heavier yarn will result in a larger finished piece. If you change yarn weight, adjust your hook size accordingly and be aware that the final dimensions will differ from the 6.1 inch spaniel and 5.9 inch bed stated in the pattern.

How do I prevent the dog bed side wall from twisting while crocheting 82 rounds?

Use a stitch marker to mark the beginning of each round and ensure you're always crocheting in the same direction. Stuff the side wall gradually as you work to help maintain its shape and prevent twisting. Taking breaks during this lengthy section is perfectly fine.

What's the best way to attach the layered ears?

Align the beige and light pink pieces together with the pink side facing inward. Crochet around the edges with beige yarn as instructed, then position the ears on the head before sewing. Pin them in place first and check from multiple angles to ensure they're symmetrical before permanently attaching.

Can I make the dog bed larger to fit the spaniel more spaciously?

Yes! Simply continue the increase pattern on the base for additional rounds, then adjust the side wall accordingly by adding more rounds to match the larger circumference. Keep the same stitch count per round for the side wall to maintain the proper height proportion.