Autumn Crochet Cable Blanket Pattern
Beginner Friendly
Perfect for those just starting their crochet journey, with clear instructions and simple techniques
Single-Day Project
A satisfying project you can complete in a single afternoon or evening.
Handmade Gift
A beautiful keepsake — free forever. Read online or print at home.
About This Autumn Crochet Cable Blanket Pattern
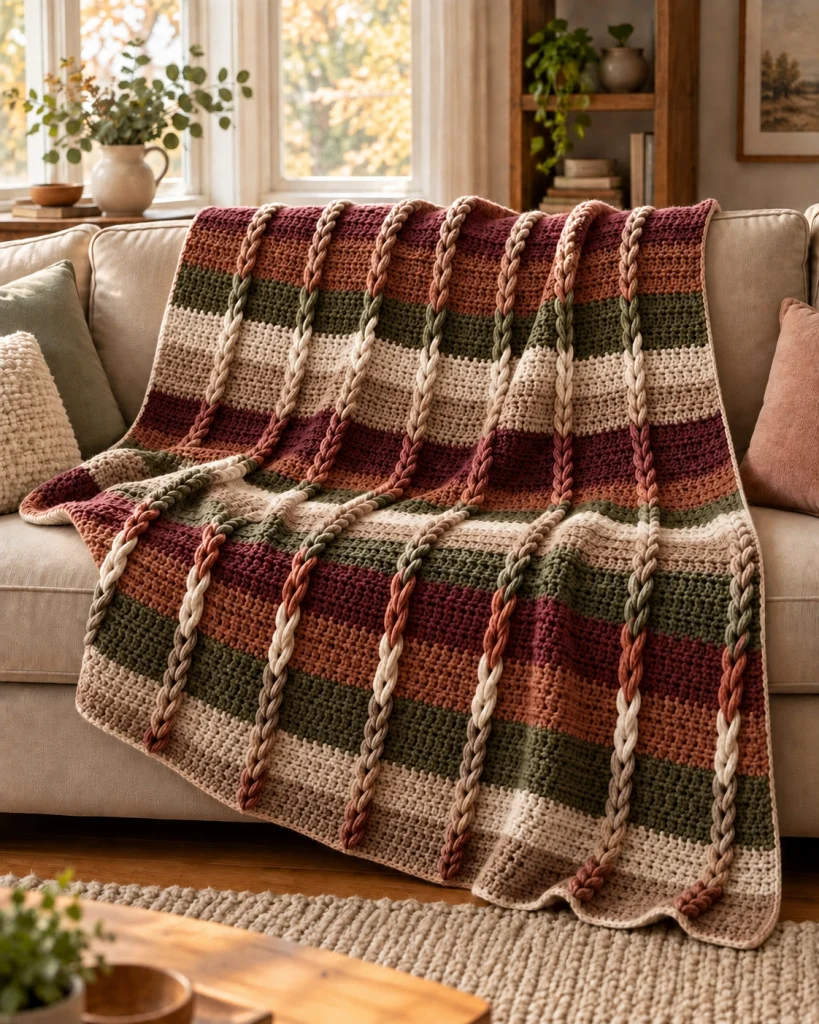
This autumn crochet cable blanket pattern combines simple horizontal stripes with dramatic raised braided columns for a warm, handmade fall look. Shades of burgundy, burnt orange, olive green, warm cream and taupe give the blanket a soft autumn palette that looks beautiful draped over a sofa or armchair.
The blanket body is worked as a large striped rectangle, while the thick decorative braids are crocheted separately and attached vertically across the finished throw. This construction gives you the bold dimensional look without having to work complicated cable stitches throughout the entire blanket.
Materials
- Bulky #5 yarn – warm cream 600-700 g
- Bulky #5 yarn – taupe / oatmeal 500-600 g
- Bulky #5 yarn – olive green 500-600 g
- Bulky #5 yarn – burnt orange / terracotta 500-600 g
- Bulky #5 yarn – deep burgundy 500-600 g
- 6.5 mm crochet hook 1
- 5.5-6 mm crochet hook for braids optional
- Large yarn needle 1
- Stitch markers 8-10
- Scissors 1 pair
Abbreviations
chchainsl stslip stitchscsingle crochethdchalf double crochetdcdouble crochetststitchstsstitchesreprepeatFOfasten offRSright sideWSwrong sideFinished Size
- Width: approximately 120-125 cm
- Length: approximately 155-165 cm
- Decorative braid width: approximately 3-4 cm
- Number of raised braid columns: 8
Blanket Body
The main blanket is worked back and forth in rows using a simple textured stitch. Keep your tension relaxed so the finished fabric remains soft and drapes naturally.
- With taupe yarn, ch 141.
- Row 1: hdc in the 2nd ch from hook and in each ch across. (140 sts)
- Ch 1, turn.
- Row 2: hdc in each st across. (140 sts)
- Repeat Row 2 following the stripe sequence below.
Autumn Stripe Sequence
For the warm layered look, work broad horizontal bands rather than changing color every row.
- Taupe: 8 rows
- Warm cream: 8 rows
- Olive green: 8 rows
- Burnt orange: 8 rows
- Burgundy: 8 rows
Repeat this five-color sequence until the blanket reaches approximately 155-160 cm long.
Optional Textured Body Stitch
If you want slightly more texture than standard half double crochet, alternate stitches into the front and back loops.
- Row 1: hdc across.
- Row 2: hdc in BLO across.
- Row 3: hdc across.
- Row 4: hdc in FLO across.
- Repeat Rows 1-4 throughout the blanket.
This creates subtle horizontal ridges while keeping the background simple enough for the raised braids to remain the main feature.
Raised Braided Cables – Make 8
Each dramatic vertical cable is created from three long crocheted cords that are braided together.
Cord – Make 24 Total
- Using your chosen stripe colors, ch enough stitches to create a cord approximately 165 cm long.
- Starting in the 2nd ch from hook, sl st loosely into every chain.
- FO, leaving a 25 cm sewing tail at each end.
Make three cords for each finished braid.
Thicker Cord Option
For an extra chunky raised effect:
- Ch to approximately 165 cm.
- Sc into the 2nd ch and across.
- Ch 1 and turn.
- Sc across for one additional row.
- FO.
These thicker strips produce the oversized dimensional braids seen in the finished blanket.
Creating Each Braid
- Lay three crochet cords next to each other.
- Secure the tops together temporarily with a stitch marker.
- Cross the left cord over the center cord.
- Cross the right cord over the new center cord.
- Continue alternating sides until you reach the bottom.
- Keep the braid relaxed rather than pulling tightly.
- Secure the bottom with another stitch marker.
Multicolor Braid Effect
For the flowing autumn color effect, each braid can change color as it crosses the horizontal stripes.
You can create this in two ways:
- Use three long cords made from several joined colors.
- Make separate shorter braid sections matching each stripe and join them invisibly.
For the cleanest result, change each cord color near the same horizontal point where the blanket background changes color.
Positioning the Braids
- Lay the completed blanket flat with the RS facing upward.
- Position the first braid approximately 8-10 cm from the left edge.
- Place the remaining braids evenly across the width.
- Position the final braid approximately 8-10 cm from the right edge.
- Use stitch markers every 15-20 cm to temporarily secure each braid.
- Step back and check that all columns are straight before sewing.
Sewing the Braids to the Blanket
- Thread a long yarn needle with matching yarn.
- Beginning at the top, sew underneath one side of the braid.
- Pass through only the upper portion of the blanket stitches so the sewing remains discreet on the back.
- Secure the braid every 3-4 cm.
- Alternate between the left and right sides of the braid.
- Do not sew directly through every crossover; allow the braid to retain some dimension.
- Secure both ends firmly.
Top & Bottom Braid Finish
The braid ends should look intentionally finished rather than simply cut off.
- At the top edge, tuck approximately 2 cm of each cord toward the back.
- Sew securely through the folded section.
- Repeat at the bottom.
- Use matching yarn to hide all tails inside the blanket edge.
Simple Crochet Border
A narrow neutral border gives the blanket a clean finished edge.
- Join taupe or cream yarn in any corner.
- Round 1: sc evenly around the entire blanket.
- Work 3 sc into each corner.
- Join with sl st.
- Round 2: ch 1, sc around again, working 3 sc into each corner.
- Join and FO.
Optional Ribbed Border
For a thicker cozy edge:
- Join yarn at one corner.
- Ch 6.
- Sc in the 2nd ch and across. (5 sc)
- Sl st into the next 2 blanket-edge stitches.
- Turn.
- Working in BLO, sc across the 5 border stitches.
- Continue around the blanket.
This produces a soft knitted-looking ribbed finish.
Color Placement
For an autumn look similar to the finished blanket, use:
- Deep burgundy for rich wine-red sections
- Burnt orange for warm terracotta sections
- Olive green for earthy contrast
- Warm cream to brighten the palette
- Taupe to soften the transitions
Avoid very bright versions of these colors. Muted, earthy shades give the blanket its cozy handmade fall character.
Alternative Color Palettes
- Christmas: cranberry, forest green, cream, taupe and deep red
- Neutral: ivory, oatmeal, camel, mocha and chocolate
- Modern: cream, sage, terracotta, dusty rose and beige
- Winter: ivory, charcoal, soft gray, dusty blue and taupe
- Vintage Fall: mustard, rust, moss, burgundy and oatmeal
Making the Blanket Smaller
For a lap blanket, begin with approximately 100-110 stitches and work until the piece measures about 120 cm long. Use 6 raised braid columns instead of 8.
Making the Blanket Larger
For a large sofa or bed throw, increase the foundation chain until the blanket measures approximately 150 cm wide. Add 2-3 additional braids while maintaining even spacing.
Finishing
- Weave in every yarn tail securely.
- Check each braid from top to bottom.
- Gently straighten any twisted sections.
- Lightly block the blanket body if needed.
- Do not aggressively flatten the raised braids.
- Allow the blanket to dry completely before folding or using.
Care Instructions
Hand washing or a gentle machine cycle is recommended, depending on the yarn used. Wash in cool water and avoid high heat.
Lay the blanket flat to dry whenever possible. After washing, gently reshape each raised braid with your fingers so the dimensional texture stays defined.
Frequently Asked Questions
The striped blanket body is beginner-friendly. The decorative braids require extra assembly and careful placement, making the complete project best suited to confident beginners or intermediate crocheters.
No. The oversized braided details are made separately and sewn onto the completed striped blanket. This keeps the construction much easier while still creating a dramatic cable effect.
Yes. Five or six widely spaced braids create a simpler look, while eight or more produce the richly textured appearance shown here.
Yes. The finished blanket will be lighter and less chunky. Use a hook appropriate for your yarn and add stitches and rows as necessary to reach the desired dimensions.
Make each cord slightly longer than the blanket and braid it loosely. Lay the blanket completely flat while sewing and never stretch either the braid or the background fabric.
Absolutely. A solid cream, oatmeal or warm brown version would emphasize the raised braided texture and create a more neutral, classic throw.
The finished Autumn Crochet Cable Blanket Pattern

