Autumn Floral Crochet Bedspread Pattern – Gorgeous 3D Flower Blanket & Matching Pillows
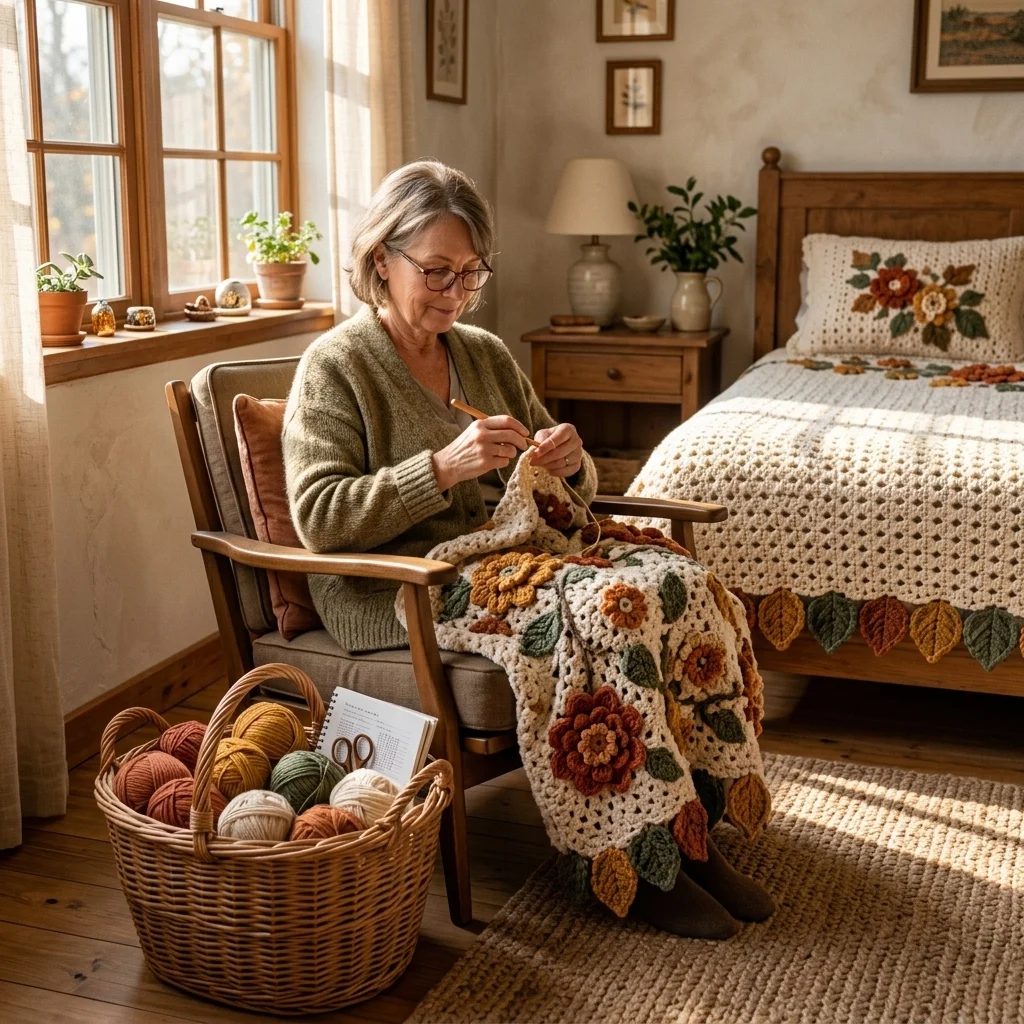
Imagine transforming your bedroom into a warm autumn retreat with a handmade crochet bedspread covered in beautiful three-dimensional flowers, delicate leafy vines, and soft cream stitches.
This romantic autumn-inspired crochet bedspread combines a textured ivory blanket with raised flowers in burnt orange, terracotta, mustard yellow, caramel, and warm cream. Olive-green leaves and winding brown stems create an elegant botanical arrangement across the surface.
The matching floral crochet pillows complete the cozy farmhouse look, making this an especially beautiful project for anyone who loves handmade home decor.
In this tutorial, you’ll learn how to create a similar bedspread using a repeating crochet blanket base, separate layered flowers, textured leaves, decorative vines, and a colorful autumn border.
Pattern note: This is an original, adaptable pattern inspired by the pictured design, not an exact stitch-for-stitch reproduction. The finished floral arrangement will depend on your blanket dimensions and how you position the appliques.
Project Overview
- Project: Autumn Floral Crochet Bedspread
- Skill Level: Intermediate to Advanced
- Style: Cottagecore, farmhouse, vintage floral
- Techniques: Double crochet, puff stitches, layered flower appliques, leaves, surface decoration
- Main Colors: Ivory, terracotta, rust orange, mustard, caramel, olive green
- Hook Size: 4.5 mm for blanket, 3.5–4 mm for appliques
- Yarn: DK or light worsted cotton-blend yarn
- Construction: Crochet blanket base with separately attached floral decorations
- Finished Size: Customizable
Materials You’ll Need
- Ivory or warm cream yarn for the main bedspread
- Burnt orange yarn for the statement flowers
- Terracotta yarn for smaller blossoms
- Mustard yellow yarn for autumn accents
- Caramel brown yarn for flower centers
- Olive and sage green yarn for leaves
- Dark brown yarn for vines and stems
- 4.5 mm crochet hook
- 3.5 mm or 4 mm crochet hook
- Yarn needle
- Scissors
- Stitch markers
- Measuring tape
- Blocking mats and pins
Crochet Abbreviations – US Terms
- MR: Magic ring
- ch: Chain
- sc: Single crochet
- hdc: Half double crochet
- dc: Double crochet
- tr: Treble crochet
- sl st: Slip stitch
- st: Stitch
- sp: Space
- FO: Fasten off
Part 1 – Crochet the Ivory Bedspread Base
The foundation of this project is a soft cream crochet blanket with a gently textured, openwork appearance.
The neutral background allows the colorful autumn flowers to stand out beautifully.
Step 1 – Create the Foundation Chain
Using ivory yarn and a 4.5 mm hook, make a foundation chain in a multiple of 3, plus 2 additional chains.
For a practice sample, chain 32.
For a full bedspread, crochet a gauge swatch first and calculate the required foundation length based on your desired width.
Step 2 – First Row
Work 1 dc into the fourth chain from the hook.
Work 1 dc into each remaining chain.
Turn your work.
Step 3 – Textured Crochet Row
Ch 3, counting as the first dc.
Skip the first stitch and work 1 dc into each remaining stitch.
Turn.
Step 4 – Decorative Openwork Row
Ch 4 (counts as dc and ch 1).
Skip the first 2 stitches.
*Work 1 dc into the next stitch, ch 1, skip the next stitch.*
Repeat across, adjusting the final repeat to maintain straight edges.
Turn.
Step 5 – Return to Solid Crochet
Ch 3.
Work 1 dc into each chain space and each dc from the previous row.
Turn.
Step 6 – Repeat the Texture
Continue alternating solid double crochet rows with openwork rows until the blanket reaches the desired length.
For a softer, more textured appearance, substitute occasional solid rows with half double crochet rows.
Finish with a solid row before beginning the decorative border.
Part 2 – Crochet the Large Autumn Flowers
The raised flowers are the most eye-catching part of this bedspread.
Use burnt orange, terracotta, and mustard yellow to create a collection of layered floral appliques.
Round 1 – Flower Center
Using caramel yarn, make a magic ring.
Ch 3 and work 11 dc into the ring.
Join with a sl st.
Total: 12 dc.
Round 2 – Petal Foundation
Ch 1 and sc into the first stitch.
*Ch 3, skip 1 stitch, sc into the next stitch.*
Repeat around, finishing with ch 3 and a sl st into the first sc.
Total: 6 chain-3 spaces.
Round 3 – First Petal Layer
Change to burnt orange yarn.
Into each chain-3 space, work:
(sc, hdc, 3 dc, hdc, sc).
Repeat for all six petals.
Join with a sl st.
Round 4 – Second Layer Foundation
Working behind the petals, attach yarn around the base of the first petal.
Ch 5 and sc around the base of the next petal.
Repeat around to create six chain-5 loops.
Round 5 – Large Outer Petals
Into each chain-5 loop, work:
(sc, hdc, 5 dc, hdc, sc).
Repeat around.
Join with a sl st.
Round 6 – Third Petal Layer
Working behind the second layer, make six chain-7 loops, anchoring each with a sc at the base of the next petal.
Into each chain-7 loop, work:
(sc, hdc, 2 dc, 3 tr, 2 dc, hdc, sc).
Repeat around.
Fasten off and weave in the ends.
Your flower should now have three layers of textured petals.
Part 3 – Crochet the Smaller Flowers
Smaller flowers help fill the spaces between the larger statement blooms.
Round 1
Make a magic ring.
Ch 3 and work 9 dc into the ring.
Join with a sl st.
Round 2
Ch 1, sc into the first stitch.
*Ch 3, skip 1 stitch, sc into the next stitch.*
Repeat around to create five chain-3 spaces.
Round 3
Into each chain-3 space, work:
(sc, hdc, 3 dc, hdc, sc).
Repeat around.
Fasten off.
Make several flowers in mustard, terracotta, caramel, and cream.
Part 4 – Crochet the Olive-Green Leaves
The botanical leaves give this blanket its distinctive autumn garden appearance.
Step 1 – Foundation
Using olive-green yarn, ch 13.
Step 2 – First Side
Starting in the second chain from the hook, work:
1 sc, 1 hdc, 3 dc, 3 tr, 2 dc, 1 hdc, 1 sc.
Step 3 – Opposite Side
Work around the other side of the foundation chain.
Repeat the stitch sequence in reverse:
1 sc, 1 hdc, 2 dc, 3 tr, 3 dc, 1 hdc, 1 sc.
Join with a sl st.
Step 4 – Leaf Vein
Using a contrasting sage or brown yarn, embroider a simple central vein along the length of the leaf.
For additional detail, add two or three small diagonal veins.
Make leaves in different shades of olive, sage, and muted brown.
Part 5 – Crochet the Winding Vines
The delicate vines connect the flowers and leaves across the surface of the bedspread.
Step 1 – Long Stem
Using dark brown yarn, crochet a chain approximately 40–80 cm long, depending on your design.
Step 2 – Strengthen the Stem
Work 1 sl st into each chain, starting from the second chain from the hook.
Fasten off, leaving a long tail for sewing.
Step 3 – Create Branches
Make shorter chains measuring approximately 10–25 cm.
Work slip stitches along each chain.
These will become the smaller branches that connect to your flowers.
Step 4 – Arrange the Vines
Lay the stems across the blanket in gently curved lines.
Position the longest vine diagonally across the surface.
Add smaller branches extending toward the flower clusters.
Pin everything into place before sewing.
Part 6 – Assemble the Autumn Floral Design
Before attaching anything permanently, arrange all the crocheted pieces on the bedspread.
Step 1 – Position the Large Flowers
Place the largest burnt-orange flowers near the lower corners and along the outer decorative area.
Position a few medium-sized flowers closer to the upper section of the blanket.
Step 2 – Add the Smaller Blossoms
Fill the spaces between the larger flowers with mustard, caramel, and cream blossoms.
Step 3 – Arrange the Leaves
Place olive-green leaves around each flower.
Alternate leaf sizes and colors for a more natural botanical effect.
Step 4 – Add the Vines
Arrange the dark brown stems so they appear to grow naturally between the flowers.
Avoid placing every flower in a perfectly straight line.
Step 5 – Sew the Decorations
Using a yarn needle and matching yarn, carefully sew the vines onto the blanket first.
Attach the leaves next.
Finally, sew the flowers in place, securing their centers and selected petal bases while leaving the outer petals slightly raised.
Check the back of the blanket to ensure that all yarn ends are secured.
Part 7 – Create the Autumn Leaf Border
The colorful leaf border adds a beautiful finishing touch and gives the blanket its distinctive seasonal character.
Step 1 – Foundation Border
Attach ivory yarn to the edge of the blanket.
Work sc evenly around all four sides.
At each corner, work 3 sc.
Step 2 – Decorative Edge
Work one additional round of dc stitches around the entire blanket.
At each corner, increase evenly to prevent curling.
Step 3 – Crochet Small Autumn Leaves
Using mustard, terracotta, olive, and burnt-orange yarn, ch 9.
Starting in the second chain from the hook, work:
1 sc, 1 hdc, 2 dc, 1 tr, 2 dc, 1 hdc.
Work around the opposite side of the foundation chain using the reverse stitch sequence.
Join with a sl st.
Step 4 – Attach the Leaves
Space the leaves evenly around the outer edge.
Alternate the colors to create a warm autumn palette.
Sew the leaves securely to the border, leaving their tips slightly free for a dimensional effect.
Part 8 – Crochet the Matching Floral Pillows
The matching pillows complete the bedroom ensemble.
Step 1 – Create the Pillow Panels
Using ivory yarn, crochet two square panels using the same stitch pattern as the blanket base.
Make each panel slightly larger than your pillow insert to allow for joining and finishing.
Step 2 – Add Floral Decorations
Make one large terracotta flower and two smaller blossoms for each pillow.
Add several olive-green leaves and short brown stems.
Step 3 – Sew the Appliques
Arrange the flowers in a small bouquet near the center of the front panel.
Sew them securely in place.
Step 4 – Assemble the Pillow
Place the front and back panels together.
Join three sides using sc stitches.
Insert the pillow form.
Close the final side using a removable closure or sew it shut.
Part 9 – Suggested Bedspread Sizes
| Bed Size | Suggested Finished Dimensions |
|---|---|
| Twin | 160 × 220 cm |
| Full | 200 × 230 cm |
| Queen | 230 × 250 cm |
| King | 260 × 260 cm |
These are approximate finished measurements. Adjust the dimensions to suit your mattress and desired overhang.
Part 10 – Recommended Color Palette
- Ivory: Main blanket background
- Burnt Orange: Large statement flowers
- Terracotta: Medium blossoms
- Mustard Yellow: Small flowers and decorative leaves
- Caramel: Flower centers
- Olive Green: Main foliage
- Sage Green: Secondary leaves
- Chocolate Brown: Winding stems and vines
Tips for a Beautiful Professional Finish
- Make a gauge swatch before starting the full blanket.
- Use consistent yarn thickness for all decorative elements.
- Block the flower appliques before attaching them.
- Arrange the floral design before sewing.
- Use invisible stitches to secure the decorations.
- Avoid pulling the vines too tightly against the blanket.
- Keep the back of the blanket neat and free of loose yarn ends.
- Choose a lightweight yarn to prevent the finished bedspread from becoming excessively heavy.
- Secure all raised decorations carefully, especially if the blanket will be used frequently.
Frequently Asked Questions
Is this crochet bedspread beginner-friendly?
The basic blanket is approachable for confident beginners, but the layered flowers, leaves, and decorative assembly are better suited to intermediate crocheters.
Can I make the blanket without flowers?
Yes. The cream crochet base can be used on its own as a simple textured bedspread.
How long will this project take?
A full-size bedspread may take several weeks or months, depending on your crochet speed and the amount of floral decoration.
Can I use acrylic yarn?
Yes. Acrylic or acrylic-blend yarn can make the bedspread lighter and easier to maintain.
How many flowers should I make?
The number depends on your blanket size and preferred arrangement. Start with a few large flowers and add smaller blossoms until the design looks balanced.
Can I change the autumn colors?
Absolutely! Try dusty pink and sage for spring, burgundy and cream for winter, or lavender and white for a romantic bedroom.
Are the flowers crocheted directly onto the blanket?
In this version, the flowers are made separately and sewn onto the finished blanket.
Can I make matching cushion covers?
Yes. The same flowers, leaves, and stitches can be used to create beautiful matching pillow covers.
How should I wash the finished bedspread?
Follow the yarn manufacturer’s care instructions. Because of the raised appliques, gentle hand washing and flat drying are often the safest options.
Final Thoughts
This autumn floral crochet bedspread is more than a cozy blanket. It’s a beautiful handmade statement piece that brings warmth, color, and personality into your bedroom.
With its creamy textured background, dimensional autumn flowers, delicate olive-green leaves, and elegant botanical vines, the design captures the beauty of fall in every stitch.
Whether you make it for your own bedroom, as a housewarming gift, or as a special family keepsake, this project offers endless opportunities to express your creativity.
Pair it with matching floral pillows, warm wooden furniture, soft lighting, and neutral bedding for a timeless cottage-inspired look.
Happy crocheting! 🧶🍂🤎