Sleeping Fox Crochet Moon Pattern – Cozy Autumn Wall Hanging
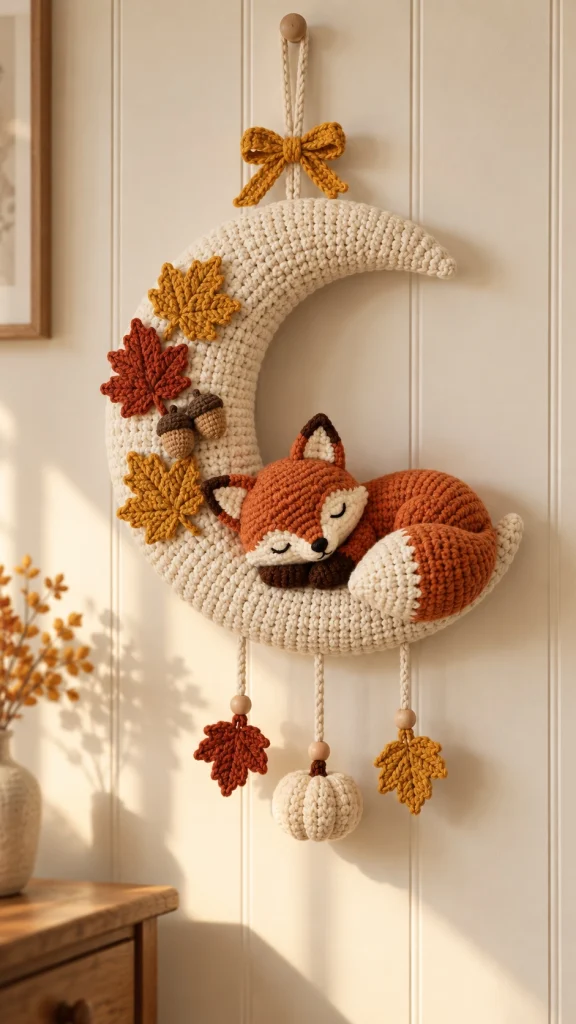
Bring the magic of autumn into your home with this adorable Sleeping Fox Crochet Moon Wall Hanging! Featuring a peaceful little fox curled up on a soft ivory crescent moon, surrounded by colorful fall leaves, tiny acorns, and delicate hanging decorations, this handmade project captures everything we love about cozy autumn days.
The warm rust-orange fox, golden mustard bow, creamy moon, and earthy autumn details make this decoration especially beautiful for a nursery, bedroom, entryway, or cozy farmhouse living room.
If you love woodland animals, fall crochet projects, and handmade seasonal decorations, this charming crochet wall hanging is a wonderful project to try.
Pattern note: This is an original, untested crochet interpretation inspired by the reference image. It is not an exact stitch-for-stitch reconstruction. Finished proportions may vary with yarn, tension, and assembly.
Project Overview
- Project: Sleeping Fox Crescent Moon Wall Hanging
- Skill Level: Intermediate to Advanced
- Estimated Finished Size: 35–45 cm tall including hanging decorations
- Yarn Weight: Worsted weight yarn
- Hook Size: 3.5 mm or 4 mm
- Crochet Terms: US terminology
- Style: Woodland, cottagecore, cozy autumn
- Technique: Amigurumi, shaping, embroidery, and assembly
Materials Needed
- Ivory or cream yarn for the crescent moon
- Rust-orange yarn for the sleeping fox
- White or cream yarn for the fox’s face, ears, and tail tip
- Dark brown yarn for the paws, nose, and acorn caps
- Mustard yellow yarn for the bow and autumn leaves
- Burnt orange yarn for the maple leaves
- Light brown yarn for the acorns
- Olive green yarn for optional leaf accents
- 3.5 mm crochet hook
- Polyester fiberfill
- Yarn needle
- Scissors
- Stitch markers
- Three wooden beads
- Optional flexible craft wire for the moon
- Optional felt backing for extra support
Crochet Abbreviations
- MR: Magic ring
- ch: Chain
- sc: Single crochet
- hdc: Half double crochet
- dc: Double crochet
- tr: Treble crochet
- sl st: Slip stitch
- inc: 2 sc in the same stitch
- dec: Invisible single crochet decrease
- BLO: Back loop only
- FO: Fasten off
Part 1 – Crochet the Ivory Crescent Moon
The oversized ivory crescent moon is the foundation of this beautiful autumn wall hanging. Its chunky crochet texture gives the design a soft, handmade appearance.
Crescent Moon Body
Use ivory yarn. Work in continuous rounds.
Round 1: 6 sc in MR. (6)
Round 2: Sc around. (6)
Round 3: (1 sc, inc) repeat 3 times. (9)
Round 4: Sc around. (9)
Round 5: (2 sc, inc) repeat 3 times. (12)
Round 6: Sc around. (12)
Round 7: (3 sc, inc) repeat 3 times. (15)
Round 8: Sc around. (15)
Round 9: (4 sc, inc) repeat 3 times. (18)
Round 10: Sc around. (18)
Round 11: (5 sc, inc) repeat 3 times. (21)
Round 12: Sc around. (21)
Round 13: (6 sc, inc) repeat 3 times. (24)
Round 14: Sc around. (24)
Round 15: (7 sc, inc) repeat 3 times. (27)
Round 16: Sc around. (27)
Round 17: (8 sc, inc) repeat 3 times. (30)
Round 18: Sc around. (30)
Round 19: (9 sc, inc) repeat 3 times. (33)
Round 20: Sc around. (33)
Round 21: (10 sc, inc) repeat 3 times. (36)
Rounds 22–34: Sc around. (36)
Begin stuffing the moon gradually.
Round 35: (10 sc, dec) repeat 3 times. (33)
Round 36: Sc around. (33)
Round 37: (9 sc, dec) repeat 3 times. (30)
Round 38: Sc around. (30)
Round 39: (8 sc, dec) repeat 3 times. (27)
Round 40: Sc around. (27)
Round 41: (7 sc, dec) repeat 3 times. (24)
Round 42: Sc around. (24)
Round 43: (6 sc, dec) repeat 3 times. (21)
Round 44: Sc around. (21)
Round 45: (5 sc, dec) repeat 3 times. (18)
Round 46: Sc around. (18)
Round 47: (4 sc, dec) repeat 3 times. (15)
Round 48: Sc around. (15)
Round 49: (3 sc, dec) repeat 3 times. (12)
Round 50: Sc around. (12)
Round 51: (2 sc, dec) repeat 3 times. (9)
Round 52: Sc around. (9)
Round 53: (1 sc, dec) repeat 3 times. (6)
FO and close the opening.
Shape the Crescent Moon
Gently bend the stuffed crochet tube into a crescent shape.
Bring the two pointed ends toward the same side, leaving a large open curve in the center.
Use a strong strand of ivory yarn along the inner curve to help hold the crescent shape.
Secure the shaping yarn at several points along the inner edge.
For a more structured decorative moon, optional flexible craft wire can be inserted before closing the tube. Cover all wire ends securely and avoid using exposed wire in decorations intended for children.
Part 2 – Crochet the Sleeping Fox Body
The curled-up fox is the centerpiece of this woodland wall hanging. Its round rust-orange body rests peacefully inside the crescent moon.
Fox Body
Use rust-orange yarn.
Round 1: 6 sc in MR. (6)
Round 2: Inc around. (12)
Round 3: (1 sc, inc) repeat 6 times. (18)
Round 4: (2 sc, inc) repeat 6 times. (24)
Round 5: (3 sc, inc) repeat 6 times. (30)
Round 6: (4 sc, inc) repeat 6 times. (36)
Round 7: (5 sc, inc) repeat 6 times. (42)
Round 8: (6 sc, inc) repeat 6 times. (48)
Rounds 9–16: Sc around. (48)
Round 17: (6 sc, dec) repeat 6 times. (42)
Round 18: (5 sc, dec) repeat 6 times. (36)
Round 19: (4 sc, dec) repeat 6 times. (30)
Begin stuffing lightly.
Round 20: (3 sc, dec) repeat 6 times. (24)
Round 21: (2 sc, dec) repeat 6 times. (18)
Round 22: (1 sc, dec) repeat 6 times. (12)
Round 23: Dec 6 times. (6)
FO and close the opening.
Gently flatten the body into a rounded sleeping position.
Part 3 – Crochet the Fox Head
The fox’s sleepy expression is created with embroidered closed eyes, a tiny dark nose, and cream-colored facial markings.
Fox Head
Use rust-orange yarn.
Round 1: 6 sc in MR. (6)
Round 2: Inc around. (12)
Round 3: (1 sc, inc) repeat 6 times. (18)
Round 4: (2 sc, inc) repeat 6 times. (24)
Round 5: (3 sc, inc) repeat 6 times. (30)
Rounds 6–10: Sc around. (30)
Round 11: (3 sc, dec) repeat 6 times. (24)
Round 12: (2 sc, dec) repeat 6 times. (18)
Stuff lightly.
Round 13: (1 sc, dec) repeat 6 times. (12)
Round 14: Dec 6 times. (6)
FO and close.
Cream Fox Cheeks – Make Two
Use cream yarn.
Ch 7.
Round 1: Starting in the second chain from the hook, sc 5, work 3 sc in the last chain, continue along the opposite side with 4 sc, then 2 sc in the final chain. (14)
Round 2: Inc, sc 4, inc in each of the next 3 stitches, sc 4, inc in each of the last 2 stitches. (20)
FO and leave a sewing tail.
Sew both cream pieces onto the lower front of the fox’s face, slightly overlapping them to create a soft muzzle.
Sleeping Eyes
Using dark brown embroidery yarn, stitch two gently curved closed eyes.
Each eye should curve downward toward the center, creating a peaceful sleeping expression.
Fox Nose
Embroider a small dark brown or black triangular nose where the cream cheeks meet.
Add a tiny downward stitch beneath the nose if desired.
Part 4 – Crochet the Fox Ears
Make two rust-orange ears with cream inner sections and dark brown tips.
Outer Ear – Make Two
Use rust-orange yarn.
Round 1: 4 sc in MR. (4)
Round 2: (1 sc, inc) repeat twice. (6)
Round 3: (2 sc, inc) repeat twice. (8)
Round 4: (3 sc, inc) repeat twice. (10)
Round 5: (4 sc, inc) repeat twice. (12)
Round 6: Sc around. (12)
FO and flatten.
Inner Ear
Use cream yarn.
Ch 5.
Sc in the second chain from the hook, hdc in the next stitch, dc in the next stitch, and tr in the last stitch.
FO and sew the small triangle onto the outer ear.
Add a few dark brown stitches to the pointed tip.
Attach both ears to the fox’s head.
Part 5 – Crochet the Curled Fox Tail
The oversized fluffy tail curves around the fox’s body and ends in a soft cream-colored tip.
Fox Tail
Begin with cream yarn at the tail tip.
Round 1: 6 sc in MR. (6)
Round 2: Sc around. (6)
Round 3: (1 sc, inc) repeat 3 times. (9)
Round 4: (2 sc, inc) repeat 3 times. (12)
Round 5: (3 sc, inc) repeat 3 times. (15)
Round 6: (4 sc, inc) repeat 3 times. (18)
Change to rust-orange yarn.
Round 7: (5 sc, inc) repeat 3 times. (21)
Round 8: (6 sc, inc) repeat 3 times. (24)
Rounds 9–13: Sc around. (24)
Round 14: (6 sc, dec) repeat 3 times. (21)
Round 15: Sc around. (21)
Round 16: (5 sc, dec) repeat 3 times. (18)
Round 17: Sc around. (18)
Round 18: (4 sc, dec) repeat 3 times. (15)
Round 19: Sc around. (15)
Round 20: (3 sc, dec) repeat 3 times. (12)
Round 21: Sc around. (12)
Stuff the tail gradually.
FO, leaving a long sewing tail.
Curve the tail around the fox’s body and secure it with several discreet stitches.
Part 6 – Crochet the Little Fox Paws
Make four small paws using dark brown yarn.
Round 1: 6 sc in MR. (6)
Round 2: (1 sc, inc) repeat 3 times. (9)
Rounds 3–5: Sc around. (9)
FO and flatten slightly.
Attach the paws beneath the fox’s head and body.
Only the front paws need to be prominently visible.
Part 7 – Crochet the Autumn Maple Leaves
The crescent moon is decorated with mustard yellow and burnt-orange maple leaves.
For the most natural appearance, create leaves in different sizes.
Basic Maple Leaf
Use mustard yellow or burnt-orange yarn.
Round 1: Ch 5, join with a sl st to form a ring.
Round 2: Ch 1, work 10 sc into the ring, join with a sl st. (10)
Round 3: Create five pointed lobes around the circle.
For each lobe, ch 6, sc in the second chain from the hook, hdc in the next chain, dc in the next two chains, and hdc in the final chain.
Sl st into the next available stitch on the center circle.
Repeat until five lobes are formed, distributing the attachment points evenly.
Ch 7 for the stem, then sl st back along the chain.
FO and weave in the ends.
Add Leaf Veins
Using a contrasting golden or brown yarn, embroider a central vein along each leaf lobe.
Add small diagonal veins for a more realistic autumn leaf appearance.
Make approximately five or six leaves for the main moon and hanging ornaments.
Part 8 – Crochet the Miniature Acorns
The tiny acorns add woodland charm to the upper-left side of the crescent moon.
Acorn Body – Make Two
Use light brown yarn.
Round 1: 6 sc in MR. (6)
Round 2: (1 sc, inc) repeat 3 times. (9)
Round 3: (2 sc, inc) repeat 3 times. (12)
Rounds 4–6: Sc around. (12)
Round 7: Dec 6 times. (6)
Stuff lightly and close.
Acorn Cap
Use dark brown yarn.
Round 1: 6 sc in MR. (6)
Round 2: Inc around. (12)
Round 3: Sc around. (12)
FO and sew the cap over the wider end of the acorn.
Add a short brown stem at the top.
Attach the acorns beneath the autumn leaves.
Part 9 – Crochet the Mini Ivory Pumpkin
A small cream-colored pumpkin hangs from the bottom center of the crescent moon.
Pumpkin Body
Use ivory yarn.
Round 1: 6 sc in MR. (6)
Round 2: Inc around. (12)
Round 3: (1 sc, inc) repeat 6 times. (18)
Round 4: (2 sc, inc) repeat 6 times. (24)
Rounds 5–9: Sc around. (24)
Round 10: (2 sc, dec) repeat 6 times. (18)
Round 11: (1 sc, dec) repeat 6 times. (12)
Stuff firmly.
Round 12: Dec 6 times. (6)
FO and close.
Shape the Pumpkin Ridges
Thread a long strand of ivory yarn through the center of the pumpkin.
Wrap it around the outside and pull gently to form a ridge.
Repeat evenly around the pumpkin to create six defined sections.
Pumpkin Stem
Use brown yarn.
Ch 5, sc in the second chain from the hook and across.
FO and sew to the top of the pumpkin.
Part 10 – Crochet the Mustard Yellow Bow
A small mustard-yellow bow adds a charming finishing touch to the hanging loop.
Bow Body
Use mustard yellow yarn.
Ch 13.
Row 1: Sc in the second chain from the hook and across. (12)
Rows 2–8: Ch 1, turn, sc across. (12)
FO, leaving a long tail.
Pinch the center and wrap yarn around it several times.
Secure the yarn at the back.
Bow Tails
Make two small tails.
Ch 11.
Sc in the second chain from the hook and across. (10)
Work another two rows of sc.
FO and attach behind the bow.
Shape the tails into soft pointed ends.
Part 11 – Crochet the Hanging Cords
The wall hanging features three delicate cords suspended beneath the crescent moon.
Use ivory yarn.
Make three cords of slightly different lengths.
- Left cord: approximately 13 cm
- Center cord: approximately 18 cm
- Right cord: approximately 14 cm
For each cord, crochet a chain to the desired length.
Work slip stitches or single crochet stitches back along the chain to reinforce it.
Attach one wooden bead near the lower end of each cord.
Secure the beads firmly.
Attach the Hanging Decorations
Attach a burnt-orange maple leaf to the left cord.
Attach the small ivory pumpkin to the center cord.
Attach a mustard-yellow maple leaf to the right cord.
Adjust the lengths so the center pumpkin hangs slightly lower than the leaves.
Part 12 – Assemble the Sleeping Fox Crochet Moon
Step 1 – Prepare the Moon
Place the finished crescent moon on a flat surface.
Ensure the inner curve faces the direction where the fox will rest.
Step 2 – Attach the Fox Body
Position the fox’s rounded body along the lower inner curve of the moon.
Sew the body securely to the moon at several contact points.
Step 3 – Position the Fox Head
Place the fox’s head toward the left side of the body.
Angle it slightly downward to create a peaceful sleeping pose.
Sew firmly in place.
Step 4 – Attach the Curled Tail
Wrap the fox’s large tail around the front of its body.
Position the cream-colored tail tip toward the lower right side.
Secure the tail with hidden stitches.
Step 5 – Add the Autumn Leaves
Arrange the mustard and burnt-orange maple leaves along the left outer curve of the moon.
Place the leaves at different angles for a natural falling-leaf appearance.
Step 6 – Add the Mini Acorns
Position the two tiny acorns between the autumn leaves.
Sew securely in place.
Step 7 – Attach the Hanging Cords
Sew the three ivory cords along the bottom of the moon.
Arrange them evenly across the lower curve.
Ensure the decorations hang freely.
Step 8 – Add the Hanging Loop
Make a sturdy ivory crochet loop and attach it near the upper center of the moon.
Check the balance before securing the loop permanently.
Step 9 – Attach the Mustard Bow
Position the small mustard bow just above the crescent moon.
Sew it neatly over the hanging loop.
Step 10 – Final Shaping
Gently adjust the moon, fox, leaves, and dangling ornaments.
Make sure the fox rests comfortably inside the crescent.
Check every attachment point before hanging the finished decoration.
Creative Color Variations
Classic Autumn Fox
Rust orange, ivory, mustard yellow, burnt orange, and dark brown.
Woodland Nursery
Soft terracotta, oatmeal, sage green, and warm beige.
Neutral Farmhouse
Cream, taupe, caramel, muted brown, and ivory.
Magical Forest
Deep green, copper, golden yellow, and warm cream.
Winter Fox
Snowy white, pale gray, soft blue, and silver.
Where to Display Your Sleeping Fox Crochet Moon
1. Cozy Bedroom
Hang it above a bedside table for a warm, peaceful woodland atmosphere.
2. Autumn Entryway
Display it on an interior door to welcome the fall season.
3. Nursery Wall Decor
Use it as decorative woodland artwork, securely mounted well out of reach of babies and children.
4. Farmhouse Living Room
Pair it with pumpkins, woven baskets, and autumn foliage.
5. Handmade Gift
Create one for a friend or family member who loves foxes, woodland animals, and cozy crochet decorations.
6. Seasonal Craft Fair
Make several versions in coordinating autumn colors for a beautiful handmade display.
Helpful Crochet Tips
- Use consistent yarn weight throughout the project.
- Stuff the moon evenly without overfilling it.
- Shape the moon before attaching the fox.
- Embroider the fox’s eyes before sewing the head to the body.
- Keep the fox’s body slightly flattened for a natural sleeping pose.
- Use hidden stitches to secure the curled tail.
- Block the maple leaves to emphasize their pointed shapes.
- Arrange the autumn decorations before sewing them permanently.
- Reinforce the hanging loop to support the completed project.
- Keep wooden beads, cords, and other small parts away from young children.
Frequently Asked Questions
Is this sleeping fox crochet moon suitable for beginners?
This project is best for intermediate crocheters who are comfortable with amigurumi shaping, sewing pieces together, and embroidery.
How long does it take to make?
Depending on experience, the project may take approximately 8–14 hours.
Can I make the crescent moon larger?
Yes. Use thicker yarn and a larger crochet hook, or extend the widest section of the moon before beginning the decreases.
Can I use velvet yarn?
Yes. Velvet yarn creates an especially soft appearance, although it may make smaller details more difficult to crochet.
How do I keep the fox attached to the moon?
Use strong yarn and sew the fox at several points along the moon’s inner curve.
Can I change the fox’s color?
Absolutely. Try gray, cream, caramel, or even soft pink for a different woodland-inspired look.
Can I make the wall hanging without wooden beads?
Yes. The beads are decorative and can be omitted.
Can I replace the pumpkin with another ornament?
Yes. A tiny mushroom, acorn, star, or additional maple leaf would work beautifully.
Can I wash the finished decoration?
If made entirely from washable yarn and stuffing, gently spot-clean it as needed. Avoid soaking decorations containing wooden beads, craft wire, or delicate embroidery.
Is this suitable as a baby mobile?
No. This version is intended as decorative wall art rather than a toy or crib mobile. Keep it securely mounted out of children’s reach.
Final Thoughts
This Sleeping Fox Crochet Moon Wall Hanging combines the beauty of autumn with the warmth of handmade crochet.
From the peaceful little fox curled inside the ivory crescent moon to the golden leaves, tiny acorns, soft pumpkin, and delicate dangling ornaments, every detail adds to its woodland charm.
Whether displayed in a cozy bedroom, farmhouse entryway, or autumn-inspired living room, this handmade decoration is sure to bring warmth and personality to your home.
Choose your favorite autumn yarn colors, gather your crochet hook, and enjoy creating your own little sleeping fox beneath the moon.
Happy crocheting! 🦊🌙🍁🧶