Halloween Crochet Skeleton Pattern – Cute Amigurumi with Pumpkin Beret
Looking for a Halloween crochet project that’s spooky, adorable, and full of handmade charm? Meet this cute crochet skeleton wearing a cozy burnt-orange pumpkin beret!
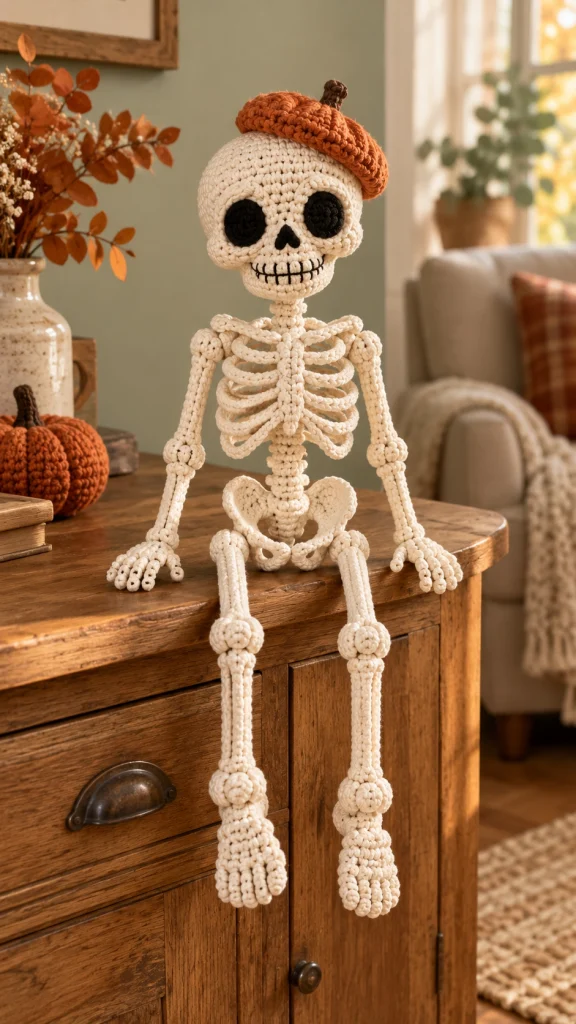
With its oversized smiling skull, round black eye sockets, delicate crocheted rib cage, long dangling legs, and tiny articulated fingers, this charming skeleton makes a wonderful addition to your autumn and Halloween decorations.
Perfect for displaying on a wooden shelf, fireplace mantel, or entryway cabinet, this handmade skeleton combines playful Halloween style with cozy farmhouse charm.
Whether you’re decorating your home, preparing for a seasonal craft fair, or creating a special handmade gift, this skeleton is a fun project for experienced crocheters.
Pattern note: This is an original, untested crochet interpretation inspired by the reference image. It is not an exact stitch-for-stitch reconstruction. The skeleton requires careful shaping, structural reinforcement, and assembly. Finished proportions may vary.
Project Overview
- Project: Halloween Crochet Skeleton with Pumpkin Beret
- Skill Level: Advanced
- Estimated Finished Height: 40–50 cm
- Yarn Weight: Worsted or DK weight
- Recommended Hook: 3.0–3.5 mm
- Crochet Terms: US terminology
- Style: Halloween, autumn, whimsical amigurumi
- Techniques: Amigurumi, shaping, embroidery, assembly, and crochet cord construction
Materials Needed
- Ivory or cream cotton yarn for the skull and bones
- Black cotton yarn for the eye sockets, nose, and smile
- Burnt-orange yarn for the pumpkin beret
- Dark brown yarn for the pumpkin stem
- 3.0 mm or 3.5 mm crochet hook
- Polyester fiberfill
- Yarn needle
- Scissors
- Stitch markers
- Optional plastic canvas or internal support for display stability
- Optional pipe cleaners or covered craft wire for posing
Safety: This is a decorative display piece, not a toy. Small details and optional internal supports may be unsuitable for children. Cover and secure all wire ends, and keep the finished skeleton away from young children.
Crochet Abbreviations
- MR: Magic ring
- ch: Chain
- sc: Single crochet
- hdc: Half double crochet
- dc: Double crochet
- sl st: Slip stitch
- inc: Two single crochets in one stitch
- dec: Invisible decrease
- FO: Fasten off
- BLO: Back loop only
Part 1 – Crochet the Skeleton Skull
The oversized ivory skull gives this skeleton its playful personality. The large rounded shape contrasts beautifully with the narrow skeletal body.
Skull – Main Head
Use ivory yarn and work in continuous rounds.
Round 1: 6 sc in MR. (6)
Round 2: Inc around. (12)
Round 3: (1 sc, inc) repeat 6 times. (18)
Round 4: (2 sc, inc) repeat 6 times. (24)
Round 5: (3 sc, inc) repeat 6 times. (30)
Round 6: (4 sc, inc) repeat 6 times. (36)
Round 7: (5 sc, inc) repeat 6 times. (42)
Round 8: (6 sc, inc) repeat 6 times. (48)
Round 9: (7 sc, inc) repeat 6 times. (54)
Rounds 10–18: Sc around. (54)
Round 19: (7 sc, dec) repeat 6 times. (48)
Round 20: (6 sc, dec) repeat 6 times. (42)
Round 21: (5 sc, dec) repeat 6 times. (36)
Round 22: (4 sc, dec) repeat 6 times. (30)
Begin stuffing the skull firmly.
Round 23: (3 sc, dec) repeat 6 times. (24)
Round 24: (2 sc, dec) repeat 6 times. (18)
Round 25: (1 sc, dec) repeat 6 times. (12)
Round 26: Dec 6 times. (6)
FO and close the opening.
Part 2 – Crochet the Skull Cheekbones
The raised cheekbones create the recognizable skull silhouette.
Cheekbone Pieces – Make Two
Use ivory yarn.
Ch 7.
Round 1: Starting in the second chain from the hook, sc 5, work 3 sc in the last chain, continue along the opposite side with 4 sc, then 2 sc in the final chain. (14)
Round 2: Inc, sc 4, inc in each of the next 3 stitches, sc 4, inc in each of the last 2 stitches. (20)
FO and leave a sewing tail.
Attach both cheekbones to the lower sides of the skull.
Position them symmetrically beneath the eye sockets.
Part 3 – Crochet the Black Eye Sockets
The skeleton has two large round black crocheted eye sockets.
Eye Sockets – Make Two
Use black yarn.
Round 1: 6 sc in MR. (6)
Round 2: Inc around. (12)
Round 3: (1 sc, inc) repeat 6 times. (18)
Round 4: (2 sc, inc) repeat 6 times. (24)
FO, leaving a long sewing tail.
Flatten both circles and sew them onto the front of the skull.
Position the eye sockets slightly above the center of the face.
Raised Eye Borders
Use ivory yarn.
Surface crochet or embroider a curved border around the upper portion of each eye socket.
This creates the rounded brow details visible in the design.
Part 4 – Embroider the Nose and Skeleton Smile
Skeleton Nose
Use black yarn.
Embroider a small inverted triangular nose between and slightly below the eye sockets.
Fill the triangle with short satin stitches.
Smiling Mouth
Using black embroidery yarn, stitch a wide curved smile across the lower front of the skull.
Add several short vertical stitches across the smile to represent individual teeth.
Keep the stitches evenly spaced.
The finished expression should look friendly and playful rather than frightening.
Part 5 – Crochet the Neck and Spine
The narrow spine supports the skull and connects the rib cage to the pelvis.
Neck
Use ivory yarn.
Round 1: 6 sc in MR. (6)
Rounds 2–7: Sc around. (6)
FO and leave a long sewing tail.
Stuff lightly and attach beneath the skull.
Spine
Use ivory yarn.
Round 1: 6 sc in MR. (6)
Rounds 2–30: Sc around. (6)
Stuff very lightly.
FO, leaving a long sewing tail.
Attach the spine below the neck.
Spinal Vertebrae
To create the segmented bone appearance, use ivory yarn to wrap small raised bands around the spine at regular intervals.
Alternatively, make several tiny crochet rings and sew them around the spine.
Part 6 – Crochet the Rib Cage
The detailed open rib cage is one of the most distinctive features of this crochet skeleton.
Instead of creating a solid torso, the rib cage is formed using curved crocheted cords.
Make the Rib Cords
Use ivory yarn.
Make approximately 12 curved rib cords, six for each side.
Suggested starting chain lengths:
- Upper ribs: 13–15 chains
- Middle ribs: 16–19 chains
- Lower ribs: 14–17 chains
For each rib, crochet a chain to the required length.
Work slip stitches back along the chain to create a slightly thicker cord.
FO, leaving long sewing tails.
Shape the Rib Cage
Attach the inner end of each rib to the central spine or breastbone area.
Curve the ribs outward and slightly downward.
Connect the outer ends to the shoulder-side support points.
Arrange the ribs in matching pairs on the left and right sides.
The upper ribs should be narrower, the middle ribs wider, and the lower ribs gradually shorter.
Breastbone
Use ivory yarn.
Ch 18.
Sc in the second chain from the hook and across. (17)
Work two additional rows of sc.
FO and sew vertically along the front center of the rib cage.
Attach the rib cords to the sides of this piece.
For a stable open rib cage, carefully reinforce the back with hidden yarn joins or a discreet internal support.
Part 7 – Crochet the Shoulder Joints
Make two small rounded shoulder joints.
Use ivory yarn.
Round 1: 6 sc in MR. (6)
Round 2: Inc around. (12)
Rounds 3–4: Sc around. (12)
Round 5: Dec 6 times. (6)
Stuff lightly and close.
Attach one joint to each upper side of the rib cage.
Part 8 – Crochet the Arms
The skeleton’s long arms hang naturally beside the rib cage.
Upper Arm Bones – Make Two
Use ivory yarn.
Round 1: 6 sc in MR. (6)
Rounds 2–20: Sc around. (6)
FO, leaving a sewing tail.
Stuff lightly or reinforce with a soft crochet cord.
Elbow Joints – Make Two
Round 1: 6 sc in MR. (6)
Round 2: Inc around. (12)
Round 3: Sc around. (12)
Round 4: Dec 6 times. (6)
FO and close.
Forearm Bones – Make Four
Use ivory yarn.
Ch 19.
Sl st in the second chain from the hook and across.
FO, leaving a sewing tail.
Use two narrow cords side by side for each forearm.
Arm Assembly
Attach the upper arm to the shoulder joint.
Attach the elbow joint at the lower end.
Sew two forearm cords beneath each elbow.
Position the arms naturally beside the skeleton’s body.
Part 9 – Crochet the Skeleton Hands
The delicate skeletal hands feature narrow fingers and small rounded joints.
Palm – Make Two
Use ivory yarn.
Ch 7.
Row 1: Sc in the second chain from the hook and across. (6)
Rows 2–5: Ch 1, turn, sc across. (6)
FO, leaving a long tail.
Fingers
Make four fingers and one thumb for each hand.
For each finger, ch 8–12 depending on the desired length.
Work slip stitches back along the chain.
Attach the fingers individually along the edge of the palm.
Make the middle finger slightly longer than the others.
Finger Joints
Use small wrapped yarn knots to create the appearance of tiny finger joints.
Attach the completed hands to the forearms.
Part 10 – Crochet the Pelvis
The pelvis connects the narrow spine to the skeleton’s long legs.
Pelvis Center
Use ivory yarn.
Round 1: 6 sc in MR. (6)
Round 2: Inc around. (12)
Round 3: (1 sc, inc) repeat 6 times. (18)
Rounds 4–5: Sc around. (18)
Round 6: (1 sc, dec) repeat 6 times. (12)
Stuff lightly.
FO and close.
Pelvic Wings – Make Two
Ch 9.
Row 1: Sc in the second chain from the hook and across. (8)
Row 2: Ch 1, turn, inc, sc 6, inc. (10)
Row 3: Ch 1, turn, sc across. (10)
Row 4: Ch 1, turn, dec, sc 6, dec. (8)
Row 5: Ch 1, turn, dec, sc 4, dec. (6)
FO and leave a sewing tail.
Curve both pieces outward and sew them to the pelvis center.
Attach the pelvis to the bottom of the spine.
Part 11 – Crochet the Long Skeleton Legs
The long dangling legs give this skeleton its charming seated appearance.
Thigh Bones – Make Two
Use ivory yarn.
Round 1: 6 sc in MR. (6)
Rounds 2–26: Sc around. (6)
FO and leave a sewing tail.
Knee Joints – Make Two
Round 1: 6 sc in MR. (6)
Round 2: Inc around. (12)
Rounds 3–4: Sc around. (12)
Round 5: Dec 6 times. (6)
Stuff lightly and close.
Lower Leg Bones – Make Four
Use ivory yarn.
Ch 27.
Sl st in the second chain from the hook and across.
FO, leaving a sewing tail.
Use two cords for each lower leg to represent the tibia and fibula.
Ankle Joints – Make Two
Round 1: 6 sc in MR. (6)
Round 2: Inc around. (12)
Round 3: Sc around. (12)
Round 4: Dec 6 times. (6)
FO and close.
Part 12 – Crochet the Skeleton Feet
The feet feature rounded toes and a slightly elongated shape.
Foot Base – Make Two
Use ivory yarn.
Ch 10.
Round 1: Sc 8, 3 sc in the last chain, work 7 sc along the opposite side, then 2 sc in the final chain. (20)
Round 2: Inc, sc 7, inc in each of the next 3 stitches, sc 7, inc in each of the last 2 stitches. (26)
Rounds 3–4: Sc around. (26)
Round 5: (11 sc, dec) repeat twice. (24)
FO and flatten.
Individual Toes
Make five small crochet cords for each foot.
Use chains of 5–9 stitches, depending on the toe length.
Work slip stitches back along each chain.
Sew the toes to the front of the foot.
Attach the completed feet to the ankle joints.
Part 13 – Crochet the Burnt-Orange Pumpkin Beret
The pumpkin-inspired beret is the finishing detail that gives this Halloween skeleton its adorable autumn personality.
Beret Body
Use burnt-orange yarn.
Round 1: 6 sc in MR. (6)
Round 2: Inc around. (12)
Round 3: (1 sc, inc) repeat 6 times. (18)
Round 4: (2 sc, inc) repeat 6 times. (24)
Round 5: (3 sc, inc) repeat 6 times. (30)
Round 6: (4 sc, inc) repeat 6 times. (36)
Round 7: (5 sc, inc) repeat 6 times. (42)
Round 8: (6 sc, inc) repeat 6 times. (48)
Round 9: (7 sc, inc) repeat 6 times. (54)
Rounds 10–12: Sc around. (54)
Round 13: (7 sc, dec) repeat 6 times. (48)
Round 14: (6 sc, dec) repeat 6 times. (42)
Round 15: Sc around. (42)
FO and weave in the ends.
Gently flatten the beret into a soft rounded shape.
Beret Ribbing
Using burnt-orange yarn, work surface slip stitches from the center of the beret toward the outer edge.
Repeat at evenly spaced intervals to create subtle pumpkin-inspired ridges.
Dark Brown Stem
Use dark brown yarn.
Round 1: 6 sc in MR. (6)
Rounds 2–5: Sc around. (6)
FO and sew the stem to the top center of the beret.
Place the beret slightly tilted on the skull.
Sew it in place with several discreet stitches.
Part 14 – Assemble the Crochet Skeleton
Step 1 – Finish the Skull
Attach the black eye sockets, cheekbones, and embroidered facial details.
Check that the expression is symmetrical.
Step 2 – Attach the Neck
Sew the neck securely beneath the skull.
Step 3 – Connect the Spine
Attach the spine beneath the neck.
Ensure the head and spine are aligned.
Step 4 – Assemble the Rib Cage
Position the breastbone at the front.
Attach the curved rib cords evenly on both sides.
Secure the rib cage to the spine.
Step 5 – Attach the Shoulders and Arms
Sew the shoulder joints to the upper rib cage.
Attach the upper arms, elbows, forearms, and hands.
Adjust the arms into a relaxed position.
Step 6 – Attach the Pelvis
Sew the pelvis to the lower end of the spine.
Make sure it is centered beneath the rib cage.
Step 7 – Attach the Legs
Connect the thigh bones to the pelvis.
Attach the knee joints and lower legs.
Finish with the ankle joints and feet.
Step 8 – Add the Pumpkin Beret
Place the burnt-orange beret slightly off-center on the skull.
Secure it firmly with matching yarn.
Step 9 – Position the Skeleton
Place the skeleton on a stable shelf or wooden cabinet.
Allow the legs to hang naturally over the edge.
Position the hands beside the body for a relaxed sitting pose.
Use discreet support if necessary to prevent the decoration from falling.
Creative Color Variations
Classic Halloween
Ivory bones, black facial details, and burnt-orange pumpkin beret.
Pastel Halloween
Soft cream bones with a lavender, dusty pink, or pale peach beret.
Gothic Skeleton
Antique ivory bones with a deep burgundy or black beret.
Autumn Farmhouse
Warm oatmeal bones with a mustard yellow or terracotta beret.
Christmas Skeleton
Ivory bones with a red and white Santa-style hat.
Halloween Decorating Ideas
1. Entryway Cabinet
Place the skeleton on a rustic wooden cabinet beside small crochet pumpkins and dried autumn leaves.
2. Fireplace Mantel
Display the skeleton with miniature lanterns, candles, and fall garlands.
3. Halloween Shelf Decor
Pair it with crocheted ghosts, bats, and miniature pumpkins.
4. Cozy Living Room
Place it on a side table near a knitted blanket and autumn flowers.
5. Handmade Halloween Gift
Make one for someone who loves playful seasonal decorations.
6. Craft Fair Display
Create several skeletons wearing different colored berets for an eye-catching handmade Halloween collection.
Helpful Crochet Tips
- Use a smaller hook for tighter amigurumi stitches.
- Stuff the skull firmly to maintain its rounded shape.
- Use matching yarn to hide attachment stitches.
- Keep the rib cage symmetrical.
- Make the limb cords firm enough to hold their shape.
- Use removable stitch markers to position the joints before sewing.
- Embroider the face before attaching the head to the neck.
- Attach the beret last to avoid damaging its shape during assembly.
- Check the balance before displaying the finished skeleton.
- Use hidden support if the skeleton cannot remain seated independently.
Frequently Asked Questions
Is this crochet skeleton suitable for beginners?
This project is recommended for advanced crocheters because of the detailed rib cage, narrow bones, small joints, and extensive assembly.
How long does it take to crochet?
Depending on experience, the project may take approximately 12–20 hours.
Can I make the skeleton smaller?
Yes. Use thinner yarn and a smaller crochet hook.
Can I make the skeleton larger?
Yes. Use thicker yarn and a larger hook. You may also need additional internal support.
Does the skeleton stand independently?
This design is intended to sit on a shelf or cabinet. It may require support to maintain its position.
Can I make the skeleton without wire?
Yes, although the limbs and rib cage may be less structured. Reinforced crochet cords and careful sewing can help.
Can I change the beret color?
Absolutely! Try mustard yellow, forest green, dusty pink, lavender, or deep burgundy.
Can I remove the beret?
Yes. Leave it unattached if you prefer a removable accessory, but keep detachable parts away from children.
Can I wash the finished skeleton?
Gently spot-clean it as needed. Avoid machine washing if the project contains internal supports or delicate structural details.
Is this skeleton suitable for children?
No. This version is designed as decorative Halloween artwork and is not intended as a children’s toy.
Final Thoughts
This Halloween Crochet Skeleton with Pumpkin Beret is a delightful combination of spooky and sweet.
Its oversized smiling skull, intricate rib cage, dangling legs, delicate hands, and cozy burnt-orange beret make it a unique handmade decoration for the autumn season.
Display it beside pumpkins, autumn foliage, and warm farmhouse decorations to create a charming Halloween corner in your home.
Gather your favorite yarn, prepare your crochet hook, and enjoy bringing this adorable little skeleton to life!
Happy Halloween and happy crocheting! 🎃💀🧶🍂