Christmas Crochet Door Swag Pattern – Beautiful Poinsettia Flowers, Evergreen Branches & Festive Bow
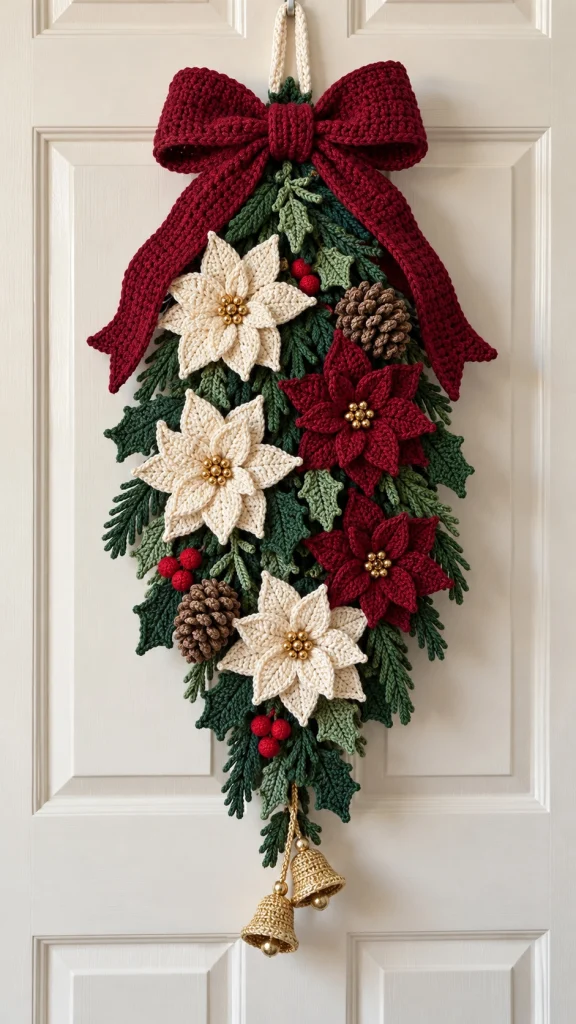
Bring the magic of Christmas to your home with this gorgeous handmade crochet door swag! Featuring elegant ivory and burgundy poinsettias, lush evergreen branches, textured pinecones, bright red berries, a dramatic burgundy bow, and delicate golden bells, this festive decoration is a beautiful alternative to a traditional Christmas wreath.
The cascading greenery and dimensional flowers create a timeless holiday arrangement that looks wonderful on a white front door, above a fireplace, or as part of a cozy farmhouse Christmas display.
In this tutorial, you’ll learn how to crochet the individual decorations and assemble them into a stunning Christmas door hanging.
Pattern note: This is an original pattern inspired by the pictured decoration. It is designed to create a similar look rather than reproduce every stitch of the reference image exactly.
Project Overview
- Project: Christmas Crochet Door Swag
- Skill Level: Intermediate
- Style: Traditional Christmas, farmhouse, cottagecore
- Techniques: Single crochet, double crochet, treble crochet, layered appliques, crochet leaves, shaping and assembly
- Suggested Finished Size: 55–70 cm long and 25–35 cm wide
- Hook Sizes: 3.5 mm and 4 mm
- Yarn: Worsted-weight cotton or acrylic-blend yarn
- Construction: Separately crocheted pieces assembled onto a sturdy backing
Materials You’ll Need
- Burgundy yarn for the large Christmas bow and red poinsettias
- Ivory yarn for the cream poinsettias and hanging loop
- Dark forest-green yarn for evergreen branches
- Sage-green yarn for secondary foliage
- Brown yarn for pinecones
- Bright red yarn for berries
- Gold-colored beads for flower centers
- Two small decorative golden bells
- 3.5 mm crochet hook
- 4 mm crochet hook
- Yarn needle
- Scissors
- Stitch markers
- Fiberfill for berries
- Sturdy felt backing or a lightweight floral support
- Sewing thread and needle
Crochet Abbreviations – US Terms
- MR: Magic ring
- ch: Chain
- sc: Single crochet
- hdc: Half double crochet
- dc: Double crochet
- tr: Treble crochet
- sl st: Slip stitch
- st: Stitch
- inc: Increase
- dec: Decrease
- FO: Fasten off
Part 1 – Crochet the Large Burgundy Christmas Bow
The oversized burgundy bow is the statement piece at the top of the arrangement. Its rich color and textured stitches give the decoration a luxurious handmade appearance.
Step 1 – Crochet the Bow Loops
Using burgundy yarn and a 4 mm hook, ch 19.
Row 1: Starting in the second chain from the hook, work 1 sc in each chain. You should have 18 sc.
Rows 2–34: Ch 1, turn, and work 1 sc in each stitch across.
Fasten off, leaving a long sewing tail.
Fold the rectangle so the two short ends meet, then sew them together to form a loop.
Flatten the loop with the seam at the center back and pinch the middle to create the bow shape.
Step 2 – Crochet the Center Wrap
Ch 9.
Row 1: Work 1 sc in the second chain from the hook and in each chain across.
Rows 2–8: Ch 1, turn, and sc across.
Wrap this strip tightly around the center of the bow and sew it securely at the back.
Step 3 – Crochet the Ribbon Tails
Make two matching ribbon tails.
Ch 13.
Row 1: Work 1 sc in the second chain from the hook and in each chain across.
Rows 2–28: Ch 1, turn, and sc across.
For a decorative V-shaped end, work the final few rows with decreases at the outer edges, or carefully fold and secure the end into a pointed shape.
Attach both ribbon tails behind the bow center.
Arrange them so they cascade naturally down the greenery.
Part 2 – Crochet the Ivory and Burgundy Poinsettias
The poinsettias are the stars of this Christmas arrangement. The pictured decoration features three ivory flowers and two burgundy flowers with beautiful layered petals.
Each flower is worked as a separate applique and attached to the greenery.
Step 1 – Flower Center
Using ivory or burgundy yarn, make a magic ring.
Work 6 sc into the ring.
Pull the ring closed and join with a sl st.
Step 2 – First Petal Layer
*Ch 7. Starting in the second chain from the hook, work 1 sc, 1 hdc, 2 dc, 1 hdc, and 1 sc. Sl st into the next stitch of the center ring.*
Repeat around to create six pointed petals.
Step 3 – Second Petal Layer
Attach yarn behind the first layer.
Working around the base of each petal, create six chain-9 loops.
Into each loop, work:
(1 sc, 1 hdc, 2 dc, 3 tr, 2 dc, 1 hdc, 1 sc).
Repeat for all six petals.
Fasten off and weave in the ends.
Step 4 – Add the Golden Centers
Sew five or six small gold-colored beads securely into the center of each poinsettia.
Use strong sewing thread and check that every bead is firmly attached.
For a fully crocheted alternative, make tiny mustard-yellow bobbles instead of using beads.
Suggested Flower Quantities
- 3 large ivory poinsettias
- 2 burgundy poinsettias
Make the ivory flowers slightly larger by using a larger hook or thicker yarn.
Part 3 – Crochet the Evergreen Branches
The evergreen branches create the lush cascading shape of the door swag.
Use a mixture of dark forest green and sage green to add depth and dimension.
Step 1 – Main Branch
Using dark green yarn, ch 45.
Starting in the second chain from the hook, work 1 sl st in each chain.
This creates the central stem.
Step 2 – Add Pine Needles
Along the stem, work:
*Ch 8, sl st back down the chain, sl st into the next stem stitch.*
Repeat along one side of the stem.
Turn the work and repeat on the opposite side.
Vary the branch lengths by occasionally using ch 5, ch 6, or ch 10.
Step 3 – Create Smaller Branches
Make additional branches using foundation chains of 20–35 stitches.
Repeat the same pine-needle technique.
Make approximately 12–18 branches in different lengths.
Step 4 – Shape the Greenery
Arrange the longest branches toward the bottom of the swag.
Position shorter branches near the top and sides.
Layer sage-green branches between the dark-green pieces to create a natural evergreen appearance.
Part 4 – Crochet the Holly Leaves
Holly leaves add structure and beautiful pointed details around the flowers.
Step 1 – Foundation
Using dark green yarn, ch 13.
Step 2 – First Side
Starting in the second chain from the hook, work:
1 sc, 1 hdc, 2 dc, 2 tr, 2 dc, 1 hdc, 1 sc.
Work slip stitches into any remaining foundation chains.
Step 3 – Opposite Side
Turn around the end of the foundation chain and work along the opposite side.
Repeat the stitch sequence in reverse to form a symmetrical leaf.
Step 4 – Add Holly Points
Along the outer edge, add small chain-3 picots at several evenly spaced points.
Each picot is made by chaining 3 and slip stitching into the first chain.
These create the distinctive pointed edges of holly leaves.
Step 5 – Leaf Veins
Using sage-green yarn, embroider a central vein along each leaf.
Add a few diagonal stitches for extra texture.
Make approximately 10–14 holly leaves.
Part 5 – Crochet the Red Christmas Berries
Small clusters of bright red berries add pops of color between the evergreen branches.
Round 1
Using red yarn, make a magic ring and work 6 sc into it.
Round 2
Work 2 sc into each stitch around.
Total: 12 sc.
Rounds 3–4
Work 1 sc into each stitch around.
Round 5
Work 6 sc decreases around.
Add a small amount of fiberfill before closing.
Fasten off, leaving a long tail.
Assemble the Berry Clusters
Make approximately 12–18 berries.
Group them in clusters of three.
Sew each cluster together and attach it to the greenery.
Part 6 – Crochet the Textured Pinecones
The brown pinecones add a beautiful woodland touch and make the decoration feel more natural and rustic.
Step 1 – Pinecone Base
Using brown yarn, make a magic ring.
Round 1: 6 sc into the ring.
Round 2: 2 sc in each stitch around. (12)
Round 3: *1 sc, inc* around. (18)
Rounds 4–8: Work 1 sc in each stitch around.
Step 2 – Create the Pinecone Texture
Work small raised shell stitches around the surface.
To make a shell, work 3 dc into the same stitch, then sl st into the next stitch.
Repeat the shells in staggered rows to create overlapping pinecone scales.
Step 3 – Shape the Pinecone
Lightly stuff the pinecone base.
Decrease evenly over the final rounds until the opening closes.
Fasten off and shape the pinecone gently with your hands.
Make two or three pinecones.
Part 7 – Crochet the Golden Christmas Bells
Two small golden bells hang from the bottom of the decoration, creating an elegant finishing detail.
You can use ready-made decorative bells or crochet your own.
Round 1
Using mustard or metallic gold yarn, make a magic ring.
Work 6 sc into the ring.
Round 2
Work 2 sc into each stitch around. (12)
Rounds 3–5
Work 1 sc into each stitch around.
Round 6
*1 sc, inc* around. (18)
Round 7
Work 1 sc into each stitch around.
Round 8
Work 1 sc, ch 1, and 1 sc into each stitch around to create a slightly flared edge.
Fasten off.
Attach a small bead or crocheted bobble inside as the bell clapper.
Make two bells and attach them to braided yarn cords.
Part 8 – Create the Hanging Loop
The hanging loop should be strong enough to support the finished decoration.
Step 1
Using ivory yarn, ch 55.
Step 2
Starting in the second chain from the hook, work 1 sc in each chain.
Step 3
Repeat for two additional rows to create a sturdy strap.
Step 4
Fold the strap into a loop and sew the ends securely to the backing.
Reinforce the attachment with several extra stitches.
Part 9 – Assemble the Christmas Door Swag
Now comes the most exciting part: bringing all the crocheted pieces together into one beautiful holiday arrangement.
Step 1 – Prepare the Backing
Cut a sturdy felt backing into a long tapered shape, approximately 55–65 cm long.
The top should be wider, gradually narrowing toward the bottom.
Attach the hanging loop securely to the upper section.
Step 2 – Arrange the Evergreen Branches
Place the longest branches along the center of the backing.
Layer smaller branches outward to create a full, cascading arrangement.
Use dark green branches as the foundation and sage-green branches for highlights.
Step 3 – Attach the Burgundy Bow
Position the oversized bow at the very top.
Allow the two ribbon tails to drape over the greenery.
Sew the bow firmly to the backing.
Step 4 – Arrange the Ivory Poinsettias
Position one ivory poinsettia near the upper left.
Place a second ivory flower toward the middle left.
Attach the third ivory flower near the lower center.
Step 5 – Add the Burgundy Poinsettias
Position one burgundy poinsettia near the center right.
Place the second slightly lower to create visual balance.
Keep the flowers slightly raised to preserve their dimensional appearance.
Step 6 – Add the Pinecones
Place one pinecone near the upper right side.
Position another pinecone toward the lower left.
Sew them securely to the backing.
Step 7 – Add the Holly Leaves and Berries
Fill any visible gaps with holly leaves.
Add clusters of red berries between the flowers and evergreen branches.
Arrange the elements naturally rather than in perfectly straight lines.
Step 8 – Attach the Golden Bells
Hang two golden bells from the lower center of the swag using braided yarn cords.
Make one cord slightly longer than the other for a charming cascading effect.
Step 9 – Final Adjustments
Check the decoration from a distance.
Adjust the foliage until the arrangement looks full and balanced.
Secure any loose pieces and weave in all remaining yarn ends.
Suggested Christmas Color Palette
- Deep Burgundy: Main bow and red poinsettias
- Warm Ivory: Cream poinsettias and hanging loop
- Forest Green: Main evergreen foliage
- Sage Green: Secondary branches and leaves
- Bright Red: Holly berries
- Warm Brown: Pinecones
- Metallic Gold: Flower centers and hanging bells
Tips for a Beautiful Handmade Finish
- Use consistent yarn thickness throughout the project.
- Block the poinsettia petals before assembling.
- Layer evergreen branches in different directions for a fuller appearance.
- Keep the burgundy bow slightly oversized for a dramatic festive look.
- Use a strong backing to support the weight of the flowers and pinecones.
- Secure all decorative beads and bells firmly.
- Use matching yarn when sewing the pieces together.
- Avoid placing the decoration directly against open flames or hot surfaces.
- Protect the finished piece from prolonged rain and direct sunlight.
Creative Ways to Display Your Christmas Crochet Door Swag
1. Front Door Decoration
Hang it on a white or wooden front door for a warm and welcoming Christmas entrance.
2. Above the Fireplace
Display it above your mantel alongside candles, stockings, and evergreen garlands.
3. Staircase Decoration
Attach it to a staircase post or decorative wall hook for a festive holiday accent.
4. Farmhouse Christmas Wall Decor
Pair it with rustic wooden furniture, plaid ribbons, and warm white fairy lights.
5. Handmade Christmas Gift
Create one for a friend, neighbor, or family member who loves unique handmade decorations.
Frequently Asked Questions
Is this Christmas crochet door swag beginner-friendly?
The individual components use familiar crochet stitches, but the layered poinsettias and assembly make the overall project better suited to intermediate crocheters.
How long does it take to make?
Depending on your crochet experience, the project may take approximately 15–30 hours or longer.
Can I use acrylic yarn?
Yes. Acrylic yarn is lightweight, affordable, and available in many beautiful Christmas colors.
Can I make the poinsettias in different colors?
Absolutely! Try blush pink, champagne, dusty rose, or classic Christmas red.
Can I use real bells?
Yes. Small lightweight decorative bells work beautifully, provided they are attached securely.
Can I make a smaller version?
Yes. Use fewer branches and flowers, or thinner yarn and a smaller hook.
How should I store the decoration?
Store it flat in a clean, dry box. Place tissue paper between the raised flowers to help maintain their shape.
Can I hang it outdoors?
It is best displayed indoors or on a sheltered porch because moisture and strong sunlight may damage the yarn over time.
Final Thoughts
This Christmas crochet door swag pattern is a wonderful way to add handmade charm to your holiday decorations.
With its dramatic burgundy bow, delicate ivory and red poinsettias, lush evergreen foliage, rustic pinecones, cheerful berries, and golden bells, it creates a beautiful festive statement that can be enjoyed year after year.
Whether you hang it on your front door, display it above your fireplace, or give it as a thoughtful handmade gift, this crochet Christmas decoration brings warmth, creativity, and a personal touch to the holiday season.
Gather your favorite Christmas yarn colors, prepare your crochet hook, and enjoy creating a festive decoration that is truly your own.
Happy crocheting and Merry Christmas! 🎄🧶❤️