Autumn Pumpkin Crochet Table Runner Pattern
Beginner Friendly
Perfect for those just starting their crochet journey, with clear instructions and simple techniques
Single-Day Project
A satisfying project you can complete in a single afternoon or evening.
Handmade Gift
A beautiful keepsake — free forever. Read online or print at home.
About This Autumn Pumpkin Crochet Table Runner Pattern
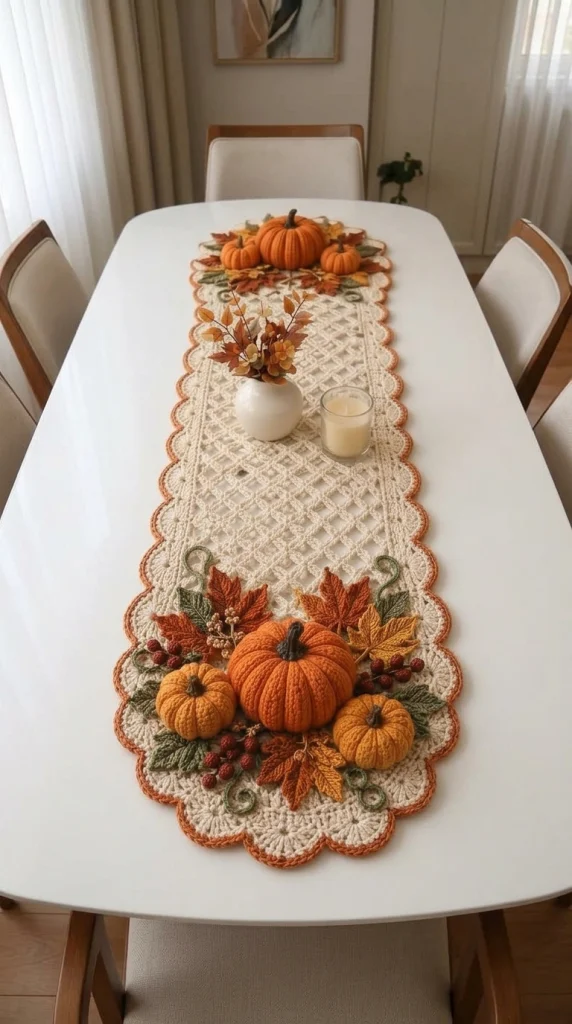
This autumn pumpkin crochet table runner pattern creates a long, elegant centerpiece inspired by the reference image. The design combines an ivory openwork runner with a warm rust-orange scalloped border and richly textured fall decorations at both ends.
The main attraction is the dimensional pumpkin arrangement. Each end features one large ribbed pumpkin surrounded by two smaller pumpkins, layered crochet maple leaves, olive-green foliage, burgundy berries and delicate curling vines. The center of the runner stays lighter and more open so candles, vases or other seasonal decorations can be placed on top without hiding the crochet work.
The finished runner measures approximately 35 cm wide × 150 cm long. You can easily make it shorter or longer by changing the number of repeated center rows before beginning the decorated end sections.
Materials
- Ivory cotton yarn approximately 600-700 m
- Burnt orange yarn approximately 180 m
- Mustard yarn approximately 80 m
- Olive green yarn approximately 100 m
- Dark forest green yarn approximately 50 m
- Burgundy yarn approximately 50 m
- Dark brown yarn approximately 40 m
- Beige/tan yarn approximately 40 m
- 3.5 mm crochet hook main runner
- 3.0 mm crochet hook leaves and small details
- Polyester fiberfill for pumpkins and berries
- Yarn needle 1
- Stitch markers 4-6
- Scissors 1 pair
Abbreviations
chchainsl stslip stitchscsingle crochethdchalf double crochetdcdouble crochettrtreble crochetdc2togdouble crochet 2 togetherBLOback loop onlyinc2 stitches in same stitchdecdecreaseststitchspspaceFOfasten offMain Runner Foundation
- With ivory yarn and 3.5 mm hook, ch 73.
- Row 1: Dc in 4th ch from hook and in each ch across. (70 dc)
- Row 2: Ch 3, turn, dc across. (70 dc)
- Row 3: Ch 3, turn, dc in next 5 sts, *ch 2, skip 2 sts, dc in next 2 sts*. Repeat across, ending with solid dc stitches along the opposite edge.
- Row 4: Ch 3, turn. Work dc into each dc and 2 dc into each ch-2 sp.
- Rows 5-8: Repeat Rows 3-4 twice.
Open Diamond Lace Center
- Row 9: Ch 5, turn, skip 2 sts, sc in next st, *ch 5, skip 3 sts, sc in next st*. Repeat across.
- Row 10: Ch 5, turn, sc into center of first ch-5 loop, *ch 5, sc into next ch-5 loop*. Repeat across.
- Rows 11-14: Repeat Row 10.
- Row 15: Ch 3, turn. Work 3 dc into each ch-5 loop across.
- Row 16: Ch 3, dc across.
Textured Diamond Section
- Row 17: Ch 3, turn, dc in next 4 sts, *ch 3, skip 3 sts, sc in next st, ch 3, skip 3 sts, dc in next 5 sts*. Repeat across.
- Row 18: Ch 3, turn, work dc over dc sections and ch-3 spaces while keeping the open diamonds centered.
- Rows 19-24: Continue shifting each open space by one stitch toward the center to create diagonal diamond lines.
- Rows 25-30: Reverse the placement of the spaces so the diamonds close again.
- Repeat Rows 17-30 until the runner measures approximately 115-120 cm.
Second End Section
- Repeat the lace sequence used at the beginning so both ends of the runner are symmetrical.
- Finish with 2 solid dc rows.
- Do not fasten off.
Ivory Side Border
- Ch 1 and begin working evenly around the entire runner.
- Round 1: Sc around all four sides, working 3 sc into each corner.
- Round 2: Ch 3, dc around, working 5 dc into each corner stitch.
- Round 3: *Sc in next 3 sts, ch 3, skip 2 sts*. Repeat around.
- Round 4: Work 5 dc into each ch-3 sp and sc between shells.
- FO ivory.
Rust Scalloped Edge
- Join burnt orange yarn into any border stitch.
- *Sl st in next stitch, skip 1 stitch, 5 dc in next stitch, skip 1 stitch.*
- Repeat around the complete runner.
- Adjust spacing slightly at the corners if necessary so each corner receives a complete scallop.
- FO and weave in ends.
Large Ribbed Pumpkin – Make 2
- With burnt orange yarn, ch 31.
- Row 1: Hdc in second ch from hook and across. (30 sts)
- Row 2: Ch 1, turn, BLO hdc across. (30 sts)
- Rows 3-42: Repeat Row 2.
- FO leaving a long tail.
- Bring first and last rows together and seam to form a tube.
- Thread yarn around one open end and pull tightly closed.
- Stuff firmly with fiberfill.
- Gather the second opening and pull closed.
- Pass yarn repeatedly through the center from top to bottom, pulling gently to flatten the pumpkin and emphasize the ribs.
Medium Pumpkin – Make 4
- Using mustard or burnt orange, ch 23.
- Row 1: Hdc in second ch from hook and across. (22 sts)
- Rows 2-32: Ch 1, turn, BLO hdc across.
- Seam short edges together.
- Gather bottom, stuff and gather top.
- Pull yarn through the center several times to create the rounded pumpkin shape.
Pumpkin Stems
- With dark brown, make a magic ring.
- Round 1: 6 sc into ring. (6 sts)
- Rounds 2-6: Sc around. (6 sts)
- FO leaving a long tail.
- Lightly stuff if necessary.
- Sew one stem into the center of each pumpkin.
Large Maple Leaves
- Using burnt orange, mustard or olive yarn, ch 13.
- Sl st in second ch, sc, hdc, dc, tr, dc, hdc, sc along the chain to begin the first leaf section.
- Ch 7 from the center stem.
- Work back along the new chain with sl st, sc, hdc, dc, tr, dc.
- Sl st into the central stem.
- Repeat branching on both sides until 5 pointed lobes have been formed.
- Work sc evenly around the leaf perimeter.
- Sl st back down the center chain to create a raised central vein.
- FO leaving a long sewing tail.
Small Autumn Leaves
- Ch 9.
- Starting in second ch: sc, hdc, dc, tr, dc, hdc, sc.
- Work 3 sc into final chain.
- Continue along opposite side: sc, hdc, dc, tr, dc, hdc, sc.
- Sl st to first stitch.
- Ch 4 and sl st back along chain to form a short stem.
- FO.
Textured Green Leaves
- With olive green, ch 11.
- Sc in second ch, hdc, dc in next 2, tr in next 2, dc in next 2, hdc, sc.
- Work 3 sc in final chain.
- Repeat stitches along opposite side.
- Sl st to join.
- Surface sl st along the center to form a pronounced vein.
- FO leaving a sewing tail.
Crochet Berries
- With burgundy yarn, make a magic ring.
- Round 1: 6 sc into ring. (6)
- Round 2: Inc around. (12)
- Rounds 3-4: Sc around. (12)
- Add a tiny amount of stuffing.
- Round 5: Dec around. (6)
- FO and close opening.
- Make approximately 18-24 berries.
Berry Branches
- With brown or olive yarn, ch 18.
- Sl st back through 5 chains.
- Ch 5 to create a side branch.
- Sl st back down the branch.
- Continue making 3-5 branches along the main chain.
- Sew one burgundy berry to the end of each branch.
- Make several berry clusters for both decorated ends.
Curling Vines
- With olive green yarn, ch 30.
- Work 3 sc into second ch from hook.
- Work 3 sc into every remaining chain.
- The chain will naturally curl into a spiral.
- FO leaving a sewing tail.
- Make 6-8 vines in different lengths.
Decorating the First End
- Place one large burnt-orange pumpkin approximately 10-12 cm from the rounded end of the runner.
- Place two smaller pumpkins diagonally beside it.
- Arrange 5-7 maple leaves behind the pumpkins using rust, mustard and olive shades.
- Add green leaves between the warmer colors for contrast.
- Place berry branches along both sides of the pumpkin cluster.
- Add 2-3 curling vines around the outside edges.
- Pin every piece before sewing anything permanently.
- Sew leaves first, berries and vines second, and pumpkins last so the pumpkins remain dimensional.
Decorating the Opposite End
- Repeat the same basic arrangement at the other end.
- Rotate several leaves in different directions so the two ends look coordinated rather than perfectly duplicated.
- Position one large pumpkin centrally with two smaller pumpkins around it.
- Add layered leaves, berries and vines until the composition visually balances the first end.
Blocking and Finishing
- Before attaching the dimensional decorations, lightly wet-block the main runner.
- Stretch it gently until the sides are straight and the scallops are evenly opened.
- Allow it to dry completely.
- Attach all appliqués after blocking.
- Steam the leaves very lightly if necessary, keeping the iron or steamer away from the dimensional pumpkins.
- Weave in every remaining end securely.
Tips for Success
- Use cotton yarn for crisp lace and clearly defined leaves.
- Keep the central lace section relatively flat so the runner remains practical for table decorations.
- Stuff the pumpkins firmly but avoid overfilling them or the crochet ribs will disappear.
- Use several autumn shades rather than a single orange to reproduce the layered seasonal look.
- Lay out the entire pumpkin-and-leaf arrangement before sewing the pieces down.
- Keep the largest decorations near the two ends so the middle remains usable for candles or a vase.
Common Mistakes to Avoid
- Do not make the border too tight; it can cause the long runner to curl inward.
- Avoid overstuffing the pumpkins because they should remain low enough to sit naturally on a table.
- Do not attach the appliqués before blocking the runner.
- Avoid placing too many raised decorations in the center where they could interfere with tableware.
- Keep the rust edging consistent around the entire runner for a polished finished appearance.
Ways to Customize This Pattern
- Use sage green, cream and beige pumpkins for a neutral farmhouse version.
- Replace burgundy berries with golden berries for a lighter autumn palette.
- Make all three pumpkins ivory for an elegant Thanksgiving table.
- Add tiny crochet acorns between the leaves.
- Shorten the center repeat to create a coffee-table runner.
- Make only one decorated end if the runner will hang over the edge of a console table.
Frequently Asked Questions
Yes. Continue repeating the central diamond-lace section until the runner reaches your preferred length, then work the second decorative end.
Yes. Instead of permanently sewing them to the runner, attach small clear snaps to the pumpkin bases and corresponding positions on the runner. This also makes the runner easier to wash and store.
A smooth DK-weight cotton yarn is ideal because it gives the lace good stitch definition while keeping the leaves and pumpkins structured.
If all decorations are permanently attached, gentle hand washing is safest. Press excess water out with a towel and reshape the runner flat while drying. Avoid twisting the stuffed pumpkins.
The basic runner uses familiar crochet stitches, but the lace repeats, dimensional pumpkins and layered appliqué arrangement make the complete project better suited to an intermediate crocheter or an ambitious beginner comfortable reading stitch instructions.
The finished Autumn Pumpkin Crochet Table Runner Pattern

