Crochet Christmas Poinsettia Wreath – Free Pattern with Evergreen Branches & Gold Accents
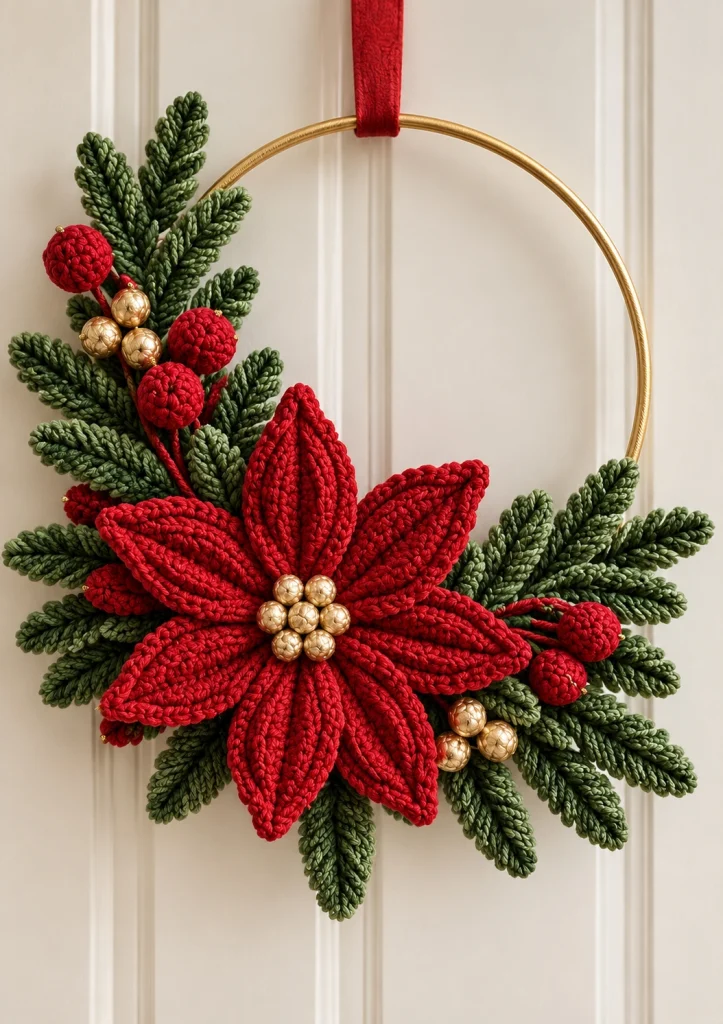
Add a touch of handmade elegance to your Christmas decorations with this beautiful crochet Christmas poinsettia wreath. Featuring a large, richly textured red poinsettia, deep-green evergreen branches, bright red berries, delicate golden accents, and a minimalist gold hoop, this festive wreath brings timeless holiday charm to any home.
Unlike traditional full-circle Christmas wreaths, this modern asymmetrical design leaves the upper portion of the golden hoop visible while the crocheted decorations create a lush floral arrangement across the lower half.
This free crochet pattern guides you through creating the poinsettia petals, evergreen foliage, berries, and decorative accents before assembling them into a sophisticated handmade Christmas wreath.
Pattern Information
- Skill Level: Intermediate to Advanced
- Finished Diameter: Approximately 30–35 cm
- Flower Diameter: Approximately 20–23 cm
- Yarn Weight: DK or worsted-weight cotton yarn
- Hook Sizes: 3 mm, 3.5 mm, and 4 mm
- Terminology: US crochet terms
- Construction: Individual crocheted elements attached to a metal hoop
- Use: Indoor Christmas door or wall decoration
Materials Needed
- Deep Christmas-red cotton yarn for the poinsettia petals
- Forest-green cotton yarn for evergreen branches
- Small amounts of red yarn for decorative berries
- 3 mm crochet hook for berries
- 3.5 mm crochet hook for poinsettia petals
- 4 mm crochet hook for evergreen branches
- 30–35 cm gold metal embroidery or wreath hoop
- 6–8 small gold beads for the poinsettia center
- 6–10 additional gold beads for decorative clusters
- Red velvet ribbon for hanging
- Polyester fiberfill
- Yarn needle
- Scissors
- Stitch markers
- Green floral wire, optional
- Strong sewing thread
- Optional felt backing
- Optional fabric stiffener
Safety: Keep small beads and wire away from children and pets. Secure all bead clusters firmly and cover any exposed wire ends.
Crochet Abbreviations
- MR: Magic ring
- ch: Chain
- sc: Single crochet
- hdc: Half double crochet
- dc: Double crochet
- tr: Treble crochet
- sl st: Slip stitch
- inc: Two single crochets in one stitch
- dec: Single crochet decrease
- FO: Fasten off
- st: Stitch
- sts: Stitches
Unless otherwise indicated, work flat pieces in turned rows and amigurumi pieces in continuous rounds.
Part 1: Crochet the Large Red Poinsettia
The poinsettia is the focal point of this Christmas wreath. To recreate its full, dimensional appearance, crochet eight pointed petals and arrange them in overlapping layers.
Use deep-red cotton yarn and a 3.5 mm crochet hook.
Step 1: Crochet the Large Petals
Make five large petals.
Row 1: Ch 3. Sc in the second chain from the hook and in the next chain. (2 sts)
Row 2: Ch 1, turn, inc in both stitches. (4 sts)
Row 3: Ch 1, turn, sc across. (4 sts)
Row 4: Ch 1, turn, inc, sc 2, inc. (6 sts)
Row 5: Ch 1, turn, sc across. (6 sts)
Row 6: Ch 1, turn, inc, sc 4, inc. (8 sts)
Row 7: Ch 1, turn, sc across. (8 sts)
Row 8: Ch 1, turn, inc, sc 6, inc. (10 sts)
Rows 9–12: Ch 1, turn, sc across. (10 sts)
Row 13: Ch 1, turn, dec, sc 6, dec. (8 sts)
Row 14: Ch 1, turn, sc across. (8 sts)
Row 15: Ch 1, turn, dec, sc 4, dec. (6 sts)
Row 16: Ch 1, turn, dec, sc 2, dec. (4 sts)
Row 17: Ch 1, turn, dec twice. (2 sts)
Row 18: Ch 1, turn, dec. (1 st)
FO, leaving a long sewing tail.
Step 2: Add the Raised Petal Edging
Attach red yarn at the base of each petal.
Work evenly around the outer edge using single crochet stitches.
At the pointed tip, work (sc, ch 1, sc) to emphasize the pointed shape.
Continue down the opposite side and fasten off.
For a more dimensional appearance, surface-crochet a raised central vein along each petal using slip stitches.
Step 3: Crochet the Smaller Petals
Make three smaller petals.
Row 1: Ch 3, sc in the second chain and next chain. (2 sts)
Row 2: Inc twice. (4 sts)
Row 3: Sc across. (4 sts)
Row 4: Inc, sc 2, inc. (6 sts)
Rows 5–7: Sc across. (6 sts)
Row 8: Dec, sc 2, dec. (4 sts)
Row 9: Dec twice. (2 sts)
Row 10: Dec. (1 st)
FO and add the same edging used for the larger petals.
Step 4: Assemble the Poinsettia
- Arrange the five large petals into a circular flower shape.
- Overlap the bases slightly.
- Sew the petal bases together securely.
- Position the three smaller petals over the first layer.
- Stagger them between the larger petals.
- Sew the smaller petals into place.
- Gently shape the petals upward to create depth.
The finished poinsettia should look full and dimensional, with pointed red petals radiating outward.
Part 2: Create the Golden Poinsettia Center
The golden center adds a luxurious finishing touch.
Step 1: Crochet the Base
Using golden-yellow yarn and a 3 mm hook:
Round 1: 6 sc in MR. (6)
Round 2: Inc around. (12)
Sl st to join and FO.
Step 2: Add the Gold Beads
- Thread six to eight gold beads onto strong sewing thread.
- Arrange the beads in a compact flower-like cluster.
- Sew each bead securely onto the crocheted base.
- Position the finished cluster in the center of the red poinsettia.
- Attach it firmly with several stitches.
For a fully crocheted alternative, replace the beads with small golden bobble stitches.
Part 3: Crochet the Evergreen Branches
The evergreen branches create the lush botanical background surrounding the poinsettia.
Use forest-green cotton yarn and a 4 mm hook.
Step 1: Make the Central Stem
Ch 31.
Starting in the second chain from the hook, work 30 sl sts across.
This forms the central stem of the branch.
Step 2: Add the Evergreen Sprigs
Attach green yarn near the base of the stem.
Repeat the following:
- Sl st into the stem.
- Ch 8.
- Starting in the second chain, sl st back toward the stem.
- Sl st into the next available stem stitch.
- Ch 10.
- Sl st back toward the stem.
- Continue alternating branch lengths.
Work the sprigs along both sides of the stem, gradually shortening them toward the tip.
This creates a tapered evergreen shape.
Step 3: Make Additional Branches
Create approximately 12–16 evergreen branches in different sizes.
- 4 long branches, approximately 18–22 cm
- 5 medium branches, approximately 12–16 cm
- 3–7 shorter branches, approximately 8–12 cm
Use slightly different shades of green if desired to create natural depth.
Step 4: Shape the Foliage
Gently spread the crocheted sprigs.
For firmer branches, carefully stitch the foliage around floral wire, making sure all wire ends are covered.
Alternatively, use fabric stiffener to help the branches maintain their shape.
Part 4: Crochet the Red Christmas Berries
Make approximately 8–12 red berries.
Use red yarn and a 3 mm crochet hook.
Round 1: 6 sc in MR. (6)
Round 2: Inc around. (12)
Rounds 3–4: Sc around. (12)
Round 5: Dec around. (6)
Lightly stuff each berry.
Close the opening and leave a long sewing tail.
Arrange the Berry Clusters
- Group the berries into clusters of two or three.
- Attach each cluster to a short crocheted green stem.
- Secure the berries tightly.
- Leave a sewing tail for attaching them to the wreath.
Position the berry clusters among the evergreen branches for a balanced festive appearance.
Part 5: Make the Decorative Gold Berry Clusters
The small golden berry clusters complement the poinsettia center and metallic hoop.
Use approximately 6–10 gold beads.
- Thread two or three beads onto strong thread.
- Arrange them into compact clusters.
- Secure the beads together.
- Attach the clusters to small green crocheted stems.
- Leave enough thread for sewing them into the foliage.
For an all-yarn alternative, crochet miniature golden berries using the same technique as the red berries, with thinner yarn and a smaller hook.
Part 6: Prepare the Golden Wreath Hoop
Use a 30–35 cm gold metal hoop as the foundation.
The visible gold hoop is an important design element, so avoid covering the entire ring with crochet.
Step 1: Plan the Arrangement
Place the hoop on a flat surface.
Position the poinsettia slightly below the center, toward the lower-left section.
Arrange the evergreen branches so they extend outward toward the left and lower-right sides.
Leave the upper-right arc of the hoop mostly uncovered.
Step 2: Attach the Evergreen Base
- Begin attaching the longest branches along the lower-left section of the hoop.
- Overlap additional branches to create fullness.
- Extend several branches toward the right.
- Use shorter branches to fill gaps.
- Secure each branch with strong green thread.
Make sure the arrangement feels balanced without becoming completely symmetrical.
Part 7: Attach the Large Poinsettia
Position the finished red poinsettia over the evergreen foliage.
Place it slightly left of the lower center of the hoop, matching the asymmetrical composition.
- Arrange the flower over the foliage.
- Check the position of each petal.
- Secure the flower base to the hoop and branches.
- Use several strong stitches to prevent movement.
- Adjust the petals so they spread naturally.
The poinsettia should be the largest and most prominent decorative element.
Part 8: Add the Berry Clusters
Arrange the red and gold berries among the evergreen branches.
Suggested Placement
- One red berry cluster near the upper-left foliage
- One red berry cluster toward the lower-right side
- One small gold cluster near the upper-left foliage
- One gold cluster near the right side of the poinsettia
Attach each cluster securely using matching yarn or strong thread.
Avoid overcrowding the flower. The berry accents should complement the poinsettia rather than compete with it.
Part 9: Add the Red Velvet Hanging Ribbon
Cut approximately 30–40 cm of red velvet ribbon.
- Fold the ribbon in half.
- Loop it around the upper section of the gold hoop.
- Adjust the ribbon to the desired hanging length.
- Secure the ends together.
- Check that the wreath hangs evenly.
The rich red ribbon ties the entire Christmas color palette together.
Part 10: Final Assembly and Finishing
- Check that the poinsettia is firmly attached.
- Adjust the evergreen branches.
- Spread the foliage naturally.
- Secure all red berry clusters.
- Check the gold bead attachments.
- Weave in loose yarn ends.
- Cover any visible wire ends.
- Gently shape the poinsettia petals.
- Check that the upper gold hoop remains visible.
- Hang the wreath and adjust its balance.
Your elegant handmade crochet Christmas poinsettia wreath is complete!
Beautiful Color Variations
Classic Christmas Red and Gold
Use deep-red poinsettia petals, forest-green branches, gold beads, and a red velvet ribbon for a traditional festive look.
White Christmas Elegance
Replace the red poinsettia with ivory-white petals and use champagne-gold accents for a refined winter decoration.
Burgundy Luxury
Choose rich burgundy petals, dark olive foliage, and antique-gold beads for a sophisticated Christmas wreath.
Blush and Champagne
Use soft blush-pink petals, sage-green branches, and champagne-gold accents for a delicate holiday theme.
Rustic Farmhouse Christmas
Combine muted brick-red petals, natural green foliage, wooden beads, and a linen hanging ribbon.
Helpful Crochet Tips
- Use firm cotton yarn to maintain the shape of the poinsettia petals.
- Choose a slightly smaller hook for tighter stitches.
- Block the petals gently before assembling the flower.
- Make the evergreen branches in different lengths for a natural appearance.
- Keep the upper-right portion of the hoop uncovered.
- Secure the flower with multiple stitches.
- Use matching thread to hide attachment points.
- Arrange all decorative elements before permanently sewing them.
- Keep the gold accents small and elegant.
- Use lightweight materials to prevent the hoop from bending.
Frequently Asked Questions
Is this crochet poinsettia wreath beginner-friendly?
This pattern is best suited for intermediate crocheters who are comfortable working in rows, making shaped petals, and assembling separate crochet elements.
How long does it take to complete?
Depending on your experience, the wreath may take approximately 8–14 hours to complete.
Can I make the wreath without a metal hoop?
Yes. You can use a wooden embroidery hoop or another sturdy circular frame, although a gold metal hoop provides the closest appearance to the pictured design.
Can I make a larger wreath?
Yes. Choose a larger hoop and increase the number of evergreen branches. You can also make larger poinsettia petals using thicker yarn and a larger hook.
Can I replace the gold beads?
Absolutely. You can use crocheted bobbles, wooden beads, or small embroidered knots instead.
Can this wreath be displayed outdoors?
It is best suited for indoor use or a fully sheltered doorway. Rain, direct sunlight, and moisture may damage the yarn and decorative elements.
Care Instructions
- Dust gently using a soft brush.
- Spot-clean with a slightly damp cloth.
- Avoid soaking the metal hoop or decorative beads.
- Allow the wreath to dry completely if damp.
- Keep away from direct heat and open flames.
- Store flat in a dry box after Christmas.
- Protect the poinsettia petals from crushing.
- Check the ribbon and attachments before rehanging each season.
Final Thoughts
This crochet Christmas poinsettia wreath is a wonderful way to bring handmade beauty into your holiday home. With its striking red flower, lush evergreen foliage, festive berries, delicate golden details, and elegant metallic hoop, it creates a timeless Christmas decoration that feels both traditional and modern.
Perfect for an entryway, interior door, living room wall, or handmade Christmas gift, this beautiful wreath celebrates the warmth and creativity of crochet.
Love this Christmas crochet project? Save this free crochet poinsettia wreath pattern to Pinterest and share it with your crochet friends for more handmade holiday inspiration!