Blue Daisy Crochet Tote Bag – Free Vintage Floral Handbag Pattern
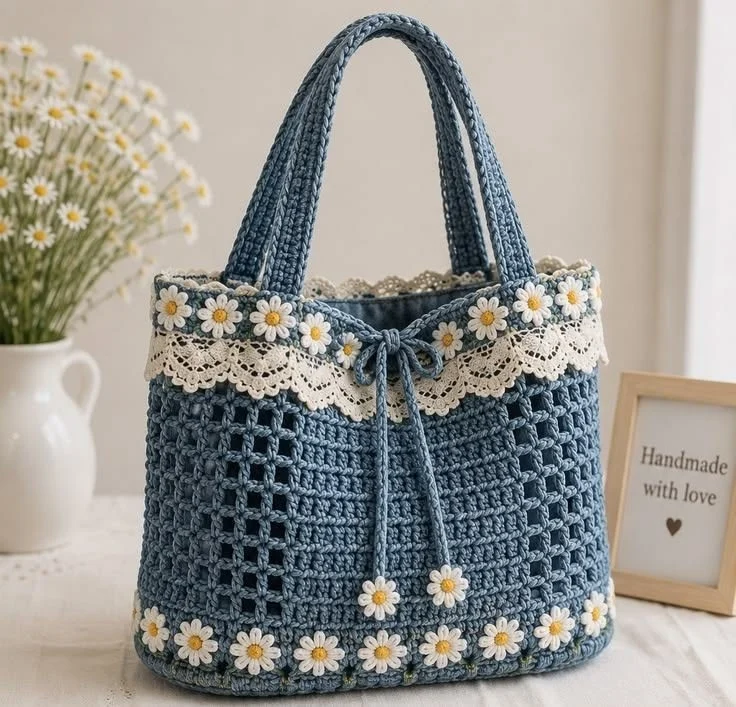
Create a charming handmade accessory with this beautiful blue daisy crochet tote bag. Featuring a soft dusty-blue body, delicate white daisies with golden-yellow centers, romantic ivory lace trim, and decorative floral drawstrings, this crochet handbag combines vintage elegance with everyday practicality.
The bag features sturdy crocheted shoulder handles, a textured central panel, openwork side sections, and rows of tiny daisies along the upper and lower edges. A small blue bow and dangling flower charms complete the feminine cottagecore-inspired design.
This free crochet pattern explains how to make the bag body, reinforced handles, floral appliqués, decorative drawstrings, and finishing details.
Pattern Information
- Skill Level: Intermediate
- Finished Width: Approximately 34 cm
- Finished Height: Approximately 28 cm
- Base Depth: Approximately 10 cm
- Handle Drop: Approximately 22 cm
- Yarn Weight: Worsted cotton yarn (Category 4)
- Hook Size: 4 mm
- Terminology: US crochet terms
- Construction: Oval-base tote worked upward in joined rounds
Measurements may vary depending on your yarn, hook size, and crochet tension.
Materials Needed
- Approximately 550–700 meters of dusty-blue cotton yarn
- 100–150 meters of ivory or white cotton yarn
- Small amount of golden-yellow yarn
- 4 mm crochet hook
- 2.5 mm crochet hook for small flowers
- Yarn needle
- Scissors
- Stitch markers
- Measuring tape
- Optional ivory cotton lace trim
- Optional cotton fabric lining
- Matching sewing thread
- Optional magnetic snap closure
- Optional thin cotton cord for reinforcing handles
Suggested Color Palette
- Dusty Blue: Main bag body and handles
- Ivory White: Daisy petals and lace trim
- Golden Yellow: Daisy centers
- Soft Cream: Optional lining and decorative accents
Crochet Abbreviations
- MR: Magic ring
- ch: Chain
- sc: Single crochet
- hdc: Half double crochet
- dc: Double crochet
- sl st: Slip stitch
- st: Stitch
- sp: Space
- inc: Increase
- BLO: Back loop only
- FO: Fasten off
Part 1: Crochet the Oval Bag Base
Using dusty-blue cotton yarn and a 4 mm hook, begin with a sturdy oval foundation.
Round 1
Ch 41. Work 2 sc in the second chain from the hook, sc in the next 38 chains, and 3 sc in the last chain. Continue along the opposite side of the foundation chain, working sc in the next 38 chains and 1 sc in the first chain. Join with a sl st. (82 sc)
Round 2
Ch 1, work 2 sc in each of the first 2 stitches, sc in the next 38 stitches, 2 sc in each of the next 3 stitches, sc in the next 38 stitches, and 2 sc in the last stitch. Join. (88 sc)
Round 3
Ch 1, sc in the first stitch, inc in the next stitch, sc in the next stitch, inc in the next stitch. Sc across the long side, spacing increases evenly around both curved ends. Join.
Rounds 4–8
Continue increasing at both curved ends to maintain a flat oval shape. Add approximately six stitches per round, distributing the increases symmetrically.
Continue until the base measures approximately 34 × 10 cm.
The exact stitch count will depend on your tension and the number of increases required to keep the base flat. Record your final stitch count before beginning the sides.
Part 2: Build the Lower Bag Body
Once the oval base is complete, begin working upward without increasing.
Round 1
Ch 1, sc in BLO around the entire base. Join with a sl st.
This creates a defined fold between the bottom and sides.
Rounds 2–5
Ch 1, sc in each stitch around. Join.
Rounds 6–8
Ch 2, hdc in each stitch around. Join.
These rounds create a firm lower band that helps the bag hold its shape.
Part 3: Crochet the Textured Main Body
The main section of the bag combines solid crochet stitches with decorative openwork panels.
Round 1
Ch 3, dc in each stitch around. Join.
Round 2
Ch 1, sc in each stitch around. Join.
Round 3: Openwork Texture
Ch 3, skip 1 stitch, dc in the next stitch, ch 1.
Repeat the sequence around, adjusting the final repeat if necessary to match your stitch count.
Round 4
Ch 1, work sc into each dc and each ch-1 space around.
Rounds 5–18
Alternate solid dc rounds, sc rounds, and openwork rounds to build the textured fabric.
For a look similar to the reference, keep the center front section more densely crocheted and use openwork sections toward the sides.
Continue until the bag body measures approximately 23 cm from the base.
Part 4: Create the Upper Decorative Band
The upper section features a structured edge with delicate floral decorations.
Round 1
Ch 1, sc around.
Round 2
Ch 2, hdc around.
Round 3
Ch 1, sc around.
Round 4
Work alternating front-loop and back-loop sc stitches to create a subtle textured edge.
Round 5
Sc around and join.
FO and weave in the ends.
Part 5: Crochet the Shoulder Handles
Make two sturdy shoulder handles using dusty-blue yarn.
Foundation
Ch 8.
Row 1
Sc in the second chain from the hook and across. (7 sc)
Rows 2–85
Ch 1, turn, sc in each stitch across.
Continue until the handle measures approximately 55–60 cm long.
For stronger handles, fold the strip lengthwise and sew the long edges together, optionally enclosing a cotton cord.
Make a second identical handle.
Attaching the Handles
- Lay the bag flat.
- Mark two attachment points on the front, approximately 15–18 cm apart.
- Position the first handle evenly.
- Sew both ends securely to the inside of the upper band.
- Repeat for the back handle.
- Reinforce each attachment with several rows of strong stitching.
Check that both handles are the same length and sit symmetrically.
Part 6: Crochet the Mini Daisy Flowers
The small white daisies are the signature decorative feature of this handbag.
Use a 2.5 mm hook for delicate, neatly defined petals.
Flower Center
Using golden-yellow yarn:
- Make a magic ring.
- Work 8 sc into the ring.
- Pull the ring closed.
- Sl st to join.
- FO the yellow yarn.
White Petals
Join ivory yarn into any center stitch.
In the same stitch, work (ch 3, 2 dc, ch 3, sl st).
Repeat in each of the remaining seven stitches to create eight small petals.
FO and weave in the ends.
Flower Quantity
Make approximately 24–30 daisies, depending on your preferred spacing.
Suggested placement:
- 12–14 daisies along the lower front edge
- 10–12 daisies along the upper edge
- 2 daisies for the hanging drawstring ends
- Additional daisies for the back or sides if desired
Part 7: Attach the Daisy Border
Arrange the flowers before sewing them permanently.
- Lay the bag flat.
- Position the lower row of daisies just above the base band.
- Space the flowers evenly.
- Secure each flower with matching yarn.
- Repeat along the upper edge.
- Check that the petals lie flat against the bag.
For a delicate look, allow the flower petals to overlap slightly without overcrowding the design.
Part 8: Add the Ivory Lace Trim
The ivory lace trim gives the handbag its romantic vintage-inspired appearance.
Option 1: Ready-Made Cotton Lace
- Measure the circumference of the bag opening.
- Cut ivory cotton lace to the required length, allowing a small overlap.
- Position the lace below the upper floral border.
- Pin it evenly around the bag.
- Sew it securely using matching thread.
Option 2: Simple Crochet Shell Lace
Using ivory yarn:
- Join yarn along the upper decorative band.
- Ch 1, sc in the first stitch.
- Skip 2 stitches.
- Work 5 dc into the next stitch.
- Skip 2 stitches, sc in the next stitch.
- Repeat around the edge, adjusting spacing as necessary.
- FO and weave in the ends.
The shell border creates a soft scalloped effect.
Part 9: Crochet the Decorative Drawstrings
The front of the bag features two slim blue cords tied into a small bow.
Make the Cords
- Using dusty-blue yarn, ch approximately 90.
- Sl st into the second chain from the hook and across.
- FO, leaving a sewing tail.
- Make a second identical cord.
Attach both cords near the center of the upper band and tie them into a bow.
These cords are decorative; they do not function as a structural closure unless you add a separate drawstring channel.
Part 10: Make the Hanging Daisy Charms
Make two additional mini daisies using the instructions from Part 6.
- Attach one flower to the end of each drawstring.
- Secure the flower centers with several stitches.
- Allow the cords to hang naturally down the front of the bag.
- Adjust the lengths so both flowers hang evenly.
The dangling daisies add a playful finishing detail.
Part 11: Add a Fabric Lining
A cotton lining helps prevent small items from slipping through the decorative openwork stitches.
Preparing the Lining
- Measure the inside width, height, and base depth of the finished bag.
- Cut matching cotton fabric panels with seam allowances.
- Sew the panels together to form a bag-shaped lining.
- Fold the upper raw edge inward.
- Insert the lining into the crochet bag.
- Pin it evenly below the top edge.
- Hand-sew it securely using matching thread.
Optional: Add a small interior pocket or magnetic snap closure before attaching the lining.
Part 12: Final Finishing
- Weave in all remaining yarn ends.
- Check the handle attachments.
- Adjust the lace trim.
- Straighten the daisy appliqués.
- Tie the front drawstrings into a neat bow.
- Arrange the dangling flower charms.
- Gently shape the bag with your hands.
- Allow the bag to rest flat before using.
Your beautiful blue daisy crochet tote bag is complete!
Creative Color Variations
Pink Cottagecore Daisy Bag
Use dusty rose yarn with white daisies and cream lace for a soft romantic look.
Sage Green Floral Tote
Combine muted sage green with ivory flowers and natural cotton trim for an elegant botanical style.
Classic Cream Daisy Bag
Make the entire bag in ivory and use pale-yellow flower centers for a timeless handmade accessory.
Lavender Spring Tote
Choose soft lavender yarn with white daisies and delicate lace for a feminine spring handbag.
Vintage Denim Blue
Use deeper denim-blue yarn with cream lace and white flowers for a classic vintage-inspired design.
Helpful Crochet Tips
- Use firm cotton yarn to help the bag maintain its shape.
- Keep the base stitches tight for durability.
- Reinforce the shoulder handles carefully.
- Use stitch markers to maintain even rounds.
- Make all mini daisies with the same hook size.
- Arrange the flowers before sewing them permanently.
- Use a fabric lining if the bag contains openwork stitches.
- Avoid making the handles too stretchy.
- Block the lace trim gently if needed.
- Choose washable yarn for easy maintenance.
Frequently Asked Questions
Is this crochet daisy tote bag beginner-friendly?
The basic bag body uses common crochet stitches, but the decorative openwork, lace trim, and floral details make this project more suitable for intermediate crocheters.
What yarn is best for a crochet handbag?
Cotton yarn is an excellent choice because it creates defined stitches and a relatively sturdy fabric. Cotton-blend yarn can also work well.
Can I make the bag larger?
Yes. Increase the starting chain length for a wider base, add more oval-base rounds for depth, and continue the body rounds until the desired height is reached.
Does the bag need a lining?
A lining is recommended because the decorative openwork sections may allow small objects to slip through.
Can I use the bag for everyday shopping?
Yes, for lightweight everyday items. For heavier loads, reinforce the handles, use dense stitches, and consider adding a strong fabric lining.
Can I replace the lace with a crocheted border?
Absolutely. A shell-stitch or picot crochet border can create a similar vintage effect without using ready-made lace.
Care Instructions
- Spot-clean whenever possible.
- Hand-wash gently in cool water if the yarn and lining permit.
- Use mild detergent.
- Avoid twisting or wringing the bag.
- Reshape while damp.
- Lay flat to dry.
- Avoid overloading the handles.
- Store in a dry place away from direct sunlight.
Final Thoughts
This blue daisy crochet tote bag is a lovely combination of handmade texture, delicate flowers, and vintage-inspired charm.
The dusty-blue crochet body, white daisies, ivory lace trim, sturdy shoulder handles, and sweet floral drawstrings create a practical yet elegant handbag that is perfect for spring outings, casual shopping, handmade gifts, or everyday accessories.
Whether you follow the original blue-and-white color palette or experiment with your favorite pastel shades, this free crochet handbag pattern offers a beautiful way to create something unique and personal.
Love this floral crochet bag? Save this free pattern to Pinterest and share it with your crochet friends for more beautiful handmade handbag inspiration!