Sage Green & Cream Crochet Granny Square Tote Bag – Free Pattern
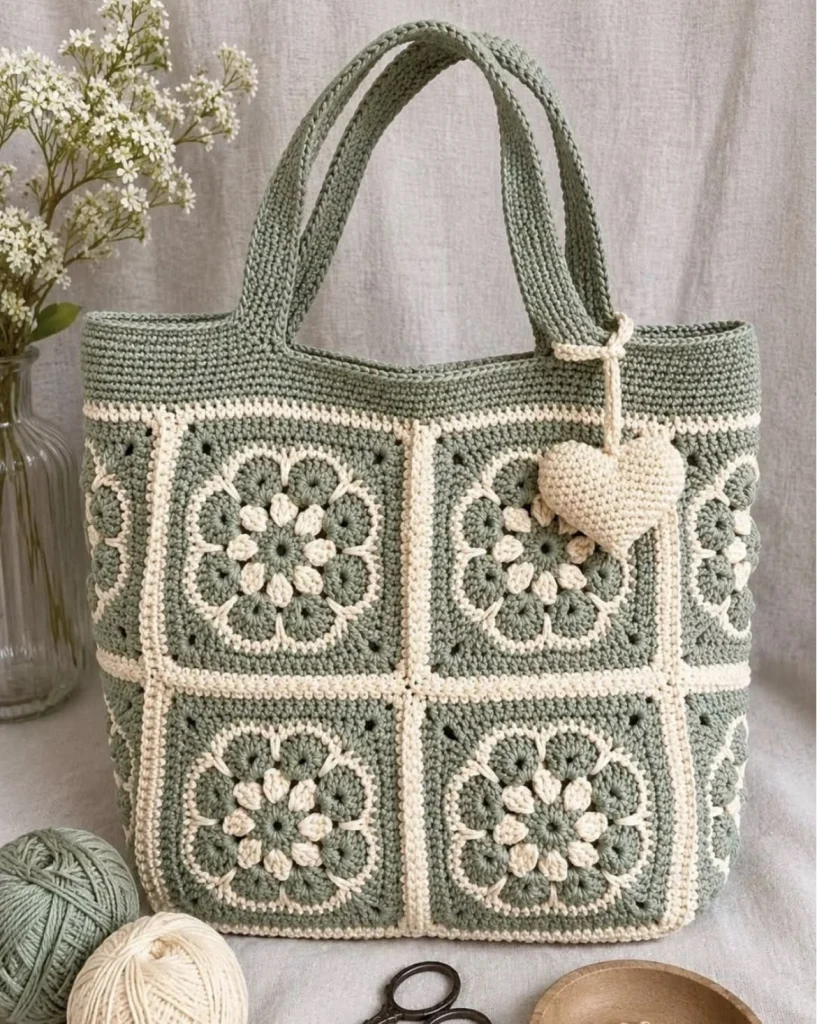
Create a beautiful handmade accessory with this sage green and cream crochet granny square tote bag. Featuring delicate floral motifs, raised cream details, neatly joined granny squares, sturdy crocheted handles, and a sweet hanging heart charm, this timeless tote combines vintage crochet beauty with everyday practicality.
The soft sage green and warm ivory color combination gives this bag a sophisticated, feminine appearance. Its structured rectangular shape makes it perfect for carrying books, yarn, shopping essentials, or everyday accessories.
This free crochet pattern explains how to create the floral granny squares, join them into a tote bag, crochet a firm base and upper border, add comfortable handles, and finish with a matching heart charm.
Pattern Information
- Skill Level: Intermediate
- Finished Width: Approximately 34–38 cm
- Finished Height: Approximately 32–36 cm, excluding handles
- Depth: Approximately 10–12 cm
- Handle Drop: Approximately 22–25 cm
- Yarn Weight: Worsted-weight cotton, category 4
- Hook Size: 4 mm
- Terminology: US crochet terms
- Construction: Floral granny square panels with a separate base and crocheted handles
Materials Needed
- Approximately 450–550 g sage green cotton yarn
- Approximately 200–250 g cream or ivory cotton yarn
- 4 mm crochet hook
- 3.5 mm crochet hook for the heart charm
- Yarn needle
- Scissors
- Stitch markers
- Measuring tape
- Optional cotton fabric lining
- Optional magnetic snap closure
- Optional lightweight bag-bottom insert
- Small amount of polyester fiberfill for the heart
Yarn Tip: Choose a firm, non-stretch cotton yarn to help the tote maintain its shape. A tightly worked cotton blend can also be used.
Crochet Abbreviations
- MR: Magic ring
- ch: Chain
- sc: Single crochet
- hdc: Half double crochet
- dc: Double crochet
- tr: Treble crochet
- sl st: Slip stitch
- inc: Two single crochets in one stitch
- dec: Single crochet decrease
- puff st: Puff stitch
- FO: Fasten off
- st: Stitch
- sts: Stitches
Part 1: Crochet the Floral Granny Squares
The decorative granny squares are the main feature of this tote bag. Each square combines a raised cream flower center with a sage green floral background and an ivory border.
For this construction, make 12 granny squares: six for the front panel and six for the back panel, arranged in two columns and three rows on each side.
The sample layout uses squares measuring approximately 11–12 cm after blocking. Adjust your hook or yarn tension to achieve consistent sizing.
Round 1: Create the Flower Center
Using sage green yarn:
Make a magic ring.
Ch 3 (counts as first dc), work 11 dc into the ring.
Sl st into the top of the beginning ch 3 to join. (12 dc)
Pull the magic ring closed.
Round 2: Form the Cream Flower Petals
Join cream yarn in any stitch.
Ch 2, yarn over and insert the hook into the same stitch, pull up a loop, yarn over and pull through two loops. Repeat twice more in the same stitch, then yarn over and pull through all remaining loops to form a puff-style cluster.
Ch 1.
Repeat a puff cluster and ch 1 in each stitch around.
Join with a sl st. (12 puff clusters)
The raised cream clusters form the textured flower center.
Round 3: Add the Sage Green Background
Join sage green yarn into any ch-1 space.
Ch 3, work 2 dc in the same space.
Ch 1.
Work 3 dc in each remaining ch-1 space, with ch 1 between groups.
Join with a sl st.
This creates a circular floral motif surrounded by green crochet clusters.
Round 4: Begin Squaring the Motif
Continue with sage green yarn.
Work into the spaces between the 3-dc groups.
In every third space, work (3 dc, ch 2, 3 dc) to form a corner.
In the other spaces, work 3 dc.
Ch 1 between groups along the sides.
Join with a sl st.
You should now have four defined corners.
Round 5: Build the Square
Work 3 dc into each ch-1 space along the sides.
At each corner, work (3 dc, ch 2, 3 dc).
Continue around and join.
The motif will become more square and structured.
Round 6: Add the Cream Border
Change to cream yarn.
Work 1 sc in each stitch along the sides.
At each corner, work (sc, ch 2, sc).
Join with a sl st and FO.
Weave in the ends carefully.
Make All 12 Squares
Repeat the same process until you have 12 matching granny squares.
Block each square to the same finished dimensions before assembly.
Part 2: Arrange the Granny Square Panels
Lay six squares flat for the front of the bag.
Arrange them in two columns and three rows.
Repeat for the back panel.
Keep all flower motifs facing the same direction.
Joining the Squares
Use cream yarn and a 4 mm hook.
- Place two granny squares with their wrong sides together.
- Insert the hook through the matching edge stitches of both squares.
- Join the yarn and work sc stitches across the seam.
- Continue joining the squares horizontally.
- Join the completed rows vertically.
- Repeat for the second panel.
This method creates the slightly raised cream seams that frame the floral motifs.
Make sure all joins are secure and the finished panels lie flat.
Part 3: Crochet the Bag Base
The bag needs a firm rectangular base to support its contents.
Use sage green yarn.
Step 1: Foundation Chain
Ch 13.
Row 1: Sc in the second chain from the hook and across. (12 sts)
Row 2: Ch 1, turn, sc across. (12 sts)
Repeat Row 2 until the base matches the width of your assembled front panel.
The base should measure approximately 10–12 cm deep.
Step 2: Reinforce the Base
Work one round of sc evenly around the rectangular base.
Place 3 sc in each corner to keep the edges smooth.
For extra stability, crochet a second identical base and sew the two layers together.
Part 4: Assemble the Tote Bag
Place the front and back granny square panels with their right sides facing outward.
Position the rectangular base between the lower edges.
Attach the Base
- Align one long edge of the base with the bottom of the front panel.
- Join using cream yarn and sc stitches.
- Repeat along the bottom of the back panel.
- Check that the base is centered.
- Secure all ends.
Close the Side Seams
Join the side edges of the front and back panels.
Work sc stitches from the bottom upward, matching the granny square borders carefully.
At the lower corners, shape the joins neatly so the bag forms a rectangular tote.
Repeat on the opposite side.
Turn the bag right side out if needed.
Part 5: Crochet the Upper Border
The solid sage green upper section gives the bag a polished, structured finish.
Join sage green yarn at one side seam.
Round 1
Work sc evenly around the entire opening of the bag.
Place stitches consistently along the granny square edges.
Join with a sl st.
Rounds 2–7
Ch 1, sc in each stitch around.
Join each round with a sl st.
Continue until the upper border measures approximately 5–6 cm high.
Round 8: Cream Accent Stripe
Change to cream yarn.
Work one round of sc.
Join and FO.
Rounds 9–12
Rejoin sage green yarn.
Work sc evenly around the bag opening.
Join each round.
FO and weave in the ends.
The cream accent stripe should sit neatly between the green upper border and the floral granny square panels.
Part 6: Crochet the Sturdy Tote Handles
The pictured tote features two long, thick sage green handles that curve gracefully above the bag.
Make two identical handles.
Step 1: Crochet the Handle Strips
Using sage green yarn:
Ch 8.
Row 1: Sc in the second chain from the hook and across. (7 sts)
Row 2: Ch 1, turn, sc across. (7 sts)
Repeat Row 2 until the strip measures approximately 55–60 cm long.
FO, leaving a long sewing tail.
Step 2: Reinforce the Handles
Fold each handle lengthwise.
Sew the long edges together using matching yarn.
This creates a thicker, rounded handle.
For added strength, place cotton webbing inside the folded handle before closing the seam.
Step 3: Attach the Handles
- Mark two attachment positions on the front upper border.
- Keep the attachment points evenly spaced.
- Position the handle ends approximately 7–9 cm from the side seams.
- Sew the ends firmly to the inside of the upper border.
- Reinforce each attachment using several rows of stitches.
- Repeat for the back handle.
Check that both handles are the same length and securely attached.
Part 7: Crochet the Cream Heart Charm
The small cream heart charm adds a delicate handmade detail to the tote.
Use cream yarn and a 3.5 mm hook.
Step 1: Make Two Heart Tops
Make two identical rounded pieces.
Round 1: 6 sc in MR. (6)
Round 2: Inc around. (12)
Round 3: Sc around. (12)
FO the first piece.
Do not fasten off the second piece.
Step 2: Join the Heart Tops
With the second piece still on the hook, insert the hook into a stitch on the first piece.
Work sc around both pieces to join them into one shape. (24 sts)
Step 3: Shape the Heart
Round 1: Sc around. (24)
Round 2: (Sc 4, dec) repeat 4 times. (20)
Round 3: Sc around. (20)
Round 4: (Sc 3, dec) repeat 4 times. (16)
Round 5: (Sc 2, dec) repeat 4 times. (12)
Lightly stuff the heart.
Round 6: (Sc 1, dec) repeat 4 times. (8)
Round 7: Dec around. (4)
Close the opening and weave in the yarn end.
Step 4: Make the Hanging Cord
Ch approximately 30 using cream yarn.
Sl st back along the chain for extra strength.
Attach one end securely to the heart.
Tie the other end around one of the bag handles.
Allow the heart to hang naturally against the front of the tote.
Part 8: Add an Optional Fabric Lining
A fabric lining makes the bag more practical for everyday use and prevents smaller items from slipping through the granny square openings.
How to Add the Lining
- Measure the inside of the finished tote.
- Cut cotton fabric panels to match the bag dimensions, allowing for seam allowances.
- Sew the fabric pieces into a rectangular lining.
- Fold and press the upper raw edge.
- Insert the lining into the bag.
- Hand-sew the lining to the inside of the upper border.
Choose a cream, beige, or sage green lining to complement the crochet design.
Part 9: Final Finishing
- Check all granny square seams.
- Reinforce any loose joins.
- Weave in remaining yarn ends.
- Shape the bag gently by hand.
- Check the base for stability.
- Make sure both handles are firmly attached.
- Attach the cream heart charm.
- Add the optional lining.
- Steam-block lightly if your yarn permits.
- Allow the tote to dry completely before using it.
Your beautiful sage green and cream crochet granny square tote bag is complete!
Beautiful Color Variations
Dusty Rose and Cream
Use dusty pink granny squares with cream floral details for a soft romantic tote.
Chocolate Brown and Ivory
Choose rich chocolate brown with ivory borders for a sophisticated vintage-inspired accessory.
Lavender and White
Combine pastel lavender with bright white flower details for a delicate spring bag.
Terracotta and Beige
Use warm terracotta and natural beige for a rustic, earthy look.
Classic Black and Cream
Create a timeless everyday tote using black granny squares and contrasting cream floral motifs.
Helpful Crochet Tips
- Use cotton yarn to reduce stretching.
- Keep your tension consistent across every granny square.
- Block all squares before joining them.
- Use stitch markers when positioning the handles.
- Reinforce the handle attachments carefully.
- Choose a sturdy base for carrying heavier items.
- Add a fabric lining for improved durability.
- Keep the cream joining seams neat and even.
- Make both handles exactly the same length.
- Use a smaller hook if your stitches are too loose.
Frequently Asked Questions
Is this crochet tote bag suitable for beginners?
This project is best suited for intermediate crocheters. Beginners familiar with granny squares, color changes, and basic bag construction can also try it.
How many granny squares do I need?
This version uses 12 floral granny squares, with six on the front and six on the back. You can adjust the number depending on your preferred dimensions.
Can I make the bag larger?
Yes. Add more granny squares or use a thicker yarn and larger hook. Remember to adjust the base and handle placement accordingly.
What yarn is best for crochet tote bags?
Cotton yarn is an excellent choice because it is durable, easy to wash, and generally maintains its shape better than highly elastic fibers.
Does the bag need a lining?
A lining is optional, but recommended for carrying small items or heavier everyday essentials.
Can I use acrylic yarn?
Yes, although acrylic may stretch more under weight. Reinforced handles and a lining are especially helpful when using softer yarns.
How long does this project take?
Depending on experience, completing the squares, joining the panels, crocheting the handles, and finishing the bag may take approximately 12–18 hours.
Care Instructions
- Hand-wash gently in cool water.
- Use a mild detergent.
- Avoid twisting or wringing the bag.
- Reshape while damp.
- Lay flat to dry.
- Avoid hanging the wet bag by its handles.
- Store in a clean, dry place.
- Check the handle attachments regularly.
Final Thoughts
This sage green and cream crochet granny square tote bag is a lovely combination of vintage floral crochet and practical modern design. Its raised flower motifs, soft color palette, neatly framed squares, comfortable handles, and charming heart accessory make it a wonderful handmade project.
Whether you use it as an everyday handbag, a crochet project bag, a market tote, or a thoughtful handmade gift, this beautiful design is sure to become a favorite.
Love this crochet bag? Save this free granny square tote bag pattern to Pinterest and share it with your crochet friends for more handmade inspiration!