Christmas Crochet Door Swag – Free Pattern with Santa Boots, Bell & Candy Canes
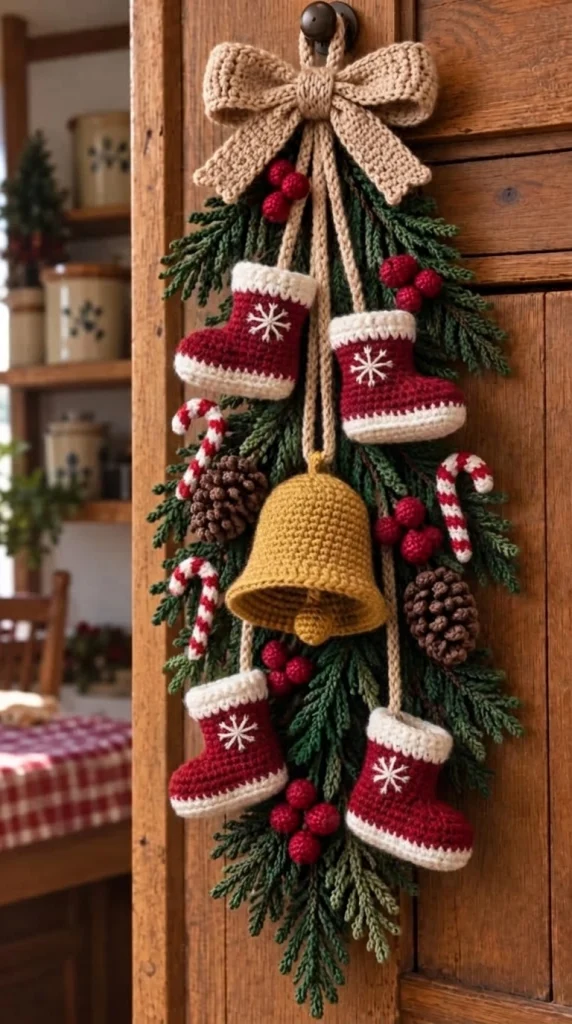
Bring handmade Christmas charm to your home with this beautiful crochet Christmas door swag. Featuring four miniature red Santa boots, a golden Christmas bell, red-and-white candy canes, textured pinecones, bright red berries, lush evergreen branches, and a large beige crochet bow, this festive hanging decoration creates a warm and welcoming holiday atmosphere.
Inspired by traditional farmhouse Christmas decorations, this vertical door swag combines classic holiday colors with cozy handmade textures. The miniature boots feature white cuffs and embroidered snowflakes, while the golden bell hangs beautifully at the center of the arrangement.
This free crochet pattern walks you through creating each decorative element and assembling everything into a charming Christmas door hanging.
Pattern Information
- Skill Level: Intermediate to Advanced
- Finished Length: Approximately 65–75 cm
- Finished Width: Approximately 25–30 cm
- Yarn Weight: DK or worsted-weight yarn
- Hook Sizes: 3 mm, 3.5 mm, and 4 mm
- Terminology: US crochet terms
- Construction: Separate crocheted ornaments assembled into a vertical hanging decoration
- Use: Indoor Christmas door, wall, or entryway decoration
Materials Needed
- Dark forest-green yarn for evergreen branches
- Deep Christmas-red yarn for Santa boots and berries
- Ivory-white yarn for boot cuffs and snowflake embroidery
- Golden-mustard yarn for the Christmas bell
- Beige or oatmeal yarn for the decorative bow and hanging cords
- Chocolate-brown yarn for pinecones
- Small amounts of red and white yarn for candy canes
- 3 mm crochet hook for small ornaments
- 3.5 mm crochet hook for the boots and bell
- 4 mm crochet hook for the bow and evergreen foliage
- Polyester fiberfill
- Yarn needle
- Scissors
- Stitch markers
- Strong cotton cord
- Optional floral wire or flexible craft wire
- Optional fabric stiffener
- Optional wooden or metal hanging ring
Safety note: This decoration is intended for indoor decorative use. Keep it away from open flames, and secure any wire ends inside the crocheted pieces.
Crochet Abbreviations
- MR: Magic ring
- ch: Chain
- sc: Single crochet
- hdc: Half double crochet
- dc: Double crochet
- tr: Treble crochet
- sl st: Slip stitch
- inc: Two single crochets in one stitch
- dec: Single crochet decrease
- BLO: Back loop only
- FO: Fasten off
Unless otherwise indicated, amigurumi pieces are worked in continuous rounds. Use a stitch marker to identify the beginning of each round.
Part 1: Crochet the Mini Santa Boots
Make four miniature Santa boots using deep-red and ivory-white yarn. Each boot should measure approximately 10–12 cm tall.
Step 1: Make the Boot Sole
Using white yarn and a 3.5 mm hook:
Round 1: Ch 9. Starting in the second chain from the hook, work 2 sc, sc in the next 6 chains, 3 sc in the final chain. Continue along the opposite side with 6 sc and 1 sc in the starting chain. (18 sts)
Round 2: Inc in each of the first 2 stitches, sc in the next 6 stitches, inc in each of the next 3 stitches, sc in the next 6 stitches, inc in the last stitch. (24 sts)
Round 3: Sc around in BLO. (24 sts)
Round 4: Sc around. (24 sts)
Change to red yarn.
Step 2: Form the Boot Foot
Rounds 5–6: Sc around. (24 sts)
Round 7: Sc in the first 6 stitches, dec 6 times across the toe, sc in the remaining 6 stitches. (18 sts)
Round 8: Sc in the first 6 stitches, dec 3 times, sc in the remaining 6 stitches. (15 sts)
Lightly stuff the foot, keeping the sole flat.
Step 3: Make the Boot Shaft
Rounds 9–15: Sc around. (15 sts)
Add a small amount of stuffing to maintain the boot shape.
Step 4: Crochet the White Cuff
Change to white yarn.
Round 16: Sc around in BLO. (15 sts)
Rounds 17–19: Hdc around. (15 sts)
FO and weave in the ends.
Fold the cuff outward slightly for a soft Christmas-stocking appearance.
Step 5: Embroider the Snowflake
Using white yarn and a yarn needle, embroider a small six-point snowflake on the outer side of each boot.
- Make one vertical stitch.
- Add a horizontal crossing stitch.
- Add two diagonal crossing stitches.
- Embroider small branches at the ends.
- Secure the yarn inside the boot.
Repeat for all four boots.
Part 2: Crochet the Golden Christmas Bell
The golden bell is the central focal point of this festive door hanging.
Using mustard-gold yarn and a 3.5 mm hook:
Bell Body
Round 1: 6 sc in MR. (6)
Round 2: Inc around. (12)
Round 3: (1 sc, inc) × 6. (18)
Round 4: (2 sc, inc) × 6. (24)
Rounds 5–8: Sc around. (24)
Round 9: (3 sc, inc) × 6. (30)
Rounds 10–13: Sc around. (30)
Round 14: (4 sc, inc) × 6. (36)
Rounds 15–16: Sc around. (36)
Round 17: (5 sc, inc) × 6. (42)
Round 18: Sc around. (42)
FO, leaving a long tail for finishing.
Gently shape the bell so the opening flares outward.
Bell Clapper
Using the same golden yarn:
Round 1: 6 sc in MR. (6)
Round 2: Inc around. (12)
Rounds 3–4: Sc around. (12)
Round 5: Dec around. (6)
Stuff lightly, close the opening, and leave a long yarn tail.
Attach the clapper to the inside top of the bell so it hangs slightly below the rim.
For a decorative shape that holds its form, use firm cotton yarn or lightly stiffen the bell after crocheting.
Part 3: Crochet the Red-and-White Candy Canes
Make three small candy canes approximately 10–12 cm long.
Use red and white yarn with a 3 mm hook.
Step 1: Make the Tube
Round 1: 6 sc in MR. (6)
Rounds 2–32: Sc around, alternating between red and white every two rounds to create stripes.
Lightly stuff the tube as you work.
Step 2: Shape the Candy Cane
- Insert a short piece of flexible craft wire into the stuffed tube if desired.
- Secure and cover both wire ends completely.
- Bend the upper section into a candy-cane hook.
- Adjust the curve gently.
- Secure the shape with a few hidden stitches if needed.
Repeat to make three candy canes.
Part 4: Crochet the Mini Pinecones
Make three textured pinecones using dark-brown yarn.
Inner Pinecone Base
Round 1: 6 sc in MR. (6)
Round 2: Inc around. (12)
Rounds 3–9: Sc around. (12)
Round 10: Dec around. (6)
Stuff lightly and close.
Adding Pinecone Scales
Attach brown yarn near the top of the pinecone.
Work small overlapping shell clusters around the base:
(Sl st, ch 2, 2 dc, ch 2, sl st) into selected stitches, spacing the clusters closely.
Continue in staggered rows until the base is covered with raised scales.
Use slightly darker yarn for some scales to create natural depth.
Part 5: Crochet the Red Christmas Berries
Make approximately 18–24 small berries.
Using red yarn and a 3 mm hook:
Round 1: 6 sc in MR. (6)
Round 2: Inc around. (12)
Rounds 3–4: Sc around. (12)
Round 5: Dec around. (6)
Lightly stuff each berry, close the opening, and leave a sewing tail.
Group the berries into clusters of three using green yarn.
Arrange the clusters throughout the evergreen branches for a festive pop of color.
Part 6: Crochet the Evergreen Branches
The evergreen foliage forms the background of the entire Christmas door swag.
Use forest-green yarn and a 4 mm hook.
Step 1: Make the Main Stem
Ch 45.
Starting in the second chain from the hook, sl st across to create a firm central stem.
Step 2: Add Pine Needles
Attach green yarn along the stem.
Repeat the following sequence:
- Sl st into the stem.
- Ch 10.
- Sl st back down the chain.
- Sl st into the next stem stitch.
- Ch 8.
- Sl st back down the chain.
- Continue alternating branch lengths.
Repeat along both sides of the stem to create a feathery evergreen appearance.
Step 3: Make Additional Branches
Create approximately 10–14 evergreen branches in different lengths.
Suggested sizes:
- 4 long branches measuring approximately 25–30 cm
- 4 medium branches measuring approximately 18–22 cm
- 4–6 shorter branches measuring approximately 12–15 cm
Layer the branches so the longest pieces sit at the back and the shorter pieces create fullness near the center.
For a more structured decoration, carefully attach the crocheted branches to a flexible internal support.
Part 7: Crochet the Large Beige Christmas Bow
The oversized beige bow adds a beautiful farmhouse-inspired finishing touch.
Using beige yarn and a 4 mm hook:
Bow Loops
Ch 16.
Row 1: Sc in the second chain from the hook and across. (15)
Rows 2–30: Ch 1, turn, sc across.
FO, leaving a long sewing tail.
Fold both ends toward the center to form two bow loops.
Sew the ends together at the back.
Bow Center
Ch 7.
Sc across for approximately 8 rows.
Wrap this small strip tightly around the center of the bow and sew it securely at the back.
Bow Tails
Make two long strips.
Ch 11.
Sc in the second chain from the hook and across. (10)
Continue for approximately 35–40 rows.
For pointed ends, decrease one stitch at each edge over the final few rows.
Attach both tails behind the bow center.
Part 8: Crochet the Hanging Cords
Using beige cotton yarn, make five hanging cords.
Suggested lengths:
- Two cords approximately 20 cm long for the upper boots
- One cord approximately 35 cm long for the central bell
- Two cords approximately 45 cm long for the lower boots
Make each cord using a chain followed by slip stitches, or use a crocheted Romanian cord for extra strength.
Attach the cords securely to the boots and bell.
Part 9: Assemble the Christmas Door Swag
Before attaching the ornaments, arrange all the pieces on a flat surface to plan the final composition.
Step 1: Create the Green Background
- Lay the longest evergreen branches vertically.
- Overlap medium branches across the center.
- Position shorter branches near the top and sides.
- Secure the stems together with strong green yarn.
- Create a tapered shape that becomes narrower toward the bottom.
Step 2: Attach the Bow
Position the large beige bow at the top of the arrangement.
Secure it with several strong stitches and arrange the tails so they fall naturally over the foliage.
Step 3: Hang the Santa Boots
Attach two red boots near the upper section and two near the lower section.
Allow the boots to hang at slightly different heights for a balanced, natural appearance.
Step 4: Position the Golden Bell
Hang the golden bell in the center of the swag.
Make sure it sits visibly in front of the evergreen branches.
Step 5: Add the Candy Canes
Position the three candy canes among the foliage, with their curved tops facing outward.
Step 6: Attach the Pinecones
Sew the three brown pinecones into the evergreen arrangement.
Distribute them at different heights to create depth.
Step 7: Add the Berry Clusters
Attach red berry clusters near the boots, bell, and pinecones.
Space them evenly to bring color throughout the decoration.
Step 8: Add the Hanging Loop
Create a strong hanging loop using beige cotton cord.
Secure the loop to the main support behind the bow.
Test the hanging decoration before displaying it.
Part 10: Final Finishing
- Weave in all loose yarn ends.
- Check that the boots and bell are firmly attached.
- Adjust the bow loops and tails.
- Spread the evergreen branches evenly.
- Position the candy canes and pinecones.
- Arrange the berry clusters.
- Make sure the decoration hangs straight.
- Secure any loose pieces with additional stitches.
Your beautiful handmade Christmas crochet door swag is ready to display!
Creative Christmas Color Variations
Traditional Red and Green
Use bright-red boots, deep-green foliage, a golden bell, and an ivory bow for a classic Christmas look.
Elegant Burgundy and Champagne
Choose burgundy boots, champagne-gold bells, cream bows, and dark evergreen branches for a sophisticated holiday decoration.
Winter Wonderland
Make white boots, icy-blue bells, silver-gray pinecones, and frosted-green foliage for a snowy winter theme.
Rustic Farmhouse Christmas
Use oatmeal beige, muted red, olive green, and natural brown for a warm vintage-inspired decoration.
Pastel Christmas
Try blush-pink boots, ivory foliage, pale-gold bells, and soft sage accents for a delicate holiday look.
Helpful Crochet Tips
- Use cotton yarn for clearly defined stitches.
- Stuff the boots lightly to maintain their shape.
- Keep the evergreen branches flexible but structured.
- Reinforce the hanging cords carefully.
- Use the same yarn weight for matching ornaments.
- Position all pieces before sewing them permanently.
- Make the bow slightly oversized for a dramatic finish.
- Use small berry clusters to fill empty spaces.
- Choose complementary colors for a coordinated design.
- Keep the finished decoration away from rain and excessive moisture.
Frequently Asked Questions
Is this Christmas crochet door swag beginner-friendly?
This project is best suited for intermediate crocheters because it combines amigurumi ornaments, decorative crochet elements, and detailed assembly.
How long does it take to make?
Depending on your experience, the complete decoration may take approximately 12–20 hours, including all ornaments and assembly.
Can I make the decoration smaller?
Yes. Use thinner yarn, a smaller crochet hook, and fewer evergreen branches. You can also reduce the number of boots and candy canes.
Can I hang this decoration outdoors?
It is best displayed indoors or in a completely sheltered entryway. Rain, strong sunlight, and moisture can damage the yarn and stuffing.
Can I replace the bell with another ornament?
Absolutely. A crocheted Christmas star, snowflake, gingerbread figure, or small gift box can replace the golden bell.
Do I need craft wire?
Craft wire is optional. It can help the candy canes and evergreen branches maintain their shape, but reinforced crochet and careful stitching can also work.
Care Instructions
- Dust gently with a soft brush.
- Spot-clean using a damp cloth.
- Avoid soaking the entire decoration.
- Allow to air-dry completely if damp.
- Keep away from open flames and heat sources.
- Store flat or loosely wrapped after Christmas.
- Avoid crushing the stuffed ornaments.
- Keep in a dry storage box between holiday seasons.
Final Thoughts
This Christmas crochet door swag is a beautiful way to celebrate the holiday season with handmade charm. From the adorable red Santa boots and golden bell to the candy canes, pinecones, berries, evergreen branches, and oversized beige bow, every detail adds warmth and festive personality.
Perfect for decorating a front door, interior doorway, entryway wall, or cozy Christmas corner, this handmade decoration can become a treasured part of your seasonal traditions.
Love this festive crochet project? Save this free Christmas crochet pattern to Pinterest and share it with your crochet friends for more beautiful handmade holiday inspiration!