Christmas Crochet Leaf Doily Pattern
Beginner Friendly
Perfect for those just starting their crochet journey, with clear instructions and simple techniques
Single-Day Project
A satisfying project you can complete in a single afternoon or evening.
Handmade Gift
A beautiful keepsake — free forever. Read online or print at home.
About This Christmas Crochet Leaf Doily Pattern
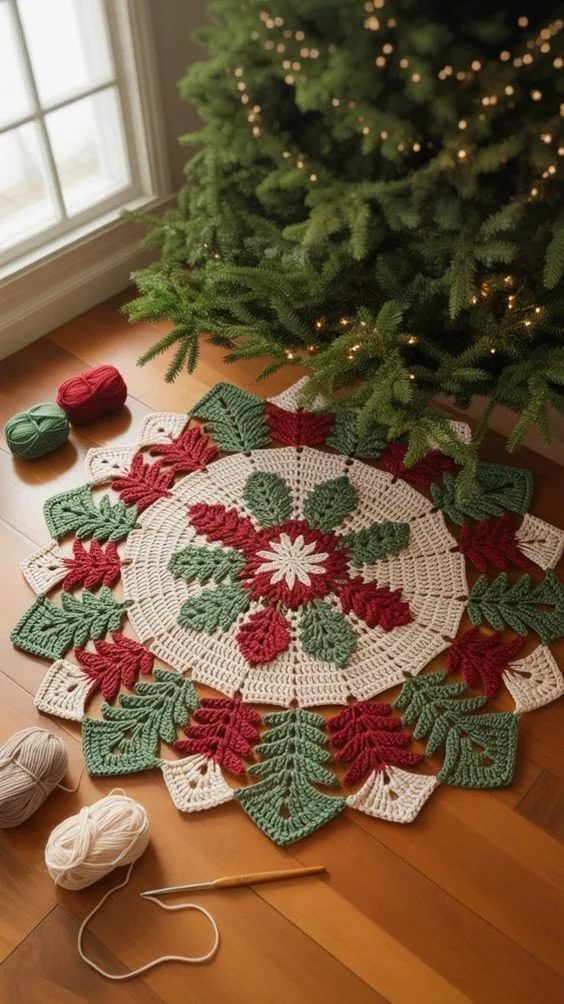
This Christmas crochet leaf doily pattern creates a beautiful botanical centerpiece with a large cream crochet circle surrounded by dimensional red, sage-green and cream leaves. The alternating leaf motifs give the piece a festive poinsettia-inspired appearance without making it look overly formal.
Use it beneath a Christmas centerpiece, on a coffee table, under a small tree, or simply as a decorative holiday mat. The dimensional leaves are worked separately and joined around the central circle, making the design easy to customize.
Materials
- DK cotton yarn – warm cream 250–300 g
- DK cotton yarn – sage or Christmas green 150–200 g
- DK cotton yarn – deep Christmas red 120–170 g
- 3.0–3.5 mm crochet hook 1
- Yarn needle 1
- Scissors 1 pair
- Stitch markers 6–8
- Blocking pins optional
Abbreviations – US Terms
MRmagic ringchchainsl stslip stitchscsingle crochethdchalf double crochetdcdouble crochettrtreble crochetFPscfront post single crochetst(s)stitch(es)spspaceFOfasten offFinished Size
Approximately 60–70 cm / 24–28 in across, depending on yarn, hook size and the number of outer leaves.
The central cream circle measures approximately 38–42 cm / 15–16.5 in before the leaf border is attached.
Construction Overview
The design is created in three sections:
- Crochet the large round cream center.
- Make individual dimensional leaf motifs in red, green and cream.
- Arrange and attach the leaves around the outside edge.
The leaves overlap slightly, creating the rich layered appearance shown in the inspiration.
Part 1 – Cream Center
Round 1
Make a MR.
Ch 3, work 11 dc into the ring.
Join with sl st to the top of beginning ch-3.
12 dc.
Round 2
Ch 3, 1 dc in same st.
Work 2 dc in each st around.
Join.
24 dc.
Round 3
Ch 3, 2 dc in next st.
Repeat [1 dc, 2 dc in next st] around.
Join.
36 dc.
Round 4
Repeat [dc in next 2 sts, 2 dc in next st] around.
48 dc.
Part 2 – Continue the Circular Center
Round 5
Repeat [dc in next 3 sts, 2 dc in next st] around.
Round 6
Repeat [dc in next 4 sts, 2 dc in next st] around.
Round 7
Repeat [dc in next 5 sts, 2 dc in next st] around.
Continue following the same increase principle, adding one additional stitch between increases on every round.
Keep checking that the circle lies completely flat.
Part 3 – Decorative Openwork Rounds
Once the center measures approximately 25–28 cm / 10–11 in, introduce subtle openwork.
Openwork Round 1
Ch 4.
Repeat:
[skip 1 st, dc in next st, ch 1]
around.
Join with sl st.
Next Round
Work 1 dc into each dc and 1 dc into each ch-1 sp, increasing evenly as needed to keep the piece flat.
Part 4 – Outer Cream Rounds
Continue alternating solid dc rounds with occasional openwork rounds until the center reaches approximately 38–42 cm / 15–16.5 in.
Finish the center with one round of sc.
Do not fasten off yet if you plan to crochet the leaves directly onto the border.
Part 5 – Large Crochet Leaf
The outer border uses pointed dimensional leaves with a raised center vein.
Ch 18.
Starting in the second chain from hook, work:
sl st, sc, hdc, dc, dc, tr, tr, tr, dc, dc, hdc, sc, sl st.
Work 3 sc into the final chain.
Continue along the opposite side of the foundation chain, mirroring the stitches:
sl st, sc, hdc, dc, dc, tr, tr, tr, dc, dc, hdc, sc, sl st.
Join at the base.
Part 6 – Shape the Leaf Points
Work one additional round around the leaf.
Along each side, alternate:
sc, hdc, dc, picot, dc, hdc, sc
at selected points to create the serrated maple-like edge.
At the tip work:
[sc, ch 3, sl st into first ch, sc]
This creates a defined pointed tip.
Part 7 – Raised Leaf Vein
Turn the leaf so the right side faces you.
Join yarn at the base.
Work surface slip stitches along the original foundation chain toward the leaf tip.
Alternatively, work FPsc around the central foundation stitches.
This raised line creates the prominent central vein visible on each leaf.
Part 8 – Side Veins
For extra texture, embroider two or three short diagonal lines from the center vein toward each side using a yarn needle.
Keep the embroidery loose so the leaf remains flat.
This step is optional but gives the motifs a more realistic botanical appearance.
Part 9 – Make the Leaves
For a full border similar to the inspiration, make approximately:
- 8–10 sage green leaves
- 7–9 deep red leaves
- 4–6 cream leaves
You may need a few additional motifs depending on your yarn and finished leaf size.
Before sewing anything, arrange every leaf around the center to determine the best spacing.
Part 10 – Smaller Accent Leaves
To fill small spaces between large motifs, make several smaller leaves.
Ch 13.
Starting in the second chain:
sl st, sc, hdc, dc, tr, dc, hdc, sc, sl st.
Work around the opposite side using the same sequence.
Add a pointed tip and surface crochet center vein.
Part 11 – Plan the Christmas Color Arrangement
Place the cream center flat on a table or blocking mat.
Arrange the large leaves around the outside.
Alternate the colors loosely:
green → red → cream → green → red
but avoid making the arrangement perfectly repetitive.
Allow neighboring leaves to overlap slightly.
Point some leaves directly outward and angle others gently left or right.
Part 12 – Attach the First Layer
Thread a yarn needle with matching yarn.
Position a leaf so approximately 2–3 cm / ¾–1¼ in overlaps the cream center.
Sew the bottom third of the leaf securely to the final rounds of the center.
Leave the outer two-thirds unattached so the leaf keeps its dimensional appearance.
Repeat around the entire circle.
Part 13 – Add the Second Layer
Place additional leaves over the gaps between the first layer.
Overlap the bases slightly.
Sew only near the base and lower center vein.
Keep the tips free.
This second layer creates the lush Christmas wreath effect around the mat.
Part 14 – Center Floral Detail
For the decorative flower in the middle, join red yarn into a central round.
Create six petal foundations:
[ch 5, sl st into the next appropriate stitch] × 6.
Into each loop work:
sc, hdc, 3 dc, hdc, sc.
FO.
Join cream yarn in the center and create a smaller six-petal flower using:
[ch 3, 2 dc, ch 3, sl st]
for each petal.
Part 15 – Optional Christmas Poinsettia Center
For an even more festive center, make two layers of pointed petals.
Large red layer: 6 petals.
Small cream layer: 6 petals.
Stack the cream layer over the red layer and sew securely into the center.
Add a small embroidered gold center if desired.
Part 16 – Final Border Stabilization
Turn the piece over.
Using cream yarn, work small hidden stitches between neighboring leaf bases.
This prevents the motifs from shifting while leaving the outer tips flexible.
Do not sew around the complete edge of each leaf.
Blocking
Blocking makes a major difference with this design.
- Lightly dampen the finished mat.
- Lay the cream center completely flat.
- Spread each leaf individually.
- Shape the pointed tips with your fingers.
- Pin only where necessary.
- Allow the piece to dry completely.
Keep the leaves slightly dimensional rather than pressing them completely flat.
Color Variations
Classic Christmas: cream, deep red and forest green.
Vintage Christmas: ivory, burgundy and muted sage.
Neutral Christmas: cream, oatmeal, taupe and olive.
Snowy Christmas: white, pale sage and dusty red.
Golden Christmas: ivory, dark green, burgundy and small touches of mustard gold.
Ways to Use the Finished Piece
- Christmas dining-table centerpiece
- Holiday coffee-table mat
- Decorative mat beneath a small Christmas tree
- Large festive doily
- Entryway table decoration
- Christmas gift-table centerpiece
- Winter wall hanging
Care Instructions
Hand wash gently in cool water.
Do not twist or wring the leaves.
Press excess water out between clean towels.
Lay flat and reshape the center.
Arrange each leaf before allowing the piece to dry.
Do not tumble dry.
Frequently Asked Questions
Yes. Simply stop the cream center several rounds earlier and use fewer leaves around the border.
Yes. Continue increasing the cream circle until it reaches your preferred size, then make additional leaf motifs to cover the larger circumference.
Too many increases usually cause rippling. Work a round with fewer or no increases and check the piece again before continuing.
Cotton yarn, firm tension and wet blocking help considerably. Pin the leaf tips while drying if necessary.
No. Sewing only the lower portion is preferable because it keeps the outer border dimensional and allows the pointed leaves to overlap naturally.
Yes. Replace the Christmas colors with burnt orange, mustard, olive, rust and brown for an autumn version.
The finished Christmas Crochet Leaf Doily Pattern

