Christmas Crochet Wall Hanging Pattern
Beginner Friendly
Perfect for those just starting their crochet journey, with clear instructions and simple techniques
Single-Day Project
A satisfying project you can complete in a single afternoon or evening.
Handmade Gift
A beautiful keepsake — free forever. Read online or print at home.
About This Christmas Crochet Wall Hanging Pattern
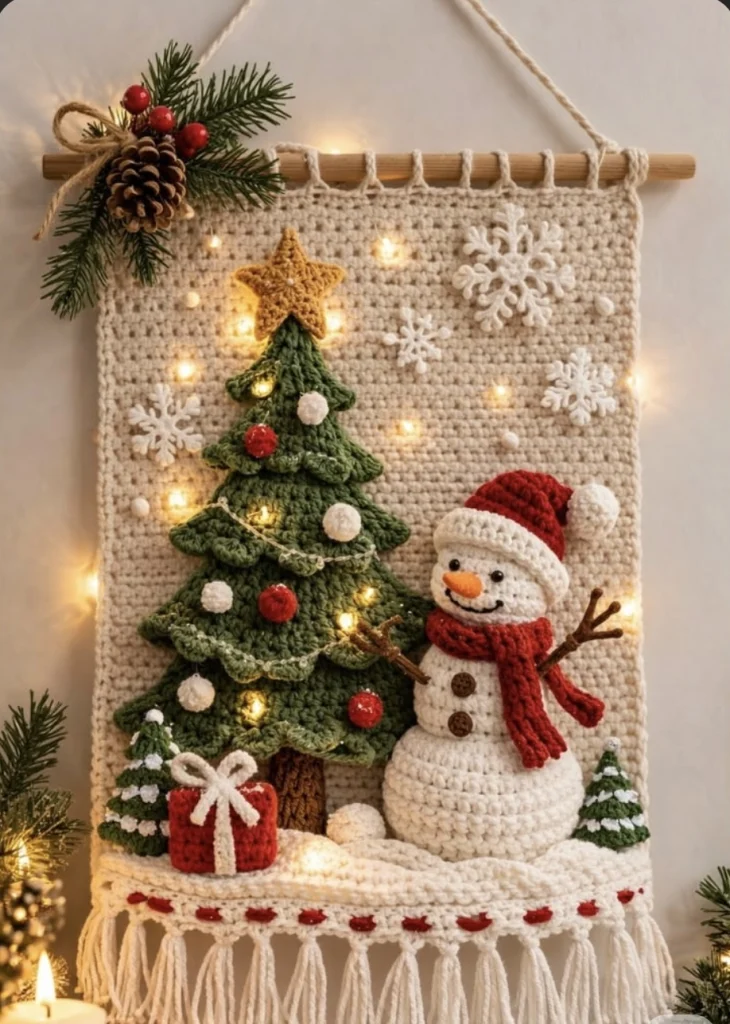
This Christmas crochet wall hanging pattern creates a detailed winter scene with a dimensional Christmas tree, an amigurumi snowman, tiny snowy trees, a wrapped present, snowflakes and a warm cream background. The layered construction gives the decoration much more depth than a flat tapestry, while red, evergreen, ivory and gold keep the finished piece traditionally festive.
The project takes roughly 14-18 hours and is designed for experienced crocheters who enjoy combining amigurumi, appliqué and decorative crochet techniques. Most elements are made separately and sewn securely to the background, which makes it possible to shape the tree branches, snowman and snowflakes before final assembly.
The finished hanging is designed for indoor seasonal decoration. A wooden dowel supports the upper edge, while a snowy lower border and long cream fringe finish the bottom. For safety, use embroidered or crocheted details instead of loose small parts if the decoration will hang where young children can reach it.
Materials
- DK cotton or cotton-blend yarn in warm cream approximately 300 g for background, snow and fringe
- DK yarn in forest green approximately 120 g
- DK yarn in bright Christmas red approximately 70 g
- DK yarn in dark brown approximately 30 g
- DK yarn in golden mustard approximately 20 g
- DK yarn in orange small amount for carrot nose
- Black embroidery yarn for eyes, smile and details
- 3.5 mm crochet hook main project
- 3.0 mm crochet hook small amigurumi details
- Polyester fiberfill approximately 80 g
- Wooden dowel approximately 48 cm long
- Strong cream cotton cord approximately 1 m for hanging
- Two small wooden buttons optional; embroidered circles may be substituted
- Yarn needle for assembly
- Stitch markers as needed
- Blocking mat and pins recommended
- Scissors 1 pair
Abbreviations
MRmagic ringchchainsl stslip stitchscsingle crochethdchalf double crochetdcdouble crochettrtreble crochetinc2 sc in same stitchdecinvisible single crochet decreaseBLOback loop onlyFLOfront loop onlyFOfasten offCream Background Panel
- With cream yarn and 3.5 mm hook, ch 81.
- Row 1: Sc in second ch from hook and in each ch across. (80)
- Rows 2-82: Ch 1, turn, sc in each st across. (80)
- Do not fasten off after Row 82.
- Work 1 round of sc evenly around all four sides, placing 3 sc in each corner.
- Join with sl st and FO.
- Wet-block the panel into a neat rectangle measuring approximately 42 x 50 cm.
Top Dowel Loops
- Make 8 attachment loops evenly spaced across the upper edge.
- For each loop, join cream yarn to the top edge and ch 12.
- Sl st into the same attachment point to close the loop.
- FO and weave the tails securely into the back of the panel.
- Check that your dowel slides comfortably through all 8 loops before final assembly.
Large Christmas Tree Base
- With forest green yarn, ch 3.
- Row 1: 2 sc in second ch from hook, 2 sc in final ch. (4)
- Row 2: Ch 1, turn, inc, sc in next 2 sts, inc. (6)
- Row 3: Ch 1, turn, inc, sc in next 4 sts, inc. (8)
- Row 4: Ch 1, turn, inc, sc in next 6 sts, inc. (10)
- Row 5: Ch 1, turn, inc, sc in next 8 sts, inc. (12)
- Row 6: Ch 1, turn, inc, sc in next 10 sts, inc. (14)
- Row 7: Ch 1, turn, inc, sc in next 12 sts, inc. (16)
- Row 8: Ch 1, turn, inc, sc in next 14 sts, inc. (18)
- Row 9: Ch 1, turn, inc, sc in next 16 sts, inc. (20)
- Row 10: Ch 1, turn, inc, sc in next 18 sts, inc. (22)
- Row 11: Ch 1, turn, inc, sc in next 20 sts, inc. (24)
- Row 12: Ch 1, turn, inc, sc in next 22 sts, inc. (26)
- Row 13: Ch 1, turn, inc, sc in next 24 sts, inc. (28)
- Row 14: Ch 1, turn, inc, sc in next 26 sts, inc. (30)
- Row 15: Ch 1, turn, inc, sc in next 28 sts, inc. (32)
- Row 16: Ch 1, turn, inc, sc in next 30 sts, inc. (34)
- Row 17: Ch 1, turn, inc, sc in next 32 sts, inc. (36)
- Row 18: Ch 1, turn, inc, sc in next 34 sts, inc. (38)
- Row 19: Ch 1, turn, inc, sc in next 36 sts, inc. (40)
- Row 20: Ch 1, turn, inc, sc in next 38 sts, inc. (42)
- FO, leaving a long tail for sewing.
Layered Tree Branches
- With the tree positioned point-up, join green yarn approximately one quarter of the way down the right edge.
- Work along a horizontal path across the tree surface using surface slip stitches.
- Branch Layer 1: *Sl st, ch 4, 2 dc in same surface point, ch 2, sl st in next surface point*. Repeat across approximately 10-12 cm.
- Move approximately 5 cm lower and repeat the branch edging across a wider 16-18 cm section.
- Move approximately 5 cm lower and repeat across approximately 22 cm.
- Work a fourth branch layer approximately 5 cm lower across approximately 27 cm.
- Work a final wide branch layer near the bottom edge.
- FO and shape each branch layer downward with your fingers.
Tree Trunk
- With dark brown yarn, ch 9.
- Row 1: Sc in second ch from hook and across. (8)
- Rows 2-13: Ch 1, turn, sc across. (8)
- FO leaving a long sewing tail.
- Embroider several vertical lines in a slightly lighter brown to create bark texture.
Golden Tree Star
- With golden yarn, make an MR.
- Round 1: 10 sc in MR. Join with sl st. (10)
- Round 2: *Ch 6, sl st in second ch from hook, sc, hdc, dc, tr, skip 1 base st, sl st in next base st*. Repeat 5 times.
- FO leaving a long tail.
- Block all five points before sewing the star to the top of the tree.
Tree Baubles – Make 9
- Use red or cream yarn.
- Round 1: 6 sc in MR. (6)
- Round 2: Inc around. (12)
- Rounds 3-4: Sc around. (12)
- Round 5: Dec around. (6)
- Add a tiny amount of stuffing.
- Cut yarn, thread through the remaining 6 sts and pull closed.
- Leave a sewing tail for attaching the bauble to the tree.
Snowman Lower Body
- With cream yarn and 3.0 mm hook, make an MR.
- Round 1: 6 sc in MR. (6)
- Round 2: Inc around. (12)
- Round 3: *Sc, inc*. Repeat around. (18)
- Round 4: *2 sc, inc*. Repeat around. (24)
- Round 5: *3 sc, inc*. Repeat around. (30)
- Round 6: *4 sc, inc*. Repeat around. (36)
- Round 7: *5 sc, inc*. Repeat around. (42)
- Rounds 8-14: Sc around. (42)
- Round 15: *5 sc, dec*. Repeat around. (36)
- Round 16: *4 sc, dec*. Repeat around. (30)
- Round 17: *3 sc, dec*. Repeat around. (24)
- Stuff firmly while keeping the back slightly flatter than the front.
- Round 18: *2 sc, dec*. Repeat around. (18)
- Round 19: *Sc, dec*. Repeat around. (12)
- Round 20: Dec around. (6)
- FO and close the opening.
Snowman Head
- With cream yarn, make an MR.
- Round 1: 6 sc in MR. (6)
- Round 2: Inc around. (12)
- Round 3: *Sc, inc*. Repeat around. (18)
- Round 4: *2 sc, inc*. Repeat around. (24)
- Round 5: *3 sc, inc*. Repeat around. (30)
- Round 6: *4 sc, inc*. Repeat around. (36)
- Rounds 7-12: Sc around. (36)
- Round 13: *4 sc, dec*. Repeat around. (30)
- Round 14: *3 sc, dec*. Repeat around. (24)
- Embroider two black eyes between Rounds 8-9, approximately 7 stitches apart.
- Embroider a curved black smile between Rounds 10-11.
- Stuff firmly.
- Round 15: *2 sc, dec*. Repeat around. (18)
- Round 16: *Sc, dec*. Repeat around. (12)
- Round 17: Dec around. (6)
- FO and close.
Carrot Nose
- With orange yarn, make an MR.
- Round 1: 4 sc in MR. (4)
- Round 2: Sc around. (4)
- Round 3: *Sc, inc*. Repeat twice. (6)
- Rounds 4-5: Sc around. (6)
- Stuff very lightly.
- FO leaving a long tail.
- Sew horizontally to the center of the snowman’s face.
Snowman Arms – Make 2
- With dark brown yarn, ch 16.
- Sl st in second ch from hook and in next 7 ch.
- Ch 5, sl st back along 4 ch to form the first twig finger.
- Ch 4, sl st back along 3 ch to form the second twig finger.
- Ch 3, sl st back along 2 ch to form the third twig finger.
- Return to the main chain and sl st through all remaining chains.
- FO leaving a long tail for attachment.
Snowman Hat
- With red yarn, make an MR.
- Round 1: 6 sc in MR. (6)
- Round 2: Sc around. (6)
- Round 3: *Sc, inc*. Repeat around. (9)
- Round 4: Sc around. (9)
- Round 5: *2 sc, inc*. Repeat around. (12)
- Round 6: Sc around. (12)
- Round 7: *Sc, inc*. Repeat around. (18)
- Round 8: *2 sc, inc*. Repeat around. (24)
- Round 9: *3 sc, inc*. Repeat around. (30)
- Rounds 10-11: Sc around. (30)
- Change to cream.
- Rounds 12-14: Sc around. (30)
- FO leaving a long tail.
Hat Pom-Pom
- With cream yarn, make an MR.
- Round 1: 6 sc in MR. (6)
- Round 2: Inc around. (12)
- Rounds 3-4: Sc around. (12)
- Round 5: Dec around. (6)
- Stuff lightly.
- FO, close and sew to the tip of the hat.
Snowman Scarf
- With red yarn, ch 61.
- Row 1: Hdc in second ch from hook and across. (60)
- Rows 2-4: Ch 1, turn, hdc across. (60)
- FO.
- Add short yarn fringe to both ends.
- Wrap the scarf around the snowman’s neck and tack it in several places so it remains positioned on the wall hanging.
Large Snowflakes – Make 3
- With cream yarn, make an MR.
- Round 1: *Sc in MR, ch 5*. Repeat 6 times. Join with sl st.
- Round 2: Sl st into first ch-5 loop. In each loop work *sc, ch 3, sc, ch 5, sc, ch 3, sc*.
- Repeat the sequence in all 6 loops.
- FO and block firmly with all six points stretched evenly.
Small Snowflakes – Make 3
- With cream yarn, make an MR.
- Round 1: *Sc in MR, ch 4*. Repeat 6 times. Join.
- Round 2: In each ch-4 loop work *sl st, ch 3, sl st, ch 4, sl st, ch 3, sl st*.
- FO and block.
Small Snowy Trees – Make 2
- With green yarn, ch 3.
- Row 1: 2 sc in second ch, 2 sc in final ch. (4)
- Row 2: Ch 1, turn, inc, sc 2, inc. (6)
- Row 3: Ch 1, turn, inc, sc 4, inc. (8)
- Row 4: Ch 1, turn, inc, sc 6, inc. (10)
- Row 5: Ch 1, turn, inc, sc 8, inc. (12)
- Row 6: Ch 1, turn, inc, sc 10, inc. (14)
- Row 7: Ch 1, turn, inc, sc 12, inc. (16)
- FO.
- Join cream yarn and work irregular surface sl sts and small picots across the tree to imitate settled snow.
Red Gift Box
- With red yarn, ch 17.
- Row 1: Sc in second ch from hook and across. (16)
- Rows 2-14: Ch 1, turn, sc across. (16)
- FO.
- With cream yarn, surface sl st vertically through the center of the red square.
- Work a second cream line horizontally across the center.
- For the bow, ch 18, sl st to the center, ch 18 again and sl st to the center.
- Ch 10 for each ribbon tail and sl st back to the center.
- FO and secure all ends on the back.
Snowbank
- With cream yarn, ch 76.
- Row 1: Hdc in second ch from hook and across. (75)
- Row 2: Ch 1, turn, *hdc in next 8 sts, 2 hdc in next st*. Repeat 8 times, hdc in final 3 sts. (83)
- Row 3: Ch 1, turn, hdc across. (83)
- Row 4: Ch 1, turn, *sc, hdc, 3 dc in next st, hdc, sc, sl st*. Repeat across as evenly as possible to create an irregular snowy upper edge.
- FO leaving a long tail.
- When assembling, allow the upper scalloped edge to overlap the lower parts of the tree trunk, present and snowman.
Decorative Red Lower Border
- Join red yarn to the lower edge beneath the snowbank.
- Row 1: Ch 1 and sc evenly across.
- Row 2: *Sl st in next 3 sts, ch 3, 3 dc in next st, ch 3, sl st in next st*. Repeat across to create small red decorative arches.
- FO and weave in ends.
Bottom Fringe
- Cut approximately 45 groups of 4 cream yarn strands, each about 30 cm long.
- Fold each group in half.
- Insert the folded loop through a stitch along the lower edge.
- Pull all loose ends through the loop and tighten gently.
- Repeat evenly across the entire bottom edge.
- Comb the fringe gently with your fingers and trim to approximately 13-14 cm.
Finishing
Place the blocked background panel flat. Position the large Christmas tree on the left side with its star near the upper third of the panel. Slide the brown trunk beneath the tree and sew it first. Sew the main tree base around its perimeter, leaving the layered branches free so they remain dimensional. Add the stuffed red and cream baubles across the branches.
Assemble the snowman by sewing the head securely to the lower body. Add the carrot nose, embroidered face, hat, pom-pom, scarf and twig arms. Position the finished snowman beside the tree and sew the back of the body and head firmly to the background. Add the two small trees and red present near the lower corners before covering their lower edges with the snowbank.
Arrange the snowflakes around the upper background, keeping enough empty cream space for the motifs to remain distinct. Sew each snowflake through its center and several outer points. Add a few small cream French knots or tiny crocheted dots as falling snow if desired. Attach the snowbank and lower decorative border, then add the fringe.
Slide the wooden dowel through the top loops. Tie the hanging cord securely to both ends and check that the piece hangs straight. Make any final adjustments to the tree branches and scarf before displaying the finished wall hanging.
Tips for Success
- Keep the back of the snowman’s body slightly flatter while stuffing so it sits neatly against the wall panel.
- Do not sew down the outer edges of the layered tree branches; leaving them free creates the dimensional look visible in the finished design.
- Block the snowflakes aggressively enough to define all six points before attaching them.
- Use several attachment stitches through the snowman’s body and head because the stuffed pieces are heavier than flat appliqués.
- Arrange every major element on the panel before sewing anything permanently so the tree and snowman remain visually balanced.
Common Mistakes to Avoid
- Overstuffing the snowman: A perfectly round back will pull away from the wall. Keep the front rounded but gently flatten the back while stuffing.
- Sewing the tree branches completely flat: Secure the underlying tree base instead and leave the scalloped branch edges free.
- Attaching the snowflakes before blocking: Their points will curl and lose definition. Block them separately first.
- Making the fringe before the lower border is complete: Finish all snow and decorative edging first so the fringe does not become tangled during assembly.
- Using weak dowel loops: Weave the loop tails deeply into the panel because the dimensional decorations add noticeable weight.
Ways to Customize This Pattern
- Replace traditional red with burgundy for a softer vintage Christmas palette.
- Use sage green instead of forest green for a neutral farmhouse version.
- Add tiny crochet candy canes, stockings or gingerbread motifs between the snowflakes.
- Embroider a family name or a short Christmas greeting across an open area of the cream background.
- Replace the snowman with a crochet reindeer while keeping the same tree and snowy landscape.
Frequently asked questions
Yes. You can crochet flat circular appliqués for the body and head, but the stuffed construction is what creates the dimensional snowman shown in this design. If reducing bulk is important, lightly stuff the existing pieces and flatten their backs before sewing.
Sew the triangular tree base securely to the background but avoid stitching through the outer scalloped edges of the branch layers. After hanging, gently curve those edges forward with your fingers.
For the visual effect of lights, embroidered golden dots or small crocheted accents are the simplest option. If you choose to add manufactured lights, use only a cool-running product intended for decorative indoor use and follow its manufacturer’s instructions rather than enclosing electrical components inside the crochet.
The easiest approach is to use sport-weight yarn with a smaller hook and reduce the background dimensions proportionally. Keep the snowman, tree and appliqués made with the same relative yarn weight so all elements remain in scale.
Spot cleaning is preferable because the finished piece combines stuffing, fringe and a wooden support. If deeper cleaning is necessary, remove the dowel first, gently hand wash the crochet in cool water, reshape it flat and allow it to dry completely before reassembling.
The finished Christmas Crochet Wall Hanging Pattern

