Christmas Poinsettia Crochet Doily Pattern
Beginner Friendly
Perfect for those just starting their crochet journey, with clear instructions and simple techniques
Single-Day Project
A satisfying project you can complete in a single afternoon or evening.
Handmade Gift
A beautiful keepsake — free forever. Read online or print at home.
About This Christmas Poinsettia Crochet Doily Pattern
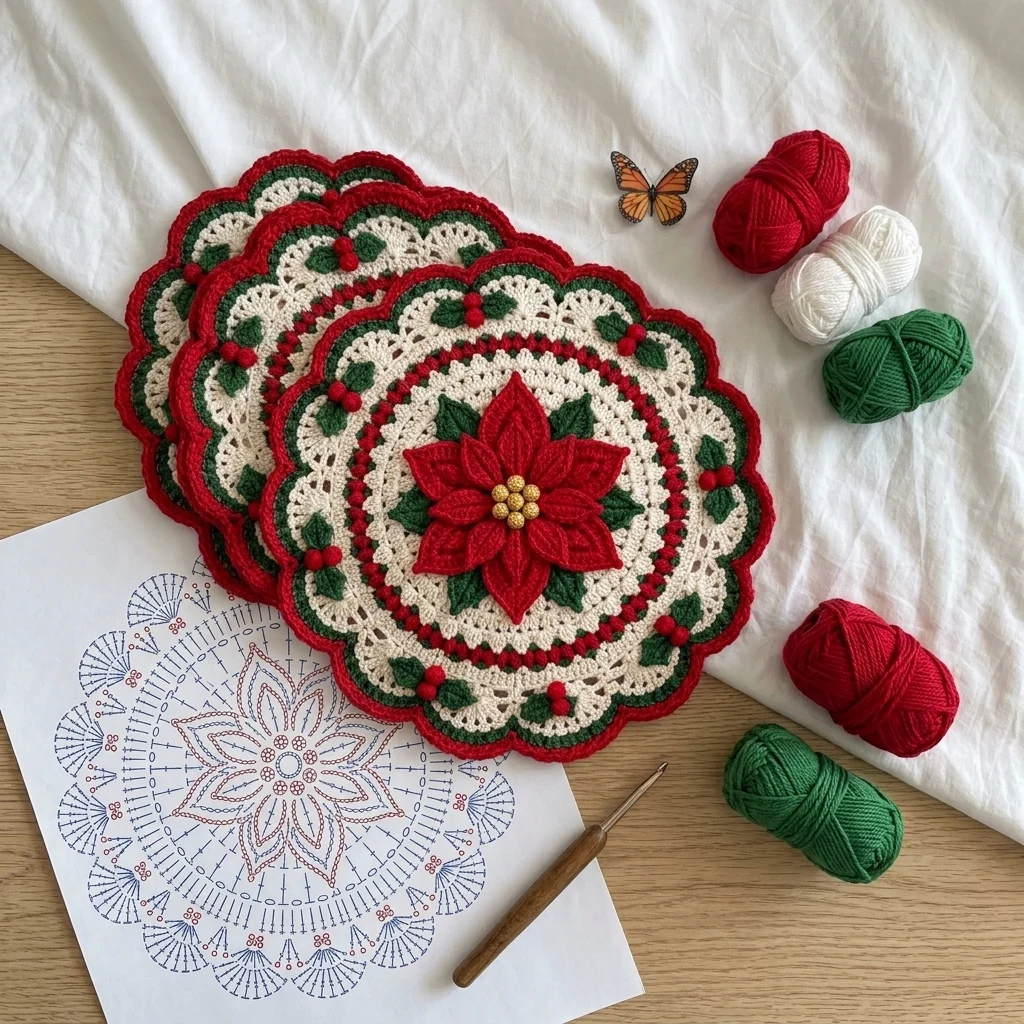
This Christmas crochet doily pattern creates a beautiful layered holiday centerpiece inspired by traditional lace crochet. The design combines a dimensional red poinsettia, dark green leaves, an ivory lace background, tiny red-and-green accent stitches, holly leaves and berries, and a dramatic scalloped border.
Use the finished piece beneath a candle arrangement, Christmas centerpiece, vase or holiday serving tray. You can also make several matching pieces for a coordinated Christmas table.
Materials
- Sport #2 or light DK #3 cotton yarn – ivory / cream 90-110 g
- Sport #2 or light DK #3 cotton yarn – Christmas red 50-60 g
- Sport #2 or light DK #3 cotton yarn – dark green 35-45 g
- Gold beads for poinsettia center 7-9
- 3.0 mm crochet hook 1
- Yarn needle 1
- Scissors 1 pair
- Stitch markers optional
Abbreviations
MRmagic ringchchainsl stslip stitchscsingle crochethdchalf double crochetdcdouble crochettrtreble crochetinc2 stitches in same stitchspspaceFOfasten offFinished Size
Approximately 32-36 cm / 12.5-14 in across after blocking.
Cream Center – Round 1
Using cream yarn, make a MR.
Round 1: Ch 3 (counts as dc), 11 dc into MR. Join with sl st to top of beginning ch-3 – 12 dc.
Pull the ring firmly closed.
Round 2
Ch 3, dc in same stitch.
Work 2 dc in every stitch around.
Join with sl st – 24 dc.
Round 3
Ch 3, 2 dc in next stitch.
Repeat (dc in next stitch, 2 dc in next stitch) around.
Join – 36 dc.
Round 4 – Openwork Begins
Ch 4 (counts as dc + ch 1).
Skip next stitch, dc in next stitch, ch 1.
Repeat around.
Join to third chain of beginning ch-4.
Round 5 – Cream Fans
Sl st into first ch-1 space.
Ch 3, 2 dc, ch 2, 3 dc in same space.
Skip one ch-space.
Work (3 dc, ch 2, 3 dc) in next space.
Repeat around and join.
Round 6 – Lace Arches
Sl st to first ch-2 space.
Ch 1, sc in ch-2 space, ch 5.
Sc in next ch-2 space, ch 5.
Repeat around.
Join with sl st.
Round 7 – Shell Layer
Into each ch-5 space work:
sc, hdc, 3 dc, hdc, sc.
Repeat in every arch around.
Join.
Round 8 – Green Accent
Change to dark green.
Work 1 sc in each stitch around.
At the top of every shell work 2 sc in the center dc to maintain a flat circle.
Join and fasten off.
Round 9 – Red Accent
Join red yarn.
Ch 1, sc in first stitch, ch 1, skip 1 stitch.
Repeat around.
Join and fasten off.
Round 10 – Return to Cream
Join cream into any ch-1 space.
Work 2 sc in each ch-1 space around.
Join.
Round 11 – Lace Foundation
Ch 5, skip 2 stitches, sc in next stitch.
Repeat around.
Adjust the final spacing slightly if necessary so the arches remain evenly distributed.
Round 12 – Lace Fans
In each ch-5 space work:
sc, hdc, 4 dc, hdc, sc.
Repeat around.
Round 13 – Open Lace
Sl st to the center of the first fan.
Ch 6, sc into center of next fan.
Repeat around.
Join.
Round 14 – Large Decorative Shells
Into every ch-6 space work:
sc, hdc, 5 dc, hdc, sc.
Repeat around.
Round 15 – Green Border Foundation
Change to green.
Work sc evenly around the complete edge.
Place 2 sc at the peak of each shell.
Join.
Round 16 – Green Scallop
Skip 2 stitches, 5 dc in next stitch, skip 2 stitches, sl st in next stitch.
Repeat around.
Fasten off.
Round 17 – Red Outer Edge
Join red yarn at the beginning of any green scallop.
Work 1 sc into each green stitch.
At the center stitch of every scallop work:
sc, ch 2, sc.
This creates the small pointed red outline visible around the finished doily.
Join and fasten off.
Large Poinsettia – Center
Using red yarn:
Round 1: 8 sc in MR.
Join with sl st.
Large Poinsettia Petals – Make 8
For each petal:
Ch 9.
Starting in second chain from hook work:
sl st, sc, hdc, dc, 2 tr, dc, hdc.
Work ch 2 at the tip.
Continue down the opposite side of the foundation chain:
hdc, dc, 2 tr, dc, hdc, sc, sl st.
Sl st into next stitch of the center ring.
Repeat until 8 petals are complete.
Small Poinsettia Layer – Make 8 Petals
Using red:
Make a MR and work 8 sc.
For each petal:
Ch 7.
Starting in second chain:
sl st, sc, hdc, dc, tr, dc.
Ch 2 at the tip and mirror the stitches down the opposite side.
Sl st into the next center stitch.
Repeat around.
Place this smaller flower over the larger flower.
Poinsettia Center
Sew 7-9 small gold beads tightly together in the center.
If you prefer an entirely crocheted version, make several small gold French knots instead.
Poinsettia Leaves – Make 6
Using dark green:
Ch 10.
Starting in second chain:
sl st, sc, hdc, dc, tr, tr, dc, hdc.
In final chain work:
sc, ch 2, sc.
Mirror the stitches down the opposite side.
Fasten off leaving a long sewing tail.
Optional Leaf Vein
Using the same green yarn or a slightly lighter shade, surface sl st from the base of each leaf to the point.
This gives each leaf the defined central vein visible in the finished motif.
Small Holly Leaves – Make 16-20
Using green:
Ch 7.
Starting in second chain:
sl st, sc, hdc, dc, hdc.
In final chain work:
sc, ch 2, sc.
Mirror the stitches down the opposite side.
Fasten off.
Red Holly Berries – Make 24-30
Using red:
Round 1: 6 sc in MR.
Round 2: Sc around.
Fasten off leaving a sewing tail.
Pull the tail slightly to create a rounded berry shape.
Assemble the Poinsettia
- Place the six green leaves around the center of the doily.
- Overlap the leaves slightly so the tips remain visible.
- Sew each leaf securely to the cream base.
- Place the large red poinsettia over the leaves.
- Sew through the flower center and inner portions of several petals.
- Add the smaller petal layer on top.
- Sew the gold bead cluster into the center.
Arrange the Holly Motifs
Create approximately 8 small holly clusters.
For each cluster:
- 2 small green leaves
- 3 red berries
Position the clusters evenly around the cream lace section near the outer edge.
Rotate each cluster slightly so the arrangement feels natural rather than perfectly identical.
Attach the Holly Leaves
Place two leaves in a shallow V shape.
Sew through the center vein and base of each leaf.
Leave the outer edges slightly free so the leaves retain dimension.
Attach the Berries
Position three berries where the two holly leaves meet.
Sew each berry securely through its center.
Keep the berries close together to create the characteristic Christmas holly cluster.
Blocking
- Gently wet the finished doily base with cool water.
- Press out excess water between clean towels. Do not wring.
- Place the doily flat on a blocking mat.
- Stretch each scallop evenly.
- Pin the center and outer edge until the circle is symmetrical.
- Allow it to dry completely.
- Remove the pins before attaching the poinsettia and holly motifs.
Final Shaping
After assembly, gently shape every poinsettia petal with your fingers.
Pull the pointed ends outward and slightly upward.
Arrange the six green leaves so they remain visible between the red petals.
Shape each holly leaf and berry cluster around the border.
Check that the red outer scallops form an even circle.
Make a Matching Set
For a coordinated Christmas table, make:
- 1 large centerpiece doily
- 4-6 smaller matching placemats
- 4-6 matching coasters
For smaller pieces, stop the main pattern after an earlier cream lace round and finish with the same green and red edging.
Color Variations
- Classic Christmas: red + forest green + ivory + gold
- Vintage Christmas: burgundy + olive + antique cream + brass
- Snowy Christmas: ivory + sage + dusty red + champagne
- Elegant Christmas: deep burgundy + emerald + white + gold
- Nordic: bright red + white + dark green
Finishing
Weave in all remaining yarn ends on the back of the work.
Check that every berry and flower is securely attached.
For a flatter table decoration, sew the poinsettia petals down near their bases only. For a more dimensional centerpiece, leave most of each petal free.
Store the doily flat rather than folded so the lace border and poinsettia keep their shape.
Frequently Asked Questions
The basic stitches are beginner-friendly, but the lace rounds, color changes and dimensional poinsettia make the complete project better suited to an adventurous beginner or intermediate crocheter.
Yes. Replace the beads with gold or yellow French knots, tiny crochet bobbles or a small crocheted center.
Yes, but the finished doily will become considerably larger. Increase the hook size to suit the yarn and check frequently that the piece remains flat.
A wavy edge usually means there are too many stitches or increases. If the work begins to ruffle, reduce the number of stitches added in the next round.
Curling generally means the round needs additional increases. Add a few evenly spaced stitches until the work lies flat.
Yes. Work only the central rounds, add a small red-and-green border and decorate each coaster with a miniature holly cluster instead of the large poinsettia.
The finished Christmas Poinsettia Crochet Doily Pattern

