Crochet Autumn Garland Pattern – Pumpkins, Mushrooms, Leaves & Acorns
Beginner Friendly
Perfect for those just starting their crochet journey, with clear instructions and simple techniques
Single-Day Project
A satisfying project you can complete in a single afternoon or evening.
Handmade Gift
A beautiful keepsake — free forever. Read online or print at home.
About This Crochet Autumn Garland Pattern – Pumpkins, Mushrooms, Leaves & Acorns
This crochet autumn garland pattern brings together all the little details that make fall decorating feel warm and handmade: plump pumpkins, woodland mushrooms, textured leaves, tiny acorns, berries and rustic crochet cords.
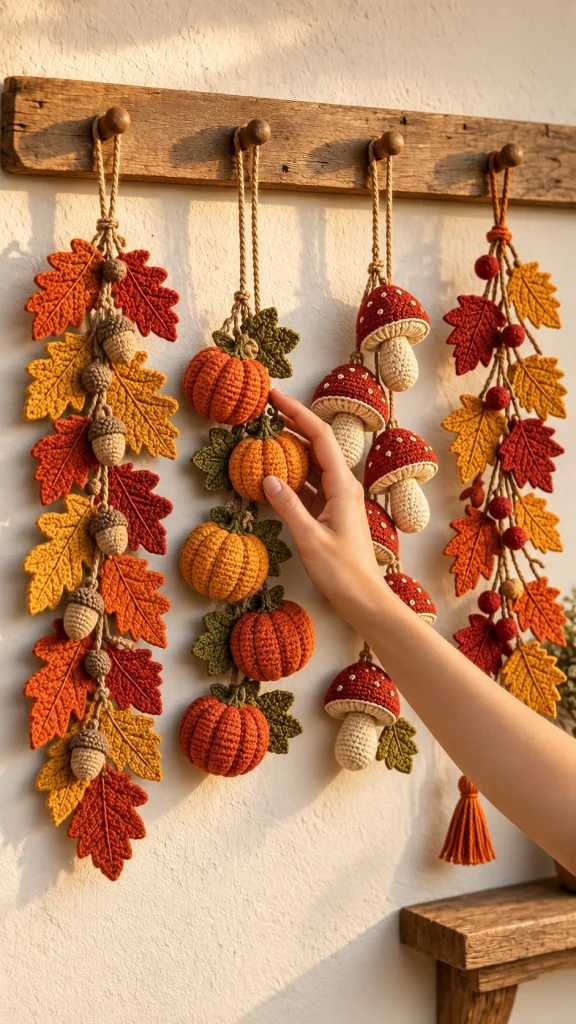
You can make one design or create the complete coordinating collection shown here. Hang them from wooden pegs, cabinet handles, a mantel, an entryway hook or along a cozy fall wall display.
Materials
- Burnt orange yarn pumpkins and leaves
- Rust / terracotta yarn leaves and mushrooms
- Mustard yellow yarn leaves and pumpkins
- Deep red yarn leaves, berries and mushroom caps
- Olive green yarn pumpkin leaves
- Dark brown yarn acorn caps and stems
- Warm beige yarn cords, acorns and mushroom stems
- DK or light worsted cotton yarn recommended
- 2.5–3.5 mm crochet hook 1
- Polyester stuffing small amount
- Yarn needle 1
- Scissors 1 pair
- Stitch markers optional
Abbreviations – US Terms
MRmagic ringchchainsl stslip stitchscsingle crochethdchalf double crochetdcdouble crochettrtreble crochetincincreasedecdecreaseBLOback loop onlyFOfasten offFinished Size
Each finished hanging measures approximately 70–100 cm / 28–39 in, depending on the number of motifs and spacing. Pumpkins measure approximately 8–10 cm / 3–4 in wide, mushrooms about 9–12 cm / 3.5–4.75 in long, and leaves approximately 9–13 cm / 3.5–5 in.
Part 1 – Rustic Hanging Cord
Using warm beige yarn, ch 100–130, depending on your preferred length.
Starting in the second chain from the hook, work sl st in every chain.
This creates a thicker, rope-like crochet cord.
FO, leaving long tails for attaching the motifs.
Part 2 – Hanging Loop
At the top of the cord, fold approximately 12–15 cm / 5–6 in into a loop.
Wrap a separate strand of beige yarn around the base of the loop 6–8 times.
Tie securely and hide the ends inside the wrapped section.
Part 3 – Basic Crochet Pumpkin
Using orange, mustard or rust yarn:
Ch 24.
Row 1: hdc in second ch from hook and across. (23)
Rows 2–30: ch 1, turn, hdc BLO across. (23)
Do not FO.
Fold the rectangle so the first and last rows meet.
Sl st through both layers to create a tube.
Part 4 – Shape the Pumpkin
Thread a long yarn tail around one open end of the tube.
Pull tightly and secure.
Turn the piece right side out.
Stuff firmly but do not overfill.
Gather the second opening and pull closed.
Part 5 – Create Pumpkin Ribs
Using a long strand of matching yarn, pass the needle through the center from top to bottom.
Wrap the yarn around the outside and pull gently to form the first groove.
Repeat evenly around the pumpkin to create 6–8 defined sections.
Knot securely underneath.
Part 6 – Pumpkin Stem
Using dark brown yarn:
Round 1: MR, 6 sc. (6)
Rounds 2–5: sc around. (6)
FO, leaving a sewing tail.
Lightly stuff if desired and sew to the center of the pumpkin.
Part 7 – Pumpkin Leaf
Using olive green yarn:
Ch 9.
Starting in second ch from hook:
sl st, sc, hdc, dc, tr, dc, hdc, sc.
Work along the opposite side of the chain:
sc, hdc, dc, tr, dc, hdc, sc, sl st.
FO, leaving a sewing tail.
Part 8 – Pumpkin Vine
Using olive yarn, ch 18–24.
Work 3 sc into each chain.
The crochet will naturally curl into a spiral.
FO and sew beside the pumpkin stem.
Part 9 – Make the Pumpkin Garland
Make 5 pumpkins in slightly different fall shades.
A balanced palette is:
1 burnt orange, 1 mustard, 1 golden orange, 1 rust and 1 deep terracotta.
Add one or two olive leaves around each stem.
Arrange the pumpkins vertically along the hanging cord.
Leave approximately 5–8 cm / 2–3 in between them.
Sew each pumpkin securely through its top center.
Part 10 – Mushroom Cap
Using rust or deep red yarn:
Round 1: MR, 6 sc. (6)
Round 2: inc around. (12)
Round 3: *sc, inc* around. (18)
Round 4: *2 sc, inc* around. (24)
Round 5: *3 sc, inc* around. (30)
Rounds 6–8: sc around. (30)
Round 9: *3 sc, dec* around. (24)
FO.
Part 11 – Cream Mushroom Underside
Using warm cream yarn:
Round 1: MR, 6 sc. (6)
Round 2: inc around. (12)
Round 3: *sc, inc* around. (18)
Round 4: *2 sc, inc* around. (24)
FO.
Place this circle inside the mushroom cap and sew around the edge.
Add a small amount of stuffing before closing completely.
Part 12 – Mushroom Stem
Using beige yarn:
Round 1: MR, 6 sc. (6)
Round 2: inc around. (12)
Rounds 3–9: sc around. (12)
Round 10: *sc, dec* around. (8)
Rounds 11–13: sc around. (8)
Stuff lightly.
FO, leaving a long sewing tail.
Sew the narrow end to the center underside of the mushroom cap.
Part 13 – Mushroom Spots
Using cream yarn, embroider small French knots or tiny surface-crochet dots over the red mushroom cap.
Scatter them irregularly rather than placing them in perfect rows.
Part 14 – Mushroom Garland
Make 4–5 mushrooms.
Vary their sizes slightly by adding or removing one increase round from the cap.
Attach each mushroom to the hanging cord by passing the cord securely through the top center of the cap.
Leave approximately 6–10 cm / 2.5–4 in between mushrooms.
Part 15 – Basic Acorn Body
Using warm beige yarn:
Round 1: MR, 6 sc. (6)
Round 2: inc around. (12)
Round 3: *sc, inc* around. (18)
Rounds 4–7: sc around. (18)
Round 8: *sc, dec* around. (12)
Stuff lightly.
Round 9: dec around. (6)
FO and close.
Part 16 – Acorn Cap
Using taupe or dark brown yarn:
Round 1: MR, 6 sc. (6)
Round 2: inc around. (12)
Round 3: *sc, inc* around. (18)
Round 4: sc around. (18)
FO, leaving a long sewing tail.
Place over the wider end of the acorn body and sew securely.
Part 17 – Acorn Stem
Using brown yarn, ch 5.
Sl st back through the chain.
FO and sew to the center of the cap.
Part 18 – Oak Leaf Foundation
Using orange, mustard, rust, burgundy, cream or olive yarn:
Ch 18.
Starting in the second chain:
sl st, sc, hdc, dc, 3 tr, dc, hdc, sc.
Leave the remaining chains unworked temporarily.
Part 19 – Oak Leaf Lobes
Continue along the foundation chain using groups of stitches to form the side lobes:
(sc, hdc, dc, tr, dc, hdc, sc) into successive sections.
Work toward the leaf tip, gradually making each lobe slightly smaller.
At the tip work ch 2, sl st into first ch.
Mirror the same lobe sequence down the opposite side.
Part 20 – Leaf Vein
Using a slightly darker matching yarn, surface crochet slip stitches along the center foundation chain.
For larger leaves, add two or three short diagonal surface-slip-stitch veins toward the lobes.
FO and weave in the ends.
Part 21 – Maple-Style Leaf
For a broader pointed leaf, begin with MR, 10 sc.
Work five pointed sections around the center.
For each main point:
sc, hdc, dc, tr, ch 2, tr, dc, hdc, sc.
Between the five large points, work sl st to create deep valleys.
FO and block firmly into a maple-leaf shape.
Part 22 – Leaf Garland
Make approximately 10–14 leaves.
Mix:
burnt orange, mustard yellow, burgundy, cream, forest olive and variegated autumn yarn.
Attach the leaves in alternating directions along the crochet cord.
Overlap some leaves slightly for a full cascading effect.
Part 23 – Leaf & Acorn Garland
Make 8–10 leaves and 4–5 acorns.
Attach one acorn between every second or third leaf.
Allow the acorns to hang slightly forward rather than sewing them completely flat.
This gives the garland more dimension.
Part 24 – Crochet Autumn Berries
Using deep red yarn:
Round 1: MR, 6 sc. (6)
Round 2: inc around. (12)
Round 3: sc around. (12)
Add a tiny amount of stuffing.
Round 4: dec around. (6)
FO and close.
Part 25 – Berry Branches
Using brown or olive yarn, ch 12–18.
Sl st back along the chain.
Make two or three shorter chains branching from the main stem.
Sew one berry to the end of each branch.
Attach the finished berry sprigs between autumn leaves.
Part 26 – Decorative Bottom Tassel
Cut approximately 20 strands of rust or orange yarn, each about 18 cm / 7 in long.
Fold them in half around the bottom of the hanging cord.
Wrap another strand around the bundle approximately 2 cm / ¾ in below the fold.
Tie securely and trim the ends evenly.
Part 27 – Arrangement Ideas
Garland 1: orange, burgundy and mustard leaves with beige acorns.
Garland 2: five dimensional pumpkins with olive leaves.
Garland 3: red woodland mushrooms with cream stems.
Garland 4: autumn leaves mixed with red berries.
Hang all four side by side for a coordinated fall wall display.
Part 28 – Final Assembly
Lay the finished hanging cord flat on a table.
Position every motif before sewing anything permanently.
Keep the largest motifs near the middle of each hanging.
Use smaller leaves, berries and acorns to fill empty spaces.
Sew through the structural center of every stuffed motif rather than through decorative stitches only.
Part 29 – Finishing
Weave in all remaining yarn tails.
Check that every pumpkin and mushroom is securely attached.
Reshape the stuffed pieces with your fingers.
Steam-block the leaves again if necessary.
Trim the tassels and straighten the hanging cords.
Autumn Color Ideas
Classic Fall: burnt orange, mustard, rust, burgundy and olive.
Neutral Farmhouse: cream, oatmeal, camel, brown and muted pumpkin.
Woodland: rust red, mushroom brown, moss green, mustard and beige.
Vintage Autumn: deep burgundy, ochre, terracotta, forest green and antique cream.
Soft Fall: pumpkin, sage, warm ivory, caramel and dusty gold.
Ways to Use the Garlands
- Hang them from rustic wooden wall pegs.
- Decorate an entryway for fall.
- Drape them along a fireplace mantel.
- Hang them from kitchen cabinet handles.
- Create a Thanksgiving wall display.
- Use individual pumpkins or mushrooms as ornaments.
- Make shorter versions for door handles.
- Combine several strands into a fall market display.
Frequently Asked Questions
The pumpkins and simple acorns are suitable for confident beginners. The shaped leaves and mushroom assembly require a little more experience, so the complete collection is best considered an intermediate project.
Cotton or a cotton-blend DK yarn gives the leaves crisp definition and helps the pumpkins keep their shape. Acrylic yarn can also be used for a softer result.
Increase both the starting chain and the number of rows in the ribbed rectangle. Keep the rectangle proportionally wider than it is tall so the pumpkin remains round and plump after gathering.
Block them before attaching them to the garland. Cotton yarn responds especially well to wet blocking or gentle steam blocking.
Yes. Crochet a longer main cord and attach the same pumpkins, leaves, mushrooms, berries and acorns horizontally. Alternate large and small motifs to keep the design balanced.
Yes. The pumpkins work as bowl fillers or ornaments, the mushrooms as woodland decorations, the leaves as appliqués, and the acorns as small hanging ornaments or gift embellishments.
The finished Crochet Autumn Garland Pattern – Pumpkins, Mushrooms, Leaves & Acorns