Crochet Autumn Leaf Pillow Pattern
Beginner Friendly
Perfect for those just starting their crochet journey, with clear instructions and simple techniques
Single-Day Project
A satisfying project you can complete in a single afternoon or evening.
Handmade Gift
A beautiful keepsake — free forever. Read online or print at home.
About This Crochet Autumn Leaf Pillow Pattern
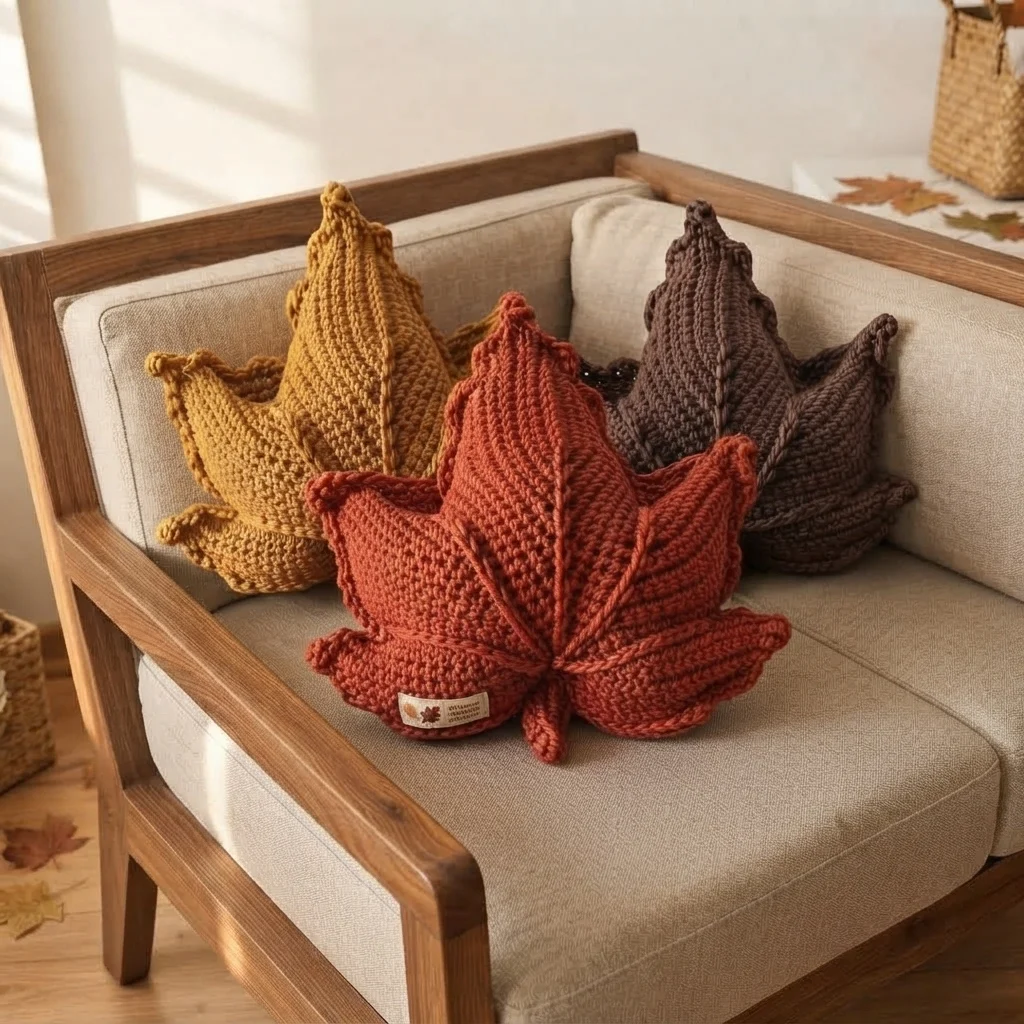
This crochet autumn leaf pillow pattern creates the beautiful sculptural cushions shown in the reference: oversized fall leaves with pointed lobes, raised center veins and a softly stuffed three-dimensional shape.
Make one in burnt orange for a statement pillow, or crochet a complete autumn collection in rust, mustard gold and chocolate brown. They look especially cozy grouped together on an armchair, sofa, reading nook or bed.
Materials
- Bulky #5 yarn – main autumn color 350-450 g
- 6 mm crochet hook 1
- Polyester fiberfill 250-350 g
- Yarn needle 1
- Scissors 1 pair
- Stitch markers 4-6
Abbreviations
chchainsl stslip stitchscsingle crochethdchalf double crochetdcdouble crochettrtreble crochetinc2 stitches in same stitchdecdecreaseFOfasten offFinished Size
Approximately 45-50 cm / 18-20 inches from the bottom stem to the tip of the center lobe.
The finished width is approximately 42-46 cm / 16.5-18 inches, depending on yarn, tension and how firmly the pillow is stuffed.
Construction
The pillow is made from two identical leaf panels.
Each panel begins at the lower center and expands outward to form five pointed leaf lobes: one tall center point, two medium side points and two smaller lower points.
Raised surface crochet is then added along the center and side sections to imitate natural leaf veins.
The two panels are joined around the outside, lightly stuffed and closed.
Leaf Panel – Lower Center
Make 2 identical panels.
Ch 4 and join with sl st to form a ring.
R1: Ch 1, work 8 sc into ring. Join. (8 sts)
R2: Ch 1, 2 sc in each stitch around. Join. (16 sts)
R3: Ch 1, *sc in next st, inc in next st.* Repeat around. (24 sts)
R4: *Sc in next 2 sts, inc.* Repeat around. (32 sts)
Begin Shaping the Leaf
The remainder of the panel is worked in turning rows rather than complete rounds.
Place five stitch markers across the upper half of the circle. These indicate the approximate positions of the five leaf lobes.
The center section should be the widest because it will form the tall central point.
The two sections beside it form the medium lobes, while the two outer sections form the smaller lower lobes.
Center Lobe
Join yarn at the center marked section.
Row 1: Ch 1, sc across 14 sts. Turn.
Row 2: Ch 1, inc, sc across to final st, inc. Turn.
Rows 3-5: Sc across.
Row 6: Ch 1, sc2tog, sc across to final 2 sts, sc2tog.
Repeat the decrease row every second row until approximately 6 stitches remain.
Then decrease at both ends on every row until 2 stitches remain.
Sc2tog and fasten off.
This creates the long pointed center section visible on the front of the pillow.
First Side Lobe
Join yarn immediately beside the center lobe.
Work across approximately 10-12 stitches.
Rows 1-3: Sc across.
Row 4: Decrease once at each end.
Row 5: Sc across.
Continue alternating a plain row and decrease row until 3 stitches remain.
On the final row, decrease to one point and fasten off.
Second Side Lobe
Repeat the previous instructions on the opposite side of the center lobe.
Keep both side lobes approximately the same length so the finished leaf remains balanced.
Lower Lobes
Join yarn to one remaining outer section.
Work across approximately 8-10 stitches.
Work 2 rows of sc.
Then decrease at both ends of every second row until 3 stitches remain.
Decrease to one stitch and fasten off.
Repeat on the opposite side.
Outer Shaping Round
Attach yarn at the bottom center of the completed leaf.
Ch 1 and work sc evenly around the entire silhouette.
At each pointed tip work:
sc, ch 1, sc into the tip.
At each deep valley between lobes, work sc2tog across the two stitches closest to the valley.
This helps sharpen the outline.
Join at the bottom and fasten off.
Raised Center Vein
The pronounced raised vein is one of the most important details of this pillow.
With the right side facing, attach yarn near the lower center.
Surface slip stitch in a straight line from the bottom of the leaf toward the tip of the center lobe.
For a thicker ridge, work a second line of surface slip stitches directly beside the first.
Side Veins
Starting from the center vein, surface crochet diagonally toward each side point.
Add one raised vein toward each of the four side lobes.
Keep the lines slightly curved rather than perfectly straight.
The finished panel should resemble the natural branching structure of a fall leaf.
Optional Stem
Ch 12.
Starting in second chain from hook, sl st back along the chain.
Turn and work one additional row of sc along the stem for thickness.
Fasten off, leaving a long tail.
Place the stem between the two pillow panels before joining them.
Joining the Pillow
Place both leaf panels together with wrong sides facing each other.
Make sure every lobe and valley lines up.
Attach yarn at the lower edge.
Sc through both layers around the outside.
At every pointed tip work:
sc, ch 1, sc.
At the valleys, work one tight sc or sc2tog to preserve the definition.
Leave approximately 15 cm / 6 inches open for stuffing.
Stuffing
Add small amounts of fiberfill gradually.
Stuff the center first.
Then gently push smaller pieces of filling into each individual leaf point.
Do not overstuff. The pillow should remain soft and slightly flattened rather than becoming round like an amigurumi toy.
Pay special attention to the tips so each point remains clearly defined.
Closing
Continue crocheting through both panels to close the remaining opening.
Fasten off.
Use the yarn needle to hide the yarn tail securely inside the pillow.
Massage and redistribute the stuffing until all five lobes have a balanced sculptural shape.
Color Ideas
- Burnt orange: the statement version shown prominently in the reference
- Mustard gold: warm and cheerful autumn style
- Chocolate brown: rustic neutral fall decor
- Olive green: early-autumn woodland look
- Burgundy: rich late-fall version
- Cream: neutral farmhouse style
Make the Three-Pillow Set
For the look shown in the reference, crochet three leaf pillows using the same pattern.
Make one in burnt orange, one in mustard ochre and one in deep chocolate brown.
Slightly vary their finished sizes by changing hook size or yarn thickness. This makes the arrangement feel more naturally handmade when grouped together.
Smaller Decorative Leaf
For a smaller cushion or decorative leaf, use worsted #4 yarn with a 4.5 mm hook.
Follow the same construction while reducing the starting circle and shortening each lobe by several rows.
This version works beautifully in an autumn basket or as a smaller accent on a sofa.
Finishing & Blocking
- Weave in any visible yarn ends.
- Shape each leaf point with your fingers.
- Gently define the valleys between the lobes.
- Adjust the stuffing so the center remains softly raised.
- Lightly steam the outer edges if necessary, avoiding direct contact between the iron and yarn.
- Allow the pillow to cool completely before styling.
Frequently Asked Questions
The stitches themselves are simple, but shaping five separate points and keeping both panels identical requires careful counting. It is best for an adventurous beginner or intermediate crocheter.
Yes. Use thicker yarn and a larger hook, or add additional rows while shaping each lobe. Keep the same proportions between the center, middle and lower points.
Slight curling can help create the dimensional appearance. If the points curl excessively, loosen your tension or add a few stitches along the outer shaping round.
Use enough filling to define the leaf shape while keeping the cushion relatively flat. Overstuffing can make the lobes round and reduce the natural leaf silhouette.
Yes. Cotton creates excellent stitch definition and especially crisp veins. Acrylic or an acrylic-wool blend will produce a softer and more cushion-like finish.
Follow the care instructions for your chosen yarn and stuffing. Hand washing or a gentle cycle is usually safest for maintaining the sculptural shape. Reshape the points and lay flat to dry.
The finished Crochet Autumn Leaf Pillow Pattern