Crochet Christmas Candle Centerpiece Pattern
Beginner Friendly
Perfect for those just starting their crochet journey, with clear instructions and simple techniques
Single-Day Project
A satisfying project you can complete in a single afternoon or evening.
Handmade Gift
A beautiful keepsake — free forever. Read online or print at home.
About This Crochet Christmas Candle Centerpiece Pattern
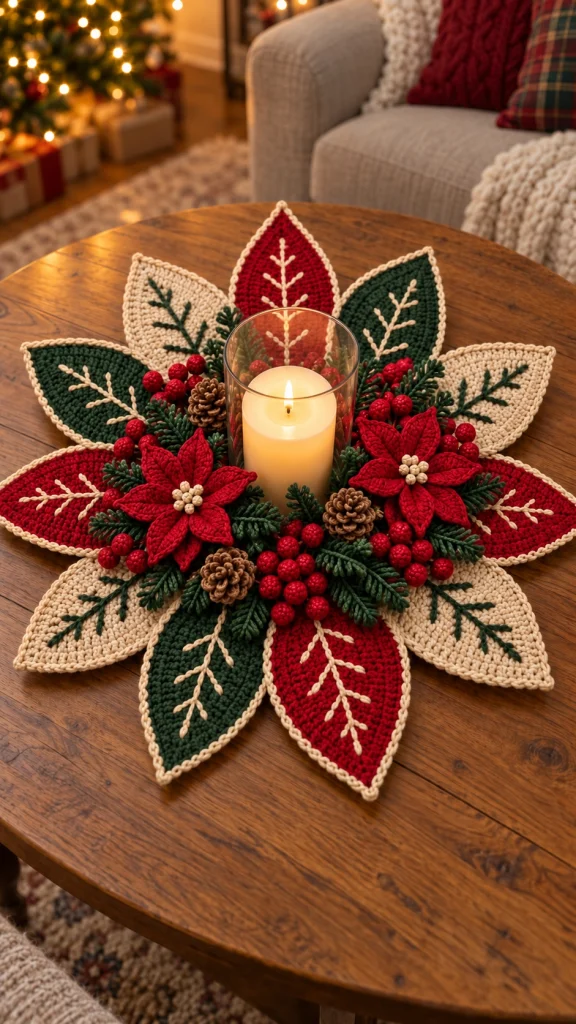
This crochet Christmas candle centerpiece pattern creates a rich handmade holiday decoration designed around a central candle. Large pointed crochet leaves form the outer starburst, while dimensional red poinsettias, evergreen sprigs, red berries and textured pinecones create a full festive arrangement around the center.
The alternating deep red, forest green and warm cream leaves give the centerpiece its dramatic shape. Cream embroidered veins and edging add definition, while the smaller decorations in the center make the piece look layered and abundant without hiding the candle.
Place it on a round dining table, coffee table, entryway console or Christmas buffet for a cozy handmade holiday display.
Materials
- Deep red worsted yarn 180–220 g
- Forest green worsted yarn 180–220 g
- Warm cream / ivory yarn 180–220 g
- Dark evergreen yarn 100–120 g
- Brown yarn 50–70 g
- Bright berry-red yarn 50–70 g
- Beige yarn for poinsettia centers small amount
- 3.5–4.0 mm crochet hook 1
- Yarn needle 1
- Scissors 1 pair
- Stitch markers 4
- Optional floral wire for shaping leaves
- LED pillar candle or candle in glass holder 1
Abbreviations – US Terms
MRmagic ringchchainsl stslip stitchscsingle crochethdchalf double crochetdcdouble crochettrtreble crochetinc2 sc in same stitchdecsingle crochet decreaseFOfasten offFinished Size
The complete centerpiece measures approximately 55–65 cm / 22–26 in across, depending on yarn tension and the final positioning of the leaves.
Each large outer leaf measures approximately 17–20 cm / 6.5–8 in long.
The center opening should measure approximately 10–12 cm / 4–5 in across to accommodate a candle holder.
Part 1 – Large Pointed Leaves
Make approximately 12 large leaves:
- 4 deep red
- 4 forest green
- 4 warm cream
Using your chosen leaf color:
Ch 26.
Side 1
Starting in the 2nd ch from hook:
sl st, sc, hdc, dc, dc, tr, tr, tr, dc, dc, hdc, sc.
Continue gradually increasing toward the widest section of the leaf.
Work toward the final chain while keeping the pointed end narrow.
Part 2 – Second Side of Leaf
Work 3 sc into the final chain to turn around the tip.
Continue along the opposite side of the foundation chain, mirroring the stitches from Side 1.
Finish with a sl st at the base.
FO.
The finished shape should be elongated with a sharp pointed tip and gently curved sides.
Part 3 – Leaf Border
Join cream yarn around each red and green leaf.
Join red or green yarn around the cream leaves if desired, or keep the cream edge monochromatic for a softer finish.
Work:
1 sl st or reverse sc in each stitch around.
At the pointed tip, work:
sc, ch 1, sc
into the same stitch.
This keeps the tip crisp and clearly defined.
Part 4 – Embroidered Leaf Veins
Using contrasting yarn, embroider or surface crochet one long line from the base to the tip of each leaf.
Add approximately 4–6 diagonal branches on each side.
For red and green leaves, use cream yarn.
For cream leaves, use forest green yarn.
Keep the branches slightly irregular for a natural botanical appearance.
Part 5 – Center Base Ring
Using forest green yarn:
Ch 36–42, depending on the diameter of your candle holder.
Join with sl st to form a ring.
R1: sc around.
R2: hdc around.
R3: sc around.
FO.
The ring should fit loosely around the candle holder without touching it tightly.
Part 6 – Arranging the Outer Leaves
Lay the center ring flat.
Position the 12 large leaves evenly around it with the pointed tips facing outward.
Alternate the colors:
red → cream → green → red → cream → green
and continue around the circle.
Overlap the inner ends slightly.
Sew the leaf bases securely to the crochet center ring.
Part 7 – Large Red Poinsettia Petals
Make 3 poinsettias.
Each flower uses approximately 6 large petals and 6 smaller petals.
For one large petal:
Ch 12.
Starting in 2nd ch:
sl st, sc, hdc, dc, tr, tr, dc, hdc, sc, sl st.
Work along the opposite side of the chain using the mirrored sequence.
FO with a long tail.
Part 8 – Small Poinsettia Petals
Using red yarn:
Ch 9.
Starting in 2nd ch:
sl st, sc, hdc, dc, tr, dc, hdc, sc.
Mirror the stitches along the opposite side.
FO.
Make approximately 6 small petals per flower.
Part 9 – Assemble the Poinsettias
Arrange the six large petals into a flower.
Overlap their bases slightly and sew together.
Place the smaller petals over the gaps between the large petals.
Sew firmly through the center.
Keep the petal tips loose so the flower remains dimensional rather than flat.
Part 10 – Poinsettia Centers
Using beige or champagne yarn:
R1: MR, 6 sc. (6)
FO.
Make approximately 6–8 tiny bobbles or knots for each flower.
Cluster them tightly in the center.
Alternatively, embroider several French knots to imitate the small golden centers of a poinsettia.
Part 11 – Evergreen Sprigs
Using dark evergreen yarn:
Ch 20–28.
Starting near the base, create small side branches:
*ch 5, sl st back down the chain, sl st into main stem*
Repeat along both sides of the central chain.
Vary branch lengths between 3–6 chains.
Make approximately 14–18 sprigs.
Part 12 – Crochet Red Berries
Using bright red yarn:
R1: MR, 6 sc. (6)
R2: inc around. (12)
R3: sc around. (12)
Add a tiny amount of stuffing.
R4: dec around. (6)
Close and FO.
Make approximately 25–35 berries.
Part 13 – Berry Clusters
Group berries into clusters of approximately 3–6.
Use green or red yarn to sew them together at their bases.
Leave a long sewing tail on each cluster.
Prepare several clusters before beginning final assembly.
Part 14 – Crochet Pinecone Base
Using medium brown yarn:
R1: MR, 6 sc. (6)
R2: inc around. (12)
R3: (sc, inc) around. (18)
R4–7: sc around.
R8: (sc, dec) around. (12)
Stuff lightly.
R9: dec around. (6)
Close.
Part 15 – Pinecone Scales
Join brown yarn to the bottom of the pinecone.
Work:
*sl st, ch 3, 2 dc in same stitch, ch 1, sl st into next stitch*
Continue around the body in a spiral.
Allow each new row of scales to overlap the previous row.
Make approximately 4–5 pinecones.
Part 16 – Inner Evergreen Layer
Place the evergreen sprigs around the center ring.
Point some outward between the large leaves.
Angle others toward the poinsettias.
Sew only the central stems down so the smaller branches remain raised and dimensional.
Part 17 – Positioning the Poinsettias
Position the three large poinsettias approximately evenly around the candle.
For a natural arrangement, avoid making their spacing mathematically perfect.
Let some petals overlap the greenery slightly.
Sew each flower securely through its center and lower petals.
Part 18 – Adding Pinecones
Place the pinecones between the poinsettias.
Position some slightly closer to the candle and others toward the outer leaves.
Sew through the solid center of each pinecone rather than through the decorative scales.
Part 19 – Adding Berry Clusters
Fill the remaining spaces with red berry clusters.
Allow several berries to extend over the edges of the greenery.
Use smaller clusters close to the candle and fuller clusters toward the outer arrangement.
Do not completely cover the green sprigs—the contrast between red berries and evergreen yarn is an important part of the design.
Part 20 – Creating the Layered Look
The centerpiece should have three visible levels:
- Bottom layer: large red, cream and green pointed leaves
- Middle layer: evergreen sprigs, berries and pinecones
- Top layer: dimensional red poinsettias
Keep the candle opening clear in the center.
Part 21 – Final Shaping
Place the centerpiece on a flat table.
Gently pull each large leaf outward until the arrangement forms an even starburst.
Lift the poinsettia petals slightly with your fingers.
Separate the evergreen branches.
Rotate berry clusters so the fullest sides face upward.
Shape the pinecones so their scales remain visible.
Part 22 – Optional Stiffening
If the large leaves curl too much, lightly steam block them before assembly.
Do not press the iron directly onto the yarn.
For cotton yarn, a small amount of fabric stiffener may be applied to the backs of the outer leaves.
Allow everything to dry completely before assembling the centerpiece.
Part 23 – Candle Placement
Place the candle holder into the center opening only after the crochet centerpiece is completely assembled.
The glass holder should sit directly on the table, not on top of thick crochet layers.
Make sure no leaves, flowers, berries or yarn ends lean toward the candle.
An LED pillar candle gives the same warm holiday effect without an exposed flame.
Suggested Christmas Color Palette
Outer leaves: deep Christmas red, forest green and warm ivory.
Leaf veins: ivory on colored leaves and forest green on ivory leaves.
Poinsettias: rich red with warm beige centers.
Greenery: dark evergreen.
Berries: bright cranberry red.
Pinecones: medium and dark brown.
Alternative Color Ideas
Elegant Christmas: ivory, champagne, dark green and burgundy.
Traditional Christmas: bright red, forest green, cream and brown.
Winter White: ivory, white, sage and champagne.
Rustic Christmas: cranberry, oatmeal, olive and warm brown.
Vintage Christmas: muted red, dusty green, antique cream and soft gold.
Where to Display It
- Christmas dining table
- Round coffee table
- Entryway console
- Kitchen island
- Holiday buffet
- Covered side table
- Christmas party table
- Dining room centerpiece
Care Instructions
Remove the candle or candle holder before cleaning.
Spot clean the crochet pieces using cool water and mild detergent.
Do not heavily soak the dimensional flowers, berries or pinecones.
Allow the centerpiece to air dry flat.
Before storing, gently reshape all leaves and flowers.
Store flat in a large box with tissue paper between dimensional sections.
Frequently Asked Questions
The individual stitches are fairly simple, but the large number of separate pieces and the layered assembly make this project best for an adventurous beginner or intermediate crocheter.
Yes. Use thinner yarn and a smaller hook, or make fewer outer leaves. Eight or nine leaves will create a more compact centerpiece.
Yes. Cotton is especially suitable because it gives the pointed leaves and poinsettia petals excellent stitch definition and helps them hold their shape.
Yes. The center can instead hold a small vase, crochet ornament, decorative bowl or LED lantern.
Approximately 12 leaves create the full starburst shown in this style of centerpiece. You can use more or fewer depending on the finished diameter you want.
Block them before assembly and sew each leaf firmly at its base. Cotton yarn or a slightly smaller hook can also create a firmer fabric.
Yes. Replace the poinsettias and berries with neutral flowers and leaves to turn the same basic construction into a winter or year-round crochet table centerpiece.
The finished Crochet Christmas Candle Centerpiece Pattern

