Crochet Daisy Coaster Pattern
Beginner Friendly
Perfect for those just starting their crochet journey, with clear instructions and simple techniques
Single-Day Project
A satisfying project you can complete in a single afternoon or evening.
Handmade Gift
A beautiful keepsake — free forever. Read online or print at home.
About This Crochet Daisy Coaster Pattern
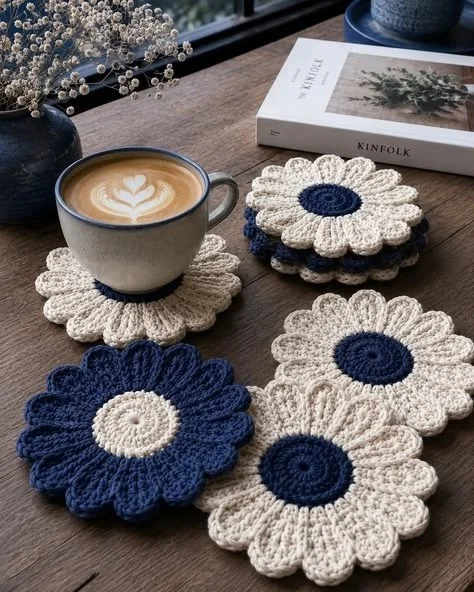
This crochet daisy coaster pattern creates a beautiful dimensional flower coaster with a round center and soft textured petals. The design looks especially elegant in warm cream and deep navy blue, giving the handmade flower a cozy but modern appearance.
Use the finished daisies under coffee mugs, tea cups, candles or small plant pots, or make a complete set for a thoughtful handmade gift. You can also reverse the colors to create the navy flower with a cream center shown in the inspiration.
Materials
- Warm cream cotton yarn 30–40 g
- Deep navy cotton yarn 15–20 g
- 3.5–4.0 mm crochet hook 1
- Yarn needle 1
- Scissors 1 pair
- Stitch marker optional
Abbreviations – US Terms
MRmagic ringchchainsl stslip stitchscsingle crochethdchalf double crochetdcdouble crochettrtreble crochetinc2 stitches in same stitchFOfasten offFinished Size
One finished flower measures approximately 12–14 cm / 4.75–5.5 in across, depending on yarn, hook size and tension.
The center should remain fairly flat while the petals have a slightly raised texture.
Part 1 – Crochet the Daisy Center
Using deep navy yarn:
Round 1: Make a MR, ch 1, work 8 sc into ring. Pull ring closed. Join with sl st. (8)
Round 2: ch 1, work 2 sc in each st around. Join. (16)
Round 3: ch 1, *1 sc in next st, 2 sc in next st*; repeat around. Join. (24)
Round 4: ch 1, *1 sc in next 2 sts, 2 sc in next st*; repeat around. Join. (32)
FO and weave in the navy tail.
Part 2 – Prepare the Petal Round
Join cream yarn into any stitch of the navy center.
Round 5: ch 1, sc in each stitch around. Join with sl st. (32)
This round creates a clean transition between the center and the petals.
Part 3 – First Daisy Petal
Each petal is worked outward and then back toward the center.
From the current stitch:
Ch 8.
Starting in the 2nd ch from hook:
1 sc, 1 hdc, 3 dc, 1 hdc, 1 sc.
Sl st into the next stitch of the center.
This creates one elongated rounded petal.
Part 4 – Continue the Petals
Sl st into the next stitch.
Repeat:
ch 8, sc in 2nd ch, hdc, dc in next 3 ch, hdc, sc, sl st into next center stitch.
Continue evenly around the flower.
Aim for approximately 16 petals.
Join at the base of the first petal.
Part 5 – Add the Raised Petal Texture
For the ribbed appearance seen in the finished coaster, work a surface slip-stitch line along the center of each petal.
Insert the hook near the base of one petal.
Pull up a loop of cream yarn.
Work loose surface slip stitches toward the tip of the petal.
FO at the tip and hide the ends on the back.
Repeat for every petal.
Part 6 – Shape the Petals
Use your fingers to gently pull each petal outward.
Round the tips slightly.
Keep the base of each petal close to the center while allowing the outer portion to spread.
The finished flower should have a full daisy shape without large spaces between the petals.
Part 7 – Optional Fuller Petals
For thicker, more dimensional petals, work around the outer edge of each petal:
1 sc along the first side, 3 sc at the tip, 1 sc along the opposite side.
Sl st at the base.
Repeat around all petals.
This creates the fuller scalloped appearance of the inspiration.
Part 8 – Reverse Color Daisy
To make the second variation:
Work Rounds 1–4 using warm cream.
Change to deep navy for the petal section.
Follow Parts 2–7 exactly as written.
This gives you a coordinating navy daisy with a cream center.
Part 9 – Make a Matching Set
For a coordinated set like the inspiration, make:
- 4 cream daisies with navy centers
- 2 navy daisies with cream centers
Or make all six identical for a more minimal table setting.
Part 10 – Optional Double-Layer Coaster
For a thicker coaster, crochet a simple flat circle in the center color.
Work the same center rounds until the circle is approximately the same diameter as the flower center and inner petal area.
Place it behind the finished flower.
Sew the two layers together around the outer edge using matching yarn.
This gives the coaster more structure and helps protect the table underneath.
Part 11 – Finishing
Weave in every yarn end securely on the back.
Check that no yarn tails are visible between the petals.
Lay the coaster flat and arrange every petal evenly around the center.
Part 12 – Blocking
Lightly dampen the finished flower.
Place it flat on a blocking mat or folded towel.
Arrange the petals into an even circle.
Pin the outer tip of each petal if necessary.
Allow the coaster to dry completely before using it.
Color Variations
Classic Navy: warm cream petals + deep navy center.
Reverse Daisy: deep navy petals + cream center.
Traditional Daisy: white petals + mustard yellow center.
Autumn: oatmeal petals + rust center.
Christmas: cream petals + deep red center.
Spring: blush pink petals + warm yellow center.
Cottage: sage green petals + cream center.
Ways to Use Your Crochet Daisy Coasters
- Coffee mug coaster
- Tea cup coaster
- Candle mat
- Small plant-pot mat
- Breakfast table decoration
- Coffee bar accessory
- Mother’s Day gift
- Housewarming gift
- Teacher gift
- Handmade gift set
Gift Set Idea
Stack four to six finished flowers together and tie them with a simple cream ribbon or jute cord.
Add a small handmade tag and pair the coaster set with a ceramic coffee mug for an easy handmade gift.
Care Instructions
For cotton yarn, gently hand wash in cool or lukewarm water with mild detergent.
Press excess water out using a towel without twisting the petals.
Reshape the flower and dry completely flat.
Re-block the petals after washing if necessary.
Frequently Asked Questions
Yes. The project mainly uses basic crochet stitches. The petals require a little more attention, but after making the first one the remaining petals repeat in the same way.
Cotton is an excellent choice because it is absorbent, washable and gives the flower petals clear stitch definition.
A finished diameter of approximately 12–14 cm / 4.75–5.5 in works well for most coffee mugs and tea cups.
Your tension may be too tight. Try loosening your stitches slightly, using a larger hook, or blocking the completed coaster.
Yes. Start each petal with fewer chains. For a smaller flower, try ch 6 instead of ch 8 and adjust the stitches along the chain proportionally.
Absolutely. Keep the same construction and change the center and petal colors to create seasonal or personalized coaster sets.
Yes. They can also be used as appliqués, wall decorations, bag embellishments, table decorations or joined together for larger crochet projects.
The finished Crochet Daisy Coaster Pattern