Pastel Crochet Christmas Angels – Free Amigurumi Ornament Pattern
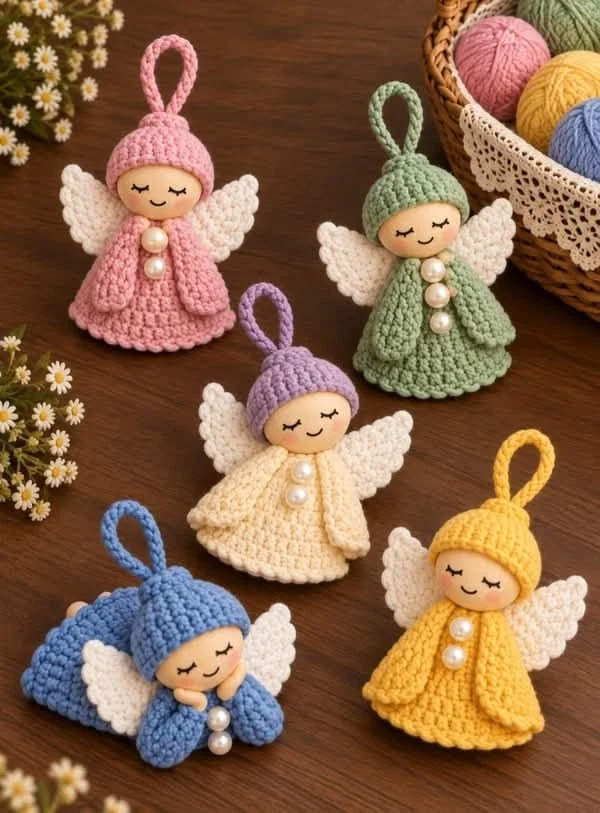
Bring a touch of sweetness to your holiday decorations with these adorable pastel crochet Christmas angels. Featuring soft pink, sage green, lavender, baby blue, and buttery yellow dresses, these tiny handmade angels make beautiful Christmas tree ornaments, thoughtful gifts, and charming nursery decorations.
Each angel features a round sleepy face, a matching crocheted hat, delicate white wings, a flowing dress, tiny arms, pearl decorations, and a hanging loop.
This free crochet angel ornament pattern includes step-by-step instructions for creating the body, head, hat, wings, arms, decorative edging, and finishing details.
Pattern at a Glance
Materials and Supplies
- DK-weight cotton yarn in pastel pink.
- DK-weight cotton yarn in sage green.
- DK-weight cotton yarn in lavender.
- DK-weight cotton yarn in baby blue.
- DK-weight cotton yarn in pastel yellow.
- White or ivory cotton yarn for the wings.
- Skin-tone yarn for the head.
- Black embroidery thread for the eyes.
- Soft pink embroidery thread for the mouth.
- 2.5 mm crochet hook.
- Polyester fiberfill stuffing.
- Yarn needle and scissors.
- Stitch markers.
- Small pearl-style beads or embroidered pearl substitutes.
- Optional fabric stiffener for the wings.
Pastel Color Combinations
Abbreviations
All rounds are worked continuously unless otherwise specified. Use a stitch marker to identify the beginning of each round.
Part 1: Crochet the Angel’s Head
Use skin-tone cotton yarn and a 2.5 mm hook. The head is crocheted as a small stuffed sphere.
Head instructions
Round 1: 6 sc in MR. (6)
Round 2: Inc in each stitch. (12)
Round 3: (1 sc, inc) × 6. (18)
Round 4: (2 sc, inc) × 6. (24)
Round 5: (3 sc, inc) × 6. (30)
Rounds 6–10: Sc around. (30)
Round 11: (3 sc, dec) × 6. (24)
Round 12: (2 sc, dec) × 6. (18)
Begin stuffing the head firmly but gently.
Round 13: (1 sc, dec) × 6. (12)
Round 14: Dec × 6. (6)
FO and close the opening with a yarn needle.
Part 2: Embroider the Sleepy Face
The sweet closed-eye expression is one of the most recognizable details of these little angels.
Face embroidery
- Position the eyes between Rounds 7 and 9 of the head.
- Leave approximately 5–6 stitches between the eyes.
- Using black embroidery thread, stitch two gently curved closed eyes.
- Add two or three tiny eyelashes at the outer corners.
- Use soft pink thread to embroider a small curved smile.
- Secure all thread ends inside the head.
Part 3: Crochet the Bell-Shaped Dress
The angel’s body is worked from the narrow neckline downward, gradually increasing to create a flowing bell-shaped dress.
Dress instructions
Using your chosen pastel color:
Round 1: 6 sc in MR. (6)
Round 2: Inc around. (12)
Round 3: Sc around. (12)
Round 4: (1 sc, inc) × 6. (18)
Round 5: Sc around. (18)
Round 6: (2 sc, inc) × 6. (24)
Round 7: Sc around. (24)
Round 8: (3 sc, inc) × 6. (30)
Round 9: Sc around. (30)
Round 10: (4 sc, inc) × 6. (36)
Round 11: Sc around. (36)
Round 12: (5 sc, inc) × 6. (42)
Rounds 13–14: Sc around. (42)
Part 4: Crochet the Decorative Scalloped Hem
The gently scalloped hem gives the dress a delicate, finished appearance.
Scalloped edging
Round 15: *Sl st in the next stitch, skip 1 stitch, work 5 dc in the next stitch, skip 1 stitch, sl st in the next stitch.* Repeat around, distributing the scallops evenly.
FO and weave in the ends.
The dress should flare naturally toward the bottom.
Part 5: Crochet the Angel’s Hat
Each angel wears a softly rounded matching hat.
Hat instructions
Using the same color as the dress:
Round 1: 6 sc in MR. (6)
Round 2: Inc around. (12)
Round 3: (1 sc, inc) × 6. (18)
Round 4: (2 sc, inc) × 6. (24)
Round 5: (3 sc, inc) × 6. (30)
Rounds 6–9: Sc around. (30)
Round 10: Sl st loosely around. (30)
FO, leaving a long sewing tail.
Part 6: Crochet the Hanging Loop
Hanging loop instructions
Using matching yarn, ch 26.
Sl st into the first chain to form a loop.
FO, leaving two long tails.
Thread both tails through the top center of the hat and secure them inside.
Adjust the loop to approximately 4–5 cm tall.
Part 7: Crochet the Angel Wings
Each angel has two small textured ivory wings. The wings should be slightly curved and pointed toward their outer ends.
Wing instructions – make two
Using ivory yarn:
Row 1: Ch 7. Sc in the second chain from the hook and across. (6)
Row 2: Ch 1, turn. Inc, 4 sc, inc. (8)
Row 3: Ch 1, turn. Sc across. (8)
Row 4: Ch 1, turn. Inc, 6 sc, inc. (10)
Row 5: Ch 1, turn. Sc across. (10)
Row 6: Ch 1, turn. Dec, 6 sc, dec. (8)
Row 7: Ch 1, turn. Dec, 4 sc, dec. (6)
Row 8: Ch 1, turn. Dec, 2 sc, dec. (4)
FO, leaving a long tail for sewing.
Part 8: Add Texture to the Wings
Wing finishing
- Using ivory yarn, surface-crochet short raised lines across the wings.
- Add small scalloped stitches along the outer edges.
- Lightly shape the wings with your fingers.
- Optional: Apply a small amount of fabric stiffener.
- Allow the wings to dry flat.
Part 9: Crochet the Angel’s Arms
Each angel has two short arms that rest gently against the front of the dress.
Arm instructions – make two
Using the dress color:
Round 1: 6 sc in MR. (6)
Rounds 2–7: Sc around. (6)
Stuff lightly or leave unstuffed for a softer appearance.
Flatten the opening and crochet 3 sc through both layers to close.
FO, leaving a sewing tail.
Part 10: Make the Decorative Pearl Buttons
The reference design features a short vertical row of pearl-style buttons down the front of each angel.
Button placement
- Place two or three small pearl-style beads vertically along the front of the dress.
- Leave approximately 0.8–1 cm between them.
- Sew each bead securely with matching thread.
- For a child-safe version, replace the beads with embroidered French knots.
Part 11: Assemble the Angel
Assembly instructions
- Position the head on top of the dress.
- Sew the head securely to the narrow neckline.
- Place the hat on the head, leaving the embroidered face visible.
- Sew the hat along its lower edge.
- Position both ivory wings symmetrically behind the shoulders.
- Sew the wings firmly to the upper back.
- Attach both arms to the upper sides of the dress.
- Angle the arms slightly toward the front.
- Add the pearl-style decorations.
- Check that the hanging loop is secure.
Part 12: Make the Pink Angel
Pink angel variation
Use soft pastel pink yarn for the dress, hat, arms, and hanging loop.
Use ivory yarn for the wings.
Add three pearl-style decorations along the front.
This variation creates a romantic, delicate ornament that looks beautiful on white or traditional green Christmas trees.
Part 13: Make the Sage Green Angel
Sage green angel variation
Use muted sage green yarn for the dress, hat, arms, and hanging loop.
Use ivory yarn for the wings.
Add three pearl-style buttons to the dress.
The sage green version pairs beautifully with natural wood ornaments, cream ribbons, and rustic holiday decorations.
Part 14: Make the Lavender Angel
Lavender angel variation
Use soft lavender yarn for the hat and hanging loop.
Use cream yarn for the dress and arms.
Use ivory yarn for the wings.
Add two pearl-style buttons down the front.
This version has a dreamy, gentle appearance and makes a lovely handmade gift.
Part 15: Make the Baby Blue Angel
Baby blue angel variation
Use baby blue yarn for the hat, dress, arms, and hanging loop.
Use ivory yarn for the wings.
Attach two pearl-style decorations.
For a slightly different pose, sew the arms close to the face to create a peaceful, sleeping angel appearance.
Part 16: Make the Pastel Yellow Angel
Yellow angel variation
Use buttery yellow yarn for the dress, hat, arms, and hanging loop.
Use ivory yarn for the wings.
Add two pearl-style decorations.
The warm yellow color creates a cheerful ornament that looks especially lovely among gold and white Christmas decorations.
Part 17: Shape the Angel’s Dress
Dress shaping instructions
- Place the completed angel on a flat surface.
- Gently spread the dress into a bell shape.
- Adjust the scalloped edging evenly.
- For a firmer ornament, use a small amount of fabric stiffener on the lower dress only.
- Allow the angel to dry completely.
Part 18: Final Finishing
- Weave in all loose yarn ends.
- Check the head attachment.
- Secure the hat and hanging loop.
- Adjust both wings to match.
- Check the embroidered facial expression.
- Inspect the pearl decorations.
- Shape the arms and dress.
- Lightly steam-block only if appropriate for the yarn.
Creative Ways to Use Crochet Angels
Christmas tree ornaments
Hang the angels among fairy lights, ribbons, and handmade crochet snowflakes.
Handmade Christmas gifts
Make a personalized angel in a loved one’s favorite pastel color.
Gift toppers
Attach a tiny crochet angel to a wrapped present for a reusable handmade decoration.
Nursery decorations
Display the angels on a high shelf, away from young children, for a soft decorative accent.
Holiday garland
Make several angels and attach them to a decorative garland, keeping the ornaments evenly spaced.
Craft fair collection
Create coordinated sets of five pastel angels as handmade seasonal decorations.
Tips for Beautiful Crochet Angels
- Use consistent yarn weight across all five angels.
- Choose a hook small enough to prevent stuffing from showing.
- Keep facial embroidery symmetrical.
- Stuff the head firmly but avoid overstuffing.
- Use a slightly smaller hook for neat wings.
- Secure all attachments with strong stitching.
- Match the hanging loop to the dress color.
- Make the wings identical for a balanced appearance.
Frequently Asked Questions
Are these crochet angels beginner-friendly?
These angels are suitable for confident beginners and intermediate crocheters familiar with magic rings, increases, decreases, and sewing amigurumi pieces together.
How big are the finished angels?
Using DK-weight yarn and a 2.5 mm hook, the angels should measure approximately 10–13 cm tall, depending on your tension and the final hat and dress shaping.
Can I use acrylic yarn instead of cotton?
Yes. Acrylic yarn can be used, although cotton generally produces firmer stitches and more defined details.
How do I make the wings hold their shape?
Use tightly worked cotton stitches and lightly block the wings. A small amount of fabric stiffener can help create a firmer shape.
Can I make the angels without pearl beads?
Absolutely. Embroidered French knots or small crocheted bobbles make beautiful alternatives.
Can these angels be used as Christmas tree ornaments?
Yes. Their lightweight construction and matching hanging loops make them ideal for decorative Christmas tree displays.
Care Instructions
- Spot-clean gently with a damp cloth.
- Avoid soaking ornaments with decorative beads or stiffened wings.
- Allow to air dry completely.
- Store in a clean, dry container.
- Avoid crushing the wings during storage.
- Keep away from open flames and excessive heat.
Final Thoughts
These pastel crochet Christmas angels are sweet handmade ornaments that bring softness, warmth, and charm to seasonal decorating.
With their peaceful embroidered faces, delicate white wings, colorful dresses, and tiny pearl details, they make a beautiful coordinated collection for Christmas trees, handmade gifts, and festive displays.
Try making all five colors to create your own adorable angel family, or customize the design with your favorite yarn shades and decorative details.
Love this free crochet angel pattern? Save it to Pinterest and share it with friends who enjoy handmade Christmas ornaments and amigurumi projects!