Rustic Crochet Pumpkin Decor Pattern
Beginner Friendly
Perfect for those just starting their crochet journey, with clear instructions and simple techniques
Single-Day Project
A satisfying project you can complete in a single afternoon or evening.
Handmade Gift
A beautiful keepsake — free forever. Read online or print at home.
About This Rustic Crochet Pumpkin Decor Pattern
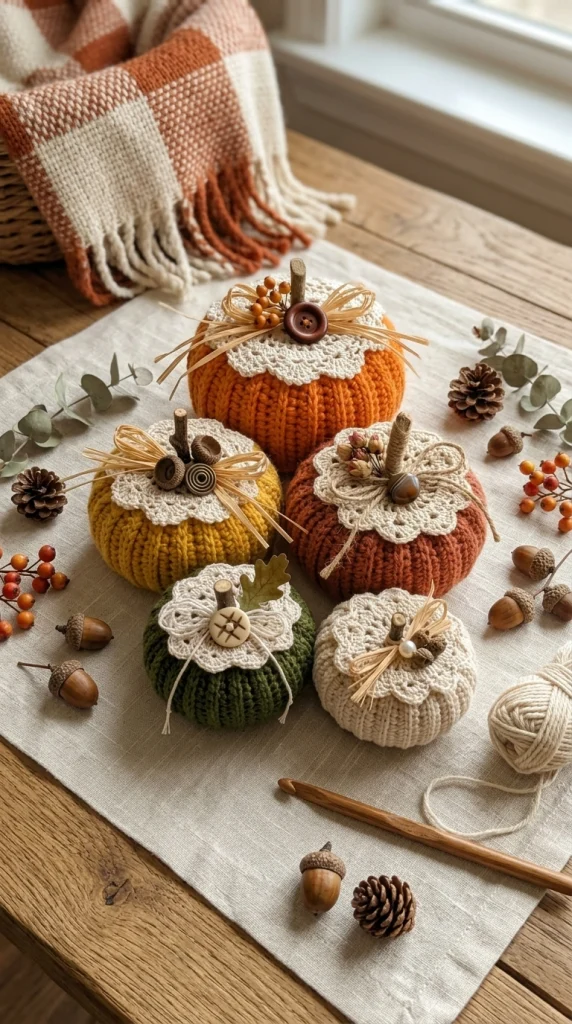
This crochet pumpkin decor pattern creates a coordinated set of five richly textured pumpkins inspired by warm handmade autumn decorations. Deep orange, mustard, terracotta, forest green and natural cream give each pumpkin its own character, while pronounced vertical ribs create the plump shapes shown in the reference. Cream crochet lace collars, rustic stems, raffia bows, wooden buttons and small botanical details finish the tops.
The pumpkins are worked as separate ribbed bodies rather than simple stuffed spheres. Each rectangle is joined into a tube, gathered, stuffed and sculpted before its decorative collar and stem are attached. The complete set takes roughly 8-12 hours depending on your speed and how detailed you make the embellishments. They work especially well as table decorations, shelf accents or a handmade fall centerpiece.
Materials
- Worsted-weight yarn in burnt orange approximately 90 g
- Worsted-weight yarn in mustard gold approximately 55 g
- Worsted-weight yarn in terracotta approximately 65 g
- Worsted-weight yarn in forest green approximately 50 g
- Worsted-weight yarn in natural cream approximately 100 g
- DK cotton yarn in cream approximately 50 g for lace collars
- Brown yarn small amount for optional crocheted stems
- 4.0 mm crochet hook pumpkin bodies
- 3.0 mm crochet hook lace collars and small details
- Polyester fiberfill approximately 250-300 g
- Natural raffia for bows
- Wooden buttons 3-5 assorted sizes
- Wooden twigs or crocheted stems 5
- Small wooden bead optional
- Artificial or crocheted miniature leaf optional
- Yarn needle for sculpting and assembly
- Stitch markers 2-4
- Scissors 1 pair
Abbreviations
chchainsl stslip stitchscsingle crochethdchalf double crochetdcdouble crochettrtreble crochetBLOback loop onlyinc2 stitches in the same stitchdecsingle crochet decreaseststitchspspaceMRmagic ringFOfasten offLarge Burnt Orange Pumpkin
- With burnt orange yarn and 4.0 mm hook, ch 31.
- Row 1: Hdc in second ch from hook and in each ch across. (30)
- Row 2: Ch 1, turn, BLO hdc in each st across. (30)
- Rows 3-44: Repeat Row 2. (30)
- Do not cut a short tail. FO leaving approximately 80 cm for seaming and gathering.
- Bring Rows 1 and 44 together with the ribs running vertically. Sl st through corresponding loops to form a tube.
- Thread the long tail through the edge stitches around one opening. Pull firmly and secure.
- Turn the gathered end inward slightly so the closure is hidden.
- Stuff firmly, concentrating more filling around the outside and slightly less through the center.
- Gather the upper opening but leave a small central space for the stem.
- Pass a long strand from top to bottom through the center 3-4 times, pulling firmly enough to flatten the pumpkin slightly and deepen the rib definition.
Mustard Pumpkin
- With mustard yarn, ch 23.
- Row 1: Hdc in second ch from hook and across. (22)
- Row 2: Ch 1, turn, BLO hdc across. (22)
- Rows 3-34: Repeat Row 2. (22)
- FO with a long tail.
- Join the first and last rows to create a tube.
- Gather and close the lower edge.
- Stuff firmly.
- Gather the upper edge around the stem opening.
- Pass yarn vertically through the center several times to compress and shape the pumpkin.
Terracotta Pumpkin
- With terracotta yarn, ch 25.
- Row 1: Hdc in second ch from hook and across. (24)
- Row 2: Ch 1, turn, BLO hdc across. (24)
- Rows 3-36: Repeat Row 2. (24)
- FO leaving a long tail.
- Seam the short ends together.
- Gather the bottom tightly and secure.
- Stuff until plump but still compressible.
- Gather the top.
- Pull a strand through the center from top to bottom several times to create the low, rounded silhouette.
Forest Green Pumpkin
- With forest green yarn, ch 21.
- Row 1: Hdc in second ch from hook and across. (20)
- Row 2: Ch 1, turn, BLO hdc across. (20)
- Rows 3-32: Repeat Row 2. (20)
- FO with a long tail.
- Seam into a tube.
- Gather the bottom edge and secure.
- Stuff evenly.
- Gather the upper edge.
- Sculpt through the center until the pumpkin is approximately 11-12 cm wide.
Small Cream Pumpkin
- With cream yarn, ch 19.
- Row 1: Hdc in second ch from hook and across. (18)
- Row 2: Ch 1, turn, BLO hdc across. (18)
- Rows 3-28: Repeat Row 2. (18)
- FO with a long tail.
- Join into a tube and gather the bottom.
- Stuff firmly but do not overfill.
- Gather the top around the stem opening.
- Sculpt through the center to form a compact, flattened pumpkin.
Large Lace Collar – Make 3
- With cream DK cotton and 3.0 mm hook, make an MR.
- Round 1: Ch 3, work 15 dc into MR, sl st to top of beginning ch-3. (16 dc)
- Round 2: Ch 3, dc in same st, 2 dc in each remaining st, sl st to join. (32 dc)
- Round 3: Ch 1, *sc in next st, ch 3, skip 1 st*. Repeat around, sl st to first sc. (16 ch-3 sps)
- Round 4: Sl st into first ch-3 sp, ch 1, work *(sc, hdc, 3 dc, hdc, sc) in ch-3 sp*. Repeat in each ch-3 sp. (16 scallops)
- Round 5: *Sl st to center dc of next scallop, ch 4, sl st into same st*. Repeat around to create pointed lace tips.
- FO and block flat.
Small Lace Collar – Make 2
- With cream DK cotton, make an MR.
- Round 1: Ch 3, 11 dc into MR, sl st to join. (12 dc)
- Round 2: Ch 3, dc in same st, 2 dc in each remaining st. (24 dc)
- Round 3: *Sc in next st, skip next st, 5 dc in next st, skip next st*. Repeat around. (6 scallops)
- Round 4: Sl st to center dc of scallop, ch 3, sl st into same dc; repeat for each scallop.
- FO and block flat.
Crocheted Stem Option – Make 5
- With brown yarn and 3.0 mm hook, make an MR.
- Round 1: 6 sc in MR. (6)
- Round 2: BLO sc around. (6)
- Rounds 3-8: Sc around. (6)
- For shorter pumpkins, stop after Round 6.
- Stuff very lightly with a scrap of yarn or fiberfill.
- FO leaving a long sewing tail.
Small Crochet Oak Leaf
- With olive yarn and 3.0 mm hook, ch 12.
- Sl st in second ch from hook, sc in next, hdc in next, dc in next 2, hdc in next, sc in next.
- Ch 3, sl st in second ch and sc in next ch to create a side point; sl st back into the main chain.
- Continue down the chain with sc, hdc and dc, creating two additional ch-3 side points.
- Work 3 sc into the final chain and continue along the opposite side.
- Mirror the stitch sequence and side points.
- Sl st to the starting point.
- FO leaving a tail for sewing.
Raffia Bows and Top Details
- Cut 3-5 strands of natural raffia approximately 35 cm long for each large pumpkin.
- Center the strands beneath the stem and tie into a loose double bow.
- Trim the ends unevenly for the rustic look shown in the reference.
- Sew a wooden button to the center of selected bows.
- Add the crochet oak leaf, small wooden bead or tiny berry cluster to selected pumpkins rather than decorating every pumpkin identically.
- Secure all non-crochet embellishments firmly if the pumpkins will be handled frequently.
Finishing
Place a blocked lace collar over the gathered top of each pumpkin before attaching its stem. Pull the center opening around the stem and tack the collar to the pumpkin at four to six evenly spaced points. Keep the scalloped edge free so it sits above the ribbing rather than lying completely flat.
Attach the stem through both the collar and pumpkin body. Add raffia, buttons and botanical details last. Arrange the finished pumpkins as a group with the largest orange pumpkin toward the back and the smaller mustard, terracotta, green and cream pumpkins staggered in front. This difference in height and color creates the layered handmade centerpiece shown in the reference.
Tips for Success
- Keep every BLO row at the same tension; uneven tension makes the vertical ribs twist after the rectangle is joined.
- Stuff around the outside first and leave the center slightly softer so the top-to-bottom sculpting strand can compress the pumpkin.
- Block the lace collars separately before attaching them. The scallops look much cleaner when opened before assembly.
- For the most natural grouping, vary both pumpkin width and stem height rather than making five identical shapes.
- When using real twigs, insert them into a small opening rather than forcing them through stitches, which can split the yarn.
Common Mistakes to Avoid
- Overstuffing the body: Too much filling creates a ball instead of a squat pumpkin. Remove a little stuffing before the final gathering if the ribs are stretched flat.
- Joining the rectangle crooked: Match each row carefully before seaming or the ribs will spiral around the pumpkin.
- Pulling the lace collar too tightly: The collar should flare over the pumpkin. Tack only its inner section in place.
- Using a weak gathering strand: Use doubled yarn for the large pumpkin so the thread does not snap while closing the opening.
- Making every decoration identical: The reference has a collected, rustic appearance. Vary buttons, bows and small accents across the set.
Ways to Customize This Pattern
- Make an all-neutral set using ivory, oatmeal, taupe and warm brown yarn.
- Replace the raffia with velvet ribbon for a more polished Thanksgiving centerpiece.
- Add crocheted acorns and miniature maple leaves around the collars.
- Use cinnamon sticks as decorative stems for a warm seasonal appearance and fragrance.
- Make three additional miniature pumpkins using 14-stitch bodies for a larger tiered centerpiece.
Frequently asked questions
Work every body row in BLO hdc and keep the stuffing firm but not stretched. After closing the pumpkin, pass yarn through its center from top to bottom several times and tighten it gradually. This compresses the center while allowing the ribbed outer edge to stay full.
Yes. Smooth any sharp edges first, make a small opening in the gathered center and insert the twig approximately 2-3 cm. Secure it internally with strong thread or fabric-safe adhesive if the pumpkin is decorative only.
Use cotton yarn for the collar and wet-block it before assembly. Pin every scallop into shape and allow it to dry completely before placing it over the pumpkin.
Yes. The ribbed bodies and lace collars provide enough texture on their own. For an entirely crocheted version, replace the raffia with chain-stitch ties and use small crochet leaves instead of buttons or wooden accents.
Increase both the starting chain and the number of ribbed rows. A taller starting chain controls the pumpkin’s height, while additional rows increase its circumference. Keep the rectangle roughly one and a half times as wide as it is tall before seaming for a full, squat shape.
The finished Rustic Crochet Pumpkin Decor Pattern