Sage Green Crochet Bucket Bag Pattern with Bobbles & Flowers
Beginner Friendly
Perfect for those just starting their crochet journey, with clear instructions and simple techniques
Single-Day Project
A satisfying project you can complete in a single afternoon or evening.
Handmade Gift
A beautiful keepsake — free forever. Read online or print at home.
About This Sage Green Crochet Bucket Bag Pattern with Bobbles & Flowers
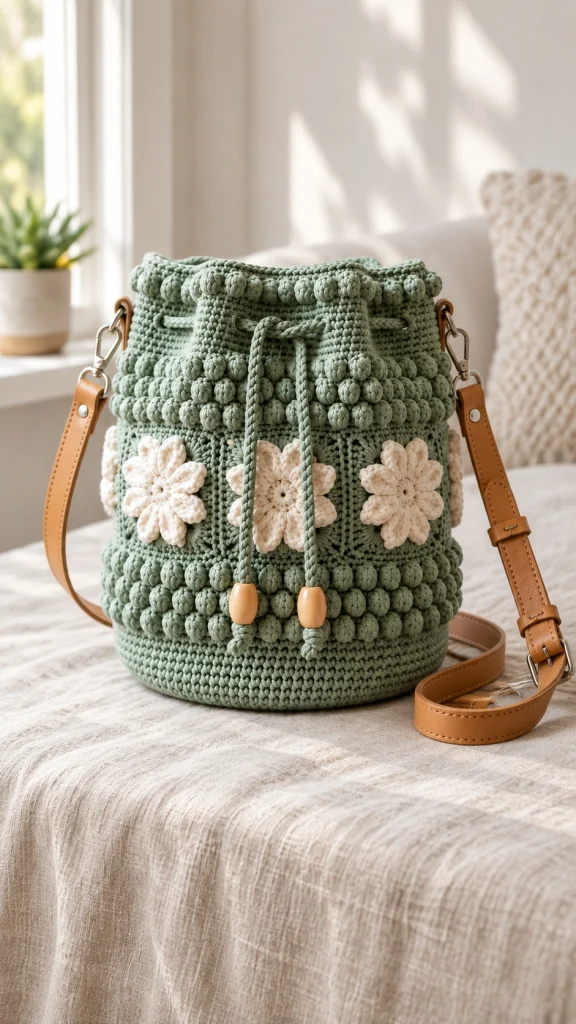
This crochet bucket bag pattern creates a beautifully textured sage green handbag with rows of raised bobbles, large cream crochet flowers, a drawstring closure and a detachable shoulder strap.
The bag has a structured round base and cylindrical bucket shape. The combination of simple crochet sections and dimensional details makes it look much more elaborate than the basic construction actually is.
The finished design works beautifully as an everyday shoulder bag, spring accessory or handmade gift.
Materials
- Sage green cotton or cotton-blend yarn approximately 350-450 g
- Cream yarn approximately 50-70 g for flowers
- 4.0 mm crochet hook main bag
- 3.5 mm crochet hook flowers and drawstring
- Detachable tan shoulder strap approximately 100-120 cm
- Metal D-rings 2
- Metal swivel clasps 2 if not included with strap
- Wooden beads 2 large-hole beads
- Fabric lining optional
- Plastic canvas or bag-base insert optional for extra structure
- Yarn needle 1
- Stitch markers 4
- Scissors 1 pair
Abbreviations
MRmagic ringchchainsl stslip stitchscsingle crochethdchalf double crochetdcdouble crochetinc2 stitches in same stitchBObobble stitchFOfasten offRound Bag Base
- With sage green yarn, make a MR.
- Round 1: Work 8 sc into MR. Join with sl st. (8)
- Round 2: Inc in every stitch around. (16)
- Round 3: *1 sc, inc* around. (24)
- Round 4: *2 sc, inc* around. (32)
- Round 5: *3 sc, inc* around. (40)
- Round 6: *4 sc, inc* around. (48)
- Round 7: *5 sc, inc* around. (56)
- Round 8: *6 sc, inc* around. (64)
- Round 9: *7 sc, inc* around. (72)
- Round 10: *8 sc, inc* around. (80)
The base should measure approximately 20-22 cm across. Add or remove an increase round if necessary to reach your preferred size.
Building the Bag Walls
- Round 11: Working in BLO, sc around. (80)
- Rounds 12-17: Sc in every stitch around.
- Keep your tension firm and even so the bag stands upright.
The BLO round creates a defined edge between the bottom and sides of the bucket bag.
Lower Bobble Band
- Round 18: Sc around.
- Round 19: *BO, sc in next stitch* around.
- Round 20: Sc around.
- Round 21: Repeat the bobble pattern, offsetting the bobbles so they sit between those from the previous bobble row.
- Round 22: Sc around.
- Round 23: *BO, sc* around.
- Round 24: Sc around.
This creates the thick dimensional bobble band around the lower portion of the bag.
Flower Section
- Rounds 25-34: Sc evenly around.
- This plain section becomes the background for the large cream flowers.
- Keep the stitch count at 80 throughout.
Upper Bobble Band
- Round 35: Sc around.
- Round 36: *BO, sc* around.
- Round 37: Sc around.
- Round 38: Repeat bobbles, offsetting their positions.
- Round 39: Sc around.
- Round 40: *BO, sc* around.
- Round 41: Sc around.
Upper Bag Section
- Rounds 42-47: Sc around.
- Check the total bag height.
- The body should measure approximately 25-26 cm from the base.
Drawstring Eyelet Round
- Round 48: *Sc in next 3 sts, ch 2, skip 2 sts* around.
- Adjust the final repeat slightly if needed to maintain even spacing.
- Round 49: Sc in every sc and work 2 sc into each ch-2 space.
- Round 50: Sc around.
Top Bobble Edge
- Round 51: *BO, sc* around.
- Round 52: Sc around.
- Round 53: Repeat the bobble pattern.
- Round 54: Sc around.
- FO and weave in the yarn securely.
The top bobbles should form a softly textured rim around the opening.
Large Cream Crochet Flowers
Make approximately 6-8 flowers depending on the size of your bag.
- With cream yarn, make a MR.
- Round 1: Work 12 sc into MR. Join.
- Round 2: *Sl st in next stitch, ch 3, 3 dc in next stitch, ch 3, sl st in next stitch*.
- Repeat around to form 6 petals.
- FO leaving a long sewing tail.
- Gently stretch each petal outward with your fingers.
Fuller 8-Petal Flower Option
- Make a MR.
- Round 1: Work 16 sc into the ring.
- For each petal: *sl st, ch 3, 3 dc, ch 3, sl st* across 2 stitches.
- Repeat until 8 petals have been created.
- FO leaving a long tail.
Mixing 6-petal and 8-petal flowers gives the decorative band a more handmade, dimensional appearance.
Attaching the Flowers
- Lay the bag flat without stretching it.
- Position the first flower in the center front.
- Place additional flowers approximately 2-3 cm apart.
- Continue the floral arrangement around the entire circumference.
- Pin each flower temporarily before sewing.
- Sew through the flower center first.
- Add several small stitches underneath individual petals.
- Keep the outer tips of some petals slightly loose to preserve dimension.
Crochet Drawstring
- With sage yarn, ch approximately 130-150.
- Sl st back through every chain for a strong cord.
- FO securely.
- Weave the cord alternately through the eyelets around the bag.
- Bring both ends out through the two front eyelets.
Wooden Bead Ends
- Thread one wooden bead onto each end of the drawstring.
- Push the bead upward approximately 2-3 cm.
- Tie a large knot underneath it.
- Trim excess yarn if necessary.
- Add another decorative knot beneath each bead for the finished look.
Side Strap Tabs
Make 2.
- Ch 9 with sage yarn.
- Row 1: Sc in second ch from hook and across. (8)
- Rows 2-8: Ch 1, turn, sc across.
- FO leaving a long sewing tail.
- Fold the tab around a metal D-ring.
- Sew both ends firmly to the upper side of the bag.
- Repeat on the opposite side.
Shoulder Strap
A detachable tan faux-leather or genuine leather strap approximately 100-120 cm long gives the bag the finished appearance shown in the design.
- Open one swivel clasp.
- Attach it to the first D-ring.
- Attach the second end to the opposite D-ring.
- Adjust the strap length for shoulder or crossbody use.
Optional Crochet Strap
If you prefer an entirely handmade bag:
- Ch 151.
- Row 1: Hdc in second ch from hook and across.
- Rows 2-4: Ch 1, turn, hdc across.
- FO.
- Sew or crochet the strap securely to swivel clasps.
Optional Fabric Lining
- Measure the circumference and height of the finished bag.
- Cut a rectangular piece of lining fabric with approximately 1.5 cm seam allowance.
- Sew the short sides together.
- Cut a circular fabric base matching the crochet base.
- Sew the circular base to the lining tube.
- Fold the upper fabric edge inward.
- Insert the lining into the crochet bag.
- Hand stitch it approximately 2 cm below the drawstring eyelets.
Optional Interior Pocket
- Cut a fabric rectangle approximately 18 × 14 cm.
- Fold all raw edges inward.
- Press the folds.
- Sew the upper edge.
- Position the pocket against the lining.
- Sew the two sides and bottom edge.
Final Assembly
- Check that all flowers are firmly attached.
- Weave in every loose yarn end.
- Insert the optional lining.
- Thread the drawstring through the eyelets.
- Add the wooden beads.
- Attach both D-rings.
- Clip on the shoulder strap.
- Pull the drawstring gently to shape the opening.
- Arrange the top bobbles evenly around the rim.
- Steam-block lightly if necessary without flattening the bobbles or flowers.
Finished Measurements
- Height: approximately 25-27 cm
- Width: approximately 23-25 cm
- Base diameter: approximately 20-22 cm
- Drawstring: approximately 120-135 cm finished
- Shoulder strap: approximately 100-120 cm
Tips for Success
- Choose sturdy yarn: Cotton or cotton-blend yarn helps the bucket keep its shape.
- Use tight tension: A dense fabric prevents the bag from stretching too much.
- Count every round: Maintaining the same stitch count keeps the sides straight.
- Push bobbles outward: This gives the textured rows their pronounced appearance.
- Reinforce hardware: Sew D-ring tabs through several rows of the bag.
- Add a lining: A lining makes the finished bag more practical for everyday use.
- Use a base insert: Plastic canvas helps the bottom stay flat when carrying heavier items.
Ways to Customize Your Crochet Bucket Bag
- Replace sage green with dusty rose, cream, terracotta or chocolate brown.
- Make the flowers in several pastel colors.
- Add pearl beads to the centers of the flowers.
- Use wooden rings instead of metal D-rings.
- Make the entire shoulder strap in crochet.
- Add a magnetic snap inside the opening.
- Add an interior zipper pocket.
- Use contrasting wooden beads on the drawstring.
- Make a miniature version as a small handbag.
Frequently Asked Questions
An adventurous beginner can make it, but familiarity with working in rounds and making bobble stitches will help. The basic bag construction uses mostly single crochet.
A firm worsted or Aran-weight cotton yarn is ideal because it provides enough structure while still creating defined bobbles and flowers.
Yes. Continue increasing the circular base before beginning the sides. Remember that a larger base requires additional yarn and may need more flowers around the middle.
No, but lining is recommended if you plan to carry small objects because it prevents them from pushing through the crochet stitches.
Yes. A wide tightly crocheted strap works well. For less stretching, use cotton yarn and reinforce the strap with a second layer.
Maintain even increases while crocheting the base and use a removable plastic canvas circle inside the lining if additional structure is needed.
Approximately 6-8 large flowers will create the look shown here, but the exact number depends on your yarn, hook size and finished bag circumference.
The finished Sage Green Crochet Bucket Bag Pattern with Bobbles & Flowers