Sage Green Crochet Tote Bag Pattern – Floral Market Bag
Beginner Friendly
Perfect for those just starting their crochet journey, with clear instructions and simple techniques
Single-Day Project
A satisfying project you can complete in a single afternoon or evening.
Handmade Gift
A beautiful keepsake — free forever. Read online or print at home.
About This Sage Green Crochet Tote Bag Pattern – Floral Market Bag
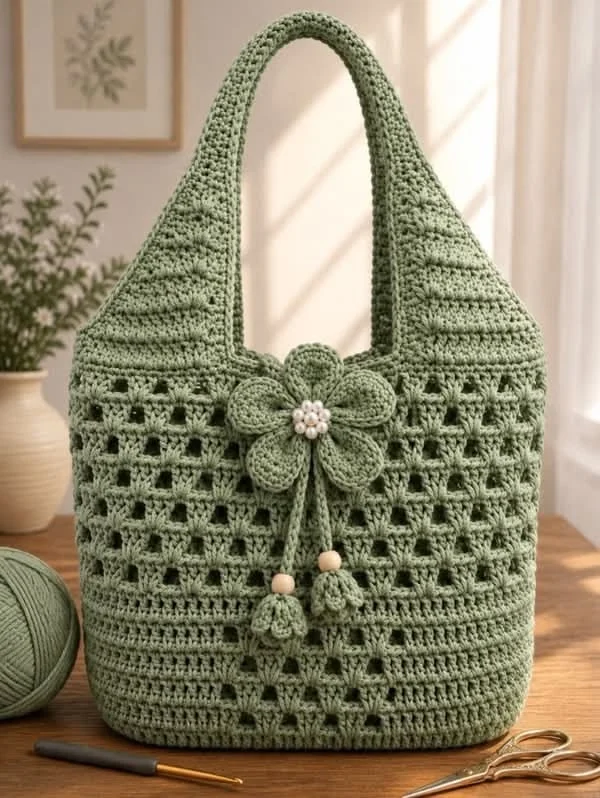
This sage green crochet tote bag pattern creates a soft but structured everyday shoulder bag with a beautiful combination of solid crochet and airy lattice stitches.
The bag features a sturdy rectangular base, an openwork center section, tall integrated handles and a large dimensional crochet flower. Two decorative crochet cords finished with wooden beads and textured bobbles give the front a charming handmade finish.
Materials
- Worsted / Medium #4 cotton or cotton-blend yarn in sage green 450-550 g
- 4 mm crochet hook 1
- 3.5 mm crochet hook optional for flower
- Wooden beads approximately 12-15 mm 2
- Small pearl beads 7-9
- Yarn needle 1
- Stitch markers 4
- Scissors 1 pair
- Optional cotton fabric for lining
- Optional magnetic snap 1
Abbreviations
MRmagic ringchchainsl stslip stitchscsingle crochethdchalf double crochetdcdouble crochettrtreble crochetspspaceststitchstsstitchesskskipFOfasten offFinished Measurements
- Bag width: approximately 35 cm / 13.8 in
- Bag height: approximately 36 cm / 14.2 in
- Base depth: approximately 9 cm / 3.5 in
- Handle opening: approximately 34-38 cm / 13.4-15 in
- Flower: approximately 11-12 cm / 4.5 in across
Bag Base
Using sage green yarn, ch 41.
R1: sc in second ch from hook and across. (40 sts)
R2-R10: ch 1, turn, sc across. (40 sts)
Do not fasten off.
Work one round of sc evenly around all four sides of the rectangle. Place 3 sc in each corner to help the base turn cleanly.
Join with sl st.
Lower Solid Section
From this point, work in joined rounds around the entire bag.
R1: ch 2, hdc in every stitch around. Join.
R2-R7: ch 2, hdc around. Join.
This creates the firm lower section visible beneath the open lattice design.
Lower Openwork Band
R8: ch 3, *dc in next 3 sts, ch 1, sk 1*. Repeat around. Join.
R9: ch 3, dc in each dc and work 1 dc into every ch-1 sp. Join.
R10: repeat R8.
R11: repeat R9.
Main Lattice Section
The center of the bag uses an airy grid stitch.
R12: ch 4, sk 1 st, dc in next st, *ch 1, sk 1, dc in next st*. Repeat around. Join into the third chain.
R13: ch 4, dc into next dc, *ch 1, dc into next dc*. Repeat around.
R14-R27: repeat R13.
Keep the chain spaces relaxed so the mesh remains even.
Upper Solid Band
R28: ch 2, hdc in each dc and each ch-1 sp around.
R29-R34: ch 2, hdc in every stitch around.
This solid section reinforces the upper portion before the handles begin.
Marking the Handles
Lay the bag flat.
Place stitch markers approximately 9 cm / 3.5 in from each side edge on both the front and back.
The stitches between the two markers on each side form the handle opening.
Check that the front and back markers line up before continuing.
First Side and Handle
Work hdc until reaching the first marker.
Instead of crocheting across the center stitches, ch 60.
Join the chain at the second marker with hdc.
Continue hdc around until reaching the corresponding markers on the back.
Ch 60 again and reconnect at the next marker.
Finish the round.
Building the Handles
Next round: hdc in every body stitch and work one hdc into each handle chain.
Following 4 rounds: hdc evenly around the entire bag and both handles.
For a firmer handle, work the final round in sc.
FO and weave in the yarn end securely.
Large Crochet Flower
The dimensional flower is worked separately and sewn to the front center of the tote.
R1: MR, work 12 sc into ring. Join.
R2: *ch 5, sk 1 st, sl st in next st*. Repeat around to create 6 loops.
R3: Into each ch-5 loop work:
sc, hdc, 3 dc, hdc, sc.
Repeat in all 6 loops.
FO.
Second Flower Layer
Join yarn behind the first layer.
R1: *ch 7, sl st around the base between two petals*. Repeat 6 times.
R2: In each ch-7 loop work:
sc, hdc, dc, 3 tr, dc, hdc, sc.
Repeat around.
FO leaving a long tail for sewing.
Flower Center
Sew 7-9 small pearl beads into the center of the flower.
Arrange one bead in the center with the remaining beads clustered closely around it.
Secure every bead individually so one loose thread cannot release the entire cluster.
Attaching the Flower
Position the flower at the center front where the solid upper band meets the lattice section.
Use the long yarn tail to stitch around the center and underneath each petal.
Allow the outer edges of the petals to remain slightly raised to preserve the dimensional appearance.
Decorative Crochet Cords
Make 2.
Ch 45.
Beginning in second ch from hook, sl st loosely across.
FO leaving a long tail.
Attach both cords underneath the flower so they hang vertically.
Adding the Wooden Beads
Thread one wooden bead onto each decorative cord.
Position the bead approximately 6-8 cm below the flower.
Tie a secure knot beneath the bead or stitch through the cord to prevent movement.
Textured Bobble Ends
Make 2.
R1: MR, 6 sc.
R2: inc around. (12)
R3: *sc, inc* around. (18)
R4-R5: sc around.
R6: *sc, dec* around. (12)
R7: dec around. (6)
Add a tiny amount of stuffing before closing.
FO and attach one bobble to the bottom of each cord.
Optional Decorative Texture
For a more floral appearance like the inspiration, work small clusters around the final bobble round:
*sl st, ch 3, 2 dc in same st, ch 3, sl st in next st*.
Repeat around the bobble.
This produces a small ruffled flower-like finish.
Optional Fabric Lining
Cut two pieces of cotton fabric approximately 2 cm larger than the bag body.
Sew the sides and bottom together with right sides facing.
Fold the upper raw edge inward approximately 1 cm.
Insert the lining into the crochet bag.
Hand stitch the folded edge just beneath the upper crochet band.
Optional Interior Pocket
Cut a rectangle approximately 18 × 15 cm.
Fold all raw edges inward and press.
Sew the upper edge first.
Position the pocket against the lining and stitch around the remaining three sides.
Optional Magnetic Closure
Install a magnetic snap in the center of the lining before sewing the lining into the tote.
Reinforce the fabric behind both snap pieces with a small square of interfacing.
Final Shaping
- Weave in every loose yarn end.
- Gently block the bag body.
- Shape the rectangular base while damp.
- Lay both handles flat and make sure they are equal in length.
- Arrange the flower petals.
- Check that both cords hang evenly.
- Allow the bag to dry completely before using.
Frequently Asked Questions
It is best for an adventurous beginner or intermediate crocheter. The bag uses basic stitches, but the openwork section, integrated handles and layered flower require some stitch-counting and assembly.
Yes. The tote works perfectly as a simple sage green market bag without the flower, cords or beads.
Yes. Reduce the number of chains used for each handle. For a hand-held tote, try approximately 35-40 chains instead of 60.
A lining is optional, but it is recommended if you intend to carry small objects because the center of the bag contains open lattice stitches.
Firm cotton or a cotton-acrylic blend gives the best balance between stitch definition, durability and structure.
Absolutely. The design also works beautifully in cream, dusty rose, burgundy, warm brown or muted olive. Keeping the flower and body in one color creates the elegant monochromatic appearance shown here.
The finished Sage Green Crochet Tote Bag Pattern – Floral Market Bag

