Red Crochet Bedspread with Tassels – Free Elegant Bedroom Crochet Pattern
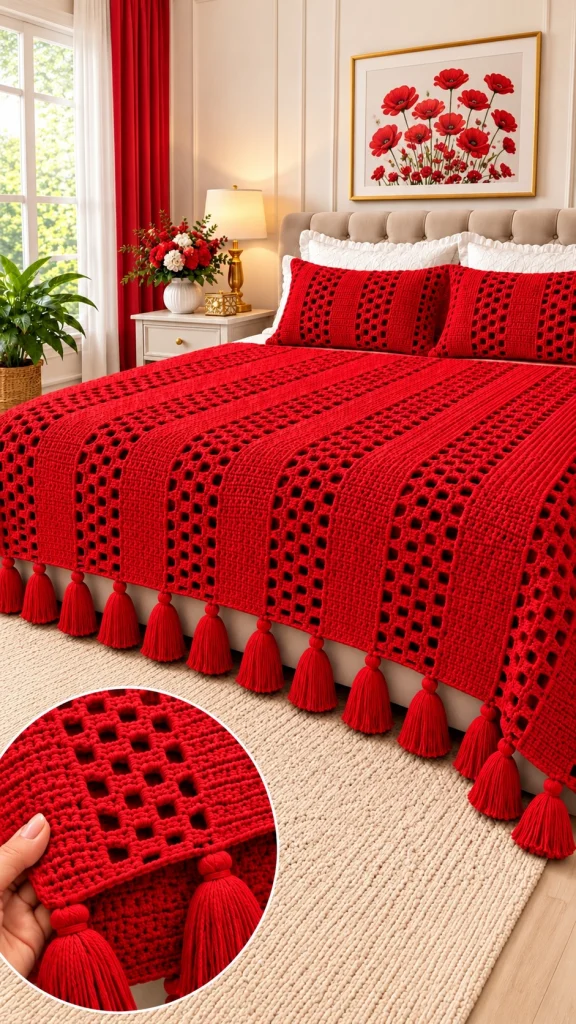
Transform your bedroom with this stunning red crochet bedspread featuring beautiful openwork stripes, textured crochet stitches, and elegant handmade tassels. This luxurious crochet bedding set combines classic craftsmanship with a bold, romantic color that makes any bedroom feel warm, sophisticated, and inviting.
Inspired by the reference photograph, this advanced crochet design features alternating solid textured bands and delicate rectangular mesh panels. The bedspread is finished with a row of long red tassels, while two matching crochet pillow covers complete the coordinated look.
Perfect for crochet lovers who enjoy creating beautiful home decor, this handmade red crochet blanket is a rewarding project that can become a treasured bedroom centerpiece.
Pattern Details
- Skill Level: Advanced
- Finished Bedspread Size: Approximately 220 × 240 cm, excluding tassels
- Matching Pillow Covers: Two, approximately 50 × 70 cm each
- Yarn Weight: DK cotton or cotton-blend yarn
- Hook Size: 4.0 mm
- Color: Rich ruby red
- Construction: Repeating vertical solid and openwork crochet panels
- Border: Structured crochet edging with long decorative tassels
- Terminology: US crochet terms
- Estimated Time: 65–90 hours, depending on experience
Materials Needed
- Approximately 3,000–3,800 g of DK cotton or cotton-blend yarn in ruby red for the full bedding set, subject to gauge and final dimensions
- 4.0 mm crochet hook
- 3.5 mm crochet hook for edging, optional
- Large tapestry needle
- Stitch markers
- Measuring tape
- Sharp scissors
- Blocking mats and rustproof pins
- Two pillow inserts measuring 50 × 70 cm
- Optional matching red fabric for pillow backing
- Optional buttons or zipper closures for pillow covers
- Cardboard approximately 18–20 cm long for making tassels
Crochet Abbreviations
- ch: Chain
- sc: Single crochet
- hdc: Half double crochet
- dc: Double crochet
- tr: Treble crochet
- sl st: Slip stitch
- st: Stitch
- sp: Space
- RS: Right side
- WS: Wrong side
- FLO: Front loop only
- BLO: Back loop only
- FPdc: Front post double crochet
- BPdc: Back post double crochet
- FO: Fasten off
1. Understanding the Bedspread Design
The bedspread is made from a repeating arrangement of long vertical crochet panels.
The reference design includes three main stitch textures:
- Solid Textured Panels: Dense crochet stitches forming structured vertical stripes.
- Openwork Mesh Panels: Decorative rectangular openings arranged in repeating columns.
- Raised Ribbed Panels: Narrow textured bands separating the openwork sections.
All panels are crocheted separately from the bottom edge toward the top, then joined with neat crochet seams.
The finished fabric should drape naturally over the sides of the bed without becoming overly stiff.
2. Crochet the Solid Textured Panels
Make seven solid panels, or adjust the number to suit your desired bedspread width.
Using ruby red yarn and a 4.0 mm hook:
Row 1: Ch 31.
Row 2: Starting in the second chain from the hook, sc across. (30)
Row 3: Ch 2, turn, hdc across. (30)
Row 4: Ch 2, turn, hdc in BLO across. (30)
Row 5: Ch 3, turn, dc across. (30)
Row 6: Ch 3, turn, alternate FPdc and BPdc across. (30)
Row 7: Ch 3, turn, work FPdc around each raised post and BPdc around each recessed post.
Rows 8–11: Repeat Rows 4–7.
Continue repeating this stitch sequence until the panel measures approximately 240 cm.
Fasten off, leaving a long sewing tail.
Make all solid panels the same length.
3. Crochet the Openwork Mesh Panels
The openwork sections create the beautiful rectangular lace pattern visible throughout the red bedspread.
Make six mesh panels.
Using ruby red yarn and a 4.0 mm hook:
Row 1: Ch 33.
Row 2: Dc in the fourth chain from the hook and in each remaining chain. (30 dc)
Row 3: Ch 3, turn, dc in next 3 stitches, *ch 2, skip 2 stitches, dc in next 4 stitches*. Repeat across, adjusting the final solid section to maintain straight edges.
Row 4: Ch 3, turn, dc into each dc and work 2 dc into every ch-2 space.
Row 5: Ch 3, turn, dc in next 3 stitches, *ch 3, skip 3 stitches, dc in next 3 stitches*. Repeat across, keeping the final edge straight.
Row 6: Ch 3, turn, work dc into each dc and 3 dc into each ch-3 space.
Rows 7–10: Repeat Rows 3–6.
Continue until the panel reaches approximately 240 cm.
Fasten off.
Important: The openwork instructions describe the intended stitch texture. The foundation and repeat counts must be adjusted together to create a consistent mesh chart before producing the full-size bedspread.
4. Crochet the Narrow Ribbed Panels
The narrow ribbed panels provide structure and emphasize the contrast between solid and openwork sections.
Make six narrow panels.
Row 1: Ch 13.
Row 2: Hdc in the third chain from the hook and across. (11)
Row 3: Ch 2, turn, hdc in BLO across. (11)
Row 4: Ch 2, turn, hdc in FLO across. (11)
Repeat Rows 3–4 until the panel measures approximately 240 cm.
Fasten off.
The alternating front-loop and back-loop stitches create a subtle ribbed texture.
5. Arrange the Crochet Panels
Lay all completed panels flat on a clean surface.
Arrange them in the following sequence:
- Solid textured panel
- Openwork mesh panel
- Narrow ribbed panel
- Solid textured panel
- Openwork mesh panel
- Solid textured panel
Continue repeating the arrangement until the desired bedspread width is achieved.
For a balanced design, position the widest solid panels near the outer edges and distribute the openwork panels evenly across the center.
Measure the assembled width before joining.
Add or remove panels if necessary to reach approximately 220 cm.
6. Join the Crochet Panels
Using a 3.5 mm or 4.0 mm crochet hook:
Place two panels together with their right sides facing.
Join yarn at one corner.
Work slip stitches through corresponding edge stitches along the entire length.
Keep the seam tension relaxed to prevent puckering.
Repeat until all panels are connected.
Turn the bedspread right side out.
Lay it flat and check that all panels remain aligned.
For a less visible seam, use a mattress stitch with a tapestry needle.
7. Crochet the Outer Border
The outer border creates a neat, professional finish and provides a strong foundation for the decorative tassels.
Using ruby red yarn:
Round 1: Join yarn at one corner and work sc evenly around all four sides.
Work 3 sc into each corner.
Round 2: Ch 2, hdc in every stitch around, working 3 hdc in each corner.
Round 3: Ch 3, dc in each stitch around, increasing at corners as needed.
Round 4: Ch 1, sc around.
Fasten off.
The border should lie flat without curling or stretching.
8. Make the Long Red Tassels
The large red tassels are one of the most eye-catching details of this elegant crochet bedspread.
Make approximately 24–36 tassels, depending on your preferred spacing and bedspread dimensions.
Tassel Instructions
- Cut a piece of sturdy cardboard approximately 18–20 cm long.
- Wrap ruby red yarn around the cardboard 45–60 times.
- Cut a separate 30 cm strand of yarn.
- Slide the strand beneath the wrapped yarn and tie it securely at the top.
- Carefully remove the yarn bundle from the cardboard.
- Cut through the loops at the bottom.
- Wrap another strand of yarn around the bundle approximately 2 cm below the top.
- Tie securely and hide the ends inside the tassel.
- Trim the bottom evenly.
Repeat until all tassels are complete.
For a luxurious look, keep the tassels full, dense, and approximately the same length.
9. Attach the Tassels to the Bedspread
Lay the bedspread flat with the right side facing upward.
Position the tassels along the foot and visible side edges.
Space them approximately 12–15 cm apart.
Using a tapestry needle, sew each tassel securely into the crochet border.
Attach the tassels through multiple stitches to distribute their weight.
Make sure the tassels hang naturally without pulling the border downward.
Trim any uneven strands after attachment.
10. Crochet the Matching Red Pillow Covers
The reference bedding set includes two rectangular crochet pillows featuring the same solid and openwork stripe design.
Make two matching pillow covers.
Front Pillow Panel
Using ruby red yarn and a 4.0 mm hook:
Begin by crocheting a combination of solid, ribbed, and openwork sections.
Arrange the panels to create a finished rectangle approximately 50 × 70 cm.
Join the panels using slip stitch seams or mattress stitch.
Work one round of single crochet around the completed pillow front.
Back Pillow Panel
Using ruby red yarn:
Ch enough stitches to create a 70 cm foundation, based on your measured gauge.
Work rows of half double crochet until the panel measures approximately 50 cm.
Fasten off.
Alternatively, use a coordinating red cotton fabric backing.
Assemble the Pillow Covers
Place the front and back panels together with right sides facing.
Join three sides using single crochet or mattress stitch.
Insert the pillow form.
Close the final edge using a zipper, buttons, or an overlapping envelope closure.
Repeat for the second pillow.
11. Optional Raised Crochet Texture
To create additional depth in the solid sections, incorporate raised crochet stitches.
Suggested options include:
- Front post double crochet ribs
- Back post double crochet channels
- Alternating half double crochet ridges
- Small bobble stitch accents
- Raised vertical cable-inspired stripes
For a design closest to the reference image, keep the raised texture subtle and allow the rectangular mesh panels to remain the main decorative feature.
12. Adjusting the Bedspread Size
This crochet design can be customized for different mattress sizes.
| Bed Size | Suggested Bedspread Dimensions |
|---|---|
| Single | 150 × 220 cm |
| Double | 200 × 230 cm |
| Queen | 220 × 240 cm |
| King | 260 × 260 cm |
These are suggested finished dimensions rather than universal mattress standards. Measure your bed and desired side drop before choosing the final size.
To increase the width, add additional crochet panels.
To increase the length, continue working additional rows in every panel.
Always keep the panel lengths consistent.
13. Blocking the Finished Bedspread
Blocking helps the crochet stitches settle evenly and improves the overall drape.
- Lay the finished bedspread on a large clean surface.
- Lightly mist with water if appropriate for your yarn.
- Gently stretch the fabric to the desired measurements.
- Align the openwork stripes and solid panels.
- Pin the outer border if necessary.
- Allow the bedspread to dry completely.
- Remove the pins carefully.
Avoid stretching the tassels excessively during blocking.
14. Care Instructions
- Wash according to the yarn manufacturer’s instructions.
- Use cool water and a gentle detergent.
- Place the bedspread in a large mesh laundry bag if machine washing is permitted.
- Avoid bleach.
- Do not wring or twist the fabric.
- Dry flat whenever possible.
- Reshape the openwork panels while damp.
- Comb the tassels gently with your fingers.
- Store folded in a dry, clean space.
15. Styling Ideas for Your Red Crochet Bedspread
A vibrant red crochet bedspread makes a beautiful focal point in both traditional and modern bedrooms.
Romantic Red and White Bedroom
Pair the bedspread with crisp white sheets, white pillows, and gold bedside lamps for a bright, elegant look.
Classic Luxury Bedroom
Combine the ruby red crochet bedding with a beige upholstered headboard, warm wood furniture, and subtle gold accessories.
Festive Winter Bedroom
Style the red bedspread with cream blankets, soft lighting, and seasonal greenery for a cozy winter atmosphere.
Minimalist Statement Bedroom
Keep the surrounding decor neutral and allow the rich red crochet texture to become the main decorative feature.
16. Tips for a Beautiful Professional Finish
- Choose high-quality cotton yarn for clear stitch definition.
- Make a gauge swatch before starting the full bedspread.
- Use the same hook size throughout the main panels.
- Count stitches regularly to maintain straight edges.
- Block individual panels before joining if needed.
- Keep the mesh openings consistent in size.
- Use matching yarn for invisible seams.
- Attach tassels at evenly measured intervals.
- Make all tassels using the same cardboard template.
- Weave in yarn ends securely.
- Check the finished dimensions before adding the border.
- Use a slightly smaller hook for a firmer outer edging.
Frequently Asked Questions
Is this red crochet bedspread suitable for beginners?
This pattern is best suited to experienced crocheters because it involves multiple stitch textures, long panels, openwork construction, joining techniques, and decorative finishing.
How much yarn do I need?
A large bedspread with two matching pillow covers may require approximately 3,000–3,800 g of DK yarn, depending on gauge, fiber, stitch density, and tassel fullness. Make a sample panel and weigh it to calculate a more accurate amount.
Can I make the bedspread without tassels?
Yes. The tassels are decorative and can be omitted for a cleaner, more minimalist appearance.
Can I use another color?
Absolutely! This design also looks beautiful in cream, beige, sage green, dusty rose, navy blue, and soft gray.
Can I make the bedspread for a king-size bed?
Yes. Add more panels to increase the width and crochet additional rows to increase the length.
What is the best yarn for this project?
Cotton or a cotton-blend yarn is a good choice because it provides stitch definition, durability, and a comfortable drape.
Can I use acrylic yarn?
Yes. Acrylic yarn can be used, although the finished fabric may have a different weight, drape, and blocking response.
Can I sell finished bedspreads made from this pattern?
Yes. You may sell handmade finished pieces created using this original pattern. Credit to Cozy Crochet Patterns is appreciated.
Final Thoughts
This Red Crochet Bedspread with Tassels is a beautiful way to bring handmade elegance into your bedroom.
With its rich ruby red color, decorative openwork stripes, textured crochet panels, and luxurious tassel edging, this crochet bedding set creates a bold yet timeless statement.
Whether you make it for your own home, as a wedding gift, or as a special handmade present, this elegant crochet bedspread is a project worth taking your time to create.
Save this free red crochet bedspread pattern to Pinterest and share it with your crochet-loving friends!
Pattern note: This is an original design interpretation inspired by the reference photograph. It is not an exact reproduction or a fully sample-tested, stitch-counted pattern. Panel widths, mesh repeats, joining dimensions, and yarn quantities should be verified with gauge swatches before starting the full project.

