Terracotta Bloom Hexagon Crochet Handbag Pattern
Advanced
For experienced crocheters who enjoy complex shaping, fine detail, and ambitious construction
Single-Day Project
A satisfying project you can complete in a single afternoon or evening.
Handmade Gift
A beautiful keepsake — free forever. Read online or print at home.
About This Terracotta Bloom Hexagon Crochet Handbag Pattern
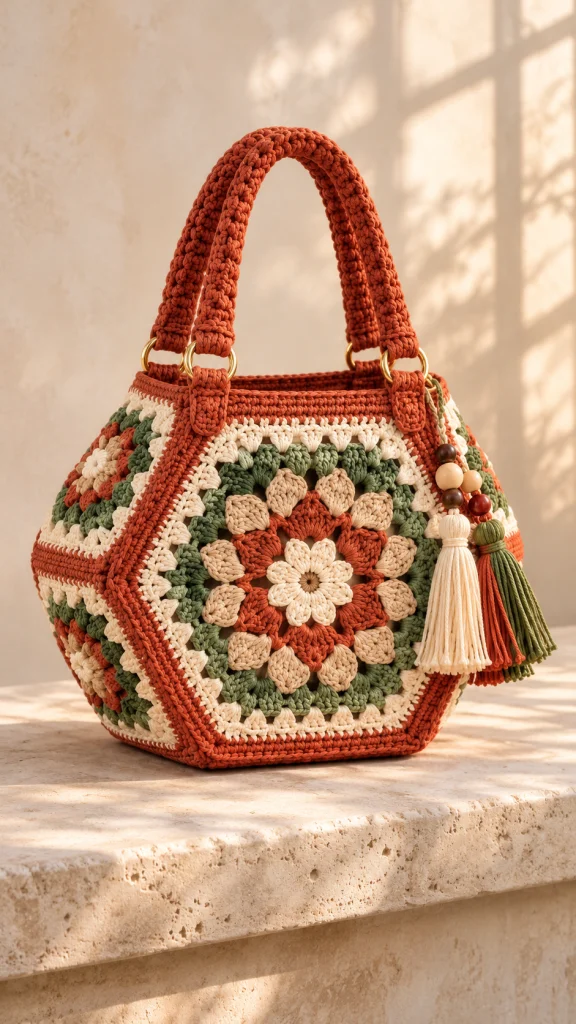
This floral hexagon crochet bag pattern creates a structured handbag with terracotta borders, layered cream and sand petals, and soft olive foliage. Two hexagonal panels frame the flowers, while a continuous gusset gives the bag its roomy base and angled sides.
The design takes approximately 25–35 hours and suits experienced crocheters comfortable with counted corners, dimensional appliqué and precise assembly. Gold-tone rings, textured handles and three beaded tassels echo the warm, earthy character of the finished bag.
A sewn lining and reinforced handle tabs support everyday essentials. The flowers are worked separately and secured to the panels, making it easier to control their placement and keep the interior smooth.
Materials
- Worsted weight cotton: terracotta approximately 450 m, dark olive 160 m, sage 120 m, cream 140 m and sand 90 m; approximately 960 m total, including a small allowance.
- 4 mm crochet hook for panels, gusset and flowers.
- 3.5 mm crochet hook for handles, tabs and edging.
- Four closed metal rings, approximately 35 mm internal diameter.
- Approximately 70 × 110 cm woven lining fabric.
- Approximately 50 × 100 cm medium-weight sew-in bag interfacing.
- Approximately 1.5 m of 20 mm cotton webbing for handle and tab reinforcement.
- One sew-in magnetic snap.
- Six to nine wooden beads with holes large enough for the tassel cords.
- Tapestry needle, sewing needle, strong sewing thread and scissors.
- Stitch markers, ruler, blocking mat and pins.
- A 14 cm tall piece of cardboard for winding tassels.
Abbreviations
chchainsl stslip stitchscsingle crochethdchalf double crochetdcdouble crochettrtreble crochetMRmagic ringststitchRSright sideWSwrong sideHexagon Panels — Make Two
- Round 1, dark olive: Make an MR. Ch 2, work (2 dc, ch 2) six times into the ring. Tighten and join. Count: 12 dc and 6 corner spaces; 2 dc per side.
- Round 2, dark olive: Ch 2, dc in every dc and work (2 dc, ch 2, 2 dc) in every corner space. Join. Count: 36 dc; 6 dc per side.
- Round 3, dark olive: Repeat the Round 2 sequence. Count: 60 dc; 10 dc per side.
- Round 4, sage: Repeat the Round 2 sequence. Count: 84 dc; 14 dc per side.
- Round 5, sage: Repeat the Round 2 sequence. Count: 108 dc; 18 dc per side.
- Round 6, cream: Repeat the Round 2 sequence. Count: 132 dc; 22 dc per side.
- Round 7, cream: Repeat the Round 2 sequence. Count: 156 dc; 26 dc per side.
- Round 8, terracotta: Repeat the Round 2 sequence. Count: 180 dc; 30 dc per side. Fasten off. Each round retains 6 corner spaces.
- Block both panels to matching hexagons approximately 34 cm across opposite points and 30 cm across opposite flat sides. Orient each with a horizontal top edge. Mark its two upper corners.
- For joining, treat each corner chain as one separate stitch. Each complete side therefore has 30 dc plus one chain from each adjacent corner: 32 joining positions. Across all six sides there are 192 positions, with no chain used twice.
Cream Center Flowers — Make Two
- Round 1, sand: Work 8 sc into an MR. Tighten and join to the first sc. Count: 8 sc.
- Round 2, cream: In the first sc work (sl st, ch 2, 3 dc, ch 2, sl st). Repeat this complete petal in each remaining sc. Count: 8 petals, each containing 3 dc. Fasten off with a sewing tail.
- Cup each petal gently toward the RS. Keep the center flat rather than pulling the ring into a cone.
Terracotta Middle Flowers — Make Two
- Round 1, terracotta: Ch 8 and join into a ring. Ch 2, work 16 dc into the ring and join. Count: 16 dc.
- Round 2: Ch 2, work 2 dc in each dc and join. Count: 32 dc.
- Round 3: Work (sl st in next dc, skip next dc, 7 tr in next dc, skip next dc) eight times. Join to the first sl st. Count: 8 broad petals, using all 32 stitches.
- Fasten off with a long sewing tail. Block lightly to approximately 14–16 cm across; the petals may overlap slightly when layered.
Sand Outer Petals — Make Twenty-Four
- Foundation, sand: Ch 9. Beginning in the second chain from the hook, work sc, hdc, dc in each of the next 4 chains, hdc, then 3 sc in the final chain. Continue along the unused underside of the foundation: hdc, dc in each of the next 4 chains, hdc, then 2 sc in the same chain as the first sc. Join to the first sc. Count: 18 stitches.
- Fasten off with a 25 cm tail. Pinch the starting end and sew its two outer stitches together to form a narrow base. Each petal should measure approximately 5–6 cm long.
- Allocate 12 petals to each panel. Arrange their pinched bases around the terracotta flower, pointing outward and spaced evenly. Keep their tips inside the cream panel rounds.
Olive Leaves — Make Twenty-Four
- Foundation, dark olive: Ch 7. Beginning in the second chain from the hook, work sc, hdc, dc in each of the next 2 chains, hdc, then (sc, ch 2, sl st in second chain from hook, sc) in the final chain. Continue along the underside: hdc, dc in each of the next 2 chains, hdc, sc. Join to the first sc. Count: 12 body stitches plus one chain-point detail.
- Fasten off with a sewing tail. Make 12 leaves for each panel, approximately 4 cm long.
- Position one leaf in each gap between adjacent sand petals. Angle the points outward, keeping every leaf clear of the panel joining edge.
Attach the Floral Layers
- Center a terracotta flower on each panel with RS facing outward. Pin all eight petals evenly and sew around the central disc. Add two small securing stitches near each petal tip, leaving the outer edges dimensional.
- Slide the pinched bases of the 12 sand petals just beneath the terracotta petal edges. Sew each base firmly to the panel and add one concealed stitch halfway along each petal.
- Slide the bases of the 12 olive leaves beneath the sand petals. Sew the bases and one side of each leaf to the panel, leaving the points free.
- Center the cream flower over the terracotta disc. Sew around its central ring and secure each petal near its base. Check the WS for loose loops and weave in all remaining ends.
Continuous Side and Base Gusset
- Row 1, terracotta: Ch 13. Sc in the second chain from the hook and each remaining chain. Count: 12 sc.
- Rows 2–160: Ch 1, turn, sc in each of the 12 sc. Count: 12 sc in every row. Fasten off after Row 160.
- Place markers after Rows 32, 64, 96 and 128. These divide the strip into five equal sections, one for each joined hexagon side.
- Block the strip to 7 cm wide and approximately 85 cm long, with each 32-row section matching one panel side. Confirm this fit before joining; a shorter strip will cup the panels and a longer strip will ripple.
Join the Bag Body and Edge the Opening
- Leave the horizontal top side of each panel open. Beginning at the outer chain of the upper-left corner, identify the 160 positions running down the left edges, across the base and up the right edges. The remaining 32 positions form the top edge.
- Hold the first panel and gusset with WS together so the seam is visible outside. With terracotta and the 3.5 mm hook, sc through each panel position and its corresponding gusset row end. Work exactly 160 joining sc, one per row end. Match the four interior corner markers to the gusset section markers.
- Attach the second panel to the other long edge of the gusset in the same way. Count: 160 joining sc. Keep both panel top edges facing the same direction.
- Opening Round 1, terracotta: Join at one gusset end. Ch 1, sc across its 12 stitches, sc in the 32 top-edge positions of the next panel, sc across the other 12-stitch gusset end, then sc in the remaining panel’s 32 top-edge positions. Join. Count: 88 sc.
- Opening Round 2: Ch 1, sc in each stitch around and join. Count: 88 sc. Fasten off. Do not decrease across the panel-to-gusset transitions.
Reinforced Ring Tabs — Make Four
- Row 1, terracotta, 3.5 mm hook: Ch 7. Sc in the second chain and each remaining chain. Count: 6 sc.
- Rows 2–18: Ch 1, turn, sc across. Count: 6 sc per row. Fasten off with a long sewing tail.
- Cut a length of webbing approximately 5 mm shorter than each tab. Fold its raw ends under and hand-stitch it to the tab’s WS.
- Pass each tab through a metal ring and fold in half. Position two tabs on each panel, centered approximately 3 cm inward from its upper corners. Place their lower edges approximately 5 cm below the opening.
- Sew both halves of each tab securely through the panel and an interior 4 × 5 cm interfacing patch. Use a stitched rectangle with a diagonal cross. Keep the ring free to pivot above the rim.
Textured Handles — Make Two
- Row 1, terracotta, 3.5 mm hook: Ch 7. Sc in the second chain and each remaining chain. Count: 6 sc.
- Row 2, WS: Ch 1, turn, sc in each stitch. Count: 6 sc.
- Row 3, RS: Ch 1, turn, work (sc in next stitch, tr in next stitch) three times. Count: 6 stitches. Push the tr stitches toward the RS to form the raised texture.
- Rows 4–100: Repeat Rows 2 and 3, ending with a Row 2 instruction on Row 100. Count: 6 stitches per row. The strip should measure approximately 50 cm; adjust hook size to obtain this length.
- With RS facing, join terracotta at a corner and work 1 sc into every row end along one long edge, 6 sc across the short end, 1 sc into every row end along the other long edge, and 6 sc across the remaining short end. Join and fasten off. Count: 212 edging sc.
- Cut webbing to the handle’s finished length, turn its ends under and sew it to the WS without stretching either layer.
- Pass each end through a ring on the same panel and fold back 4 cm. Stitch the folded section through crochet and webbing with a rectangle and diagonal cross. Each handle uses two rings and has approximately 42 cm of exposed length.
Beaded Tassels — Make Three
- Make one tassel each in cream, terracotta and dark olive. Wrap yarn around the 14 cm cardboard 35 times. Slide a separate 45 cm strand beneath the wraps at one end and tie it tightly.
- Cut through the opposite end of the wraps. Wrap a separate strand around the bundle approximately 2 cm below the tied top, wind it firmly eight times and knot. Bury the ends inside the tassel.
- Trim each tassel to approximately 13 cm. Thread two or three beads onto its doubled top cord and knot above the beads.
- Tie the three cords securely to one front ring, staggering the tassel tops slightly. Keep the knots clear of the ring tab and handle fold.
Lining and Closure
- Trace a blocked panel onto paper. Add 1 cm seam allowance around all six sides. Cut two fabric panels and two interfacing panels from this template.
- Cut one fabric gusset 9 cm wide and 87 cm long, including 1 cm seam allowance on every edge. Cut interfacing to match. Baste interfacing to the WS of all fabric pieces.
- With fabric RS together, sew one long gusset edge around five sides of the first lining panel using a 1 cm seam allowance. Clip the gusset seam allowance at each corner without cutting the stitching. Repeat with the second panel.
- Turn the lining’s entire opening allowance inward by 1 cm. Place the lining inside the bag with its WS against the crochet WS. Check the fit before attaching; the lining should rest against the base without pulling the opening downward.
- Sew the magnetic snap halves to the centers of the two lining top edges, approximately 2 cm below the folded rim. Add a small interfacing patch behind each half and follow the closure manufacturer’s sewing directions.
- Hand-stitch the folded lining rim just beneath the final crochet edging round. Add concealed tacking stitches between the lining and the reinforced tab areas so handle loads reach the supporting fabric.
Finishing
- Check both visible seams and every flower attachment. Secure any exposed yarn ends and ensure the leaves cannot catch easily on rings or jewelry.
- Place a folded towel inside the bag to support its shape. Lightly steam the edges from a safe distance if the yarn label permits, avoiding direct contact with the petals, hardware and beads.
- Add a few everyday items and lift the bag gradually. Check that the handles, tabs and lining share the load without stretching or distorting the upper corners.
Smooth the flower petals with your fingers and let the bag rest upright before using it. The broad hexagonal panels and soft gusset should hold their shape while allowing the sides to open comfortably.
Tips for Success
- Mark all six corner spaces during every panel round; this makes the four-stitch increase per side easy to verify.
- Block both panels together against the same template before making the lining.
- Pin the complete floral arrangement before sewing so the outer petals remain clear of the border.
- Use a blunt tapestry needle for crochet assembly and a sharp sewing needle for webbing and lining.
- Match gusset section lengths to panel sides before joining, rather than trying to correct a mismatch in the seam.
Common Mistakes to Avoid
- Counting the beginning ch-2 as a dc adds unwanted stitches. Count only the actual dc on each side.
- Using both corner chains for two neighboring sides creates overlapping joining positions. Allocate one corner chain to each adjacent side.
- Sewing every petal edge flat removes the layered effect. Secure the bases and selected points while leaving some edges raised.
- Attaching rings to unreinforced crochet can stretch the rim. Include webbing, backing patches and the lining support stitches.
- Making the lining too shallow leaves it hanging above the base. Fit it inside the assembled bag before sewing the rim.
Ways to Customize This Pattern
- Use deep teal instead of olive while retaining cream and terracotta for clear floral contrast.
- Make a narrower bag with 8 sc across the gusset. Recalculate the opening as 32 + 8 + 32 + 8 = 80 sc and cut the lining gusset to its measured width plus seam allowances.
- Decorate only the front panel for a smoother back; retain both complete hexagonal panels.
- Add an interior patch pocket to one lining panel before sewing the lining body.
- Omit the beads and use three plain tassels for a lighter accessory cluster.
Frequently asked questions
A soft cotton blend can work, but the bag will have less structure. Match the blocked panel dimensions and use firm interfacing. Avoid relying on loose crochet alone to support the handles.
The strip is designed with 160 rows for the 160 joining positions across five panel sides. Its blocked row gauge must match their combined length, which is why the gusset has a separate gauge requirement.
The lining is part of this bag’s support system and conceals the floral sewing. Include it for the intended finish, especially when carrying a phone, keys or other concentrated weight.
Spot-clean gently according to the yarn and fabric care labels. Support the bag while drying and keep wooden beads and metal hardware out of prolonged soaking.
The finished Terracotta Bloom Hexagon Crochet Handbag Pattern

