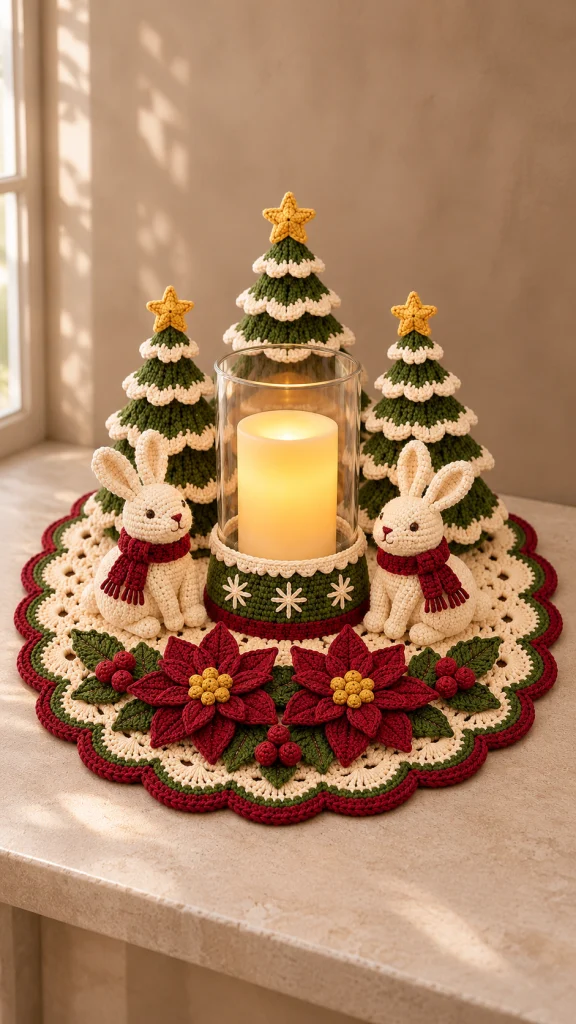
Woodland Christmas Crochet Centerpiece with Rabbits and Poinsettias
Advanced
For experienced crocheters who enjoy complex shaping, fine detail, and ambitious construction
Single-Day Project
A satisfying project you can complete in a single afternoon or evening.
Handmade Gift
A beautiful keepsake — free forever. Read online or print at home.
About This Woodland Christmas Crochet Centerpiece with Rabbits and Poinsettias
This Christmas crochet centerpiece pattern brings snowy evergreen trees, two cream rabbits, and deep red poinsettias together around a glass cylinder holding an LED candle. A cream circular mat with green and burgundy scallops anchors the arrangement, while embroidered starbursts brighten the removable candle sleeve.
This is an advanced home decor project with several coordinated components: a flat circular foundation, layered tree skirts, shaped stars, small stuffed rabbits, and dimensional floral appliqués. The rabbits are decorative elements within the centerpiece. Allow approximately 35–45 hours, including blocking, embroidery, and assembly.
The finished arrangement measures approximately 48 cm across. Three trees create height behind the light, and the flowers frame the front edge. Use firm cotton stitches for definition, then take your time positioning the pieces so the cream lace-like border remains visible between them.
Materials
- DK cotton yarn: cream approximately 300 g / 660 m.
- DK cotton yarn: forest green approximately 250 g / 550 m.
- DK cotton yarn: burgundy approximately 125 g / 275 m.
- DK cotton yarn: mustard gold approximately 25 g / 55 m.
- Small amounts of dark brown and burgundy embroidery thread for rabbit faces.
- 3 mm hook for trees, rabbits, flowers, and sleeve.
- 3.5 mm hook for the mat, or sizes needed to obtain gauge.
- Polyester stuffing, approximately 150 g.
- Three lightweight craft cones: one approximately 24 cm tall with a 14 cm base, and two approximately 18 cm tall with 11 cm bases; trim height to suit the crocheted covers.
- Clear, straight-sided glass cylinder approximately 12 cm outside diameter and at least 20 cm tall.
- Battery-operated LED pillar candle approximately 8 cm wide and 14 cm tall; use LED light only.
- Six removable sewing markers for arranging the components.
- Tapestry needle, embroidery needle, stitch markers, scissors, ruler, and blocking equipment.
- Optional washable nonslip matting cut slightly smaller than the finished mat.
Abbreviations
chchainsl stslip stitchscsingle crochethdchalf double crochetdcdouble crochettrtreble crochetincwork 2 single crochet in one stitchdecinvisible single crochet decrease over 2 stitchesMRmagic ringBLOback loop onlyFLOfront loop onlyststitchCircular Mat Foundation
- With cream and the 3.5 mm hook, work joined dc rounds. Round 1: 12 dc in MR; close ring and join. 12 stitches.
- Round 2: 2 dc in each stitch; join. 24 stitches.
- Round 3: repeat (dc in next stitch, 2 dc in next stitch) 12 times; join. 36 stitches.
- Round 4: repeat (dc in next 2 stitches, 2 dc in next stitch) 12 times; join. 48 stitches.
- Round 5: repeat (dc in next 3 stitches, 2 dc in next stitch) 12 times; join. 60 stitches.
- Round 6: repeat (dc in next 4 stitches, 2 dc in next stitch) 12 times; join. 72 stitches.
- Round 7: repeat (dc in next 5 stitches, 2 dc in next stitch) 12 times; join. 84 stitches.
- Round 8: repeat (dc in next 6 stitches, 2 dc in next stitch) 12 times; join. 96 stitches.
- Round 9: repeat (dc in next 7 stitches, 2 dc in next stitch) 12 times; join. 108 stitches.
- Round 10: repeat (dc in next 8 stitches, 2 dc in next stitch) 12 times; join. 120 stitches.
- Round 11: repeat (dc in next 9 stitches, 2 dc in next stitch) 12 times; join. 132 stitches.
- Round 12: repeat (dc in next 10 stitches, 2 dc in next stitch) 12 times; join. 144 stitches.
- Round 13: repeat (dc in next 11 stitches, 2 dc in next stitch) 12 times; join. 156 stitches.
- Round 14: repeat (dc in next 12 stitches, 2 dc in next stitch) 12 times; join. 168 stitches.
- Round 15: repeat (dc in next 13 stitches, 2 dc in next stitch) 12 times; join. 180 stitches.
- Round 16: repeat (dc in next 14 stitches, 2 dc in next stitch) 12 times; join. 192 stitches.
- Round 17: repeat (dc in next 15 stitches, 2 dc in next stitch) 12 times; join. 204 stitches.
- Round 18: repeat (dc in next 16 stitches, 2 dc in next stitch) 12 times; join. 216 stitches. Foundation diameter approximately 36 cm. Fasten off.
Openwork and Scalloped Mat Border
- Round 19: join cream in any foundation stitch, ch 1, then repeat (sc in next stitch, ch 5, skip next 3 stitches) 54 times; join to first sc. 54 sc and 54 chain arches.
- Round 20: sl st into first arch, ch 1; repeat (sc in current arch, ch 5) around, advancing to the next arch for each repeat; join. 54 sc and 54 arches.
- Round 21: sl st into first arch, ch 1; repeat (sc in current arch, ch 5) around; join. 54 sc and 54 arches.
- Round 22: sl st into first arch, ch 1; repeat (sc in current arch, 9 dc in next arch) 27 times; join. 27 shells, 27 sc, and 243 dc; 270 stitches total. Fasten off cream.
- Round 23: join green in any sc between shells. Repeat (sc in sc, sc in next 4 dc, 3 sc in next dc, sc in next 4 dc) 27 times; join. 324 stitches. Fasten off.
- Round 24: join burgundy in the stitch above any cream valley sc. Repeat (sc in valley stitch, sc in next 5 stitches, 3 sc in next stitch, sc in next 5 stitches) 27 times; join. 378 stitches. Fasten off.
- Wet-block the mat flat, opening each arch and shaping all 27 scallops evenly. Target diameter is approximately 48 cm; allow it to dry completely before attaching decorations.
Tree Cone Covers — Make Three
- Use green and the 3 mm hook. Work continuous spiral rounds. Make one tall cover through Round 48 and two short covers through Round 36. Round 1: 6 sc in MR. 6 stitches.
- Round 2: sc around. 6 stitches.
- Round 3: inc in each stitch. 12 stitches.
- Round 4: sc around. 12 stitches.
- Round 5: repeat (sc in next stitch, inc) 6 times. 18 stitches.
- Round 6: sc around. 18 stitches.
- Round 7: repeat (sc in next 2 stitches, inc) 6 times. 24 stitches.
- Round 8: sc around. 24 stitches.
- Round 9: repeat (sc in next 3 stitches, inc) 6 times. 30 stitches.
- Round 10: sc around. 30 stitches.
- Round 11: repeat (sc in next 4 stitches, inc) 6 times. 36 stitches.
- Round 12: sc around. 36 stitches.
- Round 13: repeat (sc in next 5 stitches, inc) 6 times. 42 stitches.
- Round 14: sc around. 42 stitches.
- Round 15: repeat (sc in next 6 stitches, inc) 6 times. 48 stitches.
- Round 16: sc around. 48 stitches.
- Round 17: repeat (sc in next 7 stitches, inc) 6 times. 54 stitches.
- Round 18: sc around. 54 stitches.
- Round 19: repeat (sc in next 8 stitches, inc) 6 times. 60 stitches.
- Round 20: sc around. 60 stitches.
- Rounds 21–24: sc around each round. 60 stitches per round.
- Round 25: repeat (sc in next 9 stitches, inc) 6 times. 66 stitches.
- Rounds 26–28: sc around each round. 66 stitches per round.
- Round 29: repeat (sc in next 10 stitches, inc) 6 times. 72 stitches.
- Rounds 30–32: sc around each round. 72 stitches per round.
- Round 33: repeat (sc in next 11 stitches, inc) 6 times. 78 stitches.
- Rounds 34–36: sc around each round. 78 stitches per round. For each short tree, sl st in next stitch and fasten off.
- Round 37, tall tree only: repeat (sc in next 12 stitches, inc) 6 times. 84 stitches.
- Rounds 38–40: sc around each round. 84 stitches per round.
- Round 41: repeat (sc in next 13 stitches, inc) 6 times. 90 stitches.
- Rounds 42–44: sc around each round. 90 stitches per round.
- Round 45: repeat (sc in next 14 stitches, inc) 6 times. 96 stitches.
- Rounds 46–48: sc around each round. 96 stitches per round. Sl st in next stitch and fasten off.
- Fit the covers over their craft cones. The tall cover is approximately 20 cm high and the short covers approximately 15 cm high before adding skirts and stars. Trim the supporting cones so their bases sit flush with the lower cover edges; do not stretch the stitches to fit an oversized cone.
Layered Tree Skirts and Snow Edges
- Make four skirts per short tree with starting counts of 12, 24, 36, and 48 stitches. Make five skirts for the tall tree with starting counts of 12, 24, 36, 48, and 60 stitches. Each skirt is a separate open-ended cone segment worked from its upper rim downward in joined rounds.
- Round 1: with green, chain the required starting count, join without twisting, ch 1, and sc in each chain; join. The stitch count equals the starting count.
- Round 2: repeat (sc in next stitch, inc) around; join. Counts in size order: 18, 36, 54, 72, or 90 stitches.
- Rounds 3–4: sc around and join each round. Maintain the count established in Round 2.
- Round 5: repeat (sc in next 2 stitches, inc) around; join. Counts: 24, 48, 72, 96, or 120 stitches.
- Rounds 6–8: sc around and join each round. Maintain the count established in Round 5. Fasten off green after Round 8.
- Round 9: join cream in any stitch. Repeat (sc in next stitch, skip next stitch, 5 dc in next stitch, skip next stitch) around; join. Respectively 6, 12, 18, 24, or 30 shells; total stitches 36, 72, 108, 144, or 180. Fasten off.
- Slide the largest skirt over the cone tip and position its green lower edge level with the cone cover’s lower edge. Sew its upper rim to the cover with green yarn, taking shallow stitches that do not catch the support cone.
- Add the remaining skirts in descending size order. Set each green lower edge approximately 3 cm above the preceding green edge, with its cream shells overlapping the green fabric below. Sew every upper rim securely. The smallest skirt finishes near the tree tip.
Gold Tree Stars — Make Three
- Make two faces per star with gold and the 3 mm hook. Round 1: 10 sc in MR; join. 10 stitches.
- Round 2: repeat the following five times: ch 5; working back along the chain, sl st in second chain from hook, sc in next chain, hdc in next chain, dc in last chain; skip next stitch of the center round and sl st in next stitch. Five points, each with four worked chain stitches and one anchoring sl st.
- Place two faces with wrong sides together. With a long gold tail, whipstitch corresponding outer edges together, adding only a small pinch of stuffing before closing. Keep the valleys sharply defined.
- Stitch each star’s lower valley to its tree tip, then add a second attachment stitch through the lower back of the star and tree cover. Finished stars measure approximately 5–6 cm across.
Removable Candle Sleeve
- Measure the glass circumference. At the stated gauge, use 84 stitches for a cylinder approximately 12 cm in diameter. For another diameter, calculate circumference in centimeters × 2.2, round to the nearest multiple of 6, and swatch-check the fit before continuing.
- With green and the 3 mm hook, ch 84, join without twisting, ch 1, sc in every chain; join. 84 stitches. The sleeve should slide over the glass without forcing it.
- Rounds 2–15: ch 1, sc in each stitch; join each round. 84 stitches per round. Fasten off green.
- Upper trim: join cream in any stitch of Round 15. Repeat (sc in next stitch, skip next stitch, 3 dc in next stitch, skip next stitch, sc in next stitch, sl st in next stitch) 14 times; join. 84 stitches forming 14 scallops. Fasten off.
- Lower trim Round 1: join burgundy into the unused underside loops of the foundation chain. Sc in every chain; join. 84 stitches.
- Lower trim Rounds 2–3: ch 1, sc around; join each round. 84 stitches per round. Fasten off.
- With cream yarn, embroider three eight-spoke starbursts across the front half of the sleeve, centered approximately 4 cm above its lower edge. Make each starburst approximately 2.5 cm wide using straight stitches radiating from a shared center. Secure all ends inside.
- Slide the sleeve onto the lower outside of the glass. It must remain below the rim and must never cover the interior or base of the cylinder.
Rabbit Bodies — Make Two
- Use cream and the 3 mm hook; work in a spiral. Round 1: 6 sc in MR. 6 stitches.
- Round 2: inc in each stitch. 12 stitches.
- Round 3: repeat (sc in next stitch, inc) 6 times. 18 stitches.
- Round 4: repeat (sc in next 2 stitches, inc) 6 times. 24 stitches.
- Round 5: repeat (sc in next 3 stitches, inc) 6 times. 30 stitches.
- Round 6: repeat (sc in next 4 stitches, inc) 6 times. 36 stitches.
- Rounds 7–12: sc around each round. 36 stitches per round.
- Round 13: repeat (sc in next 4 stitches, dec) 6 times. 30 stitches.
- Rounds 14–16: sc around each round. 30 stitches per round.
- Round 17: repeat (sc in next 3 stitches, dec) 6 times. 24 stitches.
- Round 18: sc around. 24 stitches. Stuff firmly, keeping the lower surface broad enough to sit.
- Round 19: repeat (sc in next 2 stitches, dec) 6 times. 18 stitches. Fasten off with a long sewing tail; leave the neck open.
Rabbit Heads and Embroidered Faces — Make Two
- With cream, work in a spiral. Round 1: 6 sc in MR. 6 stitches.
- Round 2: inc in each stitch. 12 stitches.
- Round 3: repeat (sc in next stitch, inc) 6 times. 18 stitches.
- Round 4: repeat (sc in next 2 stitches, inc) 6 times. 24 stitches.
- Round 5: repeat (sc in next 3 stitches, inc) 6 times. 30 stitches.
- Round 6: repeat (sc in next 4 stitches, inc) 6 times. 36 stitches.
- Rounds 7–12: sc around each round. 36 stitches per round.
- Round 13: repeat (sc in next 4 stitches, dec) 6 times. 30 stitches.
- Round 14: repeat (sc in next 3 stitches, dec) 6 times. 24 stitches. Stuff evenly.
- Round 15: repeat (sc in next 2 stitches, dec) 6 times. 18 stitches.
- Round 16: repeat (sc in next stitch, dec) 6 times. 12 stitches.
- Round 17: dec 6 times. 6 stitches. Finish stuffing, draw the tail through the front loops of the remaining stitches, and close.
- Orient the closed end downward. Embroider two dark brown eyes between Rounds 9 and 10, with six unworked stitches between their inner edges. Build each eye from three short vertical stitches.
- Center a small burgundy triangle between Rounds 10 and 12 for the nose. Add a short vertical stitch below it and two curved backstitched mouth lines, each approximately 5 mm long.
- Center the head over the body opening. Sew all 18 neck stitches to a corresponding ring on the underside of the head; reinforce the seam once more.
Rabbit Ears — Make Four
- With cream, work in a spiral. Round 1: 6 sc in MR. 6 stitches.
- Round 2: repeat (sc in next stitch, inc) 3 times. 9 stitches.
- Round 3: repeat (sc in next 2 stitches, inc) 3 times. 12 stitches.
- Rounds 4–10: sc around each round. 12 stitches per round.
- Round 11: repeat (sc in next 2 stitches, dec) 3 times. 9 stitches.
- Rounds 12–13: sc around each round. 9 stitches per round. Leave unstuffed and fasten off with a sewing tail.
- Flatten each ear, bringing four stitches on each side together with the ninth stitch at one fold. Sew the opening closed through both layers. Pinch the lower corners together and stitch for approximately 1 cm to make a cupped base.
- Sew two ears to each head across Rounds 3–5, leaving approximately 2 cm between bases. Angle one ear slightly outward.
Rabbit Arms, Feet, and Tails
- Arms, make four: Round 1, 6 sc in MR. Round 2, repeat (sc in next stitch, inc) 3 times. 9 stitches.
- Arm Rounds 3–9: sc around each round. 9 stitches per round.
- Arm Round 10: repeat (sc in next stitch, dec) 3 times. 6 stitches. Lightly stuff the lower half, flatten the opening, and sc through both layers across 3 paired stitches. Fasten off with a sewing tail.
- Feet, make four: Round 1, 6 sc in MR. Round 2, inc in each stitch. 12 stitches.
- Foot Rounds 3–5: sc around each round. 12 stitches per round.
- Foot Round 6: dec 6 times. 6 stitches. Stuff, draw the tail through remaining front loops, and close.
- Tails, make two: Round 1, 6 sc in MR. Round 2, inc in each stitch. 12 stitches.
- Tail Round 3: sc around. 12 stitches. Round 4: dec 6 times. 6 stitches. Stuff and close through remaining front loops.
- Sew the arms beside the neck at body Rounds 15–17, with their lower ends resting forward. Stitch the feet horizontally across the lower front at body Rounds 3–6. Attach each tail at the lower back across body Rounds 5–7, helping the rabbit sit upright.
Burgundy Rabbit Scarves — Make Two
- With burgundy, ch 55. Row 1: sc in second chain from hook and each chain across. 54 stitches.
- Rows 2–4: ch 1, turn, sc in BLO across. 54 stitches per row. Fasten off.
- Cut twelve 6 cm strands for each scarf. Fold each strand in half and attach three folded strands evenly to each short end, using two strands per attachment point. Trim fringe to approximately 1.5 cm.
- Wrap a scarf once around each neck, cross the ends at the front, and tack the crossing in place with two small stitches. Finished rabbits measure approximately 16–18 cm tall including ears.
Layered Poinsettia Petals — Make Two Flowers
- Make six large and six small burgundy petals for each flower. Work each petal around both sides of a foundation chain with the 3 mm hook.
- Large petal: ch 13. Starting in second chain from hook, work sc, hdc, dc in next 3 chains, tr in next 5 chains, dc in next chain, then (hdc, sc, hdc) in last chain. Along the unused opposite side, work dc in next chain, tr in next 5 chains, dc in next 3 chains, hdc in next chain, sc in last chain; join to first sc. 25 stitches.
- Small petal: ch 10. Starting in second chain from hook, work sc, hdc, dc in next 2 chains, tr in next 3 chains, dc in next chain, then (hdc, sc, hdc) in last chain. Along the unused opposite side, work dc in next chain, tr in next 3 chains, dc in next 2 chains, hdc in next chain, sc in last chain; join. 19 stitches.
- Fold each petal lengthwise at its narrow starting end. Sew together approximately 8 mm of the folded base to cup it. Leave the rounded outer tip open.
- Arrange six large petals radially with their narrow bases touching; sew the bases together firmly. Add six small petals above them, offset halfway between the lower petals. Sew through all bases to secure both layers. Each flower measures approximately 12–14 cm across.
Flower Centers, Leaves, and Berry Sprays
- Gold centers, make fourteen: Round 1, 6 sc in MR. Round 2, sc around. 6 stitches. Fasten off, draw the tail through the front loops, and close into a small bobble without stuffing. Sew seven to each flower center, one central bobble surrounded by six.
- Green leaves, make fourteen: ch 13. Starting in second chain from hook, work sc, hdc, dc in next 3 chains, tr in next 5 chains, dc in next chain, then (hdc, sc, hdc) in last chain. Along the opposite side, work dc in next chain, tr in next 5 chains, dc in next 3 chains, hdc in next chain, sc in last chain; join. 25 stitches.
- With a separate green strand, surface sl st along each leaf’s foundation-chain line from base to tip. Keep the strand relaxed so the leaf does not curl.
- Berries, make nine: Round 1, 6 sc in MR with burgundy. Round 2, repeat (sc in next stitch, inc) 3 times. 9 stitches.
- Berry Round 3: sc around. 9 stitches. Round 4: repeat (sc in next stitch, dec) 3 times. 6 stitches. Add a pinch of stuffing, draw the tail through remaining front loops, and close.
- Make three sprays, each containing three leaves and three berries. Overlap and sew the leaf bases together, then stitch the berries over the join in a triangular cluster.
- Reserve the remaining five leaves to tuck beneath and between the two poinsettias during final assembly.
Finishing and Arrangement
- Weave in all ends and lightly damp-shape the petals, stars, scarves, and leaves. Keep the stuffed rabbits and craft cones dry.
- Place the glass at the mat’s center and insert the LED candle. Position the tall tree directly behind it, with the two short trees to either side. Keep the three tree bases on the solid foundation rather than on the openwork border.
- Set one rabbit on each front side of the glass. Turn the faces slightly inward and check that the ears and scarves clear the glass.
- Arrange the poinsettias across the front, with one berry spray at each outer side and one between the flowers. Tuck the five separate leaves under the flowers so their tips remain visible.
- Remove the glass before sewing. Tack each tree cover to the solid mat through its lower green edge at six evenly spaced points, keeping the cones removable. Secure each rabbit through its underside at three points.
- Sew flower centers, leaf bases, and berry-spray bases to the mat with small matching stitches. Leave the petal and leaf tips free for dimension. Do not anchor bulky decorations only to a chain arch.
Return the glass and LED candle to the center once every needle and marker has been removed. Turn the arrangement slowly and adjust the flowers so the scalloped cream border shows around the front.
For storage, lift out the glass, candle, and cone supports. Support the flowers with tissue and store the mat flat. Spot-clean the assembled crochet, or remove the decorative components and supports before washing individual cotton pieces according to the yarn label.
Tips for Success
- Check the mat after every few rounds; a flat foundation makes the upright pieces much easier to balance.
- Place tree skirts with the supports inserted, then remove the supports whenever sewing through the cover.
- Keep the snow shells loose enough to drape; a tight joining stitch can pull the cream edge upward.
- Pin both rabbit faces before embroidering so the eye height and nose size match.
- Fit the candle sleeve after its first three rounds, while changing the starting circumference is still quick.
Common Mistakes to Avoid
- Counting the dc turning chain as a stitch adds unwanted increases. Count only actual dc stitches.
- Working a border shell into every arch doubles the intended scallops. Round 22 alternates one sc arch with one shell arch.
- Attaching tree skirts in the wrong order traps the larger openings. Slide on the largest skirt first and finish with the smallest.
- Overstuffing ears makes them round and heavy. Leave them empty and cup only their lower ends.
- Sewing the sleeve to the mat traps the glass. Keep the sleeve and cylinder removable for cleaning and access to the LED switch.
Ways to Customize This Pattern
- Use sage green, wine red, and oatmeal while retaining gold centers and cream snow edges.
- For a broader mat, add three more dc increase rounds before the border: repeat groups of 17, 18, then 19 dc followed by 2 dc in the next stitch. The resulting 252 stitches produce 63 arches and require a redesigned shell distribution; instead add four rounds through 264 stitches for 66 arches and 33 shells using the written border repeats.
- Make all three trees short by stopping every cover at Round 36 and using four skirts per tree.
- Replace scarf fringe with plain woven-in ends for a cleaner finish; keep the same scarf rows and dimensions.
- Make the flowers detachable by sewing them to small cream crochet backing circles and using discreet ties through the mat’s solid stitches.
Frequently asked questions
Use a battery-operated LED candle only. The yarn, stuffing, flowers, and tree supports sit close to the cylinder, and the arrangement is designed for a cool decorative light.
Measure the cylinder’s outside circumference and multiply by your measured sc stitches per centimeter. Round to a multiple of six for the scallop repeat. Join and work three rounds, then check that it slides on easily before completing the height.
First verify the round counts and make sure turning chains have not become extra stitches. If the counts are correct, block a swatch and compare your gauge: tight, tall dc can cup, while short, wide dc can ripple. Adjust hook size and stitch height before continuing.
This is decorative homeware with a glass cylinder, removable supports, and small sewn components. Keep the complete arrangement out of children’s reach; the rabbits are designed as attached decorations.
The finished Woodland Christmas Crochet Centerpiece with Rabbits and Poinsettias

