Heirloom Scalloped Crochet Christmas Tree Ornament
Advanced
For experienced crocheters who enjoy complex shaping, fine detail, and ambitious construction
Single-Day Project
A satisfying project you can complete in a single afternoon or evening.
Handmade Gift
A beautiful keepsake — free forever. Read online or print at home.
About This Heirloom Scalloped Crochet Christmas Tree Ornament
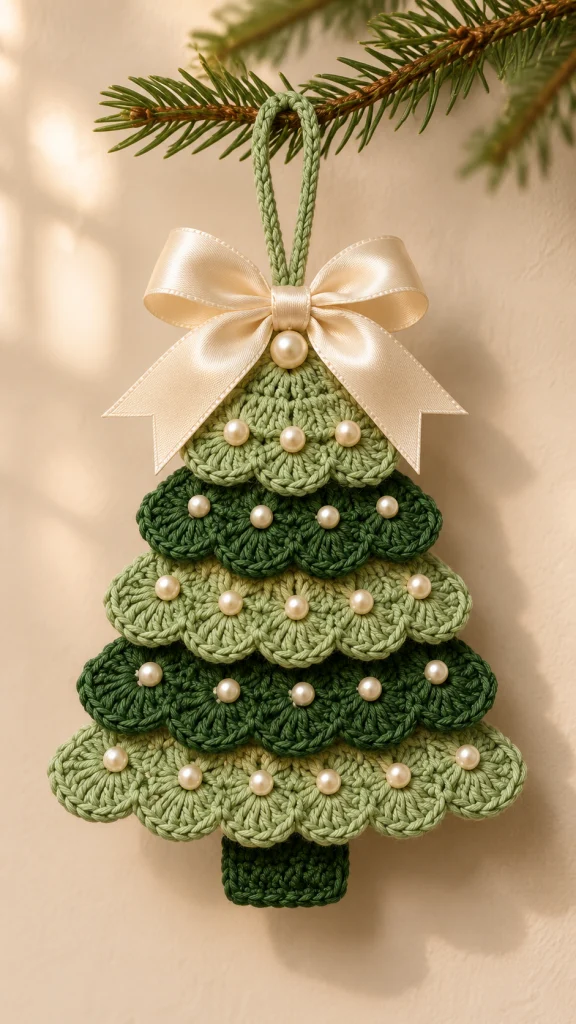
This crochet Christmas tree ornament pattern combines overlapping scalloped tiers, alternating sage and forest green, pearl beads, and a generous ivory bow. A shaped crochet backing supports the layers, helping the tree hang neatly while preserving its soft, textured surface.
The ornament is worked as five separate shell strips, a triangular backing, a small folded trunk, and a reinforced hanging loop. Careful placement gives the branches their stepped outline. Allow approximately 5–7 hours of working time, plus drying time after blocking.
This advanced project suits crocheters comfortable with shaping, precise stitch placement, and discreet assembly. The stitches are familiar; the challenge lies in controlling the proportions, overlapping the tiers evenly, and securing the decorations without distorting the fabric.
Materials
- Sport-weight cotton yarn: approximately 35 g sage green.
- Sport-weight cotton yarn: approximately 40 g forest green.
- 3.0 mm crochet hook, or size needed for gauge.
- Ivory satin ribbon, 38 mm wide: approximately 65 cm.
- Twenty-five sew-on ivory pearl beads, approximately 6 mm, for the shell tiers.
- One sew-on ivory pearl bead, approximately 9 mm, for the tree top.
- Strong matching sewing thread for the beads and bow.
- Yarn needle and a fine sewing needle that passes through the bead holes.
- Stitch markers, scissors, ruler, blocking mat, and rustproof pins.
Abbreviations
chchainscsingle crochetdcdouble crochetsl stslip stitchststitchRSright sideWSwrong sideShaped Triangle Backing
- Use forest green. Work from the tree tip toward the bottom edge. Ch 4.
- Row 1: Sc in the second ch from the hook and each remaining ch. Turn. 3 sc.
- Row 2: Ch 1, work 2 sc in the first st, sc in the next st, and 2 sc in the last st. Turn. 5 sc.
- Row 3: Ch 1, sc in every st. Turn. 5 sc.
- Rows 4–41: Repeat the following two-row sequence 19 times. First row: ch 1, work 2 sc in the first st, sc in each st to the last st, and 2 sc in the last st; turn. Second row: ch 1, sc in every st; turn. Counts after each completed pair are 7, 9, 11, 13, 15, 17, 19, 21, 23, 25, 27, 29, 31, 33, 35, 37, 39, 41, and 43 sc.
- Fasten off. Mark the center stitch of Rows 9, 17, 25, 33, and 41. These rows contain 11, 19, 27, 35, and 43 sc respectively.
- Block the backing to approximately 19.5 cm across the bottom and 17 cm from tip to bottom. Keep the center line straight and the two sloping sides equal. No perimeter border is added.
Five Scalloped Branch Tiers
- Make five strips: Tier 1 in sage with 3 shells; Tier 2 in forest green with 4 shells; Tier 3 in sage with 5 shells; Tier 4 in forest green with 6 shells; and Tier 5 in sage with 7 shells. Each strip is worked separately.
- Foundation: Ch 20 for Tier 1, 26 for Tier 2, 32 for Tier 3, 38 for Tier 4, or 44 for Tier 5.
- Row 1: Sc in the second ch from the hook and every remaining ch. Turn. Tier counts are 19, 25, 31, 37, and 43 sc respectively.
- Row 2: Ch 1, sl st in the first sc. Repeat the following sequence across: skip 2 sc, work 7 dc in the next sc, skip 2 sc, sl st in the next sc. Work the sequence exactly 3, 4, 5, 6, or 7 times for the corresponding tier. Each repeat consumes 6 foundation stitches after the initial stitch.
- Check Row 2: Tier 1 has 21 dc and 4 sl sts; Tier 2 has 28 dc and 5 sl sts; Tier 3 has 35 dc and 6 sl sts; Tier 4 has 42 dc and 7 sl sts; Tier 5 has 49 dc and 8 sl sts. The last sl st lands in the final sc.
- Fasten off each strip, leaving a 60 cm sewing tail at one end. Identify the RS as the side on which the dc stitch fronts are most clearly defined.
- Block the foundation edges straight, gently opening the shells without flattening their rounded shape. Target widths are approximately 8.4, 11.2, 14, 16.8, and 19.6 cm. Each strip should be approximately 3 cm deep.
Folded Trunk
- With forest green, ch 10.
- Row 1: Sc in the second ch from the hook and each remaining ch. Turn. 9 sc.
- Rows 2–12: Ch 1, sc in every st, turn. 9 sc in each row. Fasten off with a 45 cm tail.
- Fold the rectangle so Row 12 meets Row 1, with the RS facing outward. The fold forms the visible lower edge; the paired short row ends form the sides.
- Whipstitch the two side edges closed through corresponding row ends, making 6 paired stitches along each side. Leave the upper edge open for attachment. The folded trunk measures approximately 4 cm wide and 2.5 cm tall.
Reinforced Hanging Loop
- With sage, leave a 25 cm starting tail and ch 40 loosely.
- Beginning in the second ch from the hook, sl st in the back bump of each ch. 39 sl sts. Fasten off with a 25 cm tail.
- Block the cord to approximately 17 cm long. Bring its ends together to form a loop approximately 8 cm tall, reserving the lowest 1 cm of each end for attachment.
- Position both ends on the WS of the backing at the tip, extending down through Rows 1–3. Sew each end to several backing stitches with its own tail, then weave the tails down through the backing.
Layering and Assembly
- Lay the backing RS upward with Row 1 at the top. Center the trunk behind the middle 9 stitches of Row 41. Overlap its open upper edge with the backing by approximately 0.5 cm. Sew through both trunk layers and the backing, leaving approximately 2 cm of trunk visible below the backing.
- Attach Tier 5 first. Place its foundation edge along Row 41, matching its center foundation stitch, stitch 22, to the backing center. Using its yarn tail, sew through each of the 43 foundation stitches and the corresponding backing stitch. Leave all seven shells free below the bottom edge.
- Attach Tier 4 along Row 33, matching foundation stitch 19 to the marked center. Distribute its 37 foundation stitches evenly across the 35 backing stitches, extending the strip slightly beyond each side. Sew through every foundation stitch, using two stitches in the same backing stitch once near each end.
- Attach Tier 3 along Row 25, matching foundation stitch 16 to the marked center. Distribute its 31 foundation stitches across the 27 backing stitches. Use two foundation stitches in one backing stitch at four evenly spaced positions, two on either side of center.
- Attach Tier 2 along Row 17, matching foundation stitch 13 to the marked center. Distribute its 25 foundation stitches across the 19 backing stitches. Use two foundation stitches in one backing stitch at six evenly spaced positions, three on either side of center.
- Attach Tier 1 along Row 9, matching foundation stitch 10 to the marked center. Distribute its 19 foundation stitches across the 11 backing stitches. Use two foundation stitches in one backing stitch at eight positions, four on either side of center.
- Keep each strip relaxed while sewing; the upper strips bow slightly outward to create dimension. Let their outer shells project beyond the backing. Each upper tier should overlap the foundation edge of the tier beneath it by approximately 0.5–1 cm.
- At the valley between every pair of shells, add one small concealed tack into the backing directly beneath that valley. Catch the valley sl st only, leaving the dc shell edges free. There are 2, 3, 4, 5, and 6 valley tacks from the top tier to the bottom tier.
- Check the hanging outline before securing the remaining tails. Spread the shells so each successive tier becomes wider and the backing stays behind the branches.
Pearls and Satin Bow
- Mark one bead position on every shell: center it over the fourth dc, approximately halfway between the foundation edge and the outer shell edge. This gives 3, 4, 5, 6, and 7 beads from top to bottom, totaling 25.
- Using strong sewing thread, secure each 6 mm bead through the shell fabric with at least three passes. Catch a small amount of backing on the final pass where accessible, without pulling the shell flat. Secure the thread on the WS.
- Cut a 55 cm piece of ribbon for the bow and a 10 cm piece for its center wrap. Fold the longer piece into two loops with two downward tails, adjusting the finished bow to approximately 10–11 cm wide.
- Pinch the bow center and stitch through all folded layers. Wrap the shorter ribbon around the pinch twice, trim any excess, and sew the wrap closed on the back. Cut the tails into shallow V shapes.
- Sew the bow to the tree tip immediately below the hanging loop. Catch the backing and the bow center securely, keeping the loop free.
- Sew the 9 mm pearl immediately below the bow center, over the exposed backing above Tier 1. Position the ribbon tails to frame the upper shells.
Finishing
- Weave each yarn tail through several stitches on the WS, reverse direction, and trim. Check that every tier foundation is firmly attached and every outer scallop remains flexible.
- Hang the ornament and check that the trunk sits beneath the center line. Adjust the bow loops and shell edges by hand. If the tree leans, reposition the loop attachment toward the center before sewing it down again.
- If the crochet needs a final touch-up, dampen only the yarn and pin the branches into place. Keep the satin and beads out of direct heat and allow the ornament to dry completely.
The finished tree should hang with a soft, stepped silhouette and a little depth between its layers. Store it flat with tissue around the bow so the satin loops and rounded branches keep their shape.
Tips for Success
- Keep the shell-row slip stitches loose enough that the valleys can spread during blocking.
- Mark each strip’s center before sewing; even-shell tiers have their center between two shells.
- Pin all five tiers in place before attaching the first one to confirm that the upper tiers cover the seams below.
- Sew the backing with small, relaxed stitches so its triangle stays flat while the shells curve forward.
- Add beads after assembly so you can balance their placement on the hanging tree.
Common Mistakes to Avoid
- Working a shell into the wrong foundation stitch changes the repeat. After each anchoring slip stitch, skip two stitches before the next seven-dc shell.
- Counting the turning chain as a stitch adds unwanted width. Work only into the stated crochet stitches.
- Stretching the upper strips tightly across the backing removes their dimension. Distribute the extra foundation stitches using the specified shared attachment points.
- Sewing around every shell edge makes the tiers stiff. Attach the foundations and valley tacks, leaving the rounded edges free.
- Pulling bead thread too tightly puckers the shells. Secure each bead firmly while allowing the crochet to retain its shape.
Ways to Customize This Pattern
- Use sage for all five tiers and retain the forest-green backing and trunk for a quieter color scheme.
- Replace the pearls with small embroidered gold stars, keeping one decoration centered on each shell.
- For a larger wall ornament, use heavier yarn and a suitable hook for every crochet component. Keep all stitch counts unchanged, then enlarge the ribbon and remeasure the finished piece.
- Replace the satin bow with a fabric bow of the same finished width, sewing its center firmly over the loop attachment.
Frequently asked questions
No. It is a layered crochet hanging decoration with a flat triangular backing and a folded trunk. The overlapping shells provide the depth, so no stuffing is needed.
The extra width lets the branch ends extend beyond the backing and gives the tiers a slight forward curve. Distribute the additional stitches at the specified shared attachment points instead of stretching the backing.
Yes. Omit all 26 beads or substitute embroidery. The branch structure and assembly remain the same, and the finished ornament will be lighter.
Spot-clean gently with cool water and a small amount of mild detergent. Avoid soaking the ribbon or rubbing the pearls. Reshape the crochet and dry flat before hanging again.
The finished Heirloom Scalloped Crochet Christmas Tree Ornament

