Holly Star Crochet Christmas Lantern Pattern
Advanced
For experienced crocheters who enjoy complex shaping, fine detail, and ambitious construction
Multi-Day Project
A rewarding 12+ hour journey — perfect for dedicated crafters who love detailed work.
Handmade Gift
A beautiful keepsake — free forever. Read online or print at home.
About This Holly Star Crochet Christmas Lantern Pattern
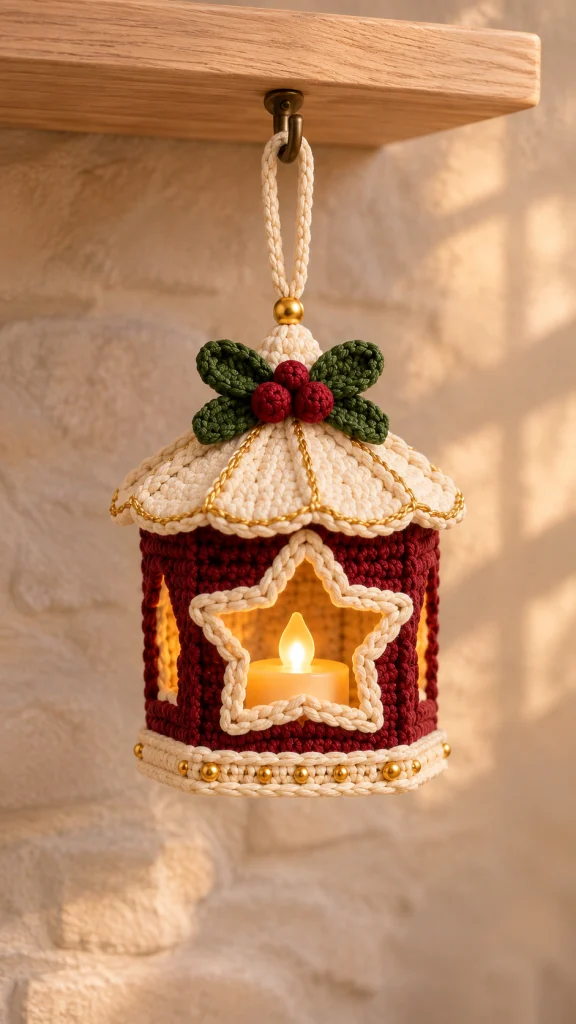
This crochet Christmas lantern pattern creates a hanging holiday decoration with a burgundy framework, an ivory scalloped roof, and a cream star surrounding a warm battery light. Green holly leaves, red berries, and fine gold trim bring together the recognizable details of a traditional Christmas lantern.
The construction combines a reinforced circular floor, three shaped support posts, a wired star frame, and a removable conical roof. Its open sides let the light shine through while keeping the lantern light enough to hang from a sturdy indoor hook. Allow approximately 12–16 hours, plus drying time, for this advanced project.
This design suits crocheters comfortable with counted shaping, working around chain foundations, assembling structural pieces, and careful hand sewing. The star and roof are shaped over templates during finishing; the finished decoration is intended exclusively for a small battery-operated LED tealight.
Materials
- DK cotton yarn: ivory approximately 160 m, burgundy approximately 110 m, dark green approximately 25 m, and berry red approximately 15 m.
- Fine gold metallic cord, approximately 8 m, for sewn decoration.
- 3 mm crochet hook for the lantern and 2.5 mm hook for leaves and berries.
- Battery-operated LED tealight, approximately 3.8 cm wide and no more than 4.5 cm tall, with an accessible battery compartment.
- Two smooth craft hoops, each approximately 10.5 cm in outside diameter, for the lower and upper body rims.
- One smooth craft hoop, approximately 14 cm in outside diameter, for the roof edge.
- Rigid plastic canvas: two circular floor inserts approximately 9.8 cm in diameter and three strips approximately 1.2 cm wide by 10 cm long.
- Paper-covered craft wire, approximately 1 mm thick: 45 cm for the star and three 12 cm pieces for the posts.
- Strong cotton sewing thread and a small sewing needle.
- Tapestry needle, removable stitch markers, scissors, ruler, and rustproof blocking pins.
- Wire cutters and pliers for turning and enclosing wire ends.
- Twelve gold beads, approximately 5 mm, plus one large-hole gold bead approximately 12 mm wide.
- A small amount of fiberfill for the berries.
- Firm blocking board and paper for drawing the star template.
- Optional fabric stiffener suitable for cotton, used according to its label.
Abbreviations
chchainsl stslip stitchscsingle crochethdchalf double crochetdcdouble crochetMRmagic ringincwork 2 stitches of the stated type in one stitchsc2togsingle crochet 2 stitches togethersc3togsingle crochet 3 stitches togetherBLOback loop onlyststitchIvory Floor and Lower Band
- Make two floor circles. Work in continuous rounds, marking the first stitch. Round 1: work 6 sc in MR. Tighten the ring. 6 sts.
- Round 2: inc in every st. 12 sts.
- Round 3: repeat 1 sc, inc six times. 18 sts.
- Round 4: repeat 2 sc, inc six times. 24 sts.
- Round 5: repeat 3 sc, inc six times. 30 sts.
- Round 6: repeat 4 sc, inc six times. 36 sts.
- Round 7: repeat 5 sc, inc six times. 42 sts.
- Round 8: repeat 6 sc, inc six times. 48 sts.
- Round 9: repeat 7 sc, inc six times. 54 sts.
- Round 10: repeat 8 sc, inc six times. 60 sts.
- Round 11: repeat 9 sc, inc six times. 66 sts.
- Round 12: repeat 10 sc, inc six times. 72 sts. Fasten off the first circle; leave the second attached.
- Place the two plastic-canvas discs between the circles, with right sides of crochet facing outward. Join through corresponding stitches of both circles with 72 sc. Enclose the lower 10.5 cm hoop against this seam by passing the hook beneath it before completing each stitch. The hoop sits around the edge of the floor. Join with a sl st. 72 sts.
- Band round 1: ch 1, work 1 sc in BLO of every stitch, join. 72 sts.
- Band round 2: ch 1, work 1 sc in every stitch, join. 72 sts.
- Band round 3: ch 1, work 1 sc in every stitch, join. 72 sts. Fasten off. This short band turns upward around the floor.
Burgundy Body Rims
- Lower rim, round 1: join burgundy to the top edge of the ivory band, ch 1, and work 72 sc around. Join with a sl st. 72 sts.
- Lower rim, round 2: ch 1, sc around, join. 72 sts. Fasten off.
- Upper rim foundation: with burgundy, ch 72 loosely. Join without twisting.
- Upper rim, round 1: ch 1, work 1 sc in each chain while enclosing the second 10.5 cm hoop. Join. 72 sts.
- Upper rim, round 2: ch 1, sc around, join. 72 sts.
- Upper rim, round 3: ch 1, sc around, join. 72 sts. Fasten off, leaving a long sewing tail.
- Mark stitches 1, 25, and 49 on both rims. These are the left edges of the three post attachments. The opening between the first two posts is the front.
Three Reinforced Burgundy Posts
- Make three identical post covers. Foundation: ch 9. Row 1: sc in the second chain from the hook and each remaining chain. 8 sts.
- Rows 2–24: ch 1, turn, and sc in all 8 sts for each of these 23 rows. Each row has 8 sts. Fasten off with a long sewing tail.
- Prepare each insert: turn both ends of a 12 cm wire piece into small closed loops so the finished piece is approximately 10 cm long. Sew it securely along the center of one plastic-canvas strip.
- Fold one crochet cover lengthwise around each insert, enclosing the wire completely. Sew the long edges together and close both ends. Each finished post is approximately 1.2 cm wide and 10 cm tall.
- Sew each post across 4 consecutive stitches of the lower rim, beginning at a marked stitch. Position the cover seam toward the lantern interior.
- Stand the posts upright and sew their upper ends across the corresponding 4 stitches of the upper rim. Check that the upper rim is level and directly above the lower rim before tightening the sewing threads.
Ivory Star Window Frame
- Draw a five-point star template with an outer radius of 4.2 cm and an inner radius of 2.1 cm. Mark alternating outer and inner points at 36-degree intervals around the center, starting with an outer point at the top. Join consecutive points with straight lines. The perimeter is approximately 28 cm.
- With ivory and the 3 mm hook, ch 60 loosely and join without twisting. Leave a 20 cm starting tail.
- Round 1: ch 1; repeat the following five times: sc in the next 4 chains, 3 sc in the next chain, sc in the next 4 chains, sc3tog over the next 3 chains. Join to the first sc. Each repeat consumes 12 chains and produces 12 stitches; total 60 sts.
- Fasten off. Wet the crochet lightly and pin it to the template. Position the middle stitch of each 3-sc group at an outer point and each sc3tog at an inner corner. Distribute the intervening stitches evenly along the edges.
- Shape wire around the same template. Overlap its ends by 2 cm along a straight edge, turn the tips inward, and bind the overlap firmly with sewing thread. Trim excess wire before enclosing it.
- Using ivory yarn, whipstitch the crochet ring to the wire, passing through every crochet stitch. Cover the overlap thoroughly. Keep all wire hidden behind the cream stitches.
- Position the star upright in the front opening. Sew its two lower outer points to the lower burgundy rim and its top outer point to the upper rim. Add a short burgundy thread tie from each side outer point to the nearest post, keeping the star centered and flat.
Ivory Conical Roof
- Use the 3 mm hook. Work joined hdc rounds with the right side facing throughout. Begin each round with ch 1 and join to the first hdc. Round 1: work 6 hdc in MR. 6 sts.
- Round 2: hdc inc in every st. 12 sts.
- Round 3: repeat 1 hdc, hdc inc six times. 18 sts.
- Round 4: repeat 2 hdc, hdc inc six times. 24 sts.
- Round 5: repeat 3 hdc, hdc inc six times. 30 sts.
- Round 6: repeat 4 hdc, hdc inc six times. 36 sts.
- Round 7: repeat 5 hdc, hdc inc six times. 42 sts.
- Round 8: repeat 6 hdc, hdc inc six times. 48 sts.
- Round 9: repeat 7 hdc, hdc inc six times. 54 sts.
- Round 10: repeat 8 hdc, hdc inc six times. 60 sts.
- Round 11: repeat 9 hdc, hdc inc six times. 66 sts.
- Round 12: repeat 10 hdc, hdc inc six times. 72 sts.
- Round 13: repeat 11 hdc, hdc inc six times. 78 sts.
- Round 14: repeat 12 hdc, hdc inc six times. 84 sts.
- Round 15: repeat 13 hdc, hdc inc six times. 90 sts.
- Round 16: repeat 14 hdc, hdc inc six times. 96 sts.
- Roof edge round: ch 1 and work 96 sc, enclosing the 14 cm hoop as you work. Join. 96 sts.
- Scallop round: repeat the following 12 times: sl st in the next st, skip 1 st, work 5 dc in the next st, skip 1 st, sl st in the next st, sc in the next 3 sts. Each repeat consumes 8 stitches. Join to the first sl st and fasten off. There are 12 scallops and 120 worked stitches, including the pattern slip stitches.
- Block the roof over a shallow cone, keeping the edge hoop level and the apex centered. Let it dry completely. The roof should overhang the body by approximately 1.75 cm on each side.
- Sew gold cord down six evenly spaced roof lines, following the increase sectors from the apex to the edge. Sew a separate length around the scalloped border with small, loose couching stitches.
Four Holly Leaves
- Use dark green and the 2.5 mm hook. Make four leaves. Ch 9. Beginning in the second chain from the hook, work sc, hdc, dc in each of the next 4 chains, hdc, then 3 sc in the last chain. Rotate to work along the unused side of the foundation: hdc, dc in each of the next 4 chains, hdc, sc. Join to the first sc. 18 sts.
- Edging round: repeat sc in each of the next 2 sts, then ch 2 and sl st in the second chain from the hook, nine times. Join to the first sc. There are 18 sc and 9 small points.
- Fasten off with a 20 cm sewing tail. Fold the leaf lightly along the foundation chain and sew a few small stitches through the base to hold a shallow cupped shape.
- Arrange the four leaves at the roof apex in two opposing pairs. Sew only their lower thirds to the roof so the tips remain raised.
Three Red Berries
- Use berry red and the 2.5 mm hook. Make three berries in continuous rounds. Round 1: 6 sc in MR. 6 sts.
- Round 2: inc in every st. 12 sts.
- Round 3: sc around. 12 sts.
- Round 4: sc around. 12 sts. Add a small pinch of fiberfill.
- Round 5: sc2tog six times. 6 sts. Cut yarn, thread through the front loops of the remaining stitches, and close.
- Sew the berries over the leaf bases in a triangle, with one berry above and two below. Keep their sewing stitches clear of the central roof opening needed for the hanging cords.
Suspension, Roof Access, and Gold Details
- Make three ivory suspension cords. For each cord, leave a 25 cm starting tail, ch 40, then sl st in the second chain from the hook and each chain back to the start. There are 39 sl sts. Leave a 25 cm ending tail.
- Wrap the tails at the lower end of each cord around the upper body hoop directly above one post and sew securely through the rim. All three cords must attach to the structural hoop, rather than only to the roof fabric.
- Bring the free ends upward inside the roof and pass them through the center opening beside the MR. Ease this opening with a tapestry needle if necessary. Adjust the three cords until the lantern hangs level with the roof seated over the upper rim.
- Bind the three cord ends together immediately above the roof with strong sewing thread. Pass their yarn tails through the large gold bead and secure the bead above the binding. Keep the cord ends accessible until the hanging loop is attached.
- Make the hanging loop: ch 56 with ivory, then sl st in the second chain from the hook and each chain back. There are 55 sl sts. Fold the strip into a loop approximately 12 cm long and sew both ends securely to the joined suspension cords above the bead. Weave and stitch all tails into the cords.
- Attach a 25 cm burgundy yarn tie to the roof underside near its rear edge. Tie it in a removable bow around the upper body hoop. To reach the light, undo the bow and slide the roof upward along the suspension cords.
- Sew the twelve small gold beads to the ivory lower band at intervals of 6 stitches. Pass the sewing thread through each bead at least three times and secure it inside the lantern.
- Sew a fine gold cord around the top and bottom edges of the ivory lower band. Use small couching stitches so the cord follows the circular shape without tightening it.
Finishing
- Check every structural seam, enclosed wire end, and bead attachment. Weave yarn tails through several stitches in two directions and trim them inside the lantern.
- Place the LED tealight in the center of the floor, with its switch accessible when the roof is raised. Seat the roof, tie the rear bow, and check that the light remains clear of the star frame.
- Hold the lantern over a soft surface and gradually transfer its full weight to the hanging loop. Confirm that the three cords share the load, the floor stays level, and the roof retains its shape.
Set the finished lantern on a table for a final look at the star and holly placement. Small adjustments to the suspension cords will help the roof sit evenly and the star face forward.
Hang it from a secure indoor hook or a sturdy branch that can support its weight. Switch the battery light off when the decoration is unattended, and remove the light before cleaning or storing the crochet.
Tips for Success
- Fit the 72-stitch rim around a hoop before completing the floor; a crowded rim will ripple and a stretched rim will distort the posts.
- Use the paper star template throughout blocking and wiring so all five points have matching lengths.
- Keep the post seams facing inward and attach each post over the same four-stitch span on both rims.
- Leave a little slack in metallic cord when sewing around scallops so it does not pull the roof edge inward.
- Apply optional stiffener to separate crochet components before adding beads, wire, or the LED light, and dry them fully.
Common Mistakes to Avoid
- Counting the roof turning chain as a stitch: this adds an unwanted stitch each round. Place a marker in the first actual hdc and join there.
- Hanging the lantern from the roof alone: this can stretch the apex. Attach all three suspension cords directly around the upper structural hoop.
- Leaving exposed wire tips: turn tips inward, bind overlaps, and enclose every end before assembling the crochet.
- Pulling the star flat during attachment: this can blunt its points. Sew it in place while it rests against the template, using gentle tension.
- Using a wax candle: replace it with a cool battery-operated LED tealight; this textile decoration cannot accommodate a flame.
Ways to Customize This Pattern
- Replace burgundy with forest green while keeping the ivory roof, red berries, and gold edging.
- Use silver beads and metallic cord for a cooler palette without changing stitch counts.
- Omit the beads and sew small gold embroidery stitches at the same twelve positions for a lighter finish.
- Make a coordinated set using different body colors, keeping the same yarn weight, gauge, hoops, and structural dimensions.
- For a tabletop version, omit the hanging loop, retain the internal roof cords as guides, and keep the rear roof tie removable for light access.
Frequently asked questions
It is a structural crochet home decoration for a battery LED tealight. The body is an open lantern cage with a framed star, reinforced rims, and a removable roof.
A different weight changes the fit around every structural part. For this size, use yarn that achieves the stated sc gauge. Enlarging the design requires resizing the hoops, floor inserts, posts, and star together.
Untie the bow at the rear roof edge, slide the roof upward along the suspension cords, and reach through an open side. Return the roof to its seated position and retie the bow before hanging.
The construction uses three broad burgundy posts and circular rims, leaving open side spaces. The wired cream star fills the front opening, giving the lantern its focal shape while allowing the LED light to remain visible.
Remove the LED light and dust gently with a soft brush. Spot-clean the cotton without soaking the wire, hoops, or beads. Store upright in a rigid box with tissue supporting the roof and star.
The finished Holly Star Crochet Christmas Lantern Pattern