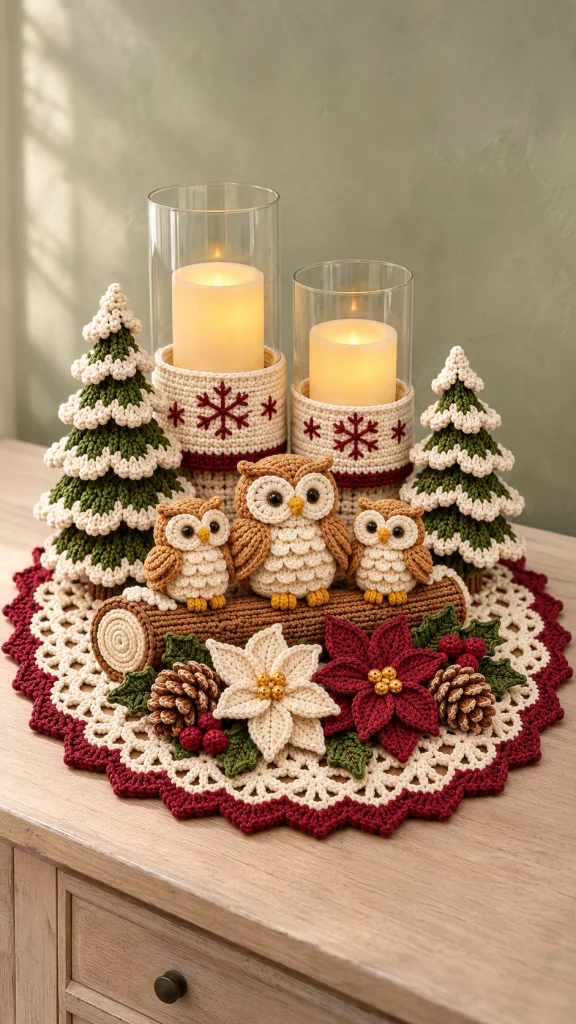
Woodland Christmas Crochet Centerpiece Pattern
Advanced
For experienced crocheters who enjoy complex shaping, fine detail, and ambitious construction
Weekend Project
A satisfying weekend make — start Friday, finish Sunday, enjoy forever.
Handmade Gift
A beautiful keepsake — free forever. Read online or print at home.
About This Woodland Christmas Crochet Centerpiece Pattern
This Christmas crochet centerpiece pattern brings snowy evergreens, three woodland owls and layered poinsettias together on a cream lace mat with a burgundy scalloped edge. A crocheted log anchors the arrangement, while embroidered sleeves dress two glass LED candle holders behind the trees.
This is an advanced home decor project with several different construction methods: a blocked circular mat, shaped and stuffed ornaments, surface-worked tree branches, layered flower petals and fitted cylindrical sleeves. The owls are decorative components of the larger arrangement. Allow approximately 45–60 hours, working in manageable sessions and leaving additional time for blocking.
The palette uses warm cream, moss green, chestnut brown, burgundy and mustard gold. The finished display measures approximately 54 cm across, with the tallest purchased glass holder bringing its height to around 32 cm. Assemble it on a rigid tray so the arrangement can be moved without pulling the lace.
Materials
- DK cotton in cream: approximately 500 g / 1,000 m.
- DK cotton in moss green: approximately 250 g / 500 m.
- DK cotton in chestnut brown: approximately 200 g / 400 m.
- DK cotton in burgundy: approximately 180 g / 360 m.
- DK cotton in mustard gold: approximately 30 g / 60 m.
- Small amounts of dark brown and olive cotton for embroidery.
- 3 mm and 3.5 mm crochet hooks.
- Polyester stuffing, approximately 250 g.
- Three pairs of black eyes: one 10 mm pair and two 8 mm pairs, or black embroidery thread.
- Tapestry needle, embroidery needle, stitch markers, scissors and blocking pins.
- Washable stuffing pellets enclosed in securely sewn fabric pouches: approximately 100 g per tree.
- Two straight-sided glass holders, approximately 10 and 12 cm in outside diameter, with heights around 24 and 32 cm.
- Two battery-operated LED pillar candles sized for the glass holders.
- Rigid circular display tray, approximately 54–56 cm across.
- Optional gold embroidery thread for flower centers; use crocheted centers as written.
Abbreviations
chchainsl stslip stitchscsingle crochethdchalf double crochetdcdouble crochettrtreble crochetinc2 sc in one stitchdecsingle crochet 2 stitches togetherMRmagic ringBLOback loop onlyFLOfront loop onlyCircular Mat: Solid Center
- With cream and the 3.5 mm hook, round 1: work 12 dc in MR. Join with sl st to first dc. 12 stitches.
- Round 2: ch 2, work 2 dc in every stitch; join. 24 stitches.
- Round 3: ch 2, repeat (dc in next stitch, 2 dc in next stitch) 12 times; join. 36 stitches.
- Round 4: ch 2, repeat (dc in next 2 stitches, 2 dc in next stitch) 12 times; join. 48 stitches.
- Round 5: ch 2, repeat (dc in next 3 stitches, 2 dc in next stitch) 12 times; join. 60 stitches.
- Round 6: ch 2, repeat (dc in next 4 stitches, 2 dc in next stitch) 12 times; join. 72 stitches.
- Round 7: ch 2, repeat (dc in next 5 stitches, 2 dc in next stitch) 12 times; join. 84 stitches.
- Round 8: ch 2, repeat (dc in next 6 stitches, 2 dc in next stitch) 12 times; join. 96 stitches.
- Round 9: ch 2, repeat (dc in next 7 stitches, 2 dc in next stitch) 12 times; join. 108 stitches.
- Round 10: ch 2, repeat (dc in next 8 stitches, 2 dc in next stitch) 12 times; join. 120 stitches.
- Round 11: ch 2, repeat (dc in next 9 stitches, 2 dc in next stitch) 12 times; join. 132 stitches.
- Round 12: ch 2, repeat (dc in next 10 stitches, 2 dc in next stitch) 12 times; join. 144 stitches.
- Round 13: ch 2, repeat (dc in next 11 stitches, 2 dc in next stitch) 12 times; join. 156 stitches.
- Round 14: ch 2, repeat (dc in next 12 stitches, 2 dc in next stitch) 12 times; join. 168 stitches.
- Round 15: ch 2, repeat (dc in next 13 stitches, 2 dc in next stitch) 12 times; join. 180 stitches.
- Round 16: ch 2, repeat (dc in next 14 stitches, 2 dc in next stitch) 12 times; join. 192 stitches. Center measures approximately 40 cm across.
Mat Lace and Burgundy Border
- Round 17: ch 1, sc in first stitch, then repeat (ch 5, skip 3 stitches, sc in next stitch) 47 times; ch 5, skip final 3 stitches and join to first sc. 48 chain arches and 48 sc.
- Round 18: sl st into first arch, ch 1, sc in that arch; repeat (ch 6, sc in next arch) 47 times, ch 6 and join to first sc. 48 arches.
- Round 19: sl st into first arch, ch 2; work (3 dc, ch 2, 3 dc) in each arch around; join to first dc. 48 fans, 288 dc and 48 chain spaces.
- Round 20: ch 1; repeat (sc in each of next 3 dc, 3 sc in chain space, sc in each of next 3 dc) 48 times; join. 432 sc. Fasten off cream.
- Round 21: join burgundy in any sc, ch 1 and sc in that stitch. Repeat (skip 3 stitches, work 9 dc in next stitch, skip 3 stitches, sc in next stitch) 53 times; skip 3 stitches, work 9 dc in next stitch, skip final 3 stitches and join to first sc. 54 scallops and 54 separating sc.
- Round 22: ch 1; work sc in every stitch around, making a picot at the fifth dc of each scallop: after its sc, ch 3 and sl st into the first of those chains. Join and fasten off. 540 sc and 54 picots.
- Wet-block flat to approximately 54 cm across, pinning each scallop evenly. Let dry completely before assembling the display.
Fitted Candle Holder Sleeves: Make Two
- Measure each holder around its outside at the intended sleeve position. At 20 sc per 10 cm, choose an even stitch count equal to circumference in centimeters multiplied by 2, rounded down to the nearest even number. For the suggested holders, begin with 62 and 74 stitches. Check the foundation around the actual glass before proceeding.
- With burgundy and the 3.5 mm hook, chain the selected number, join without twisting, ch 1 and sc in every chain. Join. 62 or 74 stitches.
- Round 2: ch 1, sc in every stitch; join. Maintain the selected count.
- Round 3: change to cream, ch 1 and sc in every stitch; join.
- Rounds 4–18: ch 1, sc in every stitch and join each round. Work each of these 15 rounds separately at the same count.
- Round 19: ch 1, work reverse sc around by inserting the hook into the preceding stitch to the right; join and fasten off. Maintain the same count.
- Embroider a central burgundy snowflake over rounds 6–16. Make three intersecting straight lines approximately 4 cm long, then add two short outward branches near each of their six ends. Add a smaller six-spoke star approximately 3 cm to either side.
- Slide the sleeves onto the holders. Their finished height is approximately 8.5 cm. Keep all yarn below the upper glass rim and use only battery-operated LED candles.
Snowy Evergreen Cones: One Tall and One Short
- With moss green, round 1: 6 sc in MR. 6 stitches.
- Rounds 2–4: sc around each round. 6 stitches.
- Round 5: inc in every stitch. 12 stitches.
- Rounds 6–8: sc around each round. 12 stitches.
- Round 9: repeat (sc in next stitch, inc) 6 times. 18 stitches.
- Round 10: sc around in BLO to leave the front loops of round 9 free. 18 stitches.
- Rounds 11–12: sc around each round. 18 stitches.
- Round 13: repeat (sc in next 2 stitches, inc) 6 times. 24 stitches.
- Rounds 14–16: sc around each round. 24 stitches.
- Round 17: repeat (sc in next 3 stitches, inc) 6 times. 30 stitches.
- Round 18: sc around in BLO. 30 stitches.
- Rounds 19–20: sc around each round. 30 stitches.
- Round 21: repeat (sc in next 4 stitches, inc) 6 times. 36 stitches.
- Rounds 22–24: sc around each round. 36 stitches.
- Round 25: repeat (sc in next 5 stitches, inc) 6 times. 42 stitches.
- Round 26: sc around in BLO. 42 stitches.
- Rounds 27–28: sc around each round. 42 stitches.
- Round 29: repeat (sc in next 6 stitches, inc) 6 times. 48 stitches.
- Rounds 30–32: sc around each round. 48 stitches. Fasten off here for the short tree.
- Tall tree only, round 33: repeat (sc in next 7 stitches, inc) 6 times. 54 stitches.
- Tall tree round 34: sc around in BLO. 54 stitches.
- Tall tree rounds 35–36: sc around each round. 54 stitches.
- Tall tree round 37: repeat (sc in next 8 stitches, inc) 6 times. 60 stitches.
- Tall tree rounds 38–40: sc around each round. 60 stitches. Fasten off.
- Stuff both cones firmly enough to hold their shape without stretching the stitches. Place a sealed pellet pouch centrally at each open base, surrounded by stuffing.
Tree Branches, Snow and Bases
- For each reserved front-loop ring, hold the tree with its tip toward you and join green in the first free loop. Repeat (work sc, hdc, 3 dc, hdc and sc in one loop; skip next 2 loops) around; join to first sc and fasten off. The rings with 18, 30, 42 and 54 loops produce 6, 10, 14 and 18 shells respectively. The short tree has the first three rings; the tall tree has all four.
- Join cream at the first stitch of a green shell. Sc in each of the shell’s 7 stitches, adding ch 3 and sl st into the first chain after the fourth sc. Repeat across every shell and join. There are 42, 70, 98 or 126 sc, with one picot per shell. Fasten off.
- For each snowy tip, use cream: round 1, 6 sc in MR; round 2, sc around; round 3, inc around; round 4, sc around. Counts are 6, 6, 12 and 12 stitches. Fasten off and sew over the green tip.
- For each base disk, use green: round 1, 6 sc in MR; round 2, inc around. 12 stitches.
- Base round 3: repeat (sc in next stitch, inc) 6 times. 18 stitches.
- Base round 4: repeat (sc in next 2 stitches, inc) 6 times. 24 stitches.
- Base round 5: repeat (sc in next 3 stitches, inc) 6 times. 30 stitches.
- Base round 6: repeat (sc in next 4 stitches, inc) 6 times. 36 stitches.
- Base round 7: repeat (sc in next 5 stitches, inc) 6 times. 42 stitches.
- Base round 8: repeat (sc in next 6 stitches, inc) 6 times. 48 stitches. Stop here for the short tree.
- Tall base round 9: repeat (sc in next 7 stitches, inc) 6 times. 54 stitches.
- Tall base round 10: repeat (sc in next 8 stitches, inc) 6 times. 60 stitches.
- Sew each disk to its matching cone one stitch to one stitch, keeping the weighted base flat. Finished trees are approximately 15 and 19 cm tall, including their snow caps.
- For a visible trunk on each tree, chain 13 in brown. Row 1: sc in second chain and each remaining chain; turn. 12 stitches. Rows 2–4: ch 1, sc across; turn. Sew the short ends together to form a ring. Sew beneath the tree, centered on the base; the broad weighted cone must still rest securely on the tray.
Woodland Log
- With brown, chain 61. Row 1: sc in second chain and every remaining chain; turn. 60 stitches.
- Rows 2–36: ch 1, sc across in BLO; turn after each row. 60 stitches per row. The panel measures approximately 30 cm long by 16 cm wide.
- Bring the foundation edge and final row together. Sew through corresponding stitches to form a tube approximately 30 cm long. Place the seam underneath.
- For each cream end disk, round 1: 6 sc in MR. Round 2: inc around. 12 stitches.
- Disk round 3: repeat (sc in next stitch, inc) 6 times. 18 stitches.
- Disk round 4: repeat (sc in next 2 stitches, inc) 6 times. 24 stitches.
- Disk round 5: repeat (sc in next 3 stitches, inc) 6 times. 30 stitches.
- Disk round 6: repeat (sc in next 4 stitches, inc) 6 times. 36 stitches.
- Change to brown for disk round 7: sc around. 36 stitches. Make two disks.
- Embroider a loose brown spiral over each cream face. Sew one disk to the tube, placing one disk stitch against each panel row end. Stuff firmly, then attach the second disk the same way.
- For a snow patch, chain 16 in cream. Row 1: sc in second chain and across; turn. 15 stitches. Row 2: ch 1, repeat (sc in next stitch, hdc in next stitch, 3 dc in next stitch, hdc in next stitch, sc in next stitch) 3 times. 21 stitches. Sew along the log’s upper left edge.
Owl Bodies: One Large and Two Small
- For every owl, start in brown. Round 1: 6 sc in MR. Round 2: inc around. 12 stitches.
- Round 3: repeat (sc in next stitch, inc) 6 times. 18 stitches.
- Round 4: repeat (sc in next 2 stitches, inc) 6 times. 24 stitches.
- Round 5: repeat (sc in next 3 stitches, inc) 6 times. 30 stitches.
- Round 6: repeat (sc in next 4 stitches, inc) 6 times. 36 stitches.
- Large owl only, round 7: repeat (sc in next 5 stitches, inc) 6 times. 42 stitches.
- Large owl round 8: repeat (sc in next 6 stitches, inc) 6 times. 48 stitches.
- Large owl rounds 9–16: sc around each round. 48 stitches.
- Large owl round 17: repeat (sc in next 6 stitches, dec) 6 times. 42 stitches.
- Large owl round 18: repeat (sc in next 5 stitches, dec) 6 times. 36 stitches.
- Large owl rounds 19–23: sc around each round. 36 stitches.
- Large owl round 24: repeat (sc in next 4 stitches, dec) 6 times. 30 stitches.
- Large owl round 25: repeat (sc in next 3 stitches, dec) 6 times. 24 stitches.
- Large owl round 26: repeat (sc in next 2 stitches, dec) 6 times. 18 stitches.
- Large owl round 27: repeat (sc in next stitch, dec) 6 times. 12 stitches. Stuff firmly.
- Large owl round 28: dec 6 times. 6 stitches. Draw the tail through remaining front loops and close.
- Small owls, after round 6, rounds 7–12: sc around each round. 36 stitches.
- Small owl round 13: repeat (sc in next 4 stitches, dec) 6 times. 30 stitches.
- Small owl rounds 14–17: sc around each round. 30 stitches.
- Small owl round 18: repeat (sc in next 3 stitches, dec) 6 times. 24 stitches.
- Small owl round 19: repeat (sc in next 2 stitches, dec) 6 times. 18 stitches.
- Small owl round 20: repeat (sc in next stitch, dec) 6 times. 12 stitches. Stuff firmly.
- Small owl round 21: dec 6 times. 6 stitches. Draw closed and weave in the tail. Finished bodies are approximately 13 and 9.5 cm tall.
Owl Eyes, Brows and Beaks
- For each large eye disk in cream, round 1: 6 sc in MR; round 2: inc around, giving 12 stitches; round 3: repeat (sc in next stitch, inc) 6 times, giving 18 stitches. Join and fasten off. Make two.
- For each small eye disk, work rounds 1–2 of the large disk and stop at 12 stitches. Make four.
- Position large disks over body rounds 19–24 and small disks over rounds 14–18, with their inner edges touching at the center front. Attach black eyes through the disk centers. If using safety eyes, install them through both disk and body before the body is stuffed and closed; otherwise embroider black centers now. Sew around each disk’s outer edge.
- For each large brow, chain 10 in brown. Sc in second chain, hdc in next 2 chains, dc in next 3, hdc in next 2 and sc in final chain. 9 stitches. Make two and sew above the disks, lifting the outer tips slightly.
- For each small brow, chain 8. Sc in second chain, hdc in next chain, dc in next 3, hdc in next chain and sc in final chain. 7 stitches. Make four and attach above the small eye disks.
- For each beak, use gold. Row 1: chain 3, sc in second chain and next chain; turn. 2 stitches. Row 2: ch 1, dec. 1 stitch. Fasten off and sew point downward between the eyes.
Owl Feather Bibs, Wings and Feet
- For a large feather strip in cream, chain 21. Row 1: sc in second chain and across; turn. 20 stitches.
- Large strip row 2: ch 1, repeat (skip next stitch, 5 dc in next stitch, skip next stitch, sl st in next stitch) 5 times. 5 feather shells. Make five strips.
- For each small strip, chain 13. Row 1: sc in second chain and across; turn. 12 stitches. Row 2: ch 1, repeat the same 4-stitch feather sequence 3 times. 3 shells. Make four strips per small owl.
- Sew the strips to the front of each owl by their foundation edges, starting just above the feet and working upward. Overlap the next strip over the preceding foundation edge. Center five large strips between body rounds 4 and 17; center four small strips between rounds 3 and 12. Keep the scallops free.
- For each large wing in brown, chain 9. Round 1: sc in second chain and next 6 chains, 3 sc in final chain; along the opposite side work sc in next 6 chains and 2 sc in the final chain. 18 stitches.
- Large wing round 2: inc, sc in next 6 stitches, inc in next 3 stitches, sc in next 6 stitches, inc in next 2 stitches. 24 stitches.
- Large wing round 3: sc around in BLO. 24 stitches. Fasten off, flatten without stuffing and sew the open edges together through paired stitches, making a 12-stitch seam. Make two.
- For each small wing, chain 7. Round 1: sc in second chain and next 4 chains, 3 sc in final chain; along opposite side sc in next 4 chains and 2 sc in final chain. 14 stitches.
- Small wing round 2: inc, sc in next 4 stitches, inc in next 3 stitches, sc in next 4 stitches, inc in next 2 stitches. 20 stitches.
- Small wing round 3: sc around in BLO. 20 stitches. Flatten and sew through paired stitches for a 10-stitch seam. Make four small wings.
- Sew the upper third of each wing to the body sides, directly below the eyes. Angle the lower ends toward the belly.
- For each foot in gold, chain 4; work 3 sl st back along the chain. Repeat this chain-and-return sequence twice more without fastening off. Three toes are formed. Sew their joined bases to the owl’s underside, with the toes projecting forward. Make two feet per owl.
Layered Poinsettias: One Cream and One Burgundy
- For each large petal, chain 13 in the flower color. Along the first side, sc in second chain, hdc in next 2 chains, dc in next 3, tr in next 3, dc in next 2 and 5 dc in final chain. Along the opposite side, dc in next 2 chains, tr in next 3, dc in next 3, hdc in next 2 and sc in final chain. Join to first sc. 27 stitches.
- Petal round 2: ch 1, sc in each of the first 13 stitches, work (sc, ch 2, sc) in next stitch, sc in final 13 stitches; join. 28 sc and one pointed chain space. Fasten off, leaving a sewing tail. Make six large petals per flower.
- For each small petal, chain 9. Along first side, sc in second chain, hdc in next chain, dc in next 2 chains, tr in next 2, dc in next chain and 5 dc in final chain. Along opposite side, dc in next chain, tr in next 2, dc in next 2, hdc in next chain and sc in final chain. Join. 19 stitches.
- Small petal round 2: ch 1, sc in first 9 stitches, work (sc, ch 2, sc) in next stitch, sc in final 9 stitches; join. 20 sc and one pointed chain space. Make five small petals per flower.
- For each flower backing disk, round 1: 6 sc in MR; round 2: inc around. 12 stitches. Fasten off.
- Sew six large petal bases evenly around the backing disk. Add five small petals above them, offsetting their points. Secure only the inner 1.5 cm of each petal so the outer edges lift.
- For each gold center nub, work 6 sc in MR, then dec 3 times. 3 stitches. Draw closed with a small yarn tail tucked inside. Make five per flower and sew together over the petal bases.
- Block petals lightly before final assembly. Each flower measures approximately 13–15 cm across.
Holly Leaves and Berry Clusters
- For each leaf in green, chain 11. Work sc in second chain, hdc in next chain, dc in next 2 chains, tr in next 2, dc in next 2, hdc in next chain and 3 sc in final chain. Along the opposite side, hdc in next chain, dc in next 2, tr in next 2, dc in next 2, hdc in next chain and sc in final chain; join. 21 stitches.
- Leaf edging: ch 1 and sc in all 21 stitches. After stitches 3, 6, 11, 16 and 19, make a picot by chaining 3 and slip stitching into the first chain. Join and fasten off. 21 sc and five picots.
- Embroider a dark olive center vein from base to tip with three short diagonal veins on each side. Make ten leaves.
- For each burgundy berry, round 1: 6 sc in MR. Round 2: sc around. 6 stitches. Insert a tiny amount of stuffing. Round 3: dec 3 times. 3 stitches. Draw closed. Make twelve berries.
- Sew berries into four clusters of three. Attach one or two leaves behind each cluster; reserve the remaining leaves to tuck behind the flowers.
Snow-Tipped Pinecones: Make Two
- For each brown core, round 1: 6 sc in MR. Round 2: inc around. 12 stitches.
- Round 3: repeat (sc in next stitch, inc) 6 times. 18 stitches.
- Rounds 4–8: sc around each round. 18 stitches.
- Round 9: repeat (sc in next stitch, dec) 6 times. 12 stitches. Stuff lightly.
- Round 10: dec 6 times. 6 stitches. Draw closed. The closed end is the pinecone tip.
- For one scale strip in brown, chain 25. Row 1: sc in second chain and across; turn. 24 stitches.
- Scale row 2: ch 1, repeat (skip next stitch, 5 dc in next stitch, skip next stitch, sl st in next stitch) 6 times. 6 scales.
- Join cream at the first scale and sl st in each of its five dc, then sl st in the separating sl st. Repeat across all six scales. 36 sl st. Fasten off. Make three strips for each cone.
- Sew the strips around the core in three overlapping rings, positioning foundation edges toward the broad base and scallops toward the narrow tip. Offset successive rings so the scales overlap the gaps beneath. Ease or overlap the strip ends at the rear.
Finishing and Display Assembly
- Weave in all ends and check that every embroidered detail and small piece is securely attached. Shape the owls with your hands, keeping their undersides broad enough to sit against the log.
- Center the blocked mat on the rigid tray. Place the taller glass holder at the back left of center and the shorter holder at the back right. Leave enough clearance to lift each holder straight upward.
- Place the tall tree at the left and the short tree at the right. Check that their weighted bases rest on the tray through the mat and that neither tree leans against glass.
- Place the log across the front of the holders. Sew the large owl at its center and the smaller owls at either side, using several stitches through each body’s lower back and underside into the log.
- Arrange the cream and burgundy poinsettias along the front edge of the log. Place pinecones to their outer sides and tuck the holly leaves and berry clusters between them. Sew the floral group together at hidden contact points, then tack it to the log.
- For a fixed display, tack the tree bases and log to the mat’s solid center with removable cotton stitches. Keep the glass holders loose so they can be lifted out. Check that the lace border carries no weight.
Set the finished arrangement where its small stitched details can be enjoyed up close. Switch on the LED candles after the glass is in place, and move the display by lifting the tray with both hands.
For storage, remove the glass and batteries, support the flowers with tissue and place the crochet pieces in a shallow box. Spot-clean the assembled ornaments; hand-wash and reblock the mat separately after removing its attachment stitches.
Tips for Success
- Mark each tree’s reserved front-loop ring before stuffing so the branch attachment points remain easy to find.
- Try each sleeve on its actual holder after round 3; adjust the foundation now if it stretches the stitches or slips downward.
- Pin owl feather strips in place from bottom to top before sewing so each row covers the preceding foundation edge.
- Block flower petals individually and leave the centers unpinned to preserve their gentle cupping.
- Keep pellet pouches flat at the tree bases and add stuffing above them to maintain an upright cone.
Common Mistakes to Avoid
- Working through both loops after a designated branch ring removes the attachment loops. Use BLO precisely on rounds 10, 18, 26 and, for the tall tree, 34.
- Counting turning chains as stitches adds unwanted increases. Begin each row or joined round in its first actual stitch.
- Pulling snow edging tight curls the branches upward. Keep cream stitches relaxed and spread each shell before fastening off.
- Sewing every feather scallop flat hides the layered texture. Attach the foundation edges and leave the lower shell edges free.
- Using the lace as a carrying surface stretches the border. Keep the assembled centerpiece on its rigid tray.
Ways to Customize This Pattern
- Replace burgundy with deep rust or midnight blue while retaining cream snow and green foliage.
- Make both trees short by stopping each cone at round 32 and using two 48-stitch base disks.
- Use embroidered black eye centers for an entirely stitched finish; complete the embroidery before attaching the disks.
- Make a smaller display with one holder, one tree and one owl, keeping the full mat as a generous decorative surround.
- For different glass diameters, recalculate each sleeve’s even foundation count from a sc swatch made with the sleeve hook.
Frequently asked questions
Use battery-operated LED candles only. Glass does not make this yarn-covered arrangement suitable for an open flame, and the surrounding flowers and trees must remain away from heat.
The finished diameter depends on dc height, chain tension and blocking. Measure the solid center after round 16; it should be about 40 cm across. Change hook size if that measurement differs substantially, then make the complete lace border.
Yes. Omit their permanent attachment stitches and use long, removable cotton ties through the undersides and around the log. The owls are intended as decorative display pieces with attached small details.
No. The suggested counts assume the stated gauge and approximate outside diameters. Measure your own glass, calculate the foundation count and test the first three rounds before embroidering the sleeves.
The finished Woodland Christmas Crochet Centerpiece Pattern