3D Floral Crochet Handbag Pattern
Beginner Friendly
Perfect for those just starting their crochet journey, with clear instructions and simple techniques
Single-Day Project
A satisfying project you can complete in a single afternoon or evening.
Handmade Gift
A beautiful keepsake — free forever. Read online or print at home.
About This 3D Floral Crochet Handbag Pattern
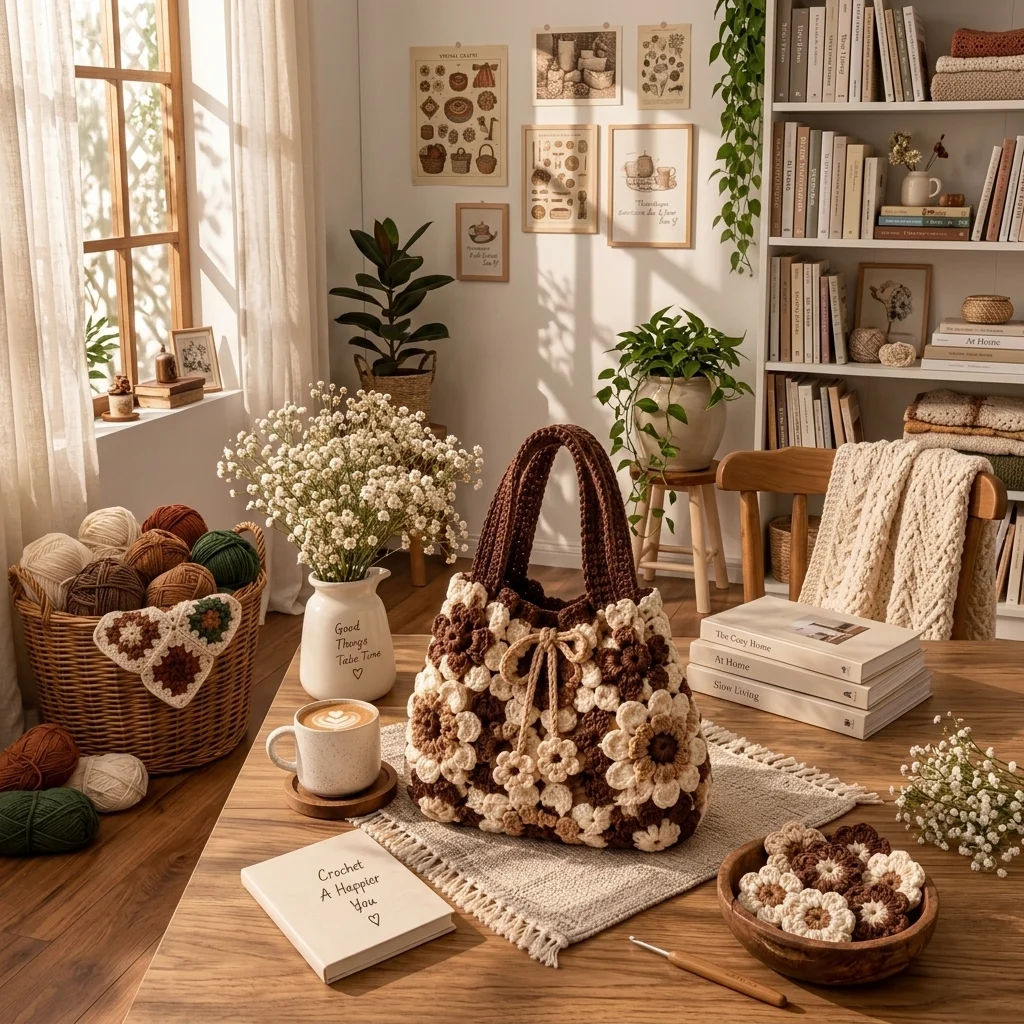
This 3D floral crochet handbag pattern recreates the richly textured purse shown in the reference, combining a sturdy cream-and-brown crochet body with dozens of raised flowers in chocolate, warm beige, and ivory. The finished bag has a softly rounded rectangular silhouette, two substantial dark-brown handles, and a decorative drawstring bow at the center.
The dimensional flowers are made separately and sewn closely across the surface so very little of the underlying bag is visible. Several flower sizes are mixed together to create the dense handmade bouquet effect. The neutral coffee-inspired palette makes the bag decorative without being overly bright, while the reinforced handles and structured base keep it practical.
Materials
- Worsted / aran cotton or cotton-blend yarn in ivory approximately 500 m
- Worsted / aran yarn in chocolate brown approximately 450 m
- Worsted / aran yarn in warm beige / camel approximately 200 m
- 4.0 mm crochet hook flowers and body
- 4.5 mm crochet hook handles if a slightly softer grip is desired
- Stitch markers 6-8
- Yarn needle 1
- Scissors 1 pair
- Optional cotton lining fabric approximately 50 × 80 cm
- Optional fusible interfacing for extra structure
- Optional magnetic snap 1 set
Abbreviations
MRmagic ringchchainsl stslip stitchscsingle crochethdchalf double crochetdcdouble crochettrtreble crochetinc2 stitches in same stitchBLOback loop onlyFLOfront loop onlyststitchstsstitchesFOfasten offBag Base
- With chocolate brown yarn and 4.0 mm hook, ch 41.
- Round 1: Sc in second ch from hook and in next 38 ch, 3 sc in final ch.
- Continue along opposite side of foundation chain, sc in next 38 ch, 2 sc in final ch. (82 sts)
- Round 2: Inc, 38 sc, inc in next 3 sts, 38 sc, inc in final 2 sts. (88 sts)
- Round 3: Sc around, placing an additional increase at each of the four curved corners. (92 sts)
- Round 4: Sc around. (92 sts)
- Round 5: BLO sc around. (92 sts)
- The BLO round creates a clear fold between the base and the side walls.
Lower Bag Body
- Continue with chocolate brown.
- Rounds 6-10: Sc around. (92 sts)
- Change to ivory.
- Rounds 11-13: Sc around. (92 sts)
- Change back to chocolate brown.
- Rounds 14-16: Sc around. (92 sts)
- Continue alternating ivory and brown every 2-4 rounds. Exact stripes will eventually be mostly hidden by the flowers.
- Rounds 17-30: Sc around while maintaining 92 sts.
- Do not increase. The sides should rise vertically from the base.
Upper Bag Shaping
- Round 31: (21 sc, dec) 4 times. (88 sts)
- Rounds 32-34: Sc around. (88 sts)
- Round 35: (20 sc, dec) 4 times. (84 sts)
- Rounds 36-38: Sc around. (84 sts)
- Round 39: (19 sc, dec) 4 times. (80 sts)
- Rounds 40-42: Sc around. (80 sts)
- The slight decreases create the gently gathered upper silhouette visible in the reference.
Top Edge
- Change to chocolate brown.
- Round 43: Sc around. (80 sts)
- Round 44: BLO sc around. (80 sts)
- Rounds 45-47: Sc around. (80 sts)
- Round 48: Sl st loosely around.
- FO and weave in the end.
Large Layered Flower – Make 10-12
- With center color, work 6 sc in MR. Join with sl st.
- Round 2: Ch 1, inc around. Join. (12 sts)
- Change to petal color.
- Round 3: *Sl st in next st, ch 3, 3 dc in next st, ch 3, sl st in next st.* Repeat around to create 6 petals.
- FO the first petal layer.
- Join a contrasting color behind Round 2.
- Working behind the first petals, *ch 5, sl st around the base between petals.* Repeat 6 times.
- Into each ch-5 space work: sc, hdc, 3 dc, hdc, sc.
- FO leaving a long sewing tail.
Medium Puff Flower – Make 14-18
- Work 6 sc in MR with chocolate, beige, or ivory. Join.
- Change color if desired.
- *Ch 3, yarn over, insert hook into same stitch and pull up a loop* 4 times.
- Yarn over and pull through all loops.
- Ch 2 and sl st into same stitch.
- Repeat in each of the remaining 5 stitches.
- You should have 6 thick dimensional petals.
- FO leaving a long sewing tail.
Small Five-Petal Flower – Make 18-24
- Work 5 sc in MR. Join.
- In first stitch work: sl st, ch 2, 2 dc, ch 2, sl st.
- Repeat the petal sequence in each remaining stitch.
- FO leaving a long sewing tail.
- Use ivory, beige, and brown in different combinations.
Extra-Small Filler Flower – Make 10-15
- Work 5 sc in MR.
- *Sl st in next st, ch 2, hdc, dc, hdc, ch 2, sl st in same stitch.*
- Repeat around.
- Pull the center ring tightly closed.
- FO leaving a sewing tail.
Creating the Flower Color Combinations
- Make several ivory flowers with chocolate centers.
- Make several chocolate flowers with ivory or beige centers.
- Make beige flowers with chocolate centers.
- Create a few flowers combining all three colors.
- Avoid arranging identical flowers directly beside one another.
- Keep approximately 45% ivory, 35% chocolate, and 20% beige for a look close to the reference.
Front Flower Placement
- Lay the empty handbag flat with the front facing upward.
- Place the largest flowers first.
- Position one large flower near each upper corner.
- Add another large flower around the lower-left area and another around the lower-right area.
- Distribute the remaining large motifs through the center.
- Fill spaces with medium flowers.
- Use small flowers to cover remaining visible areas of the bag body.
- Pin all motifs before sewing.
- Sew through the flower center and several outer petals so the motifs cannot rotate during use.
Back Flower Placement
- Repeat the same process on the back of the handbag.
- Use fewer large flowers directly underneath the handle attachment areas.
- Fill the outer sides with medium and small motifs.
- Keep approximately 2 cm of the top edge relatively clear so the opening remains flexible.
- Sew all motifs securely.
Side Flowers
- Stand the handbag upright.
- Inspect both side seams for visible gaps.
- Attach medium flowers over the widest gaps.
- Use small flowers near the top corners.
- Allow some petals from the front and back motifs to overlap the side motifs.
- This creates the continuous floral texture seen in the reference.
Handle – Make 2
- With chocolate brown and 4.5 mm hook, ch 76.
- Row 1: Sc in second ch from hook and across. (75 sts)
- Rows 2-6: Ch 1, turn, sc across. (75 sts)
- FO leaving a long tail.
- Fold the strip lengthwise.
- Using chocolate yarn, whipstitch the long edges together to form a thick rounded handle.
- Repeat for the second handle.
Reinforced Handle Option
- Before closing each handle, cut a length of cotton cord approximately 5 cm shorter than the crocheted strip.
- Place the cord inside the folded crochet handle.
- Whipstitch the edges closed around the cord.
- Do not use stretchy elastic cord.
- The reinforcement helps prevent the handles from lengthening when the bag is loaded.
Attaching the Handles
- Mark the center of the front and back top edges.
- Position each handle approximately 10-11 cm apart at its attachment points.
- Overlap each handle end approximately 4 cm onto the inside of the bag.
- Using doubled chocolate yarn, sew a rectangle around each attachment area.
- Add an X-shaped reinforcement through the center of each rectangle.
- Repeat for all four handle ends.
- Test the handles by gently pulling upward before continuing.
Drawstring Cord
- With beige yarn and 4.0 mm hook, ch 111.
- Sl st into second ch from hook and every chain across. (110 sl sts)
- FO.
- Weave the cord through the upper section of the bag approximately 2 rounds below the top edge.
- Begin and end at the center front.
- Pull gently to gather the opening.
- Tie into a loose decorative bow.
Drawstring Flower Ends – Make 2
- With beige, work 5 sc in MR.
- Round 2: Inc around. (10 sts)
- Round 3: *Sl st, ch 2, 2 dc, ch 2, sl st* in alternating stitches to form 5 small petals.
- FO.
- Thread one end of the drawstring through the flower center.
- Knot securely behind the flower.
- Repeat for the opposite cord end.
Optional Lining
- Measure the finished width, height, and depth of your bag.
- Cut two lining panels approximately 1.5 cm larger than the bag measurements on every seam edge.
- Place fabric right sides together.
- Sew the side and bottom seams.
- Box the bottom corners to match the crochet base depth.
- Fold the upper raw edge toward the wrong side by approximately 1.5 cm.
- Insert the lining into the bag.
- Hand-sew the folded edge to the inside of the crochet approximately 1 cm below the top edge.
Optional Interior Pocket
- Cut a fabric rectangle approximately 20 × 16 cm.
- Fold each raw edge inward by 1 cm and press.
- Fold the upper edge once more and stitch.
- Center the pocket on one lining panel before assembling the lining.
- Sew the sides and lower edge to the lining.
- Leave the upper edge open.
Final Assembly
- Check every flower individually and reinforce any loose petals.
- Check the four handle attachment points.
- Shape the base by hand so the handbag stands upright.
- Arrange the floral petals outward to create maximum dimension.
- Pull the drawstring slightly so the upper edge curves inward.
- Tie the center bow with two balanced loops.
- Allow the flower-tipped cords to hang down the center front.
Finishing
Lightly steam-block the plain crochet sections before attaching the flowers, but avoid pressing the finished dimensional flowers directly. Once assembled, shape every flower with your fingers by lifting the outer petals away from the handbag. The motifs should overlap slightly and create a thick, almost continuous floral surface.
For the closest appearance to the reference, keep the handles entirely chocolate brown and noticeably taller than the bag body. The dark handles visually balance the large amount of ivory used throughout the flower-covered purse.
Tips for Success
- Cotton or cotton-blend yarn works particularly well because the flowers retain their shape better than very soft acrylic.
- Make all large flowers first, arrange them, and only then determine how many small filler flowers you need.
- Do not attach flowers only through their centers. Secure at least two outer petals on larger motifs.
- Use reinforced handles if you intend to carry heavier everyday items.
- Add a fabric lining if you want to prevent small objects from pushing through the crochet stitches.
- Photograph your pinned flower arrangement before sewing so you can recreate the placement if motifs move.
Common Mistakes to Avoid
- Do not sew the flowers onto the body before completing the bag shaping.
- Avoid placing all brown flowers together or all cream flowers together. Mixing the shades creates the rich textured appearance.
- Do not over-tighten the drawstring; the reference has a softly gathered opening rather than a tightly closed pouch.
- Avoid making thin handles. The oversized textured handles are an important visual feature of this design.
- Do not leave large uncovered spaces between motifs. Use small filler flowers to create a continuous floral surface.
Ways to Customize This Bag
- Use ivory, dusty pink, and sage green for a romantic spring version.
- Use burgundy, rust, mustard, and cream for an autumn floral handbag.
- Make the entire bag in cream and use only brown flower centers for a more minimalist version.
- Add pearl beads to selected flower centers for an elegant finish.
- Replace the drawstring with a magnetic snap if you prefer a cleaner opening.
- Make a detachable crochet shoulder strap in addition to the two handles.
Frequently Asked Questions
For a bag approximately 32 × 27 cm, plan for about 50-65 flowers in mixed sizes. The exact number depends on yarn thickness, flower diameter, and how much overlap you want between motifs.
Use cotton or a firm cotton-blend yarn, crochet the base tightly, reinforce the handles with cotton cord, and add a fabric lining. These additions significantly improve the structure of a flower-covered crochet bag.
Yes. The crocheted body is designed to work independently. A lining is recommended for frequent use because it protects the flower stitching and prevents small belongings from stretching the crochet fabric.
Yes. You can leave more of the striped crochet body visible and use the flowers only as clusters around the lower corners or top edge. For the dense appearance shown in the reference, however, the motifs should cover almost the entire exterior.
Hand washing is safest. Use cool water and mild detergent, avoid twisting the bag, gently press out excess water with a towel, reshape the flowers and handles, and dry the handbag flat.
The finished 3D Floral Crochet Handbag Pattern