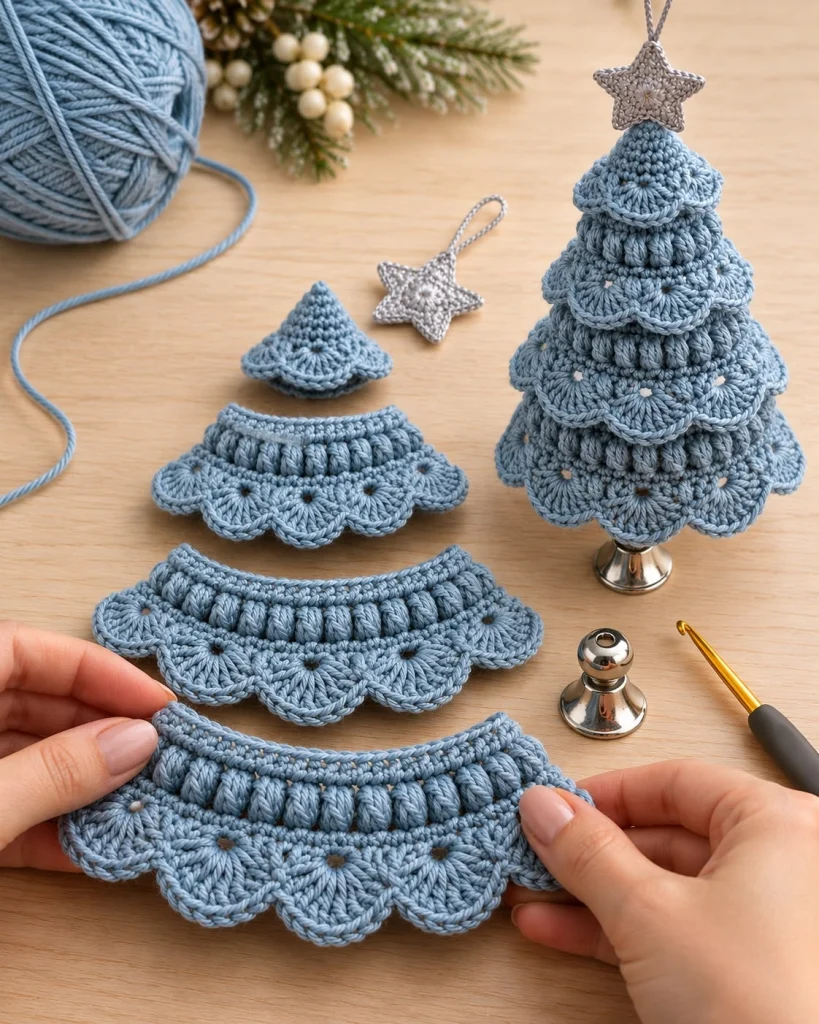
Blue Crochet Christmas Tree Ornament – Free Advanced Crochet Pattern
Create an elegant handmade decoration with this beautiful blue crochet Christmas tree ornament pattern. Featuring layered scalloped branches, raised puff-stitch texture, a delicate silver star topper, and a decorative hanging loop, this miniature tree makes a lovely addition to festive home decor.
The soft dusty-blue yarn and intricate crochet details give this ornament a sophisticated winter-inspired appearance. Display it on a Christmas tree, hang it near a window, or use it as a charming handmade gift.
Pattern Information
- Skill Level: Advanced
- Finished Height: Approximately 15 cm, excluding hanging loop
- Finished Width: Approximately 10 cm
- Yarn: Sport-weight cotton yarn
- Hook Size: 2.5–3 mm
- Construction: Layered crochet tiers, central cone, star topper, and hanging loop
- Terminology: US crochet terms
Materials Needed
- Approximately 60 g dusty-blue cotton yarn
- Small amount of metallic silver or light-gray yarn
- 2.5 mm crochet hook
- 3 mm crochet hook
- Polyester fiberfill
- Stitch markers
- Tapestry needle
- Scissors
- Optional fabric stiffener
- Optional small metal display stand
Crochet Abbreviations
- MR: Magic ring
- ch: Chain
- sl st: Slip stitch
- sc: Single crochet
- hdc: Half double crochet
- dc: Double crochet
- tr: Treble crochet
- inc: Increase
- dec: Invisible decrease
- FLO: Front loop only
- BLO: Back loop only
- FO: Fasten off
Special Stitches
Puff Stitch
Yarn over, insert the hook into the indicated stitch, yarn over and pull up a long loop. Repeat three more times in the same stitch. Yarn over and pull through all loops, then ch 1 to secure.
Shell Stitch
Work 5 dc into the same stitch or chain space to create a decorative scalloped edge.
Front Post Double Crochet
Yarn over, insert the hook around the post of the indicated stitch from front to back, yarn over, and complete a double crochet.
1. Crochet the Central Tree Cone
Using dusty-blue yarn and a 2.5 mm hook, work in continuous rounds.
- Round 1: 6 sc in MR. (6)
- Round 2: Sc in each stitch. (6)
- Round 3: (Sc, inc) × 3. (9)
- Round 4: Sc around. (9)
- Round 5: (2 sc, inc) × 3. (12)
- Round 6: Sc around. (12)
- Round 7: (3 sc, inc) × 3. (15)
- Round 8: Sc around. (15)
- Round 9: (4 sc, inc) × 3. (18)
- Round 10: Sc around. (18)
- Round 11: (5 sc, inc) × 3. (21)
- Round 12: Sc around. (21)
- Round 13: (6 sc, inc) × 3. (24)
- Round 14: Sc around. (24)
- Round 15: (7 sc, inc) × 3. (27)
- Round 16: Sc around. (27)
- Round 17: (8 sc, inc) × 3. (30)
- Round 18: Sc around. (30)
- Round 19: (9 sc, inc) × 3. (33)
- Round 20: Sc around. (33)
- Round 21: (10 sc, inc) × 3. (36)
- Round 22: Sc around. (36)
- Round 23: (11 sc, inc) × 3. (39)
- Round 24: Sc around. (39)
- Round 25: (12 sc, inc) × 3. (42)
- Round 26: Sc around. (42)
- Round 27: (13 sc, inc) × 3. (45)
- Round 28: Sc around. (45)
- Round 29: (14 sc, inc) × 3. (48)
- Round 30: Sc around. (48)
Fasten off, leaving a long tail for attaching the base.
2. Create the Layered Scalloped Branches
The tree features multiple separate decorative tiers that increase gradually in size toward the bottom.
Small Upper Tier
- Ch 24 and join into a ring without twisting.
- Round 1: Work 24 sc around.
- Round 2: (Sc, puff stitch) × 12.
- Round 3: Work 6 evenly spaced shell stitches around.
- Round 4: Sc evenly around the scalloped edge.
Fasten off and leave a long sewing tail.
Second Tier
- Ch 30 and join into a ring.
- Round 1: Work 30 sc.
- Round 2: Alternate sc and puff stitches around.
- Round 3: Work 6 shell stitches evenly around.
- Round 4: Add a decorative sc border.
Third Tier
- Ch 36 and join into a ring.
- Round 1: Work 36 sc.
- Round 2: Work 18 puff stitches separated by sc.
- Round 3: Create 9 evenly spaced shell stitches.
- Round 4: Finish with a sc border.
Fourth Tier
- Ch 42 and join into a ring.
- Round 1: Work 42 sc.
- Round 2: Alternate puff stitches and sc around.
- Round 3: Work 7 decorative shells evenly around.
- Round 4: Finish with sc.
Large Bottom Tier
- Ch 48 and join into a ring.
- Round 1: Work 48 sc.
- Round 2: Work 24 puff stitches separated by sc.
- Round 3: Create 12 evenly spaced shells.
- Round 4: Work sc around the outer edge.
Lightly block the tiers to emphasize the scalloped shapes.
3. Assemble the Layered Tree
- Position the smallest tier near the top of the cone.
- Place the second tier slightly below it.
- Continue adding the remaining tiers in increasing size.
- Overlap the scalloped edges to conceal the cone underneath.
- Use the long sewing tails to secure each tier around the cone.
- Adjust the scallops so they fall naturally and symmetrically.
The overlapping layers create the textured, three-dimensional appearance of the reference ornament.
4. Crochet the Silver Star Topper
Using metallic silver yarn and a 2.5 mm hook:
- Round 1: Work 10 sc in MR. Join with sl st.
- Round 2: *Ch 4, sl st in second ch, sc in next ch, hdc in next ch, skip 1 stitch, sl st in next stitch.* Repeat five times to form five points.
- Round 3: Work sc evenly around the star perimeter, adding (sc, ch 2, sc) at each point.
Make two identical stars and sew them together around the edges for a thicker ornament topper.
Lightly stuff or stiffen the star to help maintain its shape.
5. Create the Hanging Loop
- Using silver yarn, ch 35.
- Sl st into the first chain to form a loop.
- Work sl st along the chain for reinforcement.
- Fasten off, leaving a long tail.
Attach the hanging loop securely behind the silver star.
6. Crochet the Circular Base
Using dusty-blue yarn:
- Round 1: 6 sc in MR. (6)
- Round 2: Inc around. (12)
- Round 3: (Sc, inc) × 6. (18)
- Round 4: (2 sc, inc) × 6. (24)
- Round 5: (3 sc, inc) × 6. (30)
- Round 6: (4 sc, inc) × 6. (36)
- Round 7: (5 sc, inc) × 6. (42)
- Round 8: (6 sc, inc) × 6. (48)
Fasten off, leaving a sewing tail.
7. Final Assembly
- Insert a small amount of polyester stuffing into the central cone.
- Sew the circular base securely to the bottom of the cone.
- Attach all five scalloped tiers in their correct positions.
- Secure the silver star at the top of the tree.
- Attach the hanging loop behind the star.
- Check that the ornament hangs vertically.
- Weave in all loose yarn ends.
- Lightly steam-block the decorative layers if needed, avoiding direct contact with the yarn.
Optional Display Stand
To display the ornament on a table instead of hanging it, place the finished tree on a small decorative metal stand.
A removable stand allows the same crochet tree to be used as either a hanging ornament or tabletop decoration.
Color Variations
- Winter Blue: Dusty blue with a silver star.
- Classic Christmas: Forest green with a gold star.
- Snowy White: Ivory with a champagne-gold topper.
- Romantic Pastel: Blush pink with a pearl-white star.
- Elegant Neutral: Beige with a bronze topper.
- Luxury Holiday: Burgundy with metallic gold accents.
Frequently Asked Questions
Is this crochet Christmas tree suitable for beginners?
This design is best suited to experienced crocheters because it involves multiple separate pieces, decorative puff stitches, scalloped shaping, and precise assembly.
What yarn works best for this ornament?
Sport-weight cotton yarn is recommended because it provides clear stitch definition and helps the layered branches maintain their shape.
Can I make the tree larger?
Yes. Use thicker yarn and a larger crochet hook, or increase the number of rounds in the central cone and decorative tiers.
How do I keep the branches from curling?
Maintain consistent tension, block the pieces before assembly, and use a small amount of fabric stiffener if necessary.
Can I use this ornament without stuffing?
Yes, but a small amount of stuffing or an internal support helps the tree maintain its conical shape.
Can I sell finished ornaments made from this pattern?
Yes, you may sell finished handmade ornaments created using these original instructions.
Final Thoughts
This blue crochet Christmas tree ornament combines delicate scalloped layers, textured puff stitches, and a beautiful silver star topper into a charming handmade decoration.
Its soft blue color and elegant three-dimensional shape make it a wonderful project for holiday decorating, gifting, or creating a coordinated collection of crochet ornaments.
Save this free crochet Christmas tree pattern to Pinterest and share it with your crochet-loving friends!

