Autumn Crochet Acorn Door Hanging – Beautiful Fall Decoration Pattern
Bring the beauty of the autumn forest right to your front door with this charming handmade crochet acorn decoration!
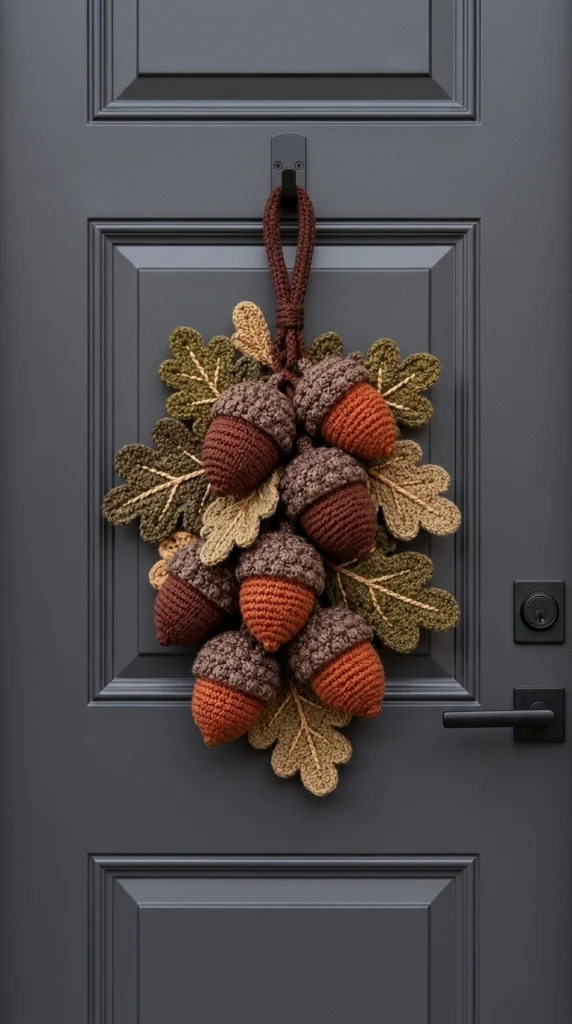
Featuring seven plump crocheted acorns surrounded by textured oak leaves in earthy shades of olive green, golden beige, chestnut brown, and burnt orange, this cozy fall door hanging is a wonderful way to welcome the season.
Unlike a traditional circular wreath, this decoration features a beautiful cascading arrangement of oversized acorns and leaves, finished with a rustic crocheted hanging loop.
It’s a lovely project for anyone who enjoys handmade farmhouse decorations, seasonal crochet, and nature-inspired crafts.
In this tutorial, you’ll learn how to crochet dimensional acorns, textured acorn caps, decorative oak leaves, and a sturdy hanging loop, then assemble everything into a beautiful autumn door swag.
Pattern note: This is an original, simplified interpretation of the photographed design. The individual crochet components can be made using the instructions below, but the exact pictured arrangement, leaf shapes, and acorn proportions may require adjustments. Make a sample before beginning a full set.
Project Overview
- Project: Autumn Crochet Acorn Door Hanging
- Skill Level: Intermediate
- Style: Rustic Farmhouse / Woodland Autumn
- Technique: Amigurumi and Crochet Appliqués
- Finished Size: Approximately 35–45 cm long, depending on yarn and arrangement
- Yarn: Worsted Weight Cotton or Acrylic
- Hook: 3.5–4 mm
- Terminology: US Crochet Terms
- Best For: Front Doors, Fall Wall Decor, Thanksgiving Decorations
Materials You’ll Need
- Worsted weight yarn in dark chestnut brown
- Burnt orange yarn
- Warm caramel yarn
- Medium taupe yarn for acorn caps
- Olive green yarn
- Mustard beige yarn
- 3.5 mm crochet hook for acorns
- 4 mm crochet hook for leaves, if needed
- Polyester fiberfill stuffing
- Yarn needle
- Scissors
- Stitch markers
- Optional floral wire or flexible craft stems
- Optional felt backing
Crochet Abbreviations
- MR: Magic Ring
- ch: Chain
- sc: Single Crochet
- hdc: Half Double Crochet
- dc: Double Crochet
- tr: Treble Crochet
- sl st: Slip Stitch
- inc: Increase (2 sc in one stitch)
- dec: Invisible Single Crochet Decrease
- BLO: Back Loop Only
- st: Stitch
- FO: Fasten Off
Part 1 – Crochet the Acorn Body
Begin with chestnut brown, burnt orange, or caramel yarn.
Work in continuous spiral rounds unless otherwise indicated.
Round-by-Round Acorn Body
Round 1: 6 sc in MR. (6)
Round 2: 1 sc in each stitch. (6)
Round 3: (1 sc, inc) repeat 3 times. (9)
Round 4: 1 sc in each stitch. (9)
Round 5: (2 sc, inc) repeat 3 times. (12)
Round 6: (3 sc, inc) repeat 3 times. (15)
Round 7: (4 sc, inc) repeat 3 times. (18)
Round 8: (5 sc, inc) repeat 3 times. (21)
Round 9: (6 sc, inc) repeat 3 times. (24)
Rounds 10–13: 1 sc in each stitch. (24)
Round 14: (2 sc, dec) repeat 6 times. (18)
Round 15: (1 sc, dec) repeat 6 times. (12)
Stuff the acorn firmly but avoid overstuffing.
Round 16: Dec 6 times. (6)
FO, close the remaining opening, and weave in the yarn tail.
Your acorn should have a gently pointed bottom and a rounded upper section.
Repeat until you have seven acorn bodies.
Part 2 – Crochet the Textured Acorn Cap
The acorn caps are one of the most beautiful details in this project.
Use medium taupe or dark mushroom-brown yarn.
Work in continuous rounds.
Round 1: 6 sc in MR. (6)
Round 2: Inc in every stitch. (12)
Round 3: (1 sc, inc) repeat 6 times. (18)
Round 4: (2 sc, inc) repeat 6 times. (24)
Round 5: 1 sc in each stitch. (24)
Round 6: (1 sc, 1 bobble stitch) repeat 12 times. (24)
Round 7: 1 sc in each stitch. (24)
Round 8: (1 bobble stitch, 1 sc) repeat 12 times. (24)
FO, leaving a long tail for sewing.
How to Make a Bobble Stitch
Yarn over, insert the hook into the indicated stitch, yarn over and pull up a loop.
Yarn over and pull through two loops.
Repeat this partial double crochet process four times in the same stitch.
Yarn over and pull through all remaining loops.
The bobble creates a raised textured bump.
For this cap, keep the bobbles facing outward.
Attach the Cap
Place the finished cap over the rounded upper end of the acorn.
Using the long yarn tail, sew the cap securely around the acorn body.
Repeat for all seven acorns.
Part 3 – Add the Acorn Stems
Use dark brown yarn.
Attach yarn to the top center of the acorn cap.
Ch 6.
Starting in the second chain from the hook, work 1 sl st in each chain.
Join to the top of the cap.
FO and secure the yarn ends.
For hanging acorns, leave a longer yarn tail or create a small attachment loop.
Part 4 – Crochet the Autumn Oak Leaves
The decorative oak leaves create the woodland character of this autumn door hanging.
Use olive green, moss green, golden beige, and muted brown yarn.
Each leaf is worked around a central foundation chain.
Leaf Foundation
Ch 19.
Starting in the second chain from the hook, work:
1 sc, 2 hdc, 10 dc, 2 hdc, 3 sc.
Continue around the opposite side of the foundation chain.
Work the same stitch sequence in reverse order.
Join with a slip stitch.
Create the Rounded Oak-Leaf Lobes
Oak leaves are recognized by their rounded lobes rather than sharply pointed edges.
Along the outer edge, work a decorative lobe sequence:
Sl st in the next stitch.
In the following stitch, work:
1 hdc, 2 dc, 1 hdc.
Sl st into the next stitch.
Repeat the lobe sequence along both sides of the leaf, spacing the lobes as needed.
For larger lobes, substitute treble crochet stitches for the double crochets.
Keep the leaf shape symmetrical, with the widest lobes near the middle.
FO and weave in the ends.
Note: This creates a stylized lobed leaf. Exact stitch placement and the number of lobes must be adjusted to achieve the deeply scalloped oak-leaf silhouette shown in the photograph.
Part 5 – Add Decorative Leaf Veins
Use cream, light beige, or golden tan yarn.
Insert your hook near the base of the leaf.
Work surface slip stitches along the central foundation line.
Continue toward the leaf tip.
For branching veins, use a yarn needle to embroider diagonal lines from the central vein toward the side lobes.
Repeat on both sides.
This creates a beautiful raised botanical effect.
Part 6 – Make the Rustic Hanging Loop
Use dark chestnut-brown yarn.
Ch 55, or enough chains to create your preferred hanging length.
Starting in the second chain from the hook, work 1 sc in each chain.
Ch 1 and turn.
Work another row of sc.
FO, leaving a long tail for attaching the loop.
Fold the strip into a loop and sew both ends securely to the top of the decoration’s backing.
For a thicker hanging cord, crochet additional rows or use a sturdy braided crochet cord.
Part 7 – Create the Door Hanging Base
The acorns and leaves need a stable backing to maintain their cascading arrangement.
For a simple handmade version, use a firm oval felt base or a crocheted panel reinforced with felt.
Suggested backing dimensions:
- Width: Approximately 20 cm
- Height: Approximately 30 cm
- Shape: Elongated oval or tapered teardrop
Choose a backing color that blends with the leaves.
Attach the hanging loop securely to the upper part of the backing.
Arrange the leaves around the outer edges, allowing some to extend beyond the backing.
Sew the leaves firmly into place.
Part 8 – Arrange the Seven Crochet Acorns
Before sewing, place all seven acorns on the prepared backing.
For an arrangement inspired by the reference design:
- Position two acorns near the top.
- Place one acorn slightly below the upper pair.
- Arrange two acorns across the middle and lower-middle area.
- Place the final two acorns toward the bottom.
Alternate chestnut brown, caramel, and burnt orange acorns for a natural woodland appearance.
Overlap the acorns slightly to create depth.
Secure each acorn to the backing with several strong stitches, passing through the body rather than relying only on the stem.
Keep the caps facing outward so their textured details remain visible.
Part 9 – Fill the Gaps with Crochet Leaves
Once the acorns are attached, arrange the oak leaves around them.
Use larger olive-green leaves near the upper and middle sections.
Add golden beige leaves between the acorns.
Position a few leaves at the bottom to create a softly tapered finish.
Layer the leaves at different angles for a natural forest-inspired appearance.
Sew each leaf securely to the backing.
Part 10 – Finish and Display
Check that all components are firmly attached.
Weave in any visible yarn ends.
Adjust the leaf positions and gently shape the acorns.
Hang your finished decoration on a sturdy door hook.
For outdoor use, place it on a sheltered door away from direct rain and prolonged moisture.
Your handmade autumn acorn door hanging is complete!
Beautiful Autumn Color Combinations
Classic Woodland
Chestnut brown, olive green, warm beige, and caramel.
Rustic Farmhouse
Cream, mushroom brown, muted sage, and soft terracotta.
Golden Autumn
Mustard yellow, burnt orange, warm brown, and moss green.
Elegant Neutral Fall
Oatmeal, taupe, ivory, and chocolate brown.
Deep Forest
Dark olive, burgundy, copper, and espresso brown.
Creative Ways to Use This Crochet Decoration
1. Front Door Decoration
Hang the finished acorn arrangement on your front door for a cozy autumn welcome.
2. Thanksgiving Wall Hanging
Display it above a console table or near your Thanksgiving dining area.
3. Fireplace Mantel Accent
Use it as part of a seasonal arrangement with pumpkins and dried leaves.
4. Handmade Fall Gift
Create one for a friend or family member who loves rustic home decorations.
5. Woodland Nursery Decor
Use it as a decorative woodland accent, securely mounted out of children’s reach.
6. Autumn Market Display
Make coordinating acorn decorations for craft fairs and handmade seasonal collections.
Tips for a Beautiful Finished Project
- Use a smaller hook than the yarn label recommends for firm amigurumi stitches.
- Stuff the acorns evenly to maintain their tapered shape.
- Keep the acorn caps slightly wider than the upper acorn bodies.
- Choose at least three coordinating autumn colors.
- Use textured bobble stitches for realistic acorn caps.
- Block the oak leaves before assembly.
- Overlap the leaves to hide the backing.
- Secure heavy components with multiple stitches.
- Use a strong hanging loop.
- Keep the decoration protected from moisture.
Frequently Asked Questions
Is this crochet acorn door hanging beginner-friendly?
This project is best for intermediate crocheters because it combines amigurumi shaping, textured stitches, leaf appliqués, and decorative assembly.
How many acorns do I need?
The reference-inspired arrangement uses seven large crochet acorns.
What yarn is best for crochet acorns?
Worsted weight cotton or acrylic yarn works well. Cotton gives excellent stitch definition, while acrylic can produce softer shapes.
How do I make the acorn caps textured?
Use bobble stitches or other raised crochet stitches to create a bumpy cap surface.
Can I make the acorns smaller?
Yes. Use thinner yarn and a smaller crochet hook.
Can I use this decoration outdoors?
It is best displayed in a sheltered location protected from rain and excessive moisture.
Can I make a Christmas version?
Yes! Replace the autumn leaves with holly leaves and use deep red, evergreen, and cream yarn.
How do I keep the decoration from losing its shape?
Use a sturdy backing, attach the components securely, and reinforce the hanging loop.
Can I wash the finished decoration?
Spot cleaning is recommended, especially when the project includes felt backing or decorative wire.
Can I sell finished crochet acorn decorations?
You can generally sell handmade items made from this original pattern, subject to applicable local requirements.
Final Thoughts
This autumn crochet acorn door hanging is a beautiful celebration of woodland colors, handmade textures, and cozy seasonal decorating.
With its dimensional acorns, textured oak leaves, and rustic hanging loop, it brings a warm farmhouse-inspired touch to your home.
Whether you display it on your front door, in your entryway, or as part of a Thanksgiving arrangement, this handmade decoration is sure to add a charming seasonal detail.
Gather your favorite fall yarn colors, prepare your crochet hook, and enjoy making your own woodland-inspired autumn decoration.
Happy crocheting! 🍂🧶