Autumn Crochet Pumpkin Door Hanging – Beautiful Fall Decoration Pattern
Welcome the cozy beauty of autumn into your home with this gorgeous handmade crochet pumpkin door hanging!
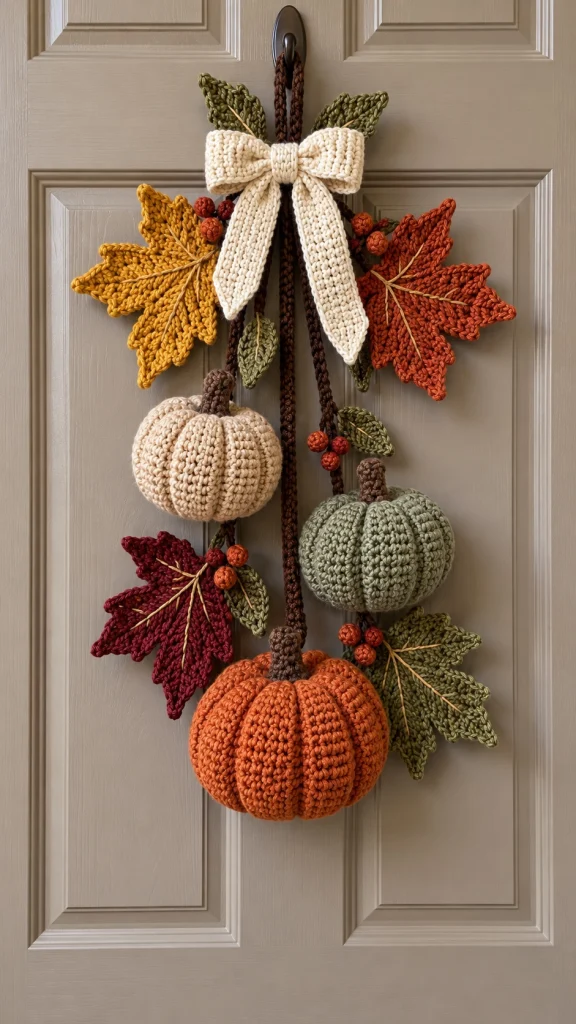
Featuring three beautifully textured pumpkins in warm ivory, soft sage green, and burnt orange, this charming seasonal decoration combines the elegance of handmade crochet with the natural colors of fall.
Surrounded by colorful maple leaves, tiny crocheted berries, and a large cream-colored bow, the pumpkins hang from rustic brown crochet cords to create a beautiful cascading arrangement.
It’s a wonderful alternative to traditional autumn wreaths and a lovely addition to farmhouse, cottagecore, and rustic seasonal decorating.
In this tutorial, you’ll learn how to create textured crochet pumpkins, decorative leaves, small berries, a beautiful bow, and a sturdy hanging arrangement.
Pattern note: This is an original, simplified interpretation of the photographed decoration, not an exact reconstruction or tested replica. The component patterns below provide a starting point; adjust sizes and assembly to match your preferred finished appearance.
Project Overview
- Project: Autumn Crochet Pumpkin Door Hanging
- Skill Level: Intermediate
- Style: Rustic Farmhouse / Cozy Autumn
- Technique: Amigurumi, Crochet Appliqués, Textured Crochet
- Finished Length: Approximately 45–60 cm, depending on yarn and hanging cords
- Yarn Weight: Worsted Weight
- Hook Size: 3.5–4 mm
- Terminology: US Crochet Terms
- Best For: Front Doors, Entryways, Fall Wall Decor, Thanksgiving Decorations
Materials You’ll Need
- Warm ivory worsted weight yarn
- Soft sage green yarn
- Burnt orange yarn
- Dark chocolate brown yarn
- Mustard yellow yarn
- Deep burgundy yarn
- Olive green yarn
- Small amount of rust-colored yarn for berries
- 3.5 mm crochet hook
- 4 mm crochet hook for decorative pieces if needed
- Polyester fiberfill stuffing
- Yarn needle
- Stitch markers
- Scissors
- Optional floral wire for shaping leaves
- Optional felt backing for stability
Crochet Abbreviations
- MR: Magic Ring
- ch: Chain
- sc: Single Crochet
- hdc: Half Double Crochet
- dc: Double Crochet
- tr: Treble Crochet
- sl st: Slip Stitch
- inc: Increase (2 sc in one stitch)
- dec: Invisible Decrease
- BLO: Back Loop Only
- FO: Fasten Off
Part 1 – Crochet the Textured Pumpkins
The three pumpkins are the centerpiece of this beautiful autumn door decoration.
Each pumpkin features pronounced vertical ridges, a softly rounded shape, and a dark brown crochet stem.
We’ll make one ivory pumpkin, one sage green pumpkin, and one larger burnt orange pumpkin.
Small Pumpkin Pattern – Make Two
Use ivory yarn for the first pumpkin and sage green yarn for the second.
Work in turned rows through the back loops only to create a ribbed rectangle.
Foundation: Ch 21.
Row 1: Sc in the second chain from the hook and in each remaining chain. (20)
Rows 2–30: Ch 1, turn, sc BLO in each stitch. (20)
FO, leaving a long tail.
Fold the rectangle so the first and last rows meet.
Sew these edges together to create a tube.
Run a gathering stitch around one open end and pull tightly closed.
Turn the pumpkin right side out.
Stuff firmly with polyester fiberfill.
Gather and close the remaining opening.
Use a long strand of matching yarn to pass through the center of the pumpkin from top to bottom several times, pulling gently to flatten the shape and emphasize the ridges.
For more pronounced pumpkin sections, wrap the yarn around the outside at evenly spaced intervals.
Large Burnt Orange Pumpkin
Use burnt orange yarn.
Foundation: Ch 29.
Row 1: Sc in the second chain from the hook and across. (28)
Rows 2–42: Ch 1, turn, sc BLO across. (28)
FO, leaving a long tail.
Assemble using the same method as the smaller pumpkins.
Stuff evenly, gather both ends, and shape the pumpkin with yarn wraps.
The larger pumpkin should have a fuller, rounded silhouette.
Part 2 – Crochet the Pumpkin Stems
Use dark chocolate brown yarn.
Work in continuous rounds.
Round 1: 6 sc in MR. (6)
Rounds 2–6: 1 sc in each stitch. (6)
FO, leaving a long tail for sewing.
Lightly stuff the stem if desired.
Sew the stem securely to the top center of the pumpkin.
Repeat for all three pumpkins.
Part 3 – Crochet the Decorative Maple Leaves
The colorful maple leaves give this decoration its beautiful autumn character.
Use mustard yellow, burnt orange, deep burgundy, and olive green yarn.
For a simplified five-point leaf appliqué, begin with a central ring and work five shaped points.
Leaf Center
Ch 4 and join with a sl st to form a ring.
Ch 1 and work 10 sc into the ring.
Join with a sl st.
Create the Five Leaf Points
For each point, work into the next two available stitches:
Sl st into the first stitch.
Ch 6.
Starting in the second chain from the hook, work:
1 sc, 1 hdc, 1 dc, 1 tr, 1 dc.
Sl st into the next stitch of the central ring.
Repeat around the center to create five points.
FO, leaving a long tail.
This produces a stylized star-shaped leaf. For a more realistic maple-leaf silhouette, enlarge the middle point and add smaller side lobes using additional shaped rows.
Add Leaf Veins
Use light beige or golden yarn.
With a yarn needle, embroider a central vein from the leaf base toward the top point.
Add smaller diagonal veins extending toward the side points.
Secure the yarn on the back.
Make approximately six to eight leaves in different autumn colors.
Part 4 – Crochet the Tiny Autumn Berries
The small rust-colored berries add a lovely decorative detail between the pumpkins and leaves.
Use burnt orange, rust, or burgundy yarn.
Round 1: 6 sc in MR. (6)
Round 2: Inc in every stitch. (12)
Rounds 3–4: Sc around. (12)
Round 5: Dec 6 times. (6)
Add a small amount of stuffing before closing.
FO, leaving a tail for attaching the berry.
Make approximately 10–14 berries.
Arrange them in small clusters of two or three.
Part 5 – Crochet the Cream Bow
The large cream-colored bow at the top gives the hanging decoration a beautiful handmade finish.
Use warm ivory yarn.
Bow Loops
Ch 13.
Row 1: Sc in the second chain from the hook and across. (12)
Rows 2–24: Ch 1, turn, sc across. (12)
FO.
Fold the rectangle so the short ends meet at the back.
Sew the ends together.
Pinch the center to form two bow loops.
Bow Center
Ch 7.
Sc in the second chain from the hook and across. (6)
Work 5 additional rows of sc.
FO.
Wrap the strip around the pinched center of the bow.
Sew securely at the back.
Bow Tails
Make two.
Ch 9.
Sc in the second chain from the hook and across. (8)
Continue working rows of sc until each tail measures approximately 18–22 cm.
To create pointed ends, decrease one stitch at each edge over the final few rows.
FO and attach the tails behind the bow center.
Part 6 – Crochet the Brown Hanging Cords
Use dark brown yarn.
The reference design features three pumpkins suspended at different heights.
Create three sturdy cords.
Suggested cord lengths:
- Ivory Pumpkin: 20 cm
- Sage Green Pumpkin: 30 cm
- Burnt Orange Pumpkin: 42 cm
For each cord, make a foundation chain slightly longer than the desired finished length.
Work 1 sc in the second chain from the hook and across.
For extra strength, add another row of sc.
FO, leaving long tails for sewing.
Alternatively, use a crocheted I-cord for a thicker, more rounded appearance.
Part 7 – Assemble the Pumpkin Door Hanging
Lay all the finished crochet pieces on a flat surface before attaching them.
Step 1 – Arrange the Pumpkins
Position the ivory pumpkin on the left.
Place the sage green pumpkin slightly lower on the right.
Position the large burnt orange pumpkin at the bottom center.
Adjust the cords until the arrangement looks balanced.
Step 2 – Attach the Hanging Cords
Sew each cord securely through the upper center of its pumpkin.
Use several stitches through the stuffed body rather than attaching the cord only to the stem.
Bring the upper ends of the cords together.
Secure them into a sturdy hanging loop.
Step 3 – Add the Crochet Leaves
Place the mustard yellow leaf near the upper left side.
Position the burnt orange leaf near the upper right side.
Add the burgundy leaf below the ivory pumpkin.
Arrange olive-green leaves near the sage pumpkin and lower section.
Sew the leaves onto the hanging cords or onto a discreet supporting backing.
Step 4 – Attach the Berries
Arrange the berries in small clusters between the leaves.
Use two or three berries per cluster.
Sew them firmly into position.
Step 5 – Add the Cream Bow
Position the bow over the upper section where the hanging cords meet.
Allow the bow tails to fall naturally between the leaves.
Sew the bow securely into place.
Part 8 – Final Shaping and Finishing
Gently reshape each pumpkin with your hands.
Adjust the leaves so their colors are evenly distributed.
Check that all berries are firmly attached.
Weave in any loose yarn ends.
Make sure the hanging loop is strong enough to support the weight of the three pumpkins.
Hang the decoration on a sturdy door hook.
Your handmade autumn pumpkin door hanging is complete!
Beautiful Autumn Color Combinations
Classic Harvest
Burnt orange, ivory, sage green, mustard yellow, and burgundy.
Neutral Farmhouse
Oatmeal, cream, mushroom brown, dusty sage, and caramel.
Warm Cottage Autumn
Terracotta, golden yellow, olive green, deep red, and beige.
Elegant Modern Fall
Muted pumpkin orange, eucalyptus green, warm ivory, and chocolate brown.
Rustic Woodland
Chestnut brown, moss green, copper, mustard, and dark burgundy.
Creative Ways to Display Your Crochet Pumpkin Hanging
1. Front Door Decoration
Hang it on your front door to welcome guests with a cozy autumn touch.
2. Thanksgiving Entryway
Display it near your entryway console with decorative pumpkins and seasonal greenery.
3. Farmhouse Kitchen Decor
Hang it on a pantry door or kitchen wall for a charming handmade accent.
4. Fall Wall Hanging
Use it as a decorative wall piece in a living room or hallway.
5. Handmade Autumn Gift
Create one for a friend or family member who loves cozy seasonal decorations.
6. Craft Fair Collection
Make coordinating pumpkin decorations in different colors for a seasonal handmade display.
Tips for Beautiful Crochet Pumpkins
- Use a smaller hook for firm, well-defined stitches.
- Keep the ribbing consistent across each pumpkin.
- Stuff the pumpkins evenly without stretching the stitches.
- Use long yarn strands to shape the pumpkin sections.
- Choose coordinating autumn colors.
- Block the crochet leaves before attaching them.
- Make the hanging cords strong enough to support the pumpkins.
- Secure decorative pieces with multiple stitches.
- Arrange everything before final assembly.
- Display the decoration away from rain and prolonged moisture.
Frequently Asked Questions
Is this crochet pumpkin door hanging beginner-friendly?
The pumpkins are relatively simple, but the complete decoration is better suited to intermediate crocheters because of the leaves, bow, and assembly.
What yarn is best for crochet pumpkins?
Worsted weight cotton or acrylic yarn works well. Cotton provides crisp stitch definition, while acrylic creates a softer finish.
How many pumpkins are needed?
This design uses three pumpkins in different sizes and colors.
Can I make the pumpkins larger?
Yes. Increase the foundation chain length and the number of rows in the ribbed rectangle.
How do I create the pumpkin ridges?
Work through the back loops only to create ribbing, then use yarn strands to shape the stuffed pumpkin into sections.
Can I use different colors?
Absolutely! Cream, terracotta, olive green, mustard, and burgundy are beautiful autumn choices.
Can I hang this decoration outdoors?
It is best displayed on a sheltered door where it will be protected from rain and excessive moisture.
Can I make a smaller version?
Yes. Use thinner yarn, a smaller crochet hook, and shorter hanging cords.
Can I make a matching autumn wreath?
Yes! Use the same pumpkins, leaves, and berries to decorate a circular wreath base.
How should I store the decoration?
Store it in a clean, dry container, keeping the pumpkins lightly supported to preserve their shape.
Final Thoughts
This autumn crochet pumpkin door hanging is a beautiful way to celebrate the cozy colors and textures of fall.
With its three dimensional pumpkins, colorful maple leaves, tiny berries, and charming cream bow, it brings a warm handmade touch to your seasonal home decor.
Whether you display it on your front door, in your entryway, or as part of a Thanksgiving arrangement, this lovely project is sure to become a favorite autumn decoration.
Gather your favorite fall-colored yarn, pick up your crochet hook, and enjoy creating a beautiful handmade piece for your home.
Happy crocheting! 🍂🎃🧶