Christmas Crochet Bell Door Hanging – Beautiful Handmade Holiday Decoration Pattern
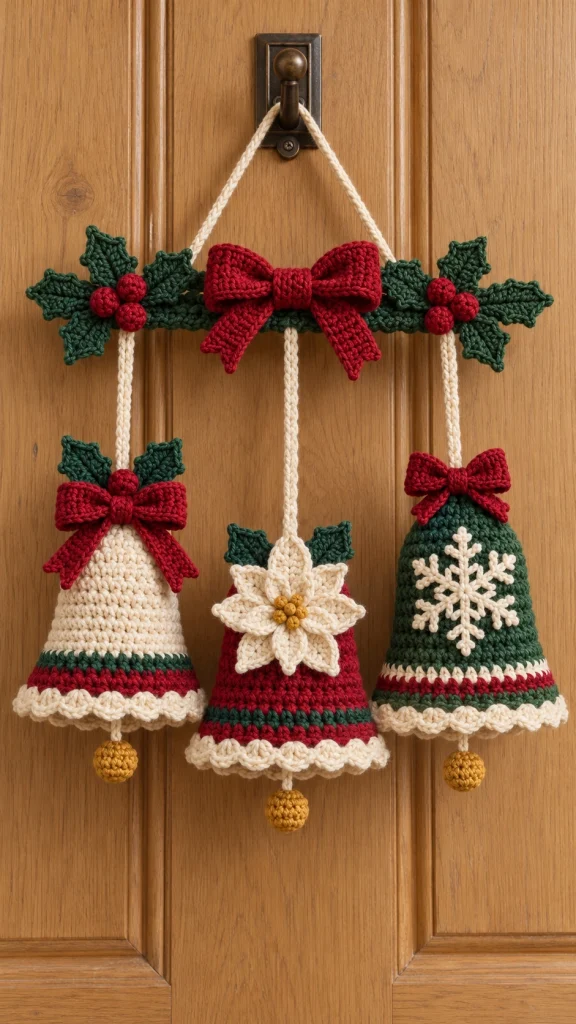
Bring a little handmade Christmas magic to your home with this beautiful crochet bell door hanging!
Featuring three charming crocheted Christmas bells in ivory, festive red, and deep evergreen, this decoration is finished with elegant red bows, delicate holly leaves, tiny red berries, and adorable golden bell clappers.
A large red crochet bow sits at the top, surrounded by rich green holly leaves and berries, while three cream-colored hanging cords suspend the bells at different heights.
The center bell features a beautiful ivory poinsettia flower, while the green bell is decorated with a delicate white snowflake.
This festive project is perfect for Christmas door decorations, holiday wall hangings, farmhouse Christmas decor, and thoughtful handmade gifts.
Pattern note: This is an original crochet interpretation inspired by the photograph. It is not an exact, tested reconstruction of the pictured design. The component instructions below are intended as a practical starting pattern.
Project Overview
- Project: Christmas Crochet Bell Door Hanging
- Skill Level: Intermediate
- Finished Length: Approximately 45–55 cm
- Bell Height: Approximately 12–15 cm
- Yarn Weight: Worsted Weight (Medium #4)
- Hook Size: 3.5 mm or 4 mm
- Terminology: US Crochet Terms
- Style: Traditional Christmas / Cozy Farmhouse
Materials You’ll Need
- Ivory or cream worsted weight yarn
- Christmas red yarn
- Deep forest green yarn
- Mustard gold yarn
- Small amount of yellow yarn for the poinsettia center
- 3.5 mm crochet hook
- Yarn needle
- Stitch markers
- Scissors
- Optional polyester fiberfill for the golden clappers
- Optional fabric stiffener for shaping the bells
- Optional lightweight backing for the holly arrangement
Crochet Abbreviations
- MR: Magic Ring
- ch: Chain
- sc: Single Crochet
- hdc: Half Double Crochet
- dc: Double Crochet
- sl st: Slip Stitch
- inc: Increase
- dec: Decrease
- FLO: Front Loop Only
- BLO: Back Loop Only
- FO: Fasten Off
Part 1 – Crochet the Christmas Bells
The three bells form the main feature of this handmade Christmas decoration.
Each bell is crocheted from the top downward, gradually widening toward the bottom to create the traditional bell silhouette.
Make one ivory bell, one red bell, and one green bell.
Basic Bell Pattern – Make Three
Use your chosen main bell color.
Work in continuous rounds unless otherwise indicated.
Round 1: 6 sc in MR. (6)
Round 2: Inc in each stitch. (12)
Round 3: (1 sc, inc) repeat 6 times. (18)
Round 4: (2 sc, inc) repeat 6 times. (24)
Rounds 5–7: Sc around. (24)
Round 8: (3 sc, inc) repeat 6 times. (30)
Rounds 9–11: Sc around. (30)
Round 12: (4 sc, inc) repeat 6 times. (36)
Rounds 13–15: Sc around. (36)
Round 16: (5 sc, inc) repeat 6 times. (42)
Rounds 17–19: Sc around. (42)
Round 20: (6 sc, inc) repeat 6 times. (48)
Rounds 21–22: Sc around. (48)
Round 23: (7 sc, inc) repeat 6 times. (54)
Round 24: Sc around. (54)
FO if you plan to attach a separate decorative border, or continue directly with your chosen edging.
Leave the bottom of the bell open.
Part 2 – Add the Christmas Color Stripes
The bells in the reference design feature charming red, green, and ivory stripes near the bottom.
To recreate this look, change yarn colors during the final rounds of each bell.
Ivory Bell
- Rounds 1–17: Ivory
- Rounds 18–19: Forest Green
- Rounds 20–21: Christmas Red
- Rounds 22–24: Ivory
Red Bell
- Rounds 1–17: Christmas Red
- Rounds 18–19: Forest Green
- Rounds 20–21: Christmas Red
- Rounds 22–24: Ivory
Green Bell
- Rounds 1–17: Forest Green
- Rounds 18–19: Ivory
- Rounds 20–21: Christmas Red
- Rounds 22–24: Ivory
Part 3 – Crochet the Scalloped Bell Edging
The cream scalloped border creates a lovely festive finish around the bottom of each bell.
Attach ivory yarn to the lower edge.
Work the following sequence around the 54-stitch opening:
Edging Round: *Sl st in next stitch, skip 1 stitch, 5 dc in next stitch, skip 1 stitch, sl st in next stitch, sl st in next stitch.* Repeat 9 times.
Join and FO.
Gently shape the scallops with your fingers.
If desired, use a small amount of fabric stiffener to help the bells maintain their shape.
Part 4 – Crochet the Golden Bell Clappers
Each bell has a small golden ball hanging from its center.
Use mustard gold yarn.
Golden Clapper Pattern – Make Three
Round 1: 6 sc in MR. (6)
Round 2: Inc in every stitch. (12)
Round 3: (1 sc, inc) repeat 6 times. (18)
Rounds 4–5: Sc around. (18)
Round 6: (1 sc, dec) repeat 6 times. (12)
Add a small amount of stuffing.
Round 7: Dec 6 times. (6)
FO and close the opening.
Use ivory yarn to create a short hanging cord approximately 4–5 cm long.
Sew the golden clapper to the lower end of the cord.
Attach the upper end of the cord securely to the inside top center of the bell.
Repeat for all three bells.
Part 5 – Crochet the Festive Red Bows
The red bows add a classic Christmas touch to the decoration.
Make one large bow for the top and two smaller bows for the outer bells.
Small Bow – Make Two
Use Christmas red yarn.
Ch 11.
Row 1: Sc in the second chain from the hook and across. (10)
Rows 2–18: Ch 1, turn, sc across. (10)
FO.
Fold the strip so the short ends meet at the back.
Sew the ends together.
Pinch the center to create two bow loops.
Wrap red yarn tightly around the center several times and secure at the back.
Small Bow Tails
Make two tails for each bow.
Ch 7.
Sc in the second chain from the hook and across. (6)
Continue working rows of sc until each tail measures approximately 7–9 cm.
FO and sew the tails behind the bow center.
Attach one small bow to the ivory bell and the other to the green bell.
Large Top Bow
For the large central bow, follow the same construction method using:
- Ch 15 for the bow rectangle
- 14 sc per row
- 26 rows total
- Two tails approximately 12–15 cm long
Shape the bow and set it aside for final assembly.
Part 6 – Crochet the Holly Leaves
The deep green holly leaves frame the top bow and give the decoration its traditional Christmas appearance.
Use forest green yarn.
Simple Holly Leaf Pattern
Ch 13.
Starting in the second chain from the hook, work:
1 sc, 1 hdc, 1 dc, 1 hdc, 1 sc, 1 sl st, 1 sc, 1 hdc, 1 dc, 1 hdc, 1 sc, 1 sl st.
Turn the work and crochet along the opposite side of the foundation chain.
Repeat the same stitch sequence along the opposite side.
Join with a sl st and FO.
This creates a simple elongated leaf. For the sharply pointed holly silhouette shown in the photograph, additional shaped edging or individually formed points will be needed.
Make approximately 8–12 leaves.
Part 7 – Crochet the Red Holly Berries
Use Christmas red yarn.
Round 1: 6 sc in MR. (6)
Round 2: Inc in each stitch. (12)
Rounds 3–4: Sc around. (12)
Round 5: Dec 6 times. (6)
Add a tiny amount of stuffing if desired.
FO and close the opening.
Make approximately 10–12 berries.
Group them in clusters of three.
Part 8 – Crochet the Ivory Poinsettia Flower
The center red bell is decorated with a beautiful ivory poinsettia featuring layered petals and a golden center.
Flower Center
Using ivory yarn, make a MR.
Work 6 sc into the ring.
Join with a sl st.
First Layer of Petals
For each petal:
Ch 7.
Starting in the second chain from the hook, work:
1 sc, 1 hdc, 2 dc, 1 hdc, 1 sc.
Sl st into the next stitch of the central ring.
Repeat to create six petals.
Second Layer
For a fuller poinsettia, make a second flower using slightly longer foundation chains.
Ch 9 for each petal.
Work 1 sc, 1 hdc, 4 dc, 1 hdc, 1 sc along each chain.
Assemble the two flower layers with the larger petals behind the smaller petals.
Golden Flower Center
Using mustard gold yarn, create several small French knots or tiny crocheted bobbles.
Sew them into the center of the flower.
Attach the finished poinsettia to the front of the red bell.
Part 9 – Embroider the White Snowflake
The forest green bell features a delicate ivory snowflake.
Use ivory yarn and a yarn needle.
Mark the center of the bell front.
Embroider six evenly spaced straight lines radiating outward.
Add two small diagonal branches near the end of each line.
Secure the yarn ends on the inside of the bell.
Keep the embroidery neat and symmetrical.
Part 10 – Crochet the Hanging Cords
Use ivory yarn.
The design features a triangular upper hanger and three vertical cords.
Upper Hanging Loop
Create a strong crocheted cord approximately 35–45 cm long.
Fold it into a triangular hanging shape.
Secure the ends to the left and right sides of the upper decorative arrangement.
Bell Suspension Cords
Make three separate cords.
- Left Bell Cord: Approximately 18 cm
- Center Bell Cord: Approximately 25 cm
- Right Bell Cord: Approximately 18 cm
For a simple cord, make a foundation chain slightly longer than the desired finished length.
Work 1 sc in the second chain from the hook and across.
FO, leaving long tails for attaching.
For a thicker, rounded cord, use a crocheted I-cord instead.
Part 11 – Assemble the Christmas Bell Door Hanging
Step 1 – Arrange the Bells
Lay the three bells on a flat surface.
Place the ivory bell on the left.
Position the red bell slightly lower in the center.
Place the forest green bell on the right.
Adjust the cords so the arrangement appears balanced.
Step 2 – Attach the Suspension Cords
Sew the suspension cords securely to the top center of each bell.
Attach the upper ends to the decorative top arrangement.
Ensure the cords are evenly spaced.
Step 3 – Create the Holly Arrangement
Arrange the holly leaves horizontally across the top.
Place several leaves on each side of the central bow.
Add red berry clusters near the outer ends.
Sew the pieces to a strong crochet foundation strip or discreet fabric backing.
Step 4 – Attach the Large Red Bow
Position the large red bow at the center of the upper holly arrangement.
Allow its tails to hang naturally.
Sew firmly in place.
Step 5 – Add the Smaller Bows
Attach one small red bow to the top of the ivory bell.
Attach the second small bow to the top of the green bell.
Step 6 – Attach the Poinsettia
Sew the ivory poinsettia to the upper front of the center red bell.
Make sure the golden center remains visible.
Step 7 – Attach the Golden Clappers
Secure the golden clapper inside each bell.
Allow the clapper to hang slightly below the bell opening.
Step 8 – Final Hanging Loop
Attach the triangular upper hanger to the decorative top section.
Check that all connections are strong.
Hang the finished decoration on a sturdy hook.
Christmas Color Combinations
Traditional Christmas
Christmas red, ivory, forest green, and gold.
Elegant Vintage Christmas
Burgundy, antique cream, olive green, and muted gold.
Winter Wonderland
Snow white, silver gray, icy blue, and pearl.
Rustic Farmhouse Christmas
Oatmeal, cranberry red, pine green, and warm beige.
Soft Scandinavian Christmas
Natural cream, dusty red, sage green, and wooden accents.
Creative Ways to Display Your Christmas Bells
1. Christmas Front Door
Hang the decoration on your front door for a festive handmade welcome.
2. Holiday Entryway
Display it near a console table decorated with candles, greenery, and Christmas ornaments.
3. Farmhouse Kitchen
Hang the bells on a pantry door or kitchen wall.
4. Christmas Wall Hanging
Use it as a decorative centerpiece in a cozy living room.
5. Handmade Christmas Gift
Make one for a friend, neighbor, or family member who loves handmade holiday decor.
6. Christmas Craft Fair
Create several coordinating designs to display in a seasonal handmade collection.
Tips for Beautiful Crochet Christmas Bells
- Use a smaller crochet hook for neat, firm stitches.
- Keep your tension consistent across all three bells.
- Use stitch markers to track increases.
- Shape the bells gently after finishing.
- Block the holly leaves before assembly.
- Attach all decorations with strong sewing stitches.
- Use matching yarn colors for invisible seams.
- Keep the center bell slightly lower for visual balance.
- Use a sturdy upper hanging cord.
- Store the decoration carefully after the holiday season.
Frequently Asked Questions
Is this Christmas crochet bell hanging beginner-friendly?
The bell bodies are approachable for confident beginners, but the complete project is best suited to intermediate crocheters because of the decorative appliqués and assembly.
What yarn should I use?
Worsted weight cotton or acrylic yarn works well. Cotton gives the bells more structure, while acrylic creates a softer appearance.
How many bells are included?
The decoration features three crocheted bells.
Can I make the bells larger?
Yes. Increase the number of rounds and continue the shaping pattern to create larger bells.
How do I make the bells hold their shape?
Use tight stitches, a smaller hook, and optional fabric stiffener.
Can I change the colors?
Absolutely! Burgundy, cream, sage green, and gold also make a beautiful Christmas combination.
Can I use this decoration outdoors?
It is best displayed on a sheltered door where it is protected from rain and excessive moisture.
Do the bells make a sound?
The crocheted clappers are decorative and generally do not produce a ringing sound.
Can I add real bells?
Yes. Small metal jingle bells can be attached inside the crochet bells if you would like a gentle festive sound. Secure them carefully and keep them away from small children.
How should I store the decoration?
Store it in a clean, dry box and avoid placing heavy objects on top of the bells.
Final Thoughts
This Christmas crochet bell door hanging is a beautiful way to add warmth, tradition, and handmade charm to your holiday home.
With its three festive bells, elegant red bows, decorative holly leaves, golden clappers, delicate snowflake, and ivory poinsettia, it creates a wonderful Christmas display.
Whether you hang it on your front door, decorate your entryway, or give it as a thoughtful handmade gift, this cozy crochet project is a lovely way to celebrate the holiday season.
Gather your favorite Christmas-colored yarn, pick up your crochet hook, and enjoy creating something beautiful for your home.
Happy crocheting and Merry Christmas! 🎄🔔🧶