Autumn Crochet Candle Amigurumi Pattern
Beginner Friendly
Perfect for those just starting their crochet journey, with clear instructions and simple techniques
Single-Day Project
A satisfying project you can complete in a single afternoon or evening.
Handmade Gift
A beautiful keepsake — free forever. Read online or print at home.
About This Autumn Crochet Candle Amigurumi Pattern
Autumn Crochet Candle Amigurumi Pattern – Cute Pumpkin Candle Decoration
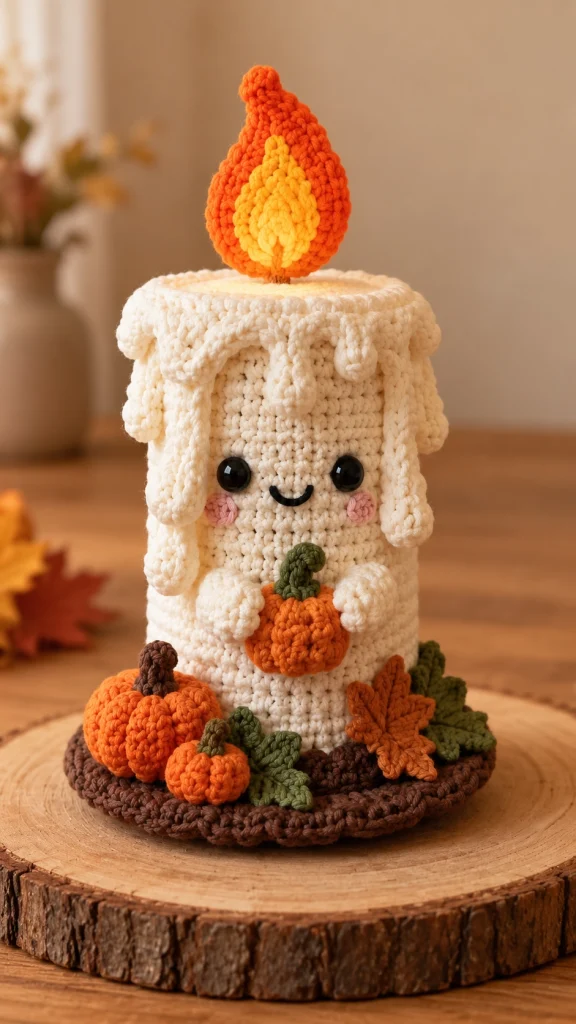
Looking for an adorable handmade decoration to bring warmth and charm to your home this fall? This autumn crochet candle amigurumi pattern is a delightful project featuring a sweet smiling candle, a colorful crochet flame, tiny pumpkins, and beautiful autumn leaves.
With its soft ivory body, cheerful face, rosy cheeks, and cozy seasonal details, this little candle makes a wonderful addition to your fall decorations.
The design combines classic amigurumi techniques with decorative crochet elements to create a charming centerpiece for a shelf, mantel, or autumn display.
Best of all, the entire decoration is made with yarn, so you can enjoy the appearance of a glowing candle without using a real flame.
Project Details
- Skill Level: Intermediate
- Estimated Time: 8–12 hours
- Finished Height: Approximately 22–26 cm
- Finished Base Diameter: Approximately 16–19 cm
- Yarn Weight: Worsted-weight cotton
- Hook Size: 3.5 mm–4 mm
- Construction: Separate pieces sewn together
Materials Needed
- Ivory cotton yarn 120–160 g
- Bright orange yarn 30 g
- Golden yellow yarn 15 g
- Dark brown yarn 40–60 g
- Olive-green yarn 25 g
- Rust-orange yarn 15 g
- Pink yarn small amount
- Black embroidery yarn small amount
- 3.5 mm crochet hook 1
- 4 mm crochet hook optional
- Black safety eyes, 10–12 mm 2
- Polyester stuffing as needed
- Yarn needle 1
- Stitch markers 2
- Scissors 1 pair
- Plastic canvas or stiff cardboard optional base support
US Crochet Abbreviations
MRMagic ringchChainscSingle crochethdcHalf double crochetdcDouble crochettrTreble crochetsl stSlip stitchinc2 sc in same stitchdecInvisible decreaseBLOBack loop onlyFLOFront loop onlyFOFasten offPart 1 – Crochet the Candle Base
Using ivory yarn and a 3.5 mm hook:
Round 1: 6 sc in MR. (6)
Round 2: Inc around. (12)
Round 3: (1 sc, inc) × 6. (18)
Round 4: (2 sc, inc) × 6. (24)
Round 5: (3 sc, inc) × 6. (30)
Round 6: (4 sc, inc) × 6. (36)
Round 7: (5 sc, inc) × 6. (42)
Round 8: (6 sc, inc) × 6. (48)
Round 9: (7 sc, inc) × 6. (54)
Round 10: (8 sc, inc) × 6. (60)
This creates the circular bottom of the candle.
Part 2 – Create the Candle Walls
Round 11: Sc in BLO around. (60)
Rounds 12–42: Sc around. (60)
The candle will gradually form a tall cylinder.
Maintain consistent tension to keep the sides straight.
If using a different yarn weight, add or remove rounds to achieve your desired candle height.
Part 3 – Add the Candle Face
Position the eyes on the front of the candle between approximately Rounds 25 and 26.
Leave about 8–10 stitches between the eyes.
Insert the safety eyes before closing the candle.
Using black embroidery yarn, create a small curved smile beneath the eyes.
Make two small pink cheek circles:
Round 1: 6 sc in MR. (6)
Round 2: Inc around. (12)
FO, leaving a sewing tail.
Flatten each circle slightly and sew one beneath each eye.
Keep the cheeks small and softly rounded.
Part 4 – Crochet the Candle Top
Using ivory yarn:
Round 1: 6 sc in MR. (6)
Round 2: Inc around. (12)
Round 3: (1 sc, inc) × 6. (18)
Round 4: (2 sc, inc) × 6. (24)
Round 5: (3 sc, inc) × 6. (30)
Round 6: (4 sc, inc) × 6. (36)
Round 7: (5 sc, inc) × 6. (42)
Round 8: (6 sc, inc) × 6. (48)
Round 9: (7 sc, inc) × 6. (54)
Round 10: (8 sc, inc) × 6. (60)
FO, leaving a long sewing tail.
Set aside until the flame and candle body are ready for assembly.
Part 5 – Create the Dripping Wax Effect
Using ivory yarn, ch 61.
Row 1: Starting in the second chain from the hook, work 60 sc.
The strip will be attached around the upper edge of the candle.
Create dripping wax shapes along one long edge.
Short Drip: Ch 6, starting in the second chain work 5 sc, sl st into the strip.
Medium Drip: Ch 10, work 9 sc back toward the strip, sl st.
Long Drip: Ch 15, work 14 sc back toward the strip, sl st.
Repeat the different drip lengths around the strip, leaving several stitches between them.
Alternate short, medium, and long drips for a natural melted-wax appearance.
FO, leaving a long tail.
Part 6 – Attach the Wax Drips
Position the dripping-wax strip around the upper edge of the candle.
The longest drips should fall toward the sides of the face without covering the eyes.
Sew the strip securely around the top of the candle.
Allow the individual drips to hang naturally.
For extra texture, gently curve selected drip ends inward.
Part 7 – Crochet the Orange Flame
Using bright orange yarn:
Round 1: 4 sc in MR. (4)
Round 2: Sc around. (4)
Round 3: (1 sc, inc) × 2. (6)
Round 4: Sc around. (6)
Round 5: (2 sc, inc) × 2. (8)
Round 6: Sc around. (8)
Round 7: (3 sc, inc) × 2. (10)
Round 8: (4 sc, inc) × 2. (12)
Round 9: (5 sc, inc) × 2. (14)
Round 10: (6 sc, inc) × 2. (16)
Round 11: (7 sc, inc) × 2. (18)
Round 12: Sc around. (18)
Round 13: (1 sc, dec) × 6. (12)
Stuff the flame lightly.
Round 14: Dec around. (6)
FO, leaving a long sewing tail.
Gently shape the flame into a pointed teardrop.
Part 8 – Crochet the Yellow Inner Flame
Using golden-yellow yarn, ch 10.
Starting in the second chain:
Work 1 sc, 2 hdc, 3 dc, 2 hdc, and 1 sc.
Ch 1 and work back along the opposite side of the foundation chain.
Repeat the same stitch sequence.
FO, leaving a sewing tail.
Shape the piece into a narrow teardrop.
Sew it onto the front of the orange flame.
Position the yellow section centrally, leaving the orange outer edge visible.
Part 9 – Attach the Flame
Locate the center of the candle top.
Using the long orange yarn tail, sew the base of the flame securely to the top.
Keep the flame standing upright.
For additional stability, insert a short piece of soft stuffing at the base before completing the attachment.
Avoid using sharp wire if the decoration may be handled by children.
Part 10 – Stuff and Close the Candle
Fill the candle body gradually with polyester stuffing.
Keep the sides smooth and evenly filled.
Do not overstuff, as this may distort the cylindrical shape.
Position the candle top over the opening.
Sew the top to the body using the long ivory yarn tail.
Check that the flame is centered.
Part 11 – Crochet the Little Candle Arms
Make two arms using ivory yarn.
Round 1: 6 sc in MR. (6)
Rounds 2–5: Sc around. (6)
Stuff lightly.
Flatten the opening and sew it closed.
FO, leaving a long tail.
Attach the arms to the front sides of the candle around the lower middle section.
Angle them slightly inward so the candle appears to be holding a tiny pumpkin.
Part 12 – Crochet the Main Pumpkin
Using orange yarn:
Round 1: 6 sc in MR. (6)
Round 2: Inc around. (12)
Round 3: (1 sc, inc) × 6. (18)
Round 4: (2 sc, inc) × 6. (24)
Rounds 5–9: Sc around. (24)
Round 10: (2 sc, dec) × 6. (18)
Round 11: (1 sc, dec) × 6. (12)
Stuff firmly.
Round 12: Dec around. (6)
FO, leaving a long tail.
Pass the yarn through the center of the pumpkin and wrap it around the outside several times to create pumpkin ridges.
Pull gently to form the characteristic ribbed shape.
Part 13 – Make the Pumpkin Stem
Using olive-green yarn:
Round 1: 5 sc in MR. (5)
Rounds 2–5: Sc around. (5)
FO, leaving a sewing tail.
Sew the stem to the center of the pumpkin.
Curve it slightly for a natural appearance.
Part 14 – Attach the Pumpkin to the Candle
Position the little pumpkin between the candle’s two arms.
Sew the pumpkin directly to the candle body.
Then secure the arms against the sides of the pumpkin.
Make sure the pumpkin remains visible from the front.
The finished candle should look as though it is gently hugging the pumpkin.
Part 15 – Crochet the Brown Autumn Base
Using dark-brown yarn:
Round 1: 6 sc in MR. (6)
Round 2: Inc around. (12)
Round 3: (1 sc, inc) × 6. (18)
Round 4: (2 sc, inc) × 6. (24)
Round 5: (3 sc, inc) × 6. (30)
Round 6: (4 sc, inc) × 6. (36)
Round 7: (5 sc, inc) × 6. (42)
Round 8: (6 sc, inc) × 6. (48)
Round 9: (7 sc, inc) × 6. (54)
Round 10: (8 sc, inc) × 6. (60)
Round 11: (9 sc, inc) × 6. (66)
Round 12: (10 sc, inc) × 6. (72)
Round 13: (11 sc, inc) × 6. (78)
Round 14: (12 sc, inc) × 6. (84)
FO and weave in the ends.
This circular piece forms the autumn display platform.
For a firmer base, crochet a second identical circle and sew the two layers together around a removable plastic-canvas insert.
Part 16 – Crochet Two Decorative Pumpkins
Make one medium pumpkin and one smaller pumpkin using orange yarn.
Medium Pumpkin: Follow the main pumpkin instructions from Part 12.
Small Pumpkin:
Round 1: 6 sc in MR. (6)
Round 2: Inc around. (12)
Round 3: (1 sc, inc) × 6. (18)
Rounds 4–6: Sc around. (18)
Round 7: (1 sc, dec) × 6. (12)
Round 8: Dec around. (6)
Stuff, close, and shape with yarn wraps.
Add small brown or green stems.
Part 17 – Crochet Autumn Maple Leaves
Using rust-orange, golden-yellow, or olive-green yarn:
Ch 5 and join to form a ring.
Round 1: Work 10 sc into the ring. Join.
Round 2: Create five leaf points around the ring.
For each point:
Ch 5, work 1 sc in the second chain, 1 hdc in the next chain, 1 dc in the next, and 1 hdc in the final chain.
Sl st into the next available stitch on the center ring.
Repeat until five points are formed.
FO, leaving a sewing tail.
Gently shape the leaf points.
Make approximately 4–6 leaves in different autumn colors.
Part 18 – Crochet Small Green Leaves
Using olive-green yarn, ch 9.
Starting in the second chain:
Work 1 sc, 1 hdc, 4 dc, 1 hdc, and 1 sc.
Ch 1 and work the same sequence along the opposite side.
Join and FO.
Make approximately 4–5 leaves.
These small leaves will fill the spaces around the pumpkins.
Part 19 – Assemble the Autumn Display
Position the finished candle in the center of the brown crochet base.
Sew the candle securely to the base.
Arrange the decorative pumpkins near the front.
Place the larger pumpkin toward one side and the smaller pumpkin slightly in front.
Position the crochet maple leaves around the pumpkins and along the back edge.
Add green leaves to fill any empty spaces.
Adjust the arrangement until it looks balanced.
Part 20 – Secure the Decorative Pieces
Use matching yarn and a yarn needle to sew each pumpkin and leaf to the brown base.
Keep the stitches hidden underneath the decorations.
Attach the larger leaves at their centers while leaving their outer tips slightly raised.
This gives the display a natural three-dimensional appearance.
Check that all pieces are firmly attached.
Part 21 – Final Shaping
Gently adjust the candle body so it stands straight.
Shape the dripping wax pieces with your fingers.
Make sure the orange flame points upward.
Position the candle arms neatly around the pumpkin.
Arrange the surrounding pumpkins and autumn leaves.
Trim and weave in any remaining yarn ends.
Creative Color Variations
Classic Autumn: Ivory candle, bright orange flame, brown base, and rust-colored leaves.
Soft Cottagecore: Cream candle, muted peach flame, sage leaves, and beige pumpkins.
Halloween Version: Black candle, orange flame, purple cheeks, and tiny jack-o’-lantern pumpkins.
Thanksgiving Centerpiece: Warm ivory candle with mustard, terracotta, and olive-green decorations.
Christmas Version: Ivory candle with red berries, green holly leaves, and a golden flame.
Care Instructions
Dust the crochet candle gently using a soft brush.
Spot-clean with cool water and mild detergent when needed.
Avoid soaking the decoration if it contains cardboard or other non-washable supports.
Allow it to air-dry completely.
Keep away from direct heat, candles, fireplaces, and open flames.
Store in a dry place when not displayed.
Frequently Asked Questions
The main candle body uses basic amigurumi stitches, but the decorative details and assembly make this project more suitable for intermediate crocheters.
Yes. Add extra plain rounds to the ivory candle body before attaching the top.
Yes. Work fewer increase rounds and begin decreasing earlier to create a shorter flame.
Yes, but plush yarn will produce a larger and softer candle. Adjust the hook size and stuffing accordingly.
Absolutely. The smiling candle can be displayed on its own, with or without the little pumpkin in its arms.
Use firm stuffing and a flat bottom. A plastic-canvas insert in the base can provide additional stability.
Yes! The orange pumpkins and autumn leaves make it perfect for Halloween, Thanksgiving, and seasonal fall displays.
It should be treated as a decorative item rather than a toy. For child-friendly versions, embroider the eyes and avoid detachable small parts.
Yes. This adorable crochet candle makes a thoughtful handmade gift for autumn lovers, crochet enthusiasts, and anyone who enjoys cozy seasonal decorations.
Final Thoughts
This autumn crochet candle amigurumi pattern is a charming way to celebrate the cozy beauty of fall.
From the smiling ivory candle and colorful crochet flame to the tiny pumpkins and textured autumn leaves, every detail adds personality to this handmade decoration.
Display it on a shelf, place it on a mantel, or give it as a thoughtful seasonal gift.
With a little patience and creativity, you can create an adorable fall centerpiece that brings handmade warmth to your home year after year.
Happy crocheting! 🧶🍂🎃
The finished Autumn Crochet Candle Amigurumi Pattern

