Autumn Crochet Gnome Pattern
Beginner Friendly
Perfect for those just starting their crochet journey, with clear instructions and simple techniques
Single-Day Project
A satisfying project you can complete in a single afternoon or evening.
Handmade Gift
A beautiful keepsake — free forever. Read online or print at home.
About This Autumn Crochet Gnome Pattern
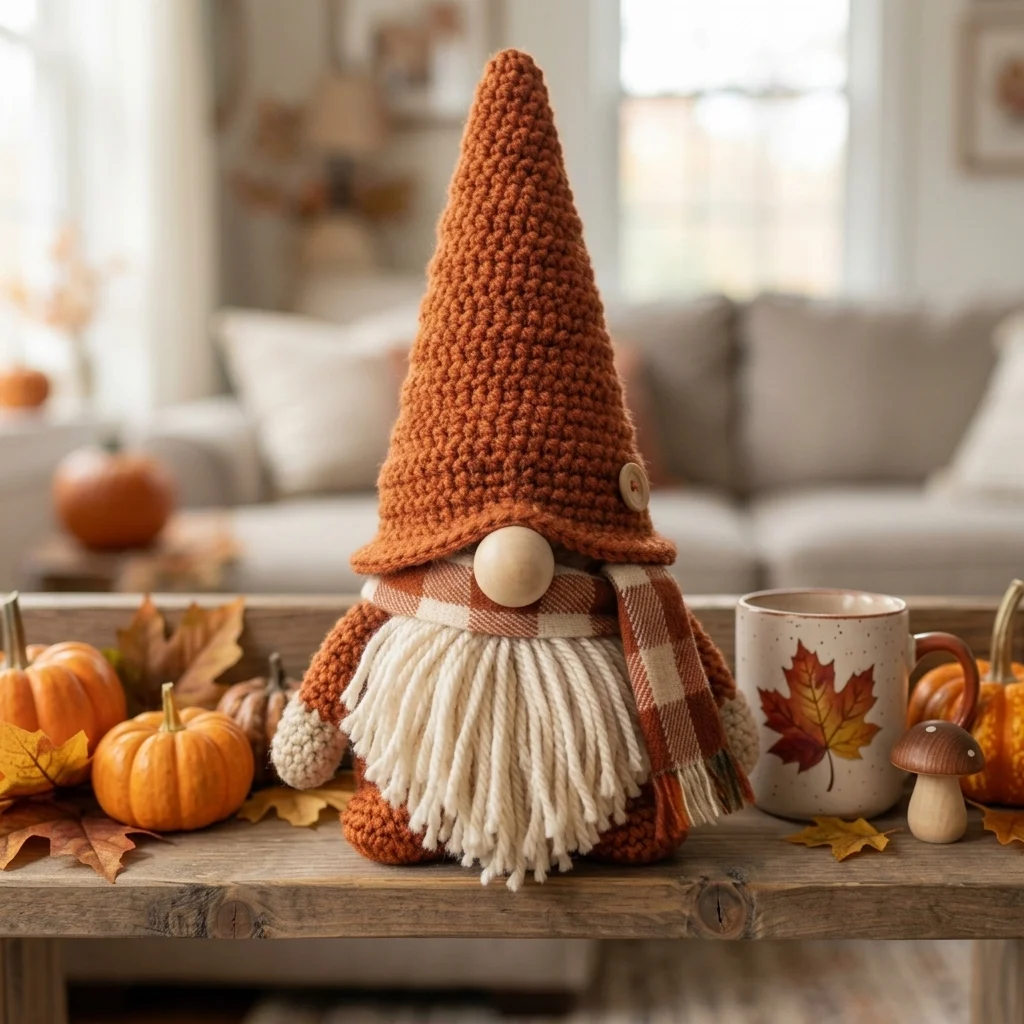
This autumn crochet gnome pattern creates a cozy fall decoration with a tall burnt-orange hat, oversized cream beard, round wooden nose, chunky body, mittened arms, and a warm plaid scarf. The strongly tapered hat and long loose-strand beard give the gnome the distinctive proportions shown in the reference, while the rust, cream, and warm brown palette works naturally with pumpkins, leaves, and other autumn decorations.
The gnome is built from several separate components for a polished three-dimensional finish. The body is worked in continuous rounds and weighted at the base, the arms and feet are shaped separately, and the hat uses gradual increases to create its long pointed silhouette. The beard is made from individually attached strands rather than a flat crocheted panel, allowing it to fall naturally over the front of the body.
Allow approximately 8-10 hours for the complete project. This advanced pattern is best for crocheters comfortable with continuous rounds, invisible decreases, controlled shaping, color changes, firm stuffing, attaching separate pieces, working a long tapered hat, and carefully assembling decorative elements so the finished gnome stands securely.
Materials
- Worsted / aran yarn in burnt orange approximately 220 m
- Worsted / aran yarn in warm cream approximately 160 m
- Strong cream yarn for beard strands approximately 90 m
- 4.0 mm crochet hook main pieces
- 3.5 mm crochet hook tighter finishing details
- Polyester fiberfill approximately 200-250 g
- Poly pellets or glass craft beads approximately 120 g for weighted base
- Small fabric pouch or nylon stocking for containing the base weight
- Natural unfinished wooden bead approximately 30-35 mm for nose
- Small wooden button approximately 18-22 mm
- Rust-and-cream plaid fabric or narrow scarf approximately 5 × 70 cm
- Strong sewing thread for wooden nose and button
- Yarn needle 1
- Long doll needle recommended for assembly
- Stitch markers 4
- Scissors 1 pair
- Wire pet brush or wide-tooth comb optional for beard finishing
Abbreviations
MRmagic ringchchainsl stslip stitchscsingle crochethdchalf double crochetinc2 single crochet in same stitchdecinvisible single crochet decreaseBLOback loop onlyFLOfront loop onlyststitchstsstitchesFOfasten offBody
- Round 1: With burnt orange, work 6 sc in MR. (6 sts)
- Round 2: Inc in each st around. (12 sts)
- Round 3: (Sc in next st, inc) 6 times. (18 sts)
- Round 4: (Sc in next 2 sts, inc) 6 times. (24 sts)
- Round 5: (Sc in next 3 sts, inc) 6 times. (30 sts)
- Round 6: (Sc in next 4 sts, inc) 6 times. (36 sts)
- Round 7: (Sc in next 5 sts, inc) 6 times. (42 sts)
- Round 8: (Sc in next 6 sts, inc) 6 times. (48 sts)
- Round 9: Working in BLO, sc around. (48 sts)
- Rounds 10-20: Sc around. (48 sts)
- Round 21: (Sc in next 6 sts, dec) 6 times. (42 sts)
- Rounds 22-24: Sc around. (42 sts)
- Round 25: (Sc in next 5 sts, dec) 6 times. (36 sts)
- Rounds 26-28: Sc around. (36 sts)
- Round 29: (Sc in next 4 sts, dec) 6 times. (30 sts)
- Round 30: Sc around. (30 sts)
- Insert the weighted pouch flat against the base.
- Stuff firmly around and above the weighted insert.
- Round 31: (Sc in next 3 sts, dec) 6 times. (24 sts)
- Round 32: (Sc in next 2 sts, dec) 6 times. (18 sts)
- Add final stuffing, keeping the top firm.
- Round 33: (Sc in next st, dec) 6 times. (12 sts)
- Round 34: Dec 6 times. (6 sts)
- FO and close the remaining opening.
Base Reinforcement
- With burnt orange and the base facing you, join yarn into any unused FLO from Body Round 9.
- Round 1: Sc in each unused loop around. (48 sts)
- Round 2: Sl st loosely in each st around. (48 sts)
- FO and weave in the ends.
- Press the reinforced ridge downward so the gnome sits on a clearly defined flat base.
Left Arm
- Begin with cream for the mitten.
- Round 1: Work 6 sc in MR. (6 sts)
- Round 2: Inc around. (12 sts)
- Round 3: (Sc in next st, inc) 6 times. (18 sts)
- Rounds 4-6: Sc around. (18 sts)
- Round 7: (Sc in next st, dec) 6 times. (12 sts)
- Add a small amount of stuffing to the mitten.
- Change to burnt orange.
- Rounds 8-17: Sc around. (12 sts)
- Stuff the lower half of the sleeve lightly, leaving the upper half almost unstuffed.
- Flatten the opening.
- Sc through both layers across. (6 sts)
- FO leaving a 35 cm sewing tail.
Right Arm
- Begin with cream.
- Round 1: Work 6 sc in MR. (6 sts)
- Round 2: Inc around. (12 sts)
- Round 3: (Sc in next st, inc) 6 times. (18 sts)
- Rounds 4-6: Sc around. (18 sts)
- Round 7: (Sc in next st, dec) 6 times. (12 sts)
- Stuff the mitten lightly.
- Change to burnt orange.
- Rounds 8-17: Sc around. (12 sts)
- Add a small amount of stuffing to the lower sleeve only.
- Flatten the opening and sc through both layers. (6 sts)
- FO leaving a long sewing tail.
Left Foot
- With burnt orange, ch 7.
- Round 1: Sc in second ch from hook, sc in next 4 ch, 3 sc in final ch; working along opposite side, sc in next 4 ch, 2 sc in final ch. (14 sts)
- Round 2: Inc, sc in next 4 sts, inc in next 3 sts, sc in next 4 sts, inc in next 2 sts. (20 sts)
- Round 3: Sc around. (20 sts)
- Round 4: Sc in next 6 sts, dec 4 times, sc in next 6 sts. (16 sts)
- Round 5: Sc in next 5 sts, dec 3 times, sc in next 5 sts. (13 sts)
- Rounds 6-7: Sc around. (13 sts)
- Stuff firmly at the toe and lightly at the heel.
- Flatten the opening and sc through both layers.
- FO leaving a long sewing tail.
Right Foot
- Repeat the Left Foot instructions exactly.
- Before closing, shape the toe so both feet have equal length and fullness.
- FO leaving a long sewing tail.
Tall Pointed Hat
- With burnt orange, work 6 sc in MR. (6 sts)
- Rounds 2-4: Sc around. (6 sts)
- Round 5: (Sc in next 2 sts, inc) 2 times. (8 sts)
- Rounds 6-8: Sc around. (8 sts)
- Round 9: (Sc in next 3 sts, inc) 2 times. (10 sts)
- Rounds 10-12: Sc around. (10 sts)
- Round 13: (Sc in next 4 sts, inc) 2 times. (12 sts)
- Rounds 14-16: Sc around. (12 sts)
- Round 17: (Sc in next 5 sts, inc) 2 times. (14 sts)
- Rounds 18-20: Sc around. (14 sts)
- Round 21: (Sc in next 6 sts, inc) 2 times. (16 sts)
- Rounds 22-24: Sc around. (16 sts)
- Round 25: (Sc in next 7 sts, inc) 2 times. (18 sts)
- Rounds 26-28: Sc around. (18 sts)
- Round 29: (Sc in next 8 sts, inc) 2 times. (20 sts)
- Rounds 30-32: Sc around. (20 sts)
- Round 33: (Sc in next 9 sts, inc) 2 times. (22 sts)
- Rounds 34-36: Sc around. (22 sts)
- Round 37: (Sc in next 10 sts, inc) 2 times. (24 sts)
- Rounds 38-40: Sc around. (24 sts)
- Round 41: (Sc in next 3 sts, inc) 6 times. (30 sts)
- Rounds 42-44: Sc around. (30 sts)
- Round 45: (Sc in next 4 sts, inc) 6 times. (36 sts)
- Rounds 46-48: Sc around. (36 sts)
- Round 49: (Sc in next 5 sts, inc) 6 times. (42 sts)
- Rounds 50-52: Sc around. (42 sts)
- Round 53: (Sc in next 6 sts, inc) 6 times. (48 sts)
- Rounds 54-56: Sc around. (48 sts)
- Round 57: (Sc in next 7 sts, inc) 6 times. (54 sts)
- Rounds 58-60: Sc around. (54 sts)
- Do not stuff the hat. FO and weave in the end.
Hat Brim
- Join burnt orange into any stitch of Hat Round 60.
- Round 1: Working in FLO, (sc in next 8 sts, inc) 6 times. (60 sts)
- Round 2: Hdc in each st around. (60 sts)
- Round 3: (Hdc in next 9 sts, 2 hdc in next st) 6 times. (66 sts)
- Round 4: Sc in each st around. (66 sts)
- Join with sl st.
- FO and weave in the end.
- Steam-block the brim very lightly if needed, keeping the lower edge softly wavy rather than perfectly flat.
Beard Foundation
- Cut 46 cream yarn strands approximately 38-42 cm long.
- Cut another 18 strands approximately 30-34 cm long.
- Cut 12 shorter strands approximately 22-26 cm long for the sides.
- Mark a curved beard area approximately 13 cm wide across the upper front of the body.
- Using a crochet hook, pull the folded center of one long strand beneath a body stitch.
- Pull both loose ends through the loop to form a lark’s-head knot.
- Attach the longest strands across the center.
- Add medium strands around the upper and outer center.
- Add the shortest strands at both sides.
- Continue until the body fabric is hidden behind a dense beard.
Layering the Beard
- Add a second row of long strands approximately 1.5 cm above the first row.
- Stagger each knot between the knots of the lower row.
- Add a third partial row beneath the future nose position.
- Use the longest strands in the center of this row.
- Gently separate the yarn strands with your fingers.
- If desired, use a wide-tooth comb only on the lower 3-4 cm for a softer finish.
- Do not brush the entire beard; the reference retains clearly defined yarn strands.
Wooden Nose Attachment
- Position the 30-35 mm wooden bead approximately 1 cm below the future hat brim.
- Part the beard strands around the nose position.
- Using strong thread and a long doll needle, pass through the body and through the bead hole if the bead is drilled.
- Pass back through the body and repeat at least three times.
- If using an undrilled wooden ball, secure it to a small crocheted support pad sewn beneath the beard.
- Pull firmly enough that the nose nestles slightly into the beard.
- Knot securely inside or behind the body.
Nose Support Pad – Optional
- With cream yarn, work 6 sc in MR. (6 sts)
- Round 2: Inc around. (12 sts)
- Round 3: (Sc in next st, inc) 6 times. (18 sts)
- FO leaving a long tail.
- Sew this circle firmly to the body beneath the intended nose position.
- Attach an undrilled wooden ball securely to this support pad with strong craft-safe adhesive if the finished gnome is intended only as adult decor.
Attaching the Arms
- Position one arm on each side of the body between approximately Rounds 20 and 24.
- Angle the arms slightly forward so the cream mittens remain visible beside the beard.
- Pin both arms temporarily.
- Check the gnome from the front to ensure both arms hang at equal heights.
- Sew through the flattened upper edge of each arm and the body stitches.
- Repeat the seam twice for strength.
- Hide all yarn tails inside the body.
Attaching the Feet
- Position the feet at the lower front of the body approximately 5-7 cm apart.
- Point the toes slightly outward.
- Pin both feet before sewing.
- Sew the back half of each foot firmly to the body.
- Leave the rounded toe section free so it projects forward.
- Set the gnome upright and check that both feet touch the surface evenly.
- Add extra hidden stitches if either foot rotates.
Plaid Scarf
- Cut a rust-and-cream plaid fabric strip approximately 5 cm wide and 70 cm long.
- If the fabric frays excessively, turn each long edge under by approximately 5 mm and stitch in place.
- Create approximately 2 cm of fringe at both short ends by carefully removing several crosswise threads.
- Wrap the scarf once around the upper body directly beneath the nose.
- Cross the ends slightly to the gnome’s right side.
- Let one end hang approximately 5 cm lower than the other.
- Use several hidden sewing stitches behind the scarf to keep it from rotating.
Positioning the Hat
- Place the hat over the upper body so the front brim rests immediately above and slightly behind the wooden nose.
- Pull the back of the hat approximately 2-3 cm lower than the front.
- Allow the brim to overlap the upper edges of both arms slightly.
- Pin the hat at the front, back, and both sides.
- Using burnt-orange yarn, sew the hat invisibly to the body beneath the brim.
- Take small stitches every 2-3 cm around the circumference.
- Leave the outermost brim edge free so it retains its natural wave.
Decorative Hat Button
- Position a natural wooden button on the lower-right side of the hat, approximately 3 cm above the brim.
- Thread strong matching sewing thread through the button holes.
- Pass through the crochet fabric without pulling hard enough to distort the hat.
- Repeat through the button holes three times.
- Knot securely on the inside of the hat.
- Hide the thread ends between crochet stitches.
Hat Tip Shaping
- Hold the finished hat upright by its point.
- Gently stretch the first 15 cm of the hat lengthwise.
- Roll the tip between your fingers to emphasize the narrow cone shape.
- Do not add stuffing to the upper hat.
- If the hat collapses too much, insert a narrow rolled piece of felt into only the lower third.
- Keep the upper two-thirds flexible so the hat retains a handmade textile appearance.
Beard Trimming and Final Shape
- Stand the assembled gnome upright on a flat surface.
- Comb the beard downward with your fingers.
- Separate any strands trapped beneath the scarf or arms.
- Trim the central strands so they finish approximately 2-3 cm above the tabletop.
- Trim the side strands progressively shorter to create a broad rounded triangle.
- Make only small cuts at a time.
- Leave several uneven strand tips so the beard does not appear artificially straight.
Finishing
Check the gnome from every side before hiding the final yarn tails. The body should sit flat, the nose should remain centered beneath the hat, and the beard should cover most of the front body without hiding the feet completely. Adjust the scarf so its plaid pattern is visible and its longer end hangs naturally along one side.
Shape the hat with your hands rather than stuffing it heavily. The finished gnome should have a tall, narrow hat balanced by a broad beard and compact body. Straighten the cream beard strands, rotate the wooden nose if necessary, and gently flatten the base before placing the gnome with pumpkins, leaves, or other fall decorations.
Tips for Success
- Use a dense crochet tension on the body because the weighted base and firm stuffing can expose gaps in loose stitches.
- Keep the weighted pouch centered and completely surrounded by fiberfill so the pellets cannot create a lumpy base.
- Attach the beard before the nose and scarf. This lets you control exactly how much beard appears around each feature.
- Do not overstuff the hat. The reference gets its tall natural shape from dense crochet fabric rather than a rigid stuffed cone.
- Trim the beard only after the gnome is fully assembled because the scarf, nose, and hat all change how the strands fall.
Common Mistakes to Avoid
- Avoid using too little weight in the body. A tall hat makes an unweighted gnome much easier to tip over.
- Do not attach identical-length beard strands everywhere. Shorter side strands and longer center strands create the rounded triangular beard seen in the reference.
- Avoid placing the nose directly on top of the beard without separating the strands first. Parting the beard around the bead makes the nose appear naturally embedded.
- Do not sew the entire hat brim flat against the body. Secure the inner edge while leaving the outer brim free for a softer handmade shape.
- Avoid attaching the feet too far underneath the body. Their rounded fronts should remain clearly visible below the beard.
Ways to Customize This Pattern
- Replace burnt orange with mustard, olive green, burgundy, or warm brown for a coordinated family of autumn gnomes.
- Use a miniature knitted or crocheted scarf instead of plaid fabric if you want every textile element to be handmade.
- Add a tiny crocheted pumpkin to one mitten for a Thanksgiving or harvest-themed version.
- Replace the wooden button with a small crocheted maple leaf attached near the hat brim.
- Make a woodland version with an olive hat, brown body, cream beard, and a small crocheted mushroom held beside the gnome.
Frequently asked questions
Place a sealed pouch containing approximately 120 g of poly pellets or glass craft beads flat against the inside base before stuffing. Keep the weight centered and pack fiberfill firmly around it. The reinforced base ridge also helps the body maintain a stable flat footprint.
Use multiple staggered rows of individually attached yarn strands instead of a single row. Concentrate the longest strands beneath the nose and use shorter strands toward the sides. The layers should overlap enough that the orange body is not visible through the beard.
Yes. Work 6 sc in a magic ring, increase to 18 stitches, work three even rounds, then decrease symmetrically while stuffing firmly. A crocheted nose will look softer, while the unfinished wooden bead more closely matches the rustic gnome in the reference.
Check your yarn and tension first. A firm worsted-weight fabric should support most of the hat without stuffing. If yours remains too soft, insert a narrow cone of felt into the lower third only. Leaving the upper section unsupported keeps the hat from looking rigid.
Yes. Using DK yarn with a 3.0-3.5 mm hook will reduce the finished size while preserving the overall proportions. Scale down the wooden nose, scarf width, beard length, and base weight so the accessories remain proportional to the smaller body.
The finished Autumn Crochet Gnome Pattern