Autumn Crochet Leaf Door Hanging Pattern
Beginner Friendly
Perfect for those just starting their crochet journey, with clear instructions and simple techniques
Single-Day Project
A satisfying project you can complete in a single afternoon or evening.
Handmade Gift
A beautiful keepsake — free forever. Read online or print at home.
About This Autumn Crochet Leaf Door Hanging Pattern
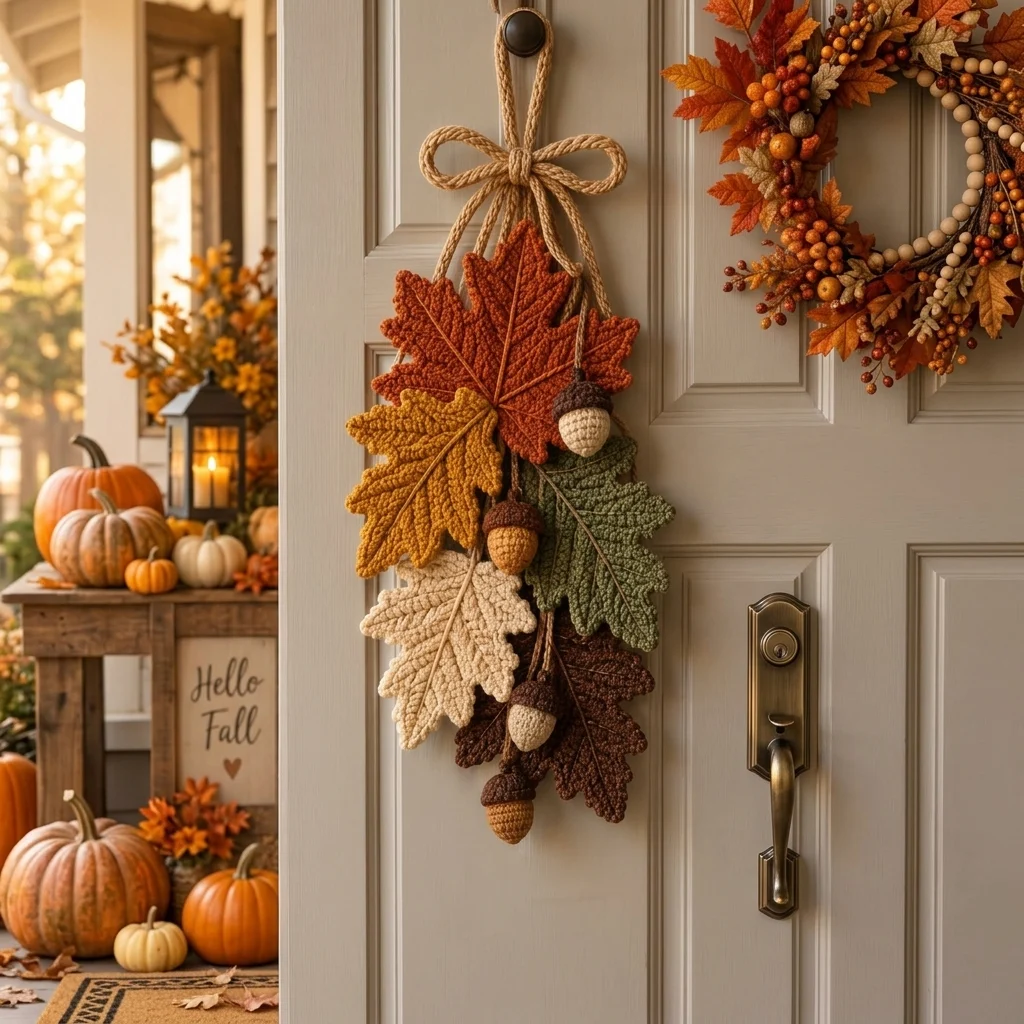
This crochet fall door hanging pattern creates a layered autumn decoration with large textured maple leaves, dimensional acorns, and a rustic crochet bow. Burnt orange, golden mustard, muted olive, warm cream, and deep brown reproduce the rich fall palette in the reference, while raised veins give every leaf a structured botanical finish.
The decoration is constructed from separate pieces rather than one flat panel. Five large maple leaves are crocheted individually with multiple pointed lobes, shaped valleys, and surface-worked veins. Four stuffed acorns hang between the leaves at different heights, and a long tan crochet cord forms both the hanging loop and oversized bow at the top.
This advanced project takes approximately 12-16 hours. It is suited to crocheters comfortable with shaped rows, treble stitches, surface crochet, three-dimensional construction, stuffing, decreases, working through specific loops, cord making, blocking, and assembling multiple motifs into a balanced hanging decoration.
Materials
- Worsted / medium cotton yarn in burnt orange approximately 90 m
- Worsted / medium cotton yarn in golden mustard approximately 70 m
- Worsted / medium cotton yarn in muted olive green approximately 80 m
- Worsted / medium cotton yarn in warm cream approximately 65 m
- Worsted / medium cotton yarn in deep chocolate brown approximately 75 m
- Worsted / medium cotton yarn in warm tan approximately 100 m for hanging cord and bow
- Worsted cotton yarn in caramel brown approximately 25 m for acorns
- 4.0 mm crochet hook leaves and main cord
- 3.5 mm crochet hook acorns and surface veins
- Polyester fiberfill small amount for acorns
- Yarn needle for assembly and embroidery
- Stitch markers 6-8
- Rustproof blocking pins for shaping leaf lobes
- Blocking mat for individual motifs
- Scissors 1 pair
Abbreviations
MRmagic ringchchainsl stslip stitchscsingle crochethdchalf double crochetdcdouble crochettrtreble crochetdtrdouble treble crochetinc2 single crochet in same stitchdecsingle crochet 2 stitches togetherFLOfront loop onlyBLOback loop onlyspspaceststitchstsstitchesRSright sideWSwrong sidepicotch 3, sl st in first chLarge Burnt Orange Maple Leaf
- With burnt orange and 4.0 mm hook, ch 22.
- Beginning in second ch from hook work sl st, sc, hdc, dc in next 2 ch, tr in next 9 ch, dc in next 4 ch, hdc, sc, sl st.
- Work 3 sc into the final foundation point to turn around the central vein.
- Continue symmetrically along the opposite side of the foundation chain.
- Join at the base with sl st.
- Lower-right lobe: Ch 8. Beginning in second ch work sl st, sc, hdc, dc, tr in next 2 ch, dc. Sl st to leaf body.
- Middle-right lobe: Ch 12. Beginning in second ch work sl st, sc, hdc, dc in next 2 ch, tr in next 4 ch, dc, hdc. Sl st to leaf body.
- Upper-right lobe: Ch 15. Beginning in second ch work sl st, sc, hdc, dc in next 2 ch, tr in next 7 ch, dc, hdc, sc. Sl st to leaf body.
- Center lobe: Ch 18. Beginning in second ch work sl st, sc, hdc, dc in next 2 ch, tr in next 9 ch, dc, hdc, sc. Sl st to center.
- Repeat the upper, middle, and lower lobe sequences symmetrically down the left side.
- Work sc evenly around the entire leaf silhouette.
- At every major lobe tip work (sc, picot, sc).
- At each valley between lobes work sl st to sharpen the indentation.
- Fasten off leaving a 40 cm assembly tail.
Mustard Maple Leaf
- With golden mustard, ch 20.
- Beginning in second ch work sl st, sc, hdc, dc in next 2 ch, tr in next 8 ch, dc in next 3 ch, hdc, sc, sl st.
- Work 3 sc at the foundation tip and continue symmetrically along the opposite side.
- Lower-right lobe: Ch 7; work back sl st, sc, hdc, dc, tr, dc.
- Middle-right lobe: Ch 11; work back sl st, sc, hdc, dc, tr in next 4 ch, dc, hdc, sc.
- Upper-right lobe: Ch 14; work back sl st, sc, hdc, dc in next 2 ch, tr in next 6 ch, dc, hdc, sc.
- Center lobe: Ch 16; work back sl st, sc, hdc, dc in next 2 ch, tr in next 8 ch, dc, hdc, sc.
- Repeat the three side lobes symmetrically along the left edge.
- Sc around the complete leaf.
- Add a picot to every major point and sl st into each valley.
- Fasten off leaving a sewing tail.
Olive Green Maple Leaf
- With muted olive green, ch 21.
- Beginning in second ch work sl st, sc, hdc, dc in next 2 ch, tr in next 9 ch, dc in next 3 ch, hdc, sc, sl st.
- Work 3 sc into the final foundation point and mirror the stitch sequence along the opposite side.
- Lower lobe: Ch 8 and work back sl st, sc, hdc, dc, tr in next 2 ch, dc.
- Middle lobe: Ch 12 and work back sl st, sc, hdc, dc in next 2 ch, tr in next 4 ch, dc, hdc.
- Upper lobe: Ch 14 and work back sl st, sc, hdc, dc in next 2 ch, tr in next 6 ch, dc, hdc.
- Center lobe: Ch 17 and work back sl st, sc, hdc, dc in next 2 ch, tr in next 9 ch, dc, hdc.
- Repeat all side lobes symmetrically on the opposite side.
- Sc around the outer edge.
- Add picots at major points and sl sts at the valleys.
- Fasten off leaving a 40 cm tail.
Cream Maple Leaf
- With warm cream, ch 18.
- Beginning in second ch work sl st, sc, hdc, dc in next 2 ch, tr in next 7 ch, dc in next 3 ch, hdc, sc, sl st.
- Work 3 sc at the tip and mirror the stitch sequence along the opposite side.
- Lower side lobe: Ch 6; work back sl st, sc, hdc, dc, tr.
- Middle side lobe: Ch 10; work back sl st, sc, hdc, dc, tr in next 3 ch, dc, hdc.
- Upper side lobe: Ch 12; work back sl st, sc, hdc, dc, tr in next 5 ch, dc, hdc.
- Center lobe: Ch 15; work back sl st, sc, hdc, dc in next 2 ch, tr in next 7 ch, dc, hdc.
- Repeat all side lobes symmetrically on the opposite side.
- Sc around the outer edge, adding picots at the main points.
- Fasten off leaving a sewing tail.
Dark Brown Maple Leaf
- With deep chocolate brown, ch 19.
- Beginning in second ch work sl st, sc, hdc, dc in next 2 ch, tr in next 7 ch, dc in next 4 ch, hdc, sc, sl st.
- Work 3 sc at the foundation tip and continue symmetrically down the opposite side.
- Lower lobe: Ch 7 and work back sl st, sc, hdc, dc, tr, dc.
- Middle lobe: Ch 10 and work back sl st, sc, hdc, dc, tr in next 3 ch, dc, hdc.
- Upper lobe: Ch 13 and work back sl st, sc, hdc, dc, tr in next 5 ch, dc, hdc, sc.
- Center lobe: Ch 15 and work back sl st, sc, hdc, dc, tr in next 7 ch, dc, hdc, sc.
- Repeat side lobes along the opposite side.
- Sc around the complete silhouette.
- Add picots to the major tips and sl sts to the valleys.
- Fasten off leaving a long assembly tail.
Raised Leaf Veins
- Work this section on all five maple leaves using a matching shade or a slightly darker version of the leaf color.
- Insert the 3.5 mm hook at the lower center of the leaf.
- Surface sl st along the original foundation chain toward the center-lobe tip.
- Keep the surface stitches loose enough that the leaf remains flat.
- Return to approximately one-third of the main vein and surface sl st diagonally toward the lower-right lobe.
- Repeat toward the lower-left lobe.
- Add another pair of diagonal veins toward the middle lobes.
- Add a final pair toward the upper lobes.
- Fasten off on the WS and weave in the ends.
Blocking the Maple Leaves
- Dampen each leaf evenly.
- Lay it RS upward on a blocking mat.
- Pin the lower base and central vein first.
- Pull the center lobe upward and pin its point.
- Pin each upper, middle, and lower side lobe individually.
- Push each valley gently inward before pinning.
- Straighten the raised veins without stretching them.
- Allow each leaf to dry completely before assembly.
Caramel Acorn Body – Make 2
- Round 1: With caramel and 3.5 mm hook, work 6 sc in MR. (6 sts)
- Round 2: Inc in each st around. (12 sts)
- Round 3: (Sc in next st, inc) 6 times. (18 sts)
- Round 4: (Sc in next 2 sts, inc) 6 times. (24 sts)
- Rounds 5-8: Sc in each st around. (24 sts)
- Round 9: (Sc in next 2 sts, dec) 6 times. (18 sts)
- Round 10: Sc in each st around. (18 sts)
- Begin stuffing firmly, keeping the lower end rounded.
- Round 11: (Sc in next st, dec) 6 times. (12 sts)
- Round 12: Dec around. (6 sts)
- Fasten off and close the remaining opening.
Cream Acorn Body – Make 2
- Round 1: With warm cream, work 6 sc in MR. (6 sts)
- Round 2: Inc around. (12 sts)
- Round 3: (Sc, inc) 6 times. (18 sts)
- Round 4: (2 sc, inc) 6 times. (24 sts)
- Rounds 5-8: Sc around. (24 sts)
- Round 9: (2 sc, dec) 6 times. (18 sts)
- Round 10: Sc around. (18 sts)
- Stuff firmly.
- Round 11: (Sc, dec) 6 times. (12 sts)
- Round 12: Dec around. (6 sts)
- Fasten off and close.
Textured Acorn Caps – Make 4
- With chocolate brown, work 6 sc in MR. (6 sts)
- Round 2: Inc in each st around. (12 sts)
- Round 3: (Sc, inc) 6 times. (18 sts)
- Round 4: (2 sc, inc) 6 times. (24 sts)
- Round 5: BLO sc in each st around. (24 sts)
- Round 6: (Sl st in next st, hdc in next st) 12 times to create the textured cap edge. (24 sts)
- Fasten off leaving a 35 cm sewing tail.
- Position the cap over the wider end of one acorn body.
- Sew around the cap edge, allowing it to overlap the body slightly.
- Repeat for all four acorns.
Acorn Stems and Hanging Cords
- With chocolate brown and 3.5 mm hook, join yarn at the center of one acorn cap.
- For the first acorn, ch 22.
- Beginning in second ch from hook, sl st back along all chains to form a firm cord.
- For the second acorn, repeat with ch 27.
- For the third acorn, repeat with ch 32.
- For the fourth acorn, repeat with ch 38.
- Fasten each cord securely into the center of its cap.
- Leave approximately 20 cm at the free end for attachment to the leaf cluster.
Main Tan Hanging Cord
- With warm tan and 4.0 mm hook, ch 165.
- Beginning in second ch from hook, sl st in each ch across. (164 sl sts)
- Do not work tightly; the cord should remain flexible enough to form the bow.
- Fasten off leaving a 30 cm tail.
- Stretch the finished cord gently by hand to even the stitches.
- The finished cord should measure approximately 115-125 cm depending on tension.
Top Hanging Loop
- Measure approximately 20 cm from the center point of the tan cord in each direction.
- Fold this center section upward to create a hanging loop approximately 15-18 cm long.
- Bring the two sides together at the bottom of the loop.
- Using a separate 25 cm length of tan yarn, wrap tightly around the joined cords 8-10 times.
- Pass the yarn end beneath the wraps and pull firmly.
- Secure the knot at the back of the hanging.
- The remaining long cord ends will form the bow and vertical tails.
Large Rustic Crochet Bow
- Using the two long ends of the main hanging cord, form a loop approximately 13 cm wide on the left.
- Form a matching 13 cm loop on the right.
- Cross the two cord sections at the center as for a standard bow.
- Pull one loop through and tighten only enough to hold the bow shape.
- Leave two vertical tails approximately 22-28 cm long.
- Wrap a separate 20 cm piece of tan yarn around the bow center 8 times.
- Knot securely on the back.
- Shape the loops so they remain broad and rounded like the reference.
Arranging the Leaf Cluster
- Place all five blocked leaves RS upward on a flat surface.
- Position the large burnt-orange leaf at the top center with its main lobe pointing upward.
- Place the mustard leaf beneath it and slightly to the left.
- Position the olive leaf beneath the orange leaf and slightly to the right.
- Place the cream leaf below the mustard leaf.
- Position the dark-brown leaf at the lower-right side.
- Overlap the bases and inner lobes by approximately 3-6 cm.
- Allow the outer lobes to remain visible rather than stacking the leaves directly on top of one another.
- The cluster should taper from approximately 27 cm wide near the upper leaves to approximately 18 cm wide near the bottom.
Joining the Maple Leaves
- Turn the arranged cluster WS upward without changing the layout.
- Using matching yarn tails, sew the mustard leaf base to the lower-left portion of the orange leaf.
- Sew the olive leaf base to the lower-right portion of the orange leaf.
- Attach the cream leaf to both the mustard leaf and a small section of the olive leaf.
- Attach the brown leaf beneath the olive leaf and slightly behind the cream leaf.
- Sew only through the central veins and inner lobe bases.
- Leave the majority of each outer lobe free so the cluster retains dimension.
- Add several hidden reinforcing stitches where three leaves overlap.
Attaching the Acorns
- Position one cream acorn along the upper-right edge between the orange and olive leaves.
- Position one caramel acorn near the center-left overlap between the mustard and olive leaves.
- Position the second cream acorn between the cream and brown leaves.
- Place the second caramel acorn below the brown leaf as the lowest hanging element.
- Vary the visible cord lengths so the acorns do not form a straight horizontal line.
- Thread each hanging-cord tail through a sturdy section of the leaf cluster.
- Secure each cord on the WS with several stitches and a hidden knot.
- Allow the acorns to hang freely rather than sewing their bodies directly to the leaves.
Attaching the Bow and Hanging Cord
- Place the bow approximately 3-5 cm above the top point of the orange leaf.
- Lay the two long bow tails down the front of the upper leaf cluster.
- Turn the decoration WS upward.
- Sew the base of the hanging loop firmly to the upper central vein of the orange leaf.
- Add reinforcing stitches through the overlapping mustard and olive leaf bases beneath it.
- Secure the bow center separately so the weight of the decoration is carried by the reinforced hanging loop rather than by the decorative bow knot.
- Turn RS upward and adjust the bow loops.
- Allow the two tails to hang naturally over the upper leaves.
Hidden Back Reinforcement
- With chocolate brown, ch 45.
- Row 1: Sc in second ch from hook and across. Ch 1, turn. (44 sts)
- Row 2: Sc in each st across. (44 sts)
- Fasten off leaving a long sewing tail.
- Position this narrow strip vertically along the WS center of the assembled leaf cluster.
- Sew the strip to the back of every leaf through the thick central vein areas.
- Keep all stitches invisible from the RS.
- Attach the top of the reinforcement directly beneath the hanging-loop attachment.
- This hidden strip prevents the decoration from stretching vertically when hung for long periods.
Final Shaping
- Hang the decoration temporarily from a sturdy hook.
- Allow it to settle naturally for approximately 15 minutes.
- Rotate any leaf that twists toward the wall.
- Lift the tips of selected lobes slightly forward to increase dimension.
- Check that all four acorns hang freely and at different heights.
- Center the large bow above the orange leaf.
- Adjust the hanging loop so the decoration sits vertically rather than leaning to either side.
- If necessary, add one hidden stitch between overlapping leaves to correct the balance.
Finishing
Weave all remaining yarn tails securely into the WS of the leaves, keeping the front surface clean and uninterrupted. Check every acorn cord and the top hanging attachment before displaying the piece. The weight should be supported through the central reinforcement rather than through a single leaf or decorative stitch.
Shape the maple lobes with your fingers after hanging, allowing a few tips to curve gently forward. Keep the acorns loose enough to move slightly, and open the bow loops so they frame the top orange leaf without hiding its central point. The finished decoration should have an organic cascading silhouette rather than a perfectly symmetrical arrangement.
Tips for Success
- Block the maple leaves aggressively enough to define every lobe and valley, but do not stretch the raised veins; they should remain slightly dimensional.
- Assemble the entire leaf arrangement on a flat surface before sewing. Photograph the layout so you can reproduce it after turning the pieces WS upward.
- Use the hidden reinforcement strip even if the individual leaves feel sturdy. Five cotton leaves plus four stuffed acorns create enough weight to stretch unsupported joins over time.
- Stuff the acorns firmly at their lower ends but slightly softer near the caps so the caps can sit naturally over the bodies.
- Attach the hanging loop independently from the bow. The bow is decorative; the reinforced loop should carry the actual weight.
Common Mistakes to Avoid
- Do not sew the entire edges of overlapping leaves together. This makes the cluster stiff and flat. Attach only the central veins and inner lobe bases.
- Avoid making all four acorn cords the same length. Staggered lengths create the cascading appearance visible in the reference.
- Do not skip blocking. Unblocked maple leaves can curl enough to hide their lobes and make the finished decoration look much narrower.
- Avoid pulling surface-crocheted veins tightly. If a leaf curls along its center line, undo the vein and remake it with looser slip stitches.
- Do not hang the complete decoration from the bow knot alone. Secure the structural loop directly to the reinforced center of the leaf cluster.
Ways to Customize This Pattern
- Create a softer neutral version using cream, camel, taupe, olive, and chocolate leaves with natural tan cords.
- Add two smaller maple leaves near the bottom for a longer cascading door decoration.
- Replace the mustard and cream leaves with burgundy and deep rust for a darker late-autumn palette.
- Add several small crocheted berries around the upper orange leaf for a fuller harvest arrangement.
- Make only three leaves and two acorns for a smaller hanging suitable for a cabinet door, wall hook, or interior doorknob.
Frequently asked questions
Use the hidden vertical reinforcement strip and attach the hanging loop directly through that reinforced center. Cotton motifs can gradually stretch under their own weight, especially when dimensional acorns are added, so the support strip distributes the load across all five leaves.
Yes. A tighter cotton yarn and slightly smaller hook will produce firmer leaves. You can also use a light fabric stiffener after blocking, but test it on a spare swatch first because some products alter yarn color or texture. Keep the piece protected from prolonged rain and moisture.
Block each lobe individually, keep the raised surface veins relaxed, and sew only the inner portions of the leaves during assembly. Once hung, curve a few lobe tips gently toward you instead of pressing every leaf flat against the door.
Yes. Additional acorns can be placed between the lower leaves, but keep them lightweight and stagger their cord lengths. If you add several more stuffed pieces, reinforce the central support strip and hanging loop with extra stitches.
Hand washing is the safest option. Use cool water, support the entire decoration when wet, press out excess water without wringing, and reshape it flat. Re-pin the maple lobe tips during drying if necessary and do not hang the piece again until every stuffed acorn is completely dry.
The finished Autumn Crochet Leaf Door Hanging Pattern