Autumn Crochet Leaf Garland Pattern
Beginner Friendly
Perfect for those just starting their crochet journey, with clear instructions and simple techniques
Single-Day Project
A satisfying project you can complete in a single afternoon or evening.
Handmade Gift
A beautiful keepsake — free forever. Read online or print at home.
About This Autumn Crochet Leaf Garland Pattern
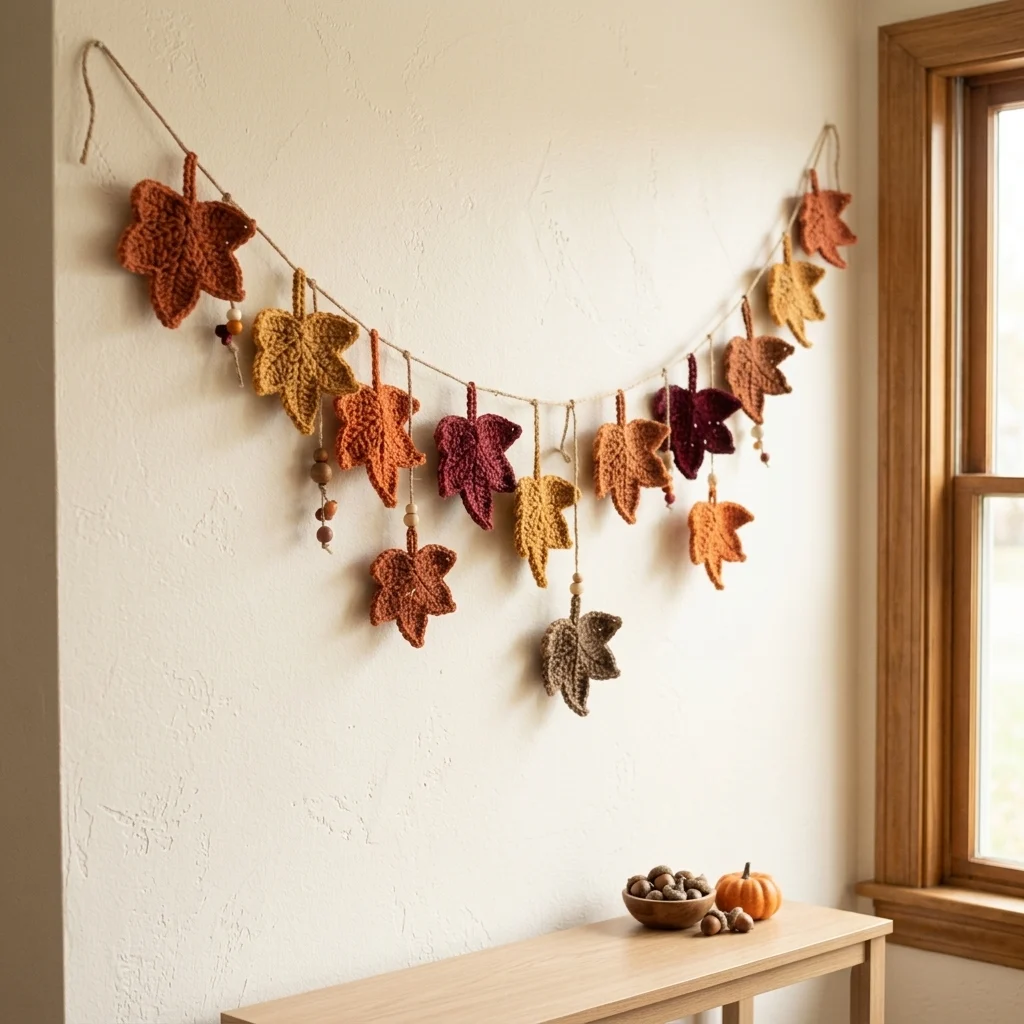
This autumn crochet leaf garland pattern creates a warm wall decoration filled with dimensional maple leaves in burnt orange, mustard, burgundy, rust, tan, and earthy taupe. Each leaf is shaped with five distinct points, a raised central vein, and a narrow crocheted stem, then suspended from a natural cord at varying heights to reproduce the relaxed arrangement shown in the reference.
The design uses separate front and back leaf layers joined around the edge for a substantial, slightly padded finish rather than thin flat appliqués. Short hanging cords, small wooden beads, and deliberately uneven spacing give the finished garland its rustic handmade character. The individual leaves are worked separately, making this a useful project for using coordinated autumn yarn remnants.
Allow approximately 7-9 hours for the full garland. This advanced pattern is suited to crocheters comfortable with increases, decreases, working into chain spaces, surface crochet, shaped rows, joining mirrored pieces, blocking, and assembling many components with consistent tension.
Materials
- DK / light worsted cotton or cotton-blend yarn in burnt orange approximately 45 m
- DK / light worsted yarn in rust approximately 40 m
- DK / light worsted yarn in mustard gold approximately 35 m
- DK / light worsted yarn in burgundy approximately 30 m
- DK / light worsted yarn in warm tan approximately 30 m
- DK / light worsted yarn in taupe-brown approximately 25 m
- Natural beige cotton cord or yarn approximately 2.5 m for main garland and drops
- 3.5 mm crochet hook main leaves
- 3.0 mm crochet hook stems and surface details
- Polyester fiberfill small amount for lightly padding leaves
- Natural wooden beads in assorted sizes 8-12 beads, approximately 6-12 mm
- Yarn needle 1
- Stitch markers 2-4
- Scissors 1 pair
- Blocking pins and mat recommended
Abbreviations
MRmagic ringchchainsl stslip stitchscsingle crochethdchalf double crochetdcdouble crochettrtreble crochetinc2 single crochet in same stitchdecsingle crochet decreaseststitchstsstitchesFOfasten offLarge Maple Leaf Center
- Make 2 identical pieces for each large leaf. Ch 5 and join with sl st to form a ring.
- Round 1: Ch 1, work 10 sc into ring, join with sl st. (10 sts)
- Round 2: Ch 1, inc in each st around, join with sl st. (20 sts)
- Round 3: Ch 1, (sc in next st, inc) 10 times, join with sl st. (30 sts)
- Do not FO. The five lobes are now worked separately around this center, using 6 stitches for each lobe.
Large Maple Leaf Top Lobe
- Row 1: Ch 1, sc in next 6 sts, turn. (6 sts)
- Row 2: Ch 1, inc, sc in next 4 sts, inc, turn. (8 sts)
- Row 3: Ch 1, sc across, turn. (8 sts)
- Row 4: Ch 1, dec, sc in next 4 sts, dec, turn. (6 sts)
- Row 5: Ch 1, dec, sc in next 2 sts, dec, turn. (4 sts)
- Row 6: Ch 1, dec twice, turn. (2 sts)
- Row 7: Ch 1, dec. (1 st)
- Ch 3, sl st in second ch from hook and next ch to create the pointed tip.
- FO.
Large Maple Leaf Upper Side Lobe – Make 2
- Join yarn to the next unused 6 stitches of the center.
- Row 1: Ch 1, sc in next 6 sts, turn. (6 sts)
- Row 2: Ch 1, inc, sc in next 4 sts, inc, turn. (8 sts)
- Row 3: Ch 1, sc across, turn. (8 sts)
- Row 4: Ch 1, dec, sc in next 4 sts, dec, turn. (6 sts)
- Row 5: Ch 1, dec, sc in next 2 sts, dec, turn. (4 sts)
- Row 6: Ch 1, dec twice. (2 sts)
- Row 7: Ch 1, dec. (1 st)
- Ch 2 and sl st back down the chains for a short point.
- FO and repeat on the opposite side.
Large Maple Leaf Lower Side Lobe – Make 2
- Join yarn to the next unused group of 6 center stitches.
- Row 1: Ch 1, sc in next 6 sts, turn. (6 sts)
- Row 2: Ch 1, inc, sc in next 4 sts, inc, turn. (8 sts)
- Row 3: Ch 1, dec, sc in next 4 sts, dec, turn. (6 sts)
- Row 4: Ch 1, dec, sc in next 2 sts, dec, turn. (4 sts)
- Row 5: Ch 1, dec twice. (2 sts)
- Row 6: Ch 1, dec. (1 st)
- Ch 2 and sl st back down the chains to sharpen the tip.
- FO and repeat for the final lower lobe.
Large Leaf Sculpted Edging
- Join matching yarn at the lower-left edge of one finished leaf piece.
- Work sc evenly toward the first lobe point.
- At each lobe tip work (sc, ch 2, sc) into the tip stitch.
- Work sc down toward the valley between lobes.
- At each valley work one sl st to pull the indentation inward.
- Repeat this sequence around all five lobes.
- Work sc evenly across the lower edge and join with sl st.
- FO.
Large Leaf Stem
- Join matching yarn at the bottom center of the leaf.
- Ch 12.
- Beginning in second ch from hook, sl st in each ch back toward the leaf. (11 sl sts)
- Sl st securely into the leaf base.
- FO leaving a sewing tail.
Large Leaf Raised Veins
- Using the 3.0 mm hook, join matching yarn at the base of the leaf.
- Surface sl st in a straight line from the base to the tip of the center lobe.
- FO.
- Rejoin approximately one-third of the way up the center vein.
- Surface sl st diagonally toward the tip of the upper-left lobe.
- Repeat toward the upper-right lobe.
- Add shorter diagonal veins toward both lower lobes.
- Keep the surface stitches relaxed so the leaf remains flat.
Joining and Padding Large Leaves
- Place two matching leaf pieces wrong sides together with all five lobes aligned.
- Join matching yarn near the bottom edge.
- Sc through both layers around the first four lobes.
- Insert an extremely thin layer of fiberfill into the center and larger lobes.
- Do not overstuff; the finished leaf should remain mostly flat.
- Continue sc through both layers around the final lobe and lower edge.
- At every lobe point work (sc, ch 1, sc) to preserve the pointed silhouette.
- Join with sl st and FO.
Medium Maple Leaf Center
- Make 2 pieces for each medium leaf. Work 6 sc in MR. (6 sts)
- Round 2: Inc around. (12 sts)
- Round 3: (Sc in next st, inc) 6 times. (18 sts)
- Join with sl st.
- The lobes will be built around the center using groups of 4, 4, 2, 4, and 4 stitches, with the two-stitch group forming the narrow bottom section between the lower lobes.
Medium Maple Leaf Top Lobe
- Row 1: Ch 1, sc in next 4 sts, turn. (4 sts)
- Row 2: Ch 1, inc, sc in next 2 sts, inc, turn. (6 sts)
- Row 3: Ch 1, sc across, turn. (6 sts)
- Row 4: Ch 1, dec, sc in next 2 sts, dec, turn. (4 sts)
- Row 5: Ch 1, dec twice. (2 sts)
- Row 6: Ch 1, dec. (1 st)
- Ch 2, sl st back down the chains and FO.
Medium Maple Leaf Side Lobes
- Join yarn to the next 4 available center stitches.
- Row 1: Ch 1, sc in next 4 sts, turn. (4 sts)
- Row 2: Ch 1, inc, sc in next 2 sts, inc, turn. (6 sts)
- Row 3: Ch 1, dec, sc in next 2 sts, dec, turn. (4 sts)
- Row 4: Ch 1, dec twice. (2 sts)
- Row 5: Ch 1, dec. (1 st)
- Ch 2 and sl st back down the chains.
- FO.
- Repeat until four side lobes have been completed symmetrically around the center.
Medium Leaf Edging, Veins and Stem
- Join matching yarn at the lower edge.
- Sc evenly around each lobe.
- At each lobe tip work (sc, ch 2, sc).
- At each valley work sl st.
- Join at the lower edge.
- Ch 10 for the stem.
- Sl st in second ch from hook and each remaining ch. (9 sl sts)
- Surface sl st from the leaf base to the center tip.
- Add four short diagonal surface veins toward the side lobes.
- FO.
Joining Medium Leaves
- Place two matching medium leaf pieces wrong sides together.
- Sc through both layers around the perimeter.
- Insert a very small amount of fiberfill into the center before closing.
- Keep all lobe tips free of stuffing so they remain sharp.
- Complete the seam and join with sl st.
- FO and weave in all ends.
Leaf Color and Size Set
- Make 2 large burnt-orange leaves using the Large Maple Leaf instructions.
- Make 1 large mustard leaf.
- Make 1 large rust leaf.
- Make 1 medium burgundy leaf.
- Make 2 medium burnt-orange leaves.
- Make 1 medium mustard leaf.
- Make 1 medium warm-tan leaf.
- Make 1 medium taupe-brown leaf.
- Make 1 additional medium rust or peach-rust leaf for a total of 11 leaves.
- Block all leaves before assembling the garland.
Blocking the Leaves
- Lightly dampen each finished leaf.
- Place it on a blocking mat.
- Pin the central lobe straight upward.
- Pin the upper side lobes diagonally outward.
- Pin the lower lobes slightly downward and outward.
- Pin each valley inward to emphasize the maple shape.
- Straighten the stem.
- Allow the leaf to dry completely before removing the pins.
Main Garland Cord
- Cut approximately 180 cm of strong natural cotton cord.
- Tie a hanging loop approximately 8 cm long at the first end.
- Measure approximately 150 cm for the decorated section.
- Tie another 8 cm hanging loop at the opposite end.
- Leave the center of the cord relaxed rather than pulling it completely straight.
- When mounted, allow the middle to drop approximately 20-25 cm below the ends to reproduce the curved arrangement in the reference.
Short Leaf Hangers
- For leaves positioned close to the main cord, cut 12-16 cm lengths of natural cord or crochet matching chains of approximately 20-25 stitches.
- Pass one end through the crocheted leaf stem.
- Tie securely with a small hidden knot.
- Attach the opposite end to the main garland cord.
- Vary the finished drop between approximately 4 and 9 cm.
Long Leaf Hangers
- Cut 22-35 cm lengths of natural cord for the lower leaves.
- Attach one end securely to a leaf stem.
- Thread a wooden bead onto selected cords before attaching them to the garland.
- Tie a small knot immediately beneath each bead to hold it in place.
- Attach the upper end to the main cord.
- Use at least three different drop lengths so the leaves do not form a straight line.
Wooden Bead Drops
- Cut 4 pieces of natural cord approximately 18-25 cm long.
- Tie a small knot approximately 3 cm from one end.
- Thread one small wooden bead onto the cord.
- Add a second bead in a contrasting natural wood tone if desired.
- Tie another knot beneath the beads.
- Leave approximately 2-3 cm of cord hanging below the final knot.
- Attach the opposite end to the main garland between selected leaves.
Garland Layout
- Lay the main cord on a large table or floor in a shallow curve.
- Place one large burnt-orange leaf near the far-left end.
- Position a mustard leaf approximately 16 cm to its right.
- Add a medium burnt-orange leaf approximately 13 cm farther along.
- Place a burgundy leaf near the left-center area.
- Hang the taupe-brown leaf on one of the longest drops near the center.
- Place the remaining mustard and orange leaves at mixed heights through the right half.
- Add the second burgundy or darker leaf near the upper-right portion for visual balance.
- Position the remaining rust and tan leaves toward the right end.
- Insert bead drops into several larger gaps rather than spacing them evenly.
Securing the Leaves
- Temporarily tie each leaf hanger to the main cord with a loose knot.
- Hang the entire garland on a wall before permanently tightening anything.
- Move individual leaves until the colors and drop lengths feel balanced.
- Rotate several leaves slightly left or right so they do not all face identically.
- Tighten each hanger knot once the arrangement is final.
- Add one small hidden stitch through the hanger knot if using slippery cotton cord.
- Trim excess cord tails to approximately 5 mm.
Finishing
Hang the finished garland from two secure hooks and allow the center to fall naturally into a shallow curve. Adjust the leaf drops individually so the largest leaves anchor the outer sections while the smaller leaves and bead strands fill the center and lower spaces. The arrangement should look intentionally irregular rather than perfectly symmetrical.
Shape each maple leaf with your fingers after hanging. Pull the five points outward, deepen the spaces between the lobes, and straighten the raised veins and stems. Keep the wooden bead details sparse so the textured crochet leaves remain the main feature of the decoration.
Tips for Success
- Block every leaf before assembly. The maple silhouette depends heavily on clearly separated lobes and sharply defined tips.
- Use the same hook and tension for both layers of each leaf so their edges align cleanly when joined.
- Add only a whisper of stuffing between the leaf layers. Too much fiberfill turns the leaves into cushions and removes the crisp botanical shape.
- Arrange all 11 leaves on the floor before attaching them permanently so you can balance burgundy, mustard, orange, and neutral tones across the garland.
- Vary the hanger lengths by several centimeters. The staggered drops are what give this garland the relaxed cascading appearance visible in the reference.
Common Mistakes to Avoid
- Do not make every leaf identical in size and color. Mixing large and medium leaves gives the garland much more natural visual movement.
- Avoid loose surface crochet on the veins. The vein stitches should sit neatly against the leaf without forming loops, but they should not be tight enough to make the fabric curl.
- Do not skip the valley slip stitches around the edging. They pull the fabric inward between lobes and make the maple shape much more recognizable.
- Avoid placing every hanger at the same height. If the leaves form a straight horizontal row, shorten some cords and lengthen others before securing the knots.
- Do not permanently attach the leaves before hanging the main cord once. Gravity changes the spacing significantly when the garland forms its final curve.
Ways to Customize This Pattern
- Create a softer neutral version with cream, camel, taupe, sage, and muted terracotta leaves.
- Add several small crocheted acorns between the leaves for a stronger woodland harvest theme.
- Replace the natural wooden beads with unfinished miniature wood rings for a more minimalist rustic look.
- Extend the main cord to approximately 220 cm and make 15-17 leaves for a fireplace mantel or large window.
- Add tiny warm-white battery fairy lights along the main cord for an illuminated autumn wall display, keeping the light source cool and separate from the yarn.
Frequently asked questions
The version shown here uses 11 leaves across approximately 150 cm of decorated cord. For a denser garland, increase the total to 13-15 leaves. For a smaller mantel decoration around 100 cm wide, 7-8 leaves usually maintain the same proportions.
First check that your edging is not tighter than the main leaf fabric. Then damp-block the finished leaf and pin every point and valley individually. Allow it to dry completely before removing the pins. Cotton and cotton-blend yarns generally hold the blocked shape especially well.
Yes. For a flatter and lighter garland, join the two leaf layers without fiberfill. The tiny amount of stuffing in this version is only used to create the substantial raised appearance visible in the reference image.
Yes, but the leaves will be larger and heavier. Use approximately a 4.0-4.5 mm hook and a stronger main hanging cord. You may also want to reduce the number of leaves if the finished garland becomes too crowded.
Start with burnt orange as the dominant color, then distribute mustard and burgundy leaves across opposite sections. Use tan and taupe leaves as quieter transitions between the stronger colors. Avoid grouping all leaves of one color together unless you intentionally want a color-blocked design.
The finished Autumn Crochet Leaf Garland Pattern