Autumn Crochet Leaf Wreath Pattern – Cozy Fall Door Decor
Beginner Friendly
Perfect for those just starting their crochet journey, with clear instructions and simple techniques
Single-Day Project
A satisfying project you can complete in a single afternoon or evening.
Handmade Gift
A beautiful keepsake — free forever. Read online or print at home.
About This Autumn Crochet Leaf Wreath Pattern – Cozy Fall Door Decor
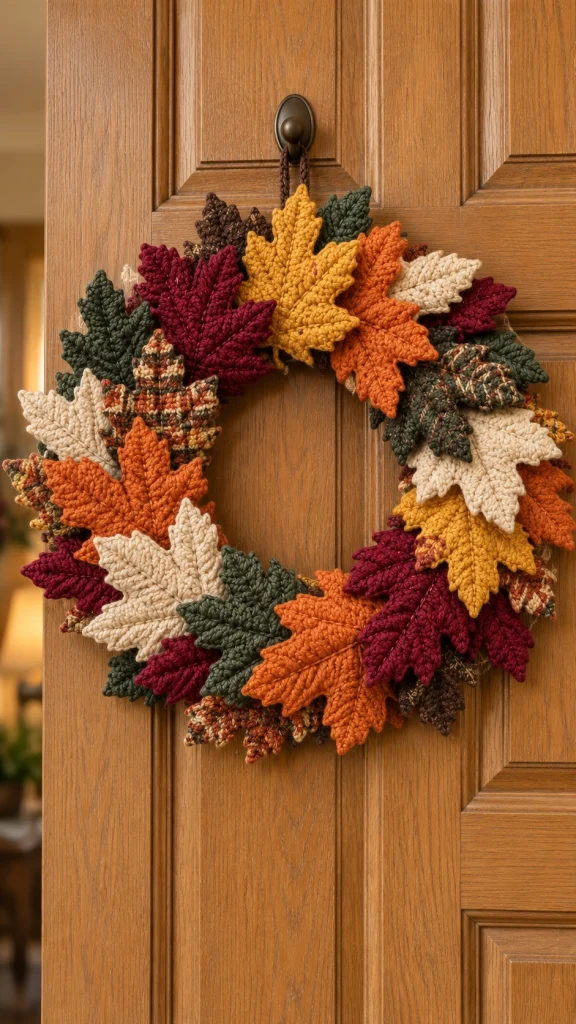
This autumn crochet leaf wreath brings all the best fall colors together in one cozy handmade decoration. Layers of dimensional crochet maple leaves in burnt orange, mustard gold, burgundy, cream, forest green and warm brown create a full wreath that looks beautiful against a natural wooden door.
The design is intentionally dense and slightly irregular, with leaves overlapping in different directions just like a real pile of autumn foliage. Because every leaf is made separately, you can easily customize the color balance and arrangement before sewing everything permanently in place.
Materials
- Burnt orange worsted yarn 100–120 g
- Mustard gold worsted yarn 80–100 g
- Deep burgundy yarn 80–100 g
- Forest / olive green yarn 80–100 g
- Warm cream yarn 70–90 g
- Chocolate brown yarn 50–70 g
- Variegated autumn yarn 50–70 g
- Dark brown yarn for hanging loop small amount
- 4.0–4.5 mm crochet hook 1
- 30–35 cm wreath form 1
- Yarn needle 1
- Scissors 1 pair
- Stitch markers optional
Abbreviations – US Terms
MRmagic ringchchainsl stslip stitchscsingle crochethdchalf double crochetdcdouble crochettrtreble crochetdtrdouble treble crochetFOfasten offFinished Size
The finished wreath measures approximately 38–42 cm / 15–16.5 in across when made with worsted-weight yarn and a 30–35 cm wreath form.
The layered leaves extend beyond the base, creating the full, slightly wild silhouette that gives this wreath its realistic autumn appearance.
Part 1 – Cover the Wreath Base
Using chocolate brown, dark olive or another neutral autumn shade, make a foundation chain long enough to wrap around your wreath form.
Row 1: Starting in 2nd ch from hook, sc across. Ch 1, turn.
Rows 2 onward: sc across until the rectangle is long enough to wrap completely around the wreath form.
FO, leaving a long sewing tail.
Part 2 – Wrap the Wreath
Wrap the crochet rectangle around the wreath form.
Bring the two long edges together at the back.
Whip stitch the edges together securely.
Rotate the covering slightly if necessary so the seam remains hidden at the back of the finished wreath.
Part 3 – Large Maple Leaf Center
Each large maple leaf begins with a small center from which the five pointed sections are worked.
Using your chosen leaf color:
Round 1: MR, ch 3, work 11 dc into ring. Join with sl st. (12 sts including beginning ch)
Do not fasten off.
Part 4 – First Large Leaf Point
From the center circle:
Ch 9.
Starting in 2nd ch from hook:
sl st, sc, hdc, dc, tr, dtr, tr, dc.
Sl st into the next stitch of the center circle.
This creates one long pointed lobe.
Part 5 – Second Leaf Point
Ch 7.
Starting in 2nd ch:
sl st, sc, hdc, dc, tr, dc.
Sl st into the next 2 stitches of the center.
This creates a slightly shorter side lobe.
Part 6 – Center Maple Point
Ch 11.
Starting in 2nd ch:
sl st, sc, hdc, dc, tr, 2 dtr, tr, dc, hdc.
Sl st back into the center.
This should be the longest point of the maple leaf.
Part 7 – Complete the Five Leaf Points
Repeat the shorter point instructions in reverse order:
Make another 7-chain side point.
Then make another 9-chain outer point.
The finished leaf should now have five clearly defined pointed lobes.
Part 8 – Shape the Lower Leaf Sections
Work small groups of sc and hdc stitches around the lower edges between the lobes.
This fills the gaps and gives the leaf a natural maple shape instead of five separate narrow points.
Keep the lower sides slightly narrower than the upper section.
Part 9 – Crochet the Leaf Stem
From the bottom center of the leaf:
Ch 8–10.
Sl st back along the chain.
Sl st into the leaf base and FO.
Leave a long tail if the leaf will be sewn directly onto the wreath.
Part 10 – Define the Leaf Veins
For the strong textured appearance shown in this style of wreath, surface crochet or embroider veins onto the finished leaf.
Begin at the stem and work one central line toward the tip.
Add one diagonal vein toward each side lobe.
Use the same yarn color for a subtle raised texture or a slightly darker shade for stronger definition.
Part 11 – Medium Maple Leaves
For smaller leaves, use the same construction but shorten each chain by approximately 2 stitches.
For example:
Outer lobes: ch 7.
Side lobes: ch 5.
Center lobe: ch 9.
Use the same progression of short to tall stitches to create pointed tips.
Part 12 – Number of Leaves
For a dense wreath approximately 40 cm across, make around 32–38 leaves.
- 6–7 burnt orange leaves
- 5–6 mustard leaves
- 5–6 burgundy leaves
- 5–6 forest or olive green leaves
- 5–6 cream leaves
- 3–4 brown leaves
- 4–5 variegated autumn leaves
You can adjust the quantities depending on which colors you want to emphasize.
Part 13 – Variegated Autumn Leaves
Use a variegated yarn containing combinations of cream, rust, brown, olive and orange.
Crochet these leaves exactly like the solid-colored maple leaves.
Allow the color changes to occur naturally rather than trying to control where each shade appears.
These mixed-color leaves help break up the larger blocks of solid color.
Part 14 – First Layer Assembly
Lay the covered wreath flat.
Begin with approximately 12–14 leaves.
Position them around the ring with their stems pointing inward and their tips pointing outward.
Alternate the direction slightly so the leaves do not form a perfectly repetitive pattern.
Sew each leaf securely through its lower third.
Part 15 – Second Layer
Add another ring of leaves over the first layer.
Position each new leaf between two leaves from the previous layer.
Overlap approximately one-third of each leaf.
Mix contrasting colors beside one another—for example burgundy beside mustard, cream beside green and orange beside brown.
Part 16 – Build the Full Texture
Continue adding leaves until the underlying wreath form is almost completely hidden.
Use medium leaves to fill smaller gaps.
Allow a few leaf tips to extend toward the center opening.
Other leaves should extend beyond the outside edge to create the irregular full silhouette.
Part 17 – Color Placement
Avoid placing too many identical colors beside each other.
For a balanced autumn arrangement, distribute the brightest shades—orange and mustard—around the wreath rather than concentrating them in one section.
Use burgundy and dark green as visual anchors between the brighter colors.
Cream leaves add contrast and prevent the wreath from becoming too dark.
Part 18 – Add Brown Background Leaves
Place a few chocolate-brown leaves deeper inside the arrangement.
These leaves do not need to remain fully visible.
Let only their pointed tips appear between brighter leaves.
This adds depth and makes the layered wreath appear thicker.
Part 19 – Fill Remaining Gaps
Hang the wreath temporarily and inspect it from several steps away.
If any part of the base remains visible, add another medium or small leaf.
Pay special attention to the inside circumference, where gaps are easiest to notice.
Continue until the wreath looks full from every angle.
Part 20 – Crochet Hanging Loop
Using dark brown yarn:
Ch 35–45.
Sl st back along the entire chain for additional strength.
Fold the cord in half.
Sew both ends securely to the upper back of the wreath.
The loop should be long enough to fit comfortably over a door hook.
Part 21 – Secure the Leaves
Once you are happy with the arrangement, reinforce the larger leaves with additional hidden stitches.
Attach mainly through the lower and middle sections.
Leave the outer points relatively free so they remain dimensional instead of lying completely flat against the wreath.
Part 22 – Shape the Wreath
Use your fingers to gently curve some leaf points forward.
Bend others slightly toward the sides.
Separate overlapping leaves so their shapes remain recognizable.
Avoid making the wreath perfectly circular around the outside—the uneven leaf tips are part of the autumn look.
Part 23 – Final Finishing
Weave in all visible yarn ends.
Check the back of the wreath and trim loose threads.
Make sure the hanging loop is firmly attached.
Hang the wreath vertically and make final adjustments to the leaves.
Autumn Color Palette
Burnt Orange: pumpkin, cinnamon or rust.
Mustard: golden ochre or harvest yellow.
Burgundy: cranberry, wine or dark red.
Green: moss, olive or forest green.
Cream: oatmeal, ivory or natural cotton.
Brown: chestnut, chocolate or walnut.
Alternative Color Ideas
Soft Neutral Fall: cream, camel, mocha, muted pumpkin and sage.
Deep Woodland: forest green, burgundy, chocolate, burnt orange and mustard.
Vintage Autumn: dusty rust, antique gold, olive, beige and wine.
Modern Fall: terracotta, oatmeal, sage, caramel and dark brown.
Thanksgiving: pumpkin orange, cranberry, golden yellow, cream and warm brown.
Displaying Your Autumn Crochet Wreath
This wreath works beautifully on a front door, interior door, fireplace wall, entryway or above an autumn console display.
If used outside, keep it under a covered porch and protect it from rain and prolonged direct sunlight.
At the end of the season, place tissue paper loosely between the layers and store the wreath flat in a large box.
Frequently Asked Questions
The stitches themselves are manageable, but shaping the maple leaves and assembling many layers requires patience. It is best for an adventurous beginner or intermediate crocheter.
No. Mixing large and medium leaves actually gives the wreath a more natural and dimensional appearance.
For a full wreath around 38–42 cm across, approximately 32–38 leaves usually creates a dense layered appearance. The exact number depends on your yarn, hook size and how much the leaves overlap.
Yes. This is an excellent scrap-yarn project because individual leaves require relatively small amounts of yarn. Choose coordinating autumn shades in a similar yarn weight.
Lightly steam or damp-block individual leaves before assembly. Keep some natural curvature rather than flattening every leaf completely.
Yes. Small crochet pumpkins, acorns or berries can be placed between the leaves, but keep them limited if you want the maple leaves to remain the main feature.
Yes. Use DK yarn, a 3.0–3.5 mm hook and a smaller wreath form. Reduce the number of leaves proportionally.
Store it flat rather than folded. A wide box with tissue paper between the leaf layers will help preserve the pointed shapes and dimensional texture.
The finished Autumn Crochet Leaf Wreath Pattern – Cozy Fall Door Decor

