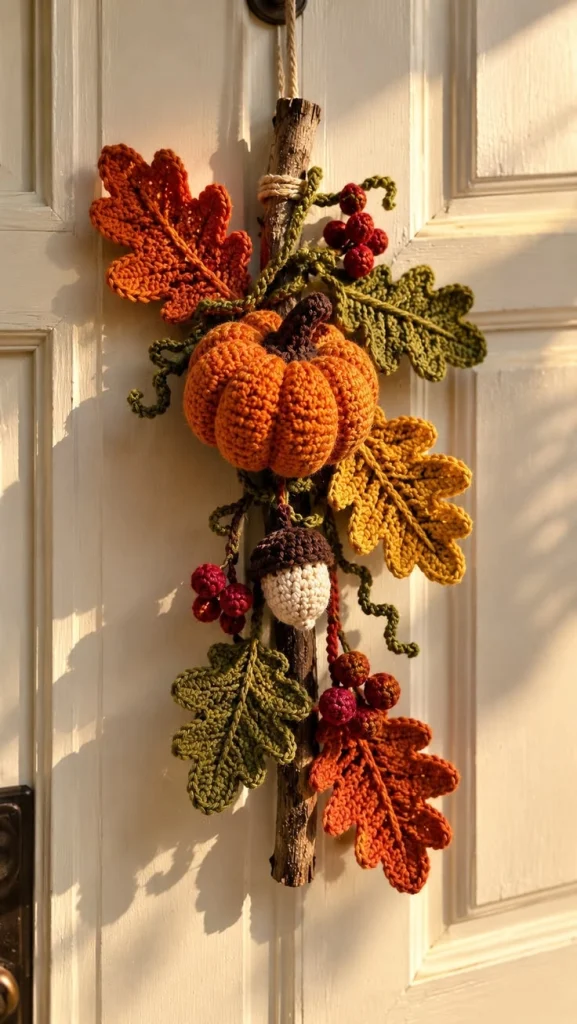
Autumn Crochet Pumpkin & Oak Leaf Door Swag – Free Crochet Pattern
Bring the warm beauty of fall into your home with this charming autumn crochet pumpkin door swag. Featuring a plump orange pumpkin, richly textured oak leaves, tiny red berries, a handmade acorn, and playful curling vines, this rustic decoration captures the cozy spirit of the autumn season.
Unlike a traditional circular wreath, this handmade door swag uses a natural wooden branch as its central support. The crochet decorations cascade along the branch, creating an elegant vertical arrangement perfect for a front door, entryway, farmhouse kitchen, or seasonal wall display.
The centerpiece is a three-dimensional orange pumpkin with deep sculpted ridges and a dark brown stem. Around it are oak-shaped leaves in burnt orange, mustard yellow, and olive green, complemented by clusters of red berries, an acorn, and delicate curling tendrils.
This free crochet tutorial explains how to make each component and assemble everything into a beautiful autumn decoration.
Pattern at a Glance
Measurements are approximate and depend on yarn, tension, and final arrangement.
Materials and Supplies
- Medium-weight cotton or acrylic yarn in pumpkin orange.
- Medium-weight yarn in burnt orange.
- Medium-weight yarn in mustard yellow.
- Medium-weight yarn in olive green.
- Medium-weight yarn in dark brown.
- Small amount of cream yarn for the acorn.
- Small amount of burgundy or deep red yarn for berries.
- 3.5 mm crochet hook.
- 4 mm crochet hook for larger leaves.
- Polyester fiberfill for stuffing.
- Yarn needle.
- Stitch markers.
- Sharp scissors.
- Natural wooden branch approximately 35–45 cm long.
- Strong cotton cord or jute twine for hanging.
- Optional floral wire for shaping leaves and vines.
- Optional fabric glue for securing decorative elements.
Autumn Color Palette
Abbreviations
All instructions use US crochet terminology.
Part 1: Crochet the 3D Pumpkin
The pumpkin is the centerpiece of the autumn door swag. It has a rounded shape with deep vertical ridges and a short brown stem.
Pumpkin body instructions
Using pumpkin orange yarn and a 3.5 mm hook:
Round 1: Make 6 sc in a MR. 6 sts.
Round 2: Inc in each st around. 12 sts.
Round 3: (Sc 1, inc) 6 times. 18 sts.
Round 4: (Sc 2, inc) 6 times. 24 sts.
Round 5: (Sc 3, inc) 6 times. 30 sts.
Round 6: (Sc 4, inc) 6 times. 36 sts.
Round 7: (Sc 5, inc) 6 times. 42 sts.
Round 8: (Sc 6, inc) 6 times. 48 sts.
Rounds 9–17: Sc in every st around. 48 sts.
Round 18: (Sc 6, dec) 6 times. 42 sts.
Round 19: (Sc 5, dec) 6 times. 36 sts.
Round 20: (Sc 4, dec) 6 times. 30 sts.
Round 21: (Sc 3, dec) 6 times. 24 sts.
Begin stuffing firmly, keeping the pumpkin rounded.
Round 22: (Sc 2, dec) 6 times. 18 sts.
Round 23: (Sc 1, dec) 6 times. 12 sts.
Round 24: Dec around. 6 sts.
FO and close the opening.
Part 2: Sculpt the Pumpkin Ridges
The deep ridges give the pumpkin its realistic segmented appearance.
Pumpkin shaping instructions
- Cut a long strand of matching orange yarn.
- Thread it through a large yarn needle.
- Insert the needle through the center of the pumpkin from bottom to top.
- Wrap the yarn around the outside of the pumpkin.
- Pull gently to create the first groove.
- Repeat evenly around the pumpkin to form 6–8 sections.
- Secure the yarn firmly at the bottom.
Adjust the tension until the pumpkin has evenly spaced ridges.
Part 3: Crochet the Pumpkin Stem
Stem instructions
Using dark brown yarn:
Round 1: 6 sc in a MR. 6 sts.
Rounds 2–7: Sc in each st around. 6 sts.
FO, leaving a long tail for sewing.
Lightly stuff the stem if needed and sew it securely to the top of the pumpkin.
Part 4: Crochet the Large Oak Leaves
The oak leaves create the flowing autumn shape of the arrangement. Make several leaves in burnt orange, mustard yellow, and olive green.
Oak leaf foundation
Using a 4 mm hook, ch 19.
Row 1: Sc in the second ch from the hook, hdc in next 2 ch, dc in next 10 ch, hdc in next 3 ch, sc in last 2 ch.
Ch 1 and work along the opposite side of the foundation chain, mirroring the stitch sequence.
Join with a sl st.
Oak leaf lobes
Work along the outside edge to create the characteristic rounded lobes.
- Sl st into the next edge stitch.
- Ch 3.
- Work 3 dc into the same area.
- Ch 2 and sl st to create a rounded lobe.
- Move along the edge and repeat.
- Create approximately 4–5 lobes on each side.
- Keep the lobes largest near the middle of the leaf.
- Finish with a pointed upper tip.
FO, leaving a long tail.
Because the lobe spacing depends on your base stitches, adjust the placement to keep both sides balanced.
Part 5: Add the Leaf Veins
Embroidered veins make the leaves more realistic.
Leaf vein instructions
- Thread a yarn needle with a contrasting strand of yarn.
- Stitch a central vein from the base to the tip.
- Add diagonal veins extending toward the lobes.
- Keep the embroidery slightly raised.
- Secure the yarn ends on the back.
For burnt orange leaves, use golden orange embroidery. For mustard leaves, use warm brown or ochre. For green leaves, use a lighter olive shade.
Part 6: Make the Leaf Collection
Suggested leaf quantities
- 2 large burnt orange oak leaves.
- 1 large mustard yellow oak leaf.
- 2 medium olive green oak leaves.
- 1 additional small leaf if needed for balance.
Vary the leaf sizes slightly to create a natural arrangement.
Part 7: Crochet the Acorn Body
The little acorn hangs beneath the pumpkin and adds a woodland-inspired detail.
Acorn body instructions
Using cream yarn and a 3.5 mm hook:
Round 1: 6 sc in a MR. 6 sts.
Round 2: (Sc 1, inc) 3 times. 9 sts.
Round 3: (Sc 2, inc) 3 times. 12 sts.
Round 4: (Sc 3, inc) 3 times. 15 sts.
Rounds 5–8: Sc in every st around. 15 sts.
Stuff lightly and FO, leaving a sewing tail.
Part 8: Crochet the Acorn Cap
Acorn cap instructions
Using dark brown yarn:
Round 1: 6 sc in a MR. 6 sts.
Round 2: Inc around. 12 sts.
Round 3: (Sc 1, inc) 6 times. 18 sts.
Round 4: Sc in BLO around. 18 sts.
Round 5: Sc around. 18 sts.
FO, leaving a long sewing tail.
Position the cap over the cream acorn body and sew securely.
Part 9: Crochet the Red Berries
Small berry clusters add a bright pop of autumn color.
Berry instructions
Using burgundy or dark red yarn:
Round 1: 6 sc in a MR. 6 sts.
Round 2: Inc around. 12 sts.
Round 3: Sc around. 12 sts.
Round 4: Dec around. 6 sts.
Add a tiny amount of stuffing, close the opening, and FO.
Make approximately 12–18 berries, depending on the desired fullness.
Part 10: Assemble the Berry Clusters
Berry cluster instructions
- Arrange three or four berries together.
- Use a yarn needle to join them at the base.
- Attach the cluster to a short olive-green crochet stem.
- Secure all yarn ends.
- Repeat to make several berry clusters.
Position some clusters near the pumpkin and others between the leaves.
Part 11: Crochet the Curly Vines
The curling vines add movement and create the flowing woodland appearance.
Curly vine instructions
Using olive green yarn, ch 31.
Row 1: Work 2 sc in the second chain from the hook and 2 sc in each remaining chain.
The strip should begin curling naturally.
FO, leaving a long tail for attaching.
Make 4–6 vines of different lengths.
For tighter curls, work 3 sc into each chain instead of 2.
Part 12: Prepare the Wooden Branch
The natural branch provides the rustic foundation for the decoration.
Branch preparation
- Select a clean, dry wooden branch approximately 35–45 cm long.
- Remove loose bark and sharp edges.
- Check that the branch is strong enough to support the crochet pieces.
- Cut a length of strong cotton cord or jute twine.
- Wrap the cord securely around the upper section of the branch.
- Create a hanging loop.
- Test the hanging loop before adding decorations.
Part 13: Attach the Pumpkin
The pumpkin should sit near the upper-middle section of the branch.
Pumpkin attachment instructions
- Position the pumpkin against the branch.
- Thread a strong yarn needle with matching yarn.
- Pass the yarn through the back of the pumpkin.
- Wrap the yarn around the branch.
- Repeat several times to secure the pumpkin.
- Adjust the pumpkin so it faces forward.
Part 14: Arrange the Oak Leaves
The leaves should cascade naturally around the pumpkin.
Leaf placement
- Position one large burnt orange leaf near the upper left side.
- Place an olive green leaf behind the upper right side.
- Position a mustard yellow leaf below and to the right of the pumpkin.
- Add another olive green leaf near the lower left side.
- Place the second burnt orange leaf near the bottom right.
- Adjust the angles for a natural flowing arrangement.
- Sew or tie the leaf stems securely to the branch.
Part 15: Add the Acorn and Berry Clusters
Decorative placement
- Hang the acorn beneath the pumpkin using a short crochet cord.
- Attach one berry cluster near the upper right side.
- Position additional berries around the lower leaves.
- Keep the clusters slightly separated for visual balance.
- Secure all pieces firmly.
Part 16: Attach the Curly Vines
Vine placement
- Attach one curly vine near the pumpkin stem.
- Position another near the upper berry cluster.
- Add two vines between the lower leaves.
- Allow the curls to extend outward naturally.
- Adjust their direction to create movement.
Part 17: Final Shaping and Finishing
- Check that the pumpkin is securely attached.
- Adjust the oak leaves into a balanced arrangement.
- Inspect the berry clusters and acorn.
- Shape the curly vines.
- Weave in all loose yarn ends.
- Trim excess hanging cord.
- Test the hanging loop.
- Make sure the decoration hangs straight.
Customization Ideas
1. Rustic farmhouse version
Use muted orange, beige, olive green, and natural jute accents.
2. Elegant neutral autumn version
Make the pumpkin in cream and use sage green, taupe, and golden brown leaves.
3. Bright harvest version
Use vibrant orange, sunflower yellow, deep red, and rich green.
4. Woodland-inspired version
Add extra acorns, mushrooms, and small pinecones.
5. Thanksgiving door decoration
Include additional golden leaves and a small crochet bow.
6. Mini wall hanging
Use lighter yarn and a smaller hook to create a compact version.
Care Instructions
- Dust gently using a soft brush.
- Spot clean crochet pieces when necessary.
- Avoid soaking the wooden branch.
- Keep away from prolonged moisture.
- Do not place near open flames.
- Store flat or hanging in a dry location.
- Reshape leaves after storage.
Frequently Asked Questions
Is this crochet pumpkin door swag beginner-friendly?
This project is best suited to intermediate crocheters because it combines amigurumi, shaped leaf appliqués, small decorative elements, and detailed assembly.
Can I use acrylic yarn instead of cotton?
Yes. Acrylic yarn works well, although cotton generally gives the leaves a firmer structure and more defined stitches.
Can I make the decoration without a real wooden branch?
Yes. A wooden dowel or a sturdy decorative stick can be used instead.
How can I make the oak leaves hold their shape?
Use firm cotton yarn, lightly block the leaves, or carefully add covered floral wire along the back edges.
Can this decoration be displayed outdoors?
It is best suited to indoor spaces or a protected covered porch. Rain and prolonged moisture may damage the yarn and wooden branch.
Can I change the pumpkin color?
Absolutely. Cream, sage green, rust, mustard, and soft beige pumpkins all work beautifully with this autumn design.
Final Thoughts
This autumn crochet pumpkin door swag is a beautiful handmade decoration that brings the warmth and charm of the harvest season into your home.
The sculpted orange pumpkin, colorful oak leaves, red berries, tiny acorn, and curling vines create a cozy woodland-inspired arrangement, while the natural wooden branch adds rustic character.
Whether displayed on your front door, in an entryway, or as part of a Thanksgiving decorating scheme, this crochet project is a lovely way to celebrate autumn with handmade creativity.
Love this crochet pattern? Save it to your favorite crochet inspiration board and share your finished autumn door swag with fellow crochet lovers!

