Autumn Crochet Wreath Pattern – Pumpkins, Acorns & Fall Leaves
Beginner Friendly
Perfect for those just starting their crochet journey, with clear instructions and simple techniques
Single-Day Project
A satisfying project you can complete in a single afternoon or evening.
Handmade Gift
A beautiful keepsake — free forever. Read online or print at home.
About This Autumn Crochet Wreath Pattern – Pumpkins, Acorns & Fall Leaves
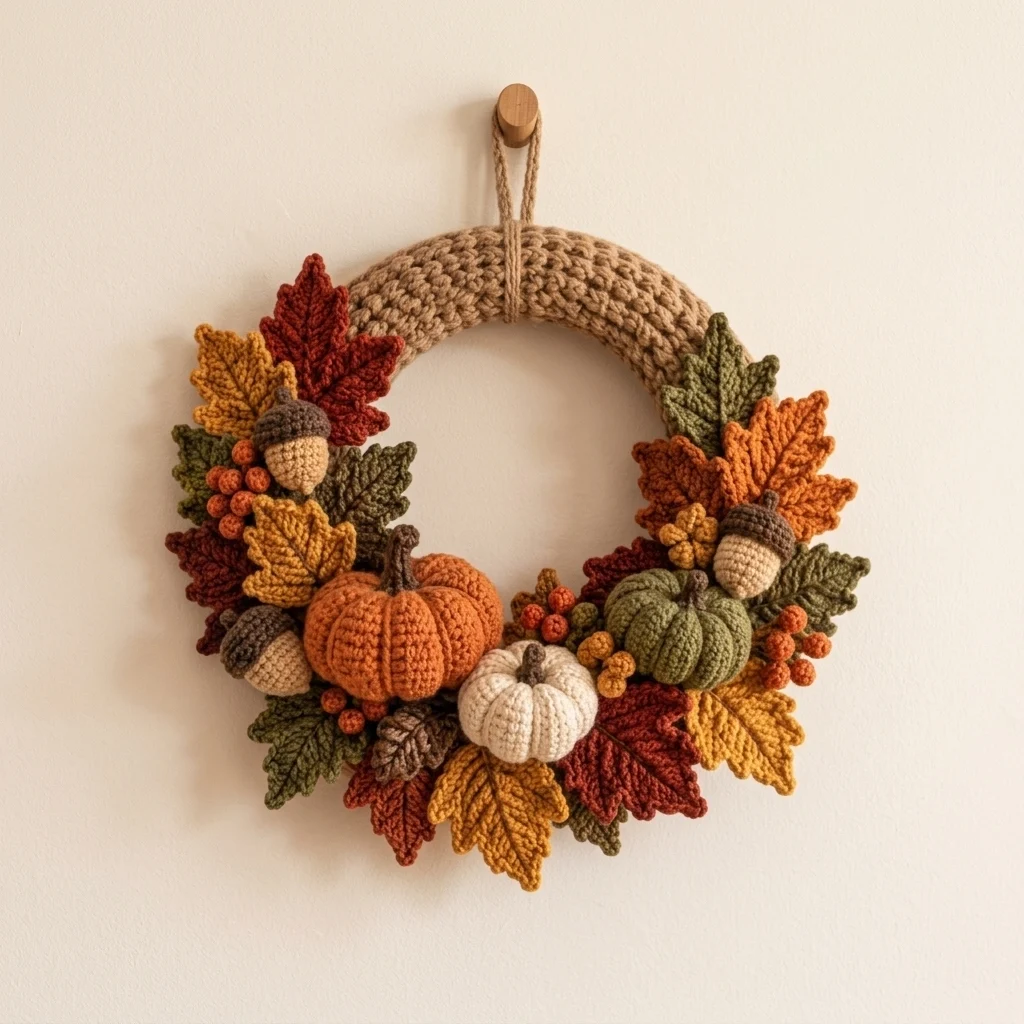
This autumn crochet wreath pattern brings together everything beautiful about fall: plump pumpkins, tiny acorns, textured maple-style leaves, berries and warm earthy colors.
The finished wreath has a natural asymmetrical arrangement, with the crochet decorations concentrated around the lower half and sides while part of the wrapped wreath base remains visible at the top. It makes a beautiful handmade decoration for a wall, interior door or covered entryway.
Materials
- Worsted weight #4 yarn – warm tan 100–150 g
- Worsted weight #4 yarn – pumpkin orange 50 g
- Worsted weight #4 yarn – cream 30 g
- Worsted weight #4 yarn – olive green 50 g
- Worsted weight #4 yarn – mustard gold 40 g
- Worsted weight #4 yarn – rust 40 g
- Worsted weight #4 yarn – burgundy 30 g
- Worsted weight #4 yarn – dark brown 30 g
- Worsted weight #4 yarn – beige 30 g
- 3.5–4 mm crochet hook 1
- Foam or straw wreath form 35–40 cm
- Polyester stuffing small amount
- Yarn needle 1
- Scissors 1 pair
- Stitch markers optional
- Strong sewing thread optional
Abbreviations – US Terms
MRmagic ringchchainsl stslip stitchscsingle crochethdchalf double crochetdcdouble crochettrtreble crochetinc2 sc in same stitchdecsingle crochet decreaseBLOback loop onlyst(s)stitch(es)FOfasten offFinished Size
The finished wreath measures approximately 35–40 cm / 14–16 in across, depending on your wreath base and how densely you arrange the decorations.
The pumpkins range from approximately 6–10 cm across, while the leaves can be made in several sizes for a layered natural appearance.
Part 1 – Wrap the Wreath Base
Begin with a foam, straw or lightweight wreath form.
Using warm tan yarn, wrap the yarn firmly around the entire wreath form. Keep each wrap directly beside the previous one so the base underneath does not show.
For a more crochet-textured appearance, you can instead crochet a long strip of sc rows wide enough to wrap around the wreath form.
Wrap or sew the strip around the form and secure it invisibly at the back.
Part 2 – Large Crochet Pumpkin
With pumpkin orange yarn:
Row 1: Ch 21. Hdc in 2nd ch from hook and across. Turn. 20 sts.
Rows 2–26: Ch 1, hdc BLO across. Turn.
The ribbed fabric should form a rectangle.
Fold the rectangle so the first and last rows meet.
Sl st or sew these edges together to form a tube.
Thread a long yarn tail through the stitches around one opening. Pull tightly and secure.
Stuff firmly but do not overfill.
Gather the second opening and close.
Pass a long strand of yarn through the center several times, pulling gently to flatten the pumpkin.
Wrap yarn around the outside in 6 sections to create the pumpkin grooves.
Part 3 – Small Cream Pumpkin
With cream yarn:
Row 1: Ch 15. Hdc in 2nd ch from hook and across. 14 sts.
Rows 2–20: Ch 1, hdc BLO across.
Join the short edges to create a tube.
Gather one opening, stuff lightly and close the second opening.
Shape into 6 sections using a long strand of matching yarn.
Part 4 – Olive Green Pumpkin
Use the same construction as the cream pumpkin, but increase the starting chain to 17 and work approximately 22 rows.
Stuff and shape into 6–8 defined sections.
Use dark brown yarn to create a short stem.
Pumpkin Stem
With dark brown yarn:
R1: 6 sc into MR. 6
R2–5: Sc around. 6
FO, leaving a long tail.
Lightly stuff if desired and sew firmly into the center of the pumpkin.
Part 5 – Crochet Acorn
Acorn Body
With beige yarn:
R1: 6 sc in MR. 6
R2: Inc around. 12
R3: (1 sc, inc) × 6. 18
R4–7: Sc around. 18
R8: (1 sc, dec) × 6. 12
Stuff lightly.
R9: Dec around. 6
FO and close.
Acorn Cap
With dark brown yarn:
R1: 6 sc in MR. 6
R2: Inc around. 12
R3: (1 sc, inc) × 6. 18
R4: Sc around.
FO, leaving a long tail.
Place the cap over the wider end of the beige acorn and sew securely.
Add a tiny brown stem at the top.
Part 6 – Crochet Fall Leaves
Make leaves in mustard, rust, burnt orange, burgundy, olive and brown.
Ch 12.
Starting in the 2nd chain from hook, work:
sl st, sc, hdc, dc, 2 dc, tr, 2 dc, dc, hdc, sc, sl st.
Ch 2 at the tip.
Continue down the opposite side of the foundation chain using the same sequence in reverse.
Join at the base.
FO, leaving a long tail for assembly.
Creating the Pointed Fall-Leaf Shape
For a more detailed maple-inspired leaf, add small side points around the basic leaf.
Join yarn along one side.
Work:
sl st, sc, hdc, dc, ch 2, sl st into 2nd ch, dc, hdc, sc.
Repeat this sequence 2–3 times along each side.
The small chain picots create the pointed autumn-leaf silhouette.
Part 7 – Crochet Berry
With rust, orange or mustard yarn:
R1: 6 sc into MR. 6
R2: Inc around. 12
R3: Sc around. 12
Add a tiny amount of stuffing.
R4: Dec around. 6
FO and close.
Make approximately 12–18 berries.
Berry Clusters
Thread 3–5 berries onto a strand of yarn.
Arrange them closely together and secure each berry with several stitches.
Create several small clusters rather than attaching individual berries evenly around the wreath.
Part 8 – Small Decorative Buds
With mustard yarn:
R1: 6 sc in MR.
R2: Inc around. 12
R3: Sc around.
R4: Dec around. 6
Stuff lightly and close.
Make 3 small buds and sew them together as a cluster.
Recommended Number of Pieces
- 1 large pumpkin – pumpkin orange
- 1 medium pumpkin – olive green
- 1 small pumpkin – cream
- 3–4 crochet acorns
- 14–20 fall leaves in mixed colors
- 12–18 berries
- 2–3 small berry or bud clusters
You can add or remove pieces depending on the size of your wreath.
Part 9 – Arrange the Wreath
Before sewing anything permanently, place every crochet piece on the wreath.
Start with the three pumpkins along the lower center.
Place the large orange pumpkin slightly left of center.
Add the cream pumpkin near the middle and the olive pumpkin slightly higher on the right.
Next, position the acorns on both sides.
Slide the largest leaves underneath the pumpkins and acorns so they appear to grow outward from the arrangement.
Add smaller leaves toward the outer edges.
Fill remaining gaps with berries and small buds.
Part 10 – Secure the Decorations
- Take a photo of your final arrangement before moving anything.
- Remove the smallest pieces first.
- Sew the large leaves securely to the wreath base.
- Add the pumpkins.
- Sew the acorns between the leaves.
- Add the smaller leaves.
- Finish with berries and tiny decorative pieces.
Use several stitches through the wreath covering for every large element.
Do not rely on a single stitch for stuffed pumpkins or acorns.
Part 11 – Hanging Loop
Cut approximately 50–60 cm of strong tan yarn.
Fold it in half.
Attach it securely around the top center of the wreath.
Make a loop approximately 10–12 cm long.
Knot securely and hide the knot behind the wreath.
Finishing
Weave in all visible yarn ends.
Check that every pumpkin, acorn and leaf is firmly attached.
Gently shape the leaves with your fingers.
Rotate some leaves slightly forward and others sideways to create depth.
Fluff the pumpkins and reshape their sections if needed.
Your autumn crochet wreath is ready to hang.
Alternative Color Ideas
Classic Fall: burnt orange, mustard, burgundy, olive and brown.
Neutral Farmhouse: cream, oatmeal, taupe, caramel and muted olive.
Deep Autumn: forest green, wine red, copper, dark mustard and chocolate brown.
Soft Autumn: dusty orange, sage, beige, muted gold and warm cream.
Care Instructions
Dust the wreath gently with a soft brush or low-powered handheld vacuum.
For small marks, spot clean carefully using cool water and mild soap.
Avoid soaking the entire wreath, especially when using a foam or straw base.
Store flat in a dry box when the season is over so the leaves and pumpkins keep their shape.
Frequently Asked Questions
The individual pieces use mostly basic crochet stitches, but assembling and shaping the wreath requires a little patience. It is best suited to an adventurous beginner or intermediate crocheter.
Yes. You can use a straw wreath, wire wreath frame or another lightweight circular base. Make sure the structure is strong enough to support the stuffed pumpkins.
Absolutely. A simpler version with one pumpkin, several leaves and two acorns can create a beautiful minimalist fall wreath.
Use several leaf sizes and autumn shades, add surface-crochet veins and avoid positioning every leaf in exactly the same direction.
Yes, provided the door is protected from rain and prolonged moisture. For exposed outdoor areas, choose weather-resistant materials instead.
Yes. The pumpkins, acorns and warm autumn leaves work beautifully for Thanksgiving, harvest-season decorating and handmade fall gifts.
The finished Autumn Crochet Wreath Pattern – Pumpkins, Acorns & Fall Leaves

