Autumn Floral Crochet Wall Hanging Pattern
Beginner Friendly
Perfect for those just starting their crochet journey, with clear instructions and simple techniques
Single-Day Project
A satisfying project you can complete in a single afternoon or evening.
Handmade Gift
A beautiful keepsake — free forever. Read online or print at home.
About This Autumn Floral Crochet Wall Hanging Pattern
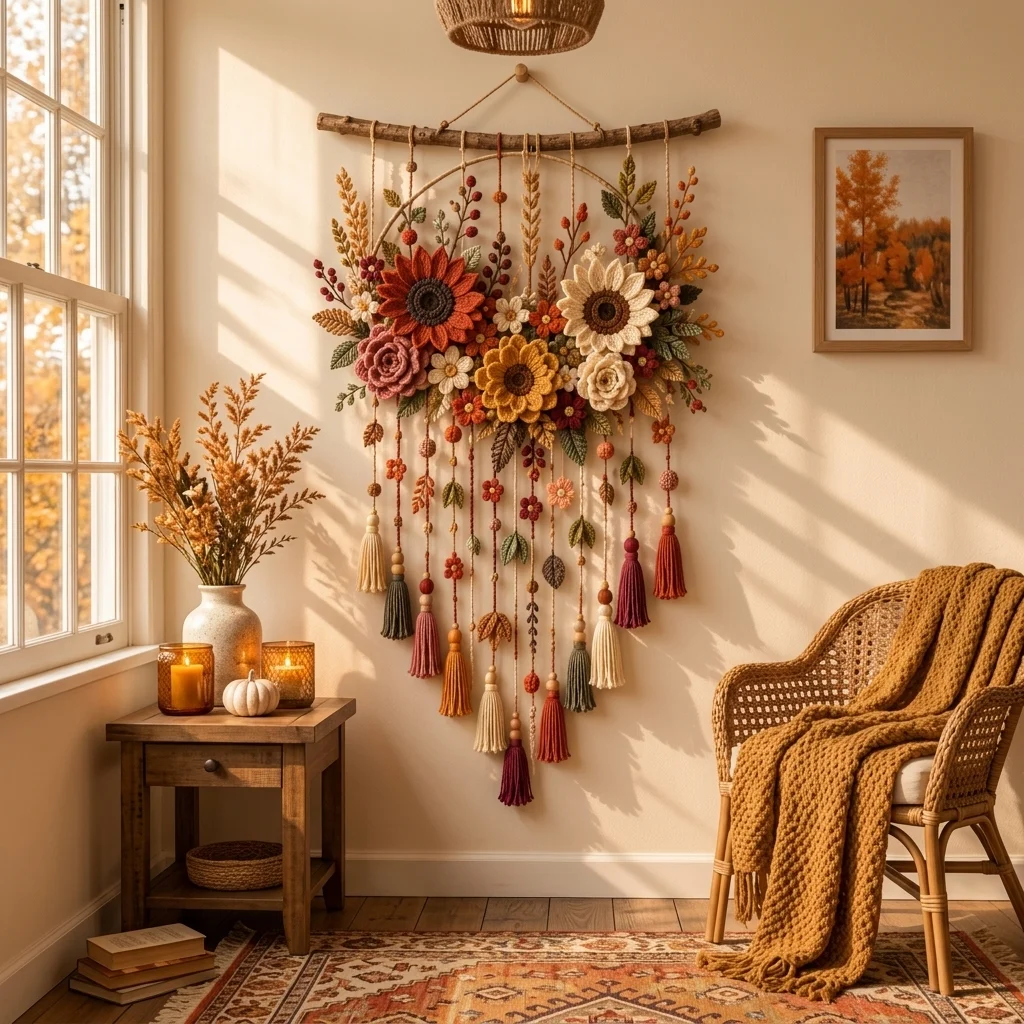
This autumn crochet wall hanging pattern creates a large botanical display filled with dimensional sunflowers, layered roses, small daisies, berries, textured leaves, and long cascading tassels. Rust, mustard, cream, dusty rose, burgundy, olive, and warm brown reproduce the rich fall palette of the reference while keeping the individual flowers easy to distinguish.
The design is assembled rather than worked as one piece. A wrapped semicircular hoop supports a dense floral arrangement across its lower half, while tall stems extend upward to soften the outline. Below the flowers, narrow crochet cords fall at staggered lengths and carry miniature flowers, leaves, berries, wooden beads, and large yarn tassels.
Allow approximately 32-40 hours for the complete project. This is an advanced decorative pattern for crocheters comfortable with circular shaping, post stitches, layered motifs, surface crochet, shaped leaves, color changes, three-dimensional flowers, stuffing small pieces, cord construction, blocking, and assembling many separate elements into a balanced wall display.
Materials
- DK / light worsted cotton yarn in burnt orange approximately 220 m
- DK / light worsted cotton yarn in golden mustard approximately 220 m
- DK / light worsted cotton yarn in warm cream approximately 250 m
- DK / light worsted cotton yarn in dusty rose approximately 170 m
- DK / light worsted cotton yarn in deep burgundy approximately 140 m
- DK / light worsted cotton yarn in dark chocolate brown approximately 150 m
- DK / light worsted cotton yarn in olive green approximately 180 m
- DK / light worsted cotton yarn in sage green approximately 120 m
- DK / light worsted cotton yarn in caramel approximately 100 m
- 3.5 mm crochet hook main motifs
- 3.0 mm crochet hook berries, cords, and surface details
- 70 cm metal or wooden hoop 1
- Natural branch approximately 85-95 cm long 1
- Natural tan cord or strong cotton yarn approximately 4 m
- Wooden beads in 10-20 mm sizes approximately 28-35
- Polyester fiberfill small amount for berries
- Floral wire optional, for upright stems
- Yarn needle for assembly
- Stitch markers 10
- Rustproof blocking pins for leaves and petals
- Blocking mat 1 large set
- Scissors 1 pair
Abbreviations
MRmagic ringchchainsl stslip stitchscsingle crochethdchalf double crochetdcdouble crochettrtreble crochetdtrdouble treble crochetinc2 single crochet in same stitchdecsingle crochet 2 stitches togetherFLOfront loop onlyBLOback loop onlyFPdcfront post double crochetBPdcback post double crochetspspaceskskipststitchstsstitchesRSright sideWSwrong sidepicotch 3, sl st in first chLarge Sunflower Center – Make 3
- Round 1: With dark chocolate brown, work 6 sc in MR. (6 sts)
- Round 2: Inc in each st around. (12 sts)
- Round 3: (Sc in next st, inc) 6 times. (18 sts)
- Round 4: (Sc in next 2 sts, inc) 6 times. (24 sts)
- Round 5: (Sc in next 3 sts, inc) 6 times. (30 sts)
- Round 6: (Sc in next 4 sts, inc) 6 times. (36 sts)
- Round 7: (Sc in next 5 sts, inc) 6 times. (42 sts)
- Round 8: Working in BLO, sc in each st around. (42 sts)
- Join with sl st and fasten off.
Sunflower Center Texture – Make 3
- With brown and 3.0 mm hook, join into the center of one disk.
- Surface sl st in a continuous spiral between Rounds 1-3.
- Continue outward with relaxed surface sl sts through Rounds 4-6.
- Work through the unused FLO of Round 8 around the outside edge.
- Fasten off on the WS.
- Repeat on the remaining two centers.
Large Sunflower Petals – Make 3 Sets
- Use burnt orange for one flower, golden mustard for one flower, and warm cream for one flower.
- Join petal yarn into any stitch of Round 8.
- Petal 1: Ch 9.
- Beginning in second ch from hook work sl st, sc, hdc, dc in next 2 ch, tr in next 2 ch, dc.
- Sl st into the next center stitch.
- Sl st into the following center stitch.
- Repeat the petal sequence 20 more times. (21 petals)
- Join behind the first petal.
- Fasten off.
Outer Sunflower Petal Layer – Make 3 Sets
- Join the matching flower color behind the first petal layer.
- Ch 11.
- Beginning in second ch work sl st, sc, hdc, dc in next 2 ch, tr in next 4 ch, dc, hdc.
- Sl st between the next two inner petals.
- Repeat until 21 outer petals are complete.
- Arrange each outer petal between two inner petals.
- Fasten off and weave in the ends.
Dusty Rose Layered Rose – Make 1
- With dusty rose, ch 61.
- Row 1: Dc in fifth ch from hook, ch 1, dc in same ch.
- (Ch 1, sk next ch, dc, ch 1, dc in next ch) across.
- Turn.
- Row 2: Into each ch-1 sp work (sc, hdc, 5 dc, hdc, sc).
- Fasten off leaving a 70 cm sewing tail.
- Beginning at one end, roll the strip tightly for the first 4 petals.
- Continue rolling more loosely to create the open outer petals.
- Sew through all layers across the underside after every full turn.
- Shape the outer petals outward with your fingers.
Cream Layered Rose – Make 1
- With warm cream, ch 55.
- Row 1: Dc in fifth ch from hook, ch 1, dc in same ch.
- (Ch 1, sk next ch, dc, ch 1, dc in next ch) across.
- Turn.
- Row 2: Work (sc, hdc, 5 dc, hdc, sc) in every ch-1 sp.
- Fasten off leaving a long tail.
- Roll the first section tightly to form the rose center.
- Roll the remaining petals gradually more loosely.
- Sew securely across the underside.
Medium Daisies – Make 8
- Make 3 cream, 2 burnt orange, 2 burgundy, and 1 dusty rose.
- Round 1: With mustard or cream center color, work 6 sc in MR. (6 sts)
- Round 2: Inc around. (12 sts)
- Change to petal color.
- Petal 1: Ch 6.
- Beginning in second ch work sl st, sc, hdc, dc, hdc.
- Sl st into next center st.
- Repeat around for 12 petals.
- Join and fasten off leaving a sewing tail.
Small Accent Flowers – Make 14
- Use burgundy, burnt orange, dusty rose, cream, and mustard in varied combinations.
- Round 1: Work 5 sc in MR. (5 sts)
- Round 2: Inc in each st around. (10 sts)
- Change color if desired.
- In first st work (sl st, ch 3, 2 dc, ch 3, sl st).
- Skip next st.
- Repeat the petal sequence in every other st around to form 5 petals.
- Fasten off leaving a 20 cm tail.
Large Botanical Leaves – Make 18
- Use olive, sage, caramel, rust, and dark brown.
- Ch 17.
- Beginning in second ch work sl st, sc, hdc, dc in next 2 ch, tr in next 7 ch, dc in next 3 ch, hdc, sc.
- Work 3 sc into the final chain.
- Continue symmetrically down the opposite side of the foundation chain.
- Join at the base.
- Round 2: Sc around the leaf.
- At one-third of the first side work (hdc, dc, hdc) in one st.
- Repeat at two-thirds of the side.
- At the tip work (sc, picot, sc).
- Mirror the two side points on the opposite edge.
- Fasten off leaving a sewing tail.
Small Botanical Leaves – Make 24
- Use olive, sage, mustard, caramel, rust, and brown.
- Ch 11.
- Beginning in second ch work sl st, sc, hdc, dc, tr in next 3 ch, dc, hdc, sc.
- Work 3 sc into the final chain.
- Continue symmetrically along the opposite side.
- At the leaf tip work a picot.
- Join at the base and fasten off.
Raised Leaf Veins
- Using matching yarn and the 3.0 mm hook, insert the hook at the base of each large leaf.
- Surface sl st along the original foundation chain toward the tip.
- Keep the stitches relaxed so the leaf remains flat.
- Add two short diagonal surface-sl-st branches on each side of the main vein.
- Repeat on selected small leaves for extra texture.
- Fasten off on the WS.
Tall Wheat Stems – Make 8
- With caramel or mustard, ch 35.
- Sl st in second ch and each ch back to the beginning to create the main stem.
- At approximately every fourth stitch, ch 5.
- Beginning in second ch work sl st, sc, hdc, sl st back to the main stem.
- Alternate the small grain branch from one side to the other.
- Continue until 7-8 grain branches are complete.
- Fasten off leaving a long attachment tail.
Berry Branches – Make 10
- Use burgundy, rust, mustard, dusty rose, and cream for berries with brown or olive stems.
- With stem color, ch 28.
- Sl st back along 5 ch.
- Ch 5 to form a side branch.
- At branch tip change to berry color.
- Work 6 sc in MR. (6 sts)
- Round 2: Sc around. (6 sts)
- Add a tiny pinch of fiberfill.
- Round 3: Dec 3 times. (3 sts)
- Close and return to the stem.
- Repeat at staggered points to make 4-6 berries per branch.
Wrapped Hoop
- Use approximately the lower two-thirds of a 70 cm hoop as the visible botanical frame.
- Secure tan yarn to the hoop with a tight knot.
- Wrap the yarn closely around the hoop so no metal or bare wood shows between wraps.
- Push the wraps together every 5 cm.
- Continue around the complete hoop.
- Knot securely at the back and weave the tail beneath at least 3 cm of wrapping.
Attaching the Hoop to the Branch
- Place the natural branch horizontally above the hoop.
- Position the hoop so its upper arc rises approximately 18-22 cm beneath the branch.
- Cut two 40 cm lengths of strong tan cord.
- Tie the left upper side of the hoop to the branch.
- Repeat on the right side.
- Add a third hidden center tie for reinforcement.
- Make sure the hoop remains centered beneath the branch.
Main Floral Layout
- Lay the wrapped hoop flat on a large work surface.
- Place the burnt-orange sunflower slightly left of center.
- Place the cream sunflower high on the right.
- Place the mustard sunflower lower and near the center.
- Position the dusty-rose rose beneath the orange sunflower.
- Place the cream rose below and slightly right of the cream sunflower.
- Fill the spaces between the five main flowers with the medium daisies.
- Scatter small accent flowers between the larger motifs.
- Allow flowers to overlap by approximately 2-5 cm.
Foliage Arrangement
- Slide large leaves beneath the outer edges of the flowers.
- Angle leaves outward rather than straight downward.
- Place olive and sage leaves near the cream and mustard flowers.
- Place brown and caramel leaves around the orange and burgundy motifs.
- Use small leaves to fill narrow gaps between flowers.
- Extend several leaves beyond the hoop edge to soften the circular outline.
- Leave approximately one-third of every large leaf visible.
Upper Botanical Stems
- Arrange the wheat and berry stems so they rise above the flower cluster.
- Place the tallest wheat stems near the center and upper-right area.
- Fan berry stems outward along both sides.
- Intermix several small leaves between the berries.
- If needed, insert thin floral wire behind the stems to keep them upright.
- Wrap the wire completely with matching yarn before installation.
- Sew the lower 5-8 cm of each stem securely behind the main flowers.
Attaching the Floral Cluster
- Photograph the completed arrangement before moving any pieces.
- Begin by sewing the three large sunflowers directly to the wrapped hoop.
- Attach each flower through its brown center rather than through the petal tips.
- Attach both roses beside the sunflowers.
- Sew medium daisies into the remaining large gaps.
- Add the large leaves behind the flowers.
- Add small leaves, accent flowers, wheat stems, and berry branches last.
- Reinforce areas where three or more motifs overlap with hidden stitches on the WS.
Cascading Crochet Cords – Make 11
- Make cords in cream, rust, mustard, burgundy, dusty rose, olive, and caramel.
- For the shortest cord, ch 65.
- For additional cords use foundation lengths of 75, 85, 95, 105, 115, 125, 135, 145, 155, and 170 ch.
- Beginning in second ch from hook, sl st back along each chain.
- Keep the slip stitches loose enough that the cords hang straight.
- Fasten off leaving 25 cm at the upper end for attachment.
Cord Flowers – Make 12
- Use contrasting fall colors.
- Work 5 sc in MR. (5 sts)
- Join with sl st.
- In each st work (sl st, ch 3, 2 dc, ch 3, sl st).
- Repeat around to form five petals.
- Fasten off leaving a long sewing tail.
- Sew the miniature flowers at different heights along selected hanging cords.
Cord Leaves – Make 16
- Ch 8.
- Beginning in second ch work sl st, sc, hdc, dc, hdc, sc, sl st.
- Work 3 sc in the final chain.
- Continue symmetrically down the opposite side.
- Join at the base.
- Fasten off leaving a 15 cm tail.
- Attach leaves individually or in pairs along the hanging cords.
Small Crochet Cord Beads – Make 14
- Round 1: Work 6 sc in MR. (6 sts)
- Round 2: Inc around. (12 sts)
- Rounds 3-4: Sc around. (12 sts)
- Add a tiny amount of fiberfill.
- Round 5: Dec around. (6 sts)
- Fasten off and close.
- Thread the hanging cord through the center using a yarn needle.
Large Yarn Tassels – Make 11
- Cut a piece of cardboard 16 cm tall.
- Wrap yarn around the cardboard 38-45 times.
- Thread a 30 cm yarn strand beneath the upper wraps and tie firmly.
- Cut through the loops along the bottom edge.
- Remove the cardboard.
- Wrap another yarn strand around the tassel approximately 2 cm below the top.
- Wrap 8-10 times and knot securely.
- Trim the lower edge evenly.
- Make tassels in cream, olive, dusty rose, mustard, rust, and burgundy to match the reference palette.
Beaded Tassel Tops
- Thread 2-4 wooden beads onto each hanging cord before attaching its tassel.
- Mix natural wood, caramel, and yarn-covered beads.
- Use larger beads near the tassel and smaller beads above them.
- Tie a secure knot beneath the final bead.
- Thread the tassel’s upper tie through the same knot.
- Secure with several additional stitches.
- Hide the tails inside the tassel head.
Attaching the Cascading Cords
- Arrange all 11 cords beneath the floral cluster before attaching them.
- Place the longest cords near the center.
- Gradually shorten the cords toward both sides to create a tapered silhouette.
- Do not make the lengths perfectly symmetrical.
- Tie the upper end of each cord around the wrapped lower hoop.
- Sew through the knot several times for reinforcement.
- Hide each upper attachment beneath a flower, leaf, or berry branch.
- Check that all tassels hang freely without touching one another.
Branch Hanging Cord
- Cut approximately 120 cm of strong natural tan cord.
- Tie one end securely approximately 8 cm from the left end of the branch.
- Tie the opposite end approximately 8 cm from the right end.
- Adjust the cord so the hanging point forms a shallow triangle above the branch.
- Test the wall hanging on a sturdy hook.
- If the branch tilts, shorten the cord on the lower side until level.
- Add hidden knots beneath the original knots for extra security.
Hidden Structural Reinforcement
- Cut three 100 cm lengths of strong cotton yarn.
- From the WS, run the first strand horizontally through the backs of the main flowers.
- Tie both ends securely to the hoop.
- Run the second strand diagonally from the upper-left floral cluster to the lower-right hoop.
- Run the third strand from upper-right to lower-left.
- Stitch the reinforcement strands to the backs of the large flower centers at every crossing.
- Keep all reinforcement invisible from the front.
- These strands carry the weight of the dimensional motifs instead of relying only on decorative joins.
Final Shaping
- Hang the completed piece on a sturdy wall hook.
- Allow it to settle for 20-30 minutes.
- Level the branch and hoop.
- Lift and separate the sunflower petals.
- Open the rose petals gently with your fingers.
- Fan the wheat and berry stems outward.
- Rotate leaves that face backward.
- Straighten every hanging cord and separate the tassels.
- Adjust the longest center tassel so it defines the lowest point of the finished composition.
Finishing
Weave all visible yarn tails into the backs of the corresponding motifs and check every attachment point before displaying the piece. The three large flower centers and the hoop should carry most of the structural load. Petals, small flowers, leaves, and berries should remain comparatively free so the arrangement retains its layered botanical depth.
Once hung, shape the arrangement by hand rather than pressing it flat. Pull selected leaves forward, separate overlapping petals, fan the tall stems above the flowers, and straighten the tassels below. The finished wall hanging should be dense across the floral center and gradually become lighter and more open toward the upper stems and lower cascading cords.
Tips for Success
- Build the wall hanging in visual layers: large flowers first, large foliage second, smaller flowers third, and delicate stems and berries last. This prevents tiny motifs from disappearing behind heavier pieces.
- Keep the largest sunflower centers firmly attached to both the hoop and hidden reinforcement strands. They provide useful structural anchor points for surrounding motifs.
- Block leaves and sunflower petals before assembly, but leave the roses unblocked so their rolled petals remain naturally dimensional.
- Stagger the tassel lengths before sewing the cords permanently. The central cords should form the deepest part of the cascading silhouette.
- If using floral wire inside the tall stems, cover every exposed wire end completely and bend the tip back on itself before wrapping it with yarn.
Common Mistakes to Avoid
- Do not attach all the floral weight only to the wrapped hoop yarn. Stitch through the structural hoop itself or around it securely so the wrapping cannot slide under load.
- Avoid arranging every flower at the same height. The reference relies on overlapping flowers at several levels to create a natural bouquet effect.
- Do not make all cascading cords equal in length. A staggered arrangement creates the distinctive tapered lower silhouette.
- Avoid overcrowding the upper hoop with heavy flowers. Keep taller areas lighter by using wheat stems, berry branches, and smaller leaves.
- Do not trim tassels until the wall hanging has been suspended. Hanging first reveals which tassels need slight length corrections.
Ways to Customize This Pattern
- Create a woodland version by replacing several small flowers with crocheted acorns, miniature mushrooms, and oak leaves.
- Use cream, beige, caramel, and muted olive for a softer neutral farmhouse wall hanging.
- Replace the cream sunflower with a second mustard flower and increase the burgundy accents for a deeper traditional fall palette.
- Make a smaller version on a 40 cm hoop using two large flowers, one rose, six hanging cords, and six tassels.
- Add tiny warm-white battery lights behind the hoop, keeping the battery pack accessible and using only cool-running lights suitable for textile decor.
Frequently asked questions
Use the hidden horizontal and diagonal reinforcement strands described in the pattern. The large flower centers should be sewn to those supports as well as the hoop. This distributes the weight of the flowers and tassels across the frame instead of concentrating it on a few decorative stitches.
Yes. A smooth wooden dowel approximately 85-95 cm long works well and produces a cleaner appearance. Wrap the ends with tan yarn or stain the dowel if you want it to coordinate with the autumn palette.
Use two separate petal layers for each sunflower, roll the roses gradually rather than tightly throughout, and attach flowers through their centers instead of sewing down their outer petals. After hanging, pull individual petals slightly forward to restore depth.
Yes. Seven or nine tassels can still create a full cascading effect. Keep the longest tassel near the center and gradually shorten the surrounding cords so the lower edge remains visually balanced.
Because the finished design combines a rigid hoop, branch, beads, dimensional motifs, and optional wire, spot cleaning is preferable. If individual motifs become heavily soiled, detachable construction is useful: secure flowers with removable ties during assembly so selected pieces can be washed and reblocked separately.
The finished Autumn Floral Crochet Wall Hanging Pattern