Autumn Leaf Crochet Scarf with Braided Vines
Advanced
For experienced crocheters who enjoy complex shaping, fine detail, and ambitious construction
Single-Day Project
A satisfying project you can complete in a single afternoon or evening.
Handmade Gift
A beautiful keepsake — free forever. Read online or print at home.
About This Autumn Leaf Crochet Scarf with Braided Vines
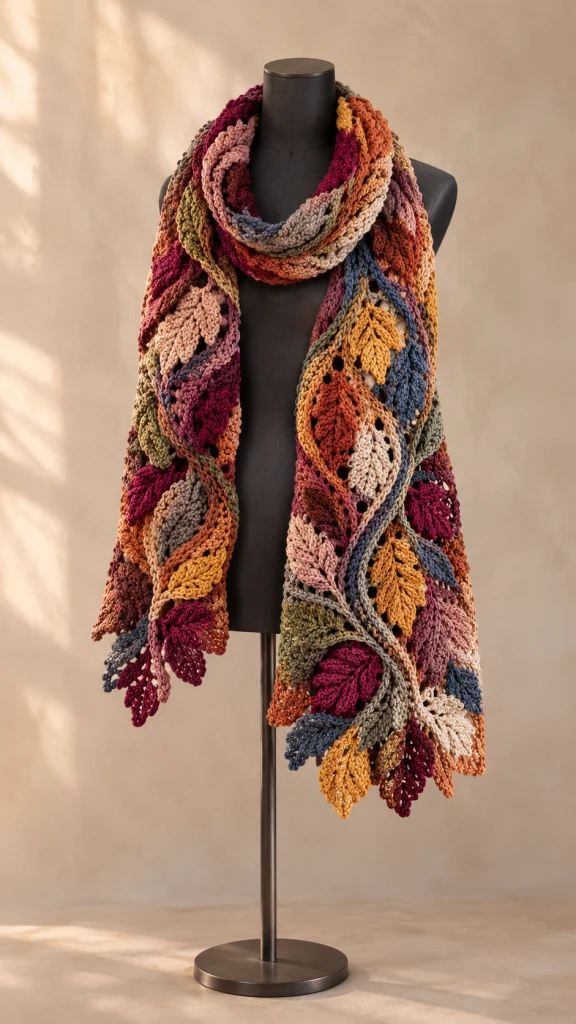
This autumn leaf crochet scarf pattern combines overlapping leaf motifs, winding paired vines and an open mesh foundation. Burgundy, rust, mustard, olive, dusty rose, oatmeal and slate blue give the long scarf the layered color and texture of autumn foliage.
The leaves are crocheted separately around a foundation chain, edged with small picots and finished with raised central veins. Three staggered columns cover the mesh, while paired crochet cords travel between them. The projecting leaf tips create an irregular outline at the sides and ends.
Allow approximately 35–45 hours for crocheting, blocking and hand assembly. This advanced project suits crocheters who enjoy detailed finishing, working into both sides of a chain and balancing decorative motifs across a flexible fabric. Instructions use US crochet terms.
Materials
- DK / light weight 3 yarn in a soft wool blend, approximately 700 g or 1,540 m total, based on 220 m per 100 g.
- Olive: 200 g, including the mesh foundation, eight leaves and two vine cords.
- Burgundy: 80 g for ten leaves.
- Rust: 100 g for ten leaves and one vine cord.
- Mustard: 60 g for eight leaves.
- Dusty rose: 60 g for eight leaves.
- Oatmeal: 100 g for eight leaves and two vine cords.
- Slate blue: 100 g for eight leaves and one vine cord.
- 4 mm crochet hook for the foundation, leaves and surface veins, or size needed for gauge.
- 4.5 mm crochet hook for the vine cords, adjusted if necessary to match cord gauge.
- Tapestry needle, scissors and removable stitch markers.
- Measuring tape, blocking mats and rustproof pins.
- Optional kitchen scale for tracking yarn use across the leaf colors.
Abbreviations
chchainscsingle crochethdchalf double crochetdcdouble crochettrtreble crochetsl stslip stitchststitchRSright sidepicotchain 3, slip stitch into the top of the single crochet just madeMesh Foundation
- With olive and the 4 mm hook, ch 50. Row 1: sc in the second ch from the hook and in each remaining ch. Turn. You have 49 sc.
- Row 2: ch 4, counting as the first dc and ch 1; skip the first sc and the next sc, dc in the following sc. Repeat [ch 1, skip 1 sc, dc in the next sc] 23 times. Turn. You have 25 dc and 24 ch-1 spaces.
- Row 3: ch 4, counting as the first dc and ch 1; skip the first dc and first ch-1 space, dc in the next dc. Repeat [ch 1, skip the next ch-1 space, dc in the next dc] 23 times, placing the final dc in the third chain of the previous turning chain. Turn. You have 25 dc and 24 ch-1 spaces.
- Rows 4–121: repeat Row 3 for 118 more rows. Every row has 25 dc and 24 ch-1 spaces. There are 120 mesh rows above the single crochet foundation row.
- Fasten off. Mark the Row 1 end as the top and the Row 121 end as the bottom. Choose one face as the RS. Wet-block to approximately 181 × 24.5 cm without pulling the openings out of shape.
Pointed Leaf Motifs — Make 60
- Make ten burgundy, ten rust, eight mustard, eight olive, eight dusty rose, eight oatmeal and eight slate blue leaves. Leave a 25 cm starting tail on each leaf for sewing.
- Foundation: with the 4 mm hook, ch 19. Number the chains from the slip-knot end: chain 1 is beside the slip knot and chain 19 is beside the hook. Work into one loop of each chain on the outward pass, keeping the opposite loops available for the return pass.
- Round 1, first side: sc in the second chain from the hook and in the next chain, hdc in each of the next 2 chains, dc in each of the next 3 chains, tr in each of the next 6 chains, dc in each of the next 3 chains, hdc in the next chain. These 17 stitches occupy chains 18 through 2.
- Round 1, pointed end: in chain 1 work [sc, ch 2, sc]. This adds 2 sc and one ch-2 point.
- Round 1, return side: work into the unused loops on the opposite side of the foundation. Starting in chain 2, hdc in the next chain, dc in each of the next 3 chains, tr in each of the next 6 chains, dc in each of the next 3 chains, hdc in each of the next 2 chains, sc in each of the next 2 chains. This adds 17 stitches and ends in chain 18.
- Round 1, stem end: work 1 additional sc into chain 18, then sl st to the first sc. You have 37 stitches plus one ch-2 point: 17 stitches on each side, 2 point stitches and 1 additional stem stitch.
- Round 2, first edge: ch 1, which does not count as a stitch. Sc in each of the first 2 stitches. Repeat [sc in each of the next 3 stitches, picot] 5 times. You have worked 17 sc and 5 picots along the first side.
- Round 2, point: sc in the next sc; work [sc, ch 3, sc] in the ch-2 point; sc in the next sc. This adds 4 sc and one ch-3 point.
- Round 2, second edge: repeat [sc in each of the next 3 stitches, picot] 5 times, then sc in each of the next 2 stitches. Sc in the final stem stitch and sl st to the first sc. You have 39 sc, 10 side picots and one ch-3 point. Picot chains and joining slip stitches are excluded from the sc count.
- Fasten off with a 30 cm tail. Gently open out the two sides. The taller middle stitches create the broad blade; the smaller stitches taper both ends.
Raised Leaf Veins
- Hold a leaf RS facing you with its narrow stem end nearest you. Use the same color as the leaf and keep the working yarn beneath the fabric.
- Insert the hook through the foundation at chain 18, draw up a loop, then surface sl st through each successive foundation chain toward chain 1. Make 18 surface slip stitches in total, one through each foundation chain from 18 through 1. Keep the stitches loose enough that the leaf remains flat.
- Fasten off at the pointed end and take the tail to the wrong side. Weave in the vein ends without gathering the central chain.
- Repeat for all 60 leaves. Wet-block each leaf to approximately 12–13 × 6–7 cm, pinning the main point and lightly opening the side picots. Keep the sewing tails available.
Paired Vine Cords — Make Six
- Make two olive cords, two oatmeal cords, one slate blue cord and one rust cord. Use the 4.5 mm hook and a relaxed tension. Target blocked cord gauge is 22 slip stitches per 10 cm.
- For each cord, ch 421. Sl st in the back bump of the second chain from the hook and in every remaining chain. You have 420 sl st. Fasten off, leaving a 30 cm sewing tail at each end.
- Wet-block each cord to approximately 191 cm. If your cord swatch gives a different gauge, use this adjustment before making the full cords: required slip stitches equal 191 multiplied by your blocked slip stitches per centimetre, rounded to the nearest whole number; chain one more than that number.
- Pair one olive with one oatmeal cord, the second olive with the rust cord, and the second oatmeal with the slate blue cord. Lay each pair together and cross its two strands approximately every 12 cm. These paired, crossing strands form the braided vine effect after sewing.
Leaf Layout and Attachment
- Lay the blocked mesh RS up, top end away from you. Mark three column centerlines at 4.25 cm, 12.25 cm and 20.25 cm from the left edge. Each column receives 20 leaves.
- Mark the first attachment level on mesh Row 3. For levels 2–20, add 6 rows each time. The attachment rows are 3, 9, 15, 21, 27, 33, 39, 45, 51, 57, 63, 69, 75, 81, 87, 93, 99, 105, 111 and 117.
- Use this color key: B = burgundy, R = rust, M = mustard, O = olive, P = dusty rose, C = oatmeal and S = slate blue. These letters describe the layout only.
- For levels 1–10, place the left, center and right leaves respectively as follows: 1: B–M–S; 2: P–R–O; 3: C–B–R; 4: O–S–P; 5: R–C–M; 6: B–P–O; 7: S–M–R; 8: C–O–B; 9: M–R–P; 10: B–C–S.
- For levels 11–20, repeat the same ten-level color layout. This uses all 60 leaves in the stated color quantities.
- At each level, place the stem of the left leaf on its column centerline at the marked row, the center leaf one mesh row farther toward the bottom, and the right leaf two mesh rows farther toward the bottom. All leaf tips point toward the bottom end.
- Alternate the lean at successive levels: at odd-numbered levels angle the left and center leaves approximately 20 degrees left and the right leaf 20 degrees right; at even-numbered levels reverse all three angles. Allow adjacent leaf edges to overlap. Keep the overall decorated width close to 30 cm.
- Working from level 20 back toward level 1, sew each leaf stem securely to a mesh dc junction. Then sew along the first 5–6 cm of its central foundation chain, catching mesh stitches beneath it. Add one discreet tack on each side of the blade where it touches a mesh junction. Leave the final 4–5 cm and the picot edges free.
- Check the reverse after each level. Spread sewing stitches over several mesh junctions, keeping all tails secure and the foundation relaxed. The upper leaves should overlap the stems of the leaves below them.
Vine Placement and Sewing
- Place one paired vine beside each leaf column. Measure positions from the left edge of the mesh. At 0, 30, 60, 90, 120, 150 and 181 cm down the foundation, position the left vine at 2.25, 6.25, 2.25, 6.25, 2.25, 6.25 and 2.25 cm respectively.
- At the same length marks, position the center vine at 10.25, 14.25, 10.25, 14.25, 10.25, 14.25 and 10.25 cm. Position the right vine at 18.25, 22.25, 18.25, 22.25, 18.25, 22.25 and 18.25 cm.
- Connect these marked positions with smooth curves. Keep the paired strands crossing approximately every 12 cm. Run the vines over the leaf stems and between the broad blades, lifting a free leaf edge where necessary.
- Distribute the spare cord length evenly along the curves and crossings. Fold the last 2–3 cm of each cord beneath a nearby leaf at each end; adjust the concealed length as needed without stretching the mesh.
- Using matching yarn, sew each strand to mesh junctions approximately every 3 cm and at every crossing. Where a strand travels over a leaf, catch the leaf and the foundation together. Keep the sewing loose enough for the scarf to bend.
Finishing
Weave every remaining tail through several stitches on the wrong side, changing direction once before trimming. Check each leaf stem and every vine crossing with a gentle tug. Reinforce any attachment that pulls on a single mesh strand.
Give the assembled scarf a gentle wet block according to the yarn label. Support the whole scarf when lifting it, press out water in towels and lay it flat. Arrange the free leaf tips with your fingers, keeping the mesh close to its original measurements. The completed scarf should measure approximately 190 × 30 cm including the projecting leaves.
Once dry, drape the scarf loosely around your neck and let the leaves settle. Smooth any trapped tips by hand so the layers remain visible.
Tips for Success
- Keep a paper label with each group of ten layout levels so the color sequence stays organized during sewing.
- Use a larger hook for surface veins if they shorten the foundation chain or cup the leaf.
- Pin several leaf levels before sewing. Small differences in leaf width are easier to balance across a group.
- Spread attachment stitches across mesh intersections; this supports the layered motifs without making hard knots.
- Check the scarf draped over a chair after attaching each vine. The mesh should hang without lengthwise puckers.
Common Mistakes to Avoid
- Working into both loops of the foundation chain on the outward leaf pass makes the return difficult. Reserve an unused loop for the second side.
- Counting picot chains as edging stitches changes the leaf count. Round 2 contains 39 sc, with decorative chains counted separately.
- Placing the final mesh dc into the fourth turning chain enlarges the edge opening. Work into the third turning chain.
- Sewing down every leaf edge flattens the texture. Secure the stem, lower vein and two side points while keeping the tip free.
- Pulling vine cords taut narrows the scarf. Pin the full curved route before making the first permanent stitches.
Ways to Customize This Pattern
- For a shorter scarf, work the mesh through Row 97 and make 16 levels of three leaves, using attachment rows 3 through 93 in six-row intervals. Fit the cords to the shorter foundation before sewing.
- For a narrower scarf, ch 34 and work 33 sc in Row 1. The mesh rows then contain 17 dc and 16 ch-1 spaces. Use two leaf columns, 40 leaves and two paired vines.
- Use shades of green with pale central veins for a woodland version, keeping the yarn weight and motif dimensions consistent.
- For a quieter texture, omit the ten side picots on every leaf while retaining all 39 sc and the ch-3 tip in Round 2.
- Add contrast veins to selected leaves using small amounts of a neighboring palette color. Keep their tension loose to preserve the leaf shape.
Frequently asked questions
No. A narrow crochet mesh foundation supports 60 separately made leaves and three paired vines. This backing distributes the weight and keeps the long scarf stable while allowing the leaves to overlap.
Yes, but the foundation, leaves and cords must be swatched together. Thicker yarn increases the scarf’s weight and width substantially. To retain these measurements, use DK yarn and adjust the hook to the blocked mesh gauge.
Each leaf is approximately 12–13 cm long, while attachment levels are about 9 cm apart. The overlap hides the attachment areas and creates the dense foliage effect. The one-row offsets between columns keep the layout from forming straight horizontal bands.
No additional border is required. Its outer dc columns and foundation row provide attachment edges, and the projecting leaves form the visible outline. Keep the first and last dc of every mesh row even for a tidy reverse.
Follow the yarn label. For a washable wool blend, hand-wash gently, support the scarf when wet and dry it flat. Avoid wringing or hanging it wet, which can stretch the mesh and concentrate weight at the leaf attachments.
The finished Autumn Leaf Crochet Scarf with Braided Vines

