Autumn Leaf Mandala Crochet Centerpiece
Advanced
For experienced crocheters who enjoy complex shaping, fine detail, and ambitious construction
Single-Day Project
A satisfying project you can complete in a single afternoon or evening.
Handmade Gift
A beautiful keepsake — free forever. Read online or print at home.
About This Autumn Leaf Mandala Crochet Centerpiece
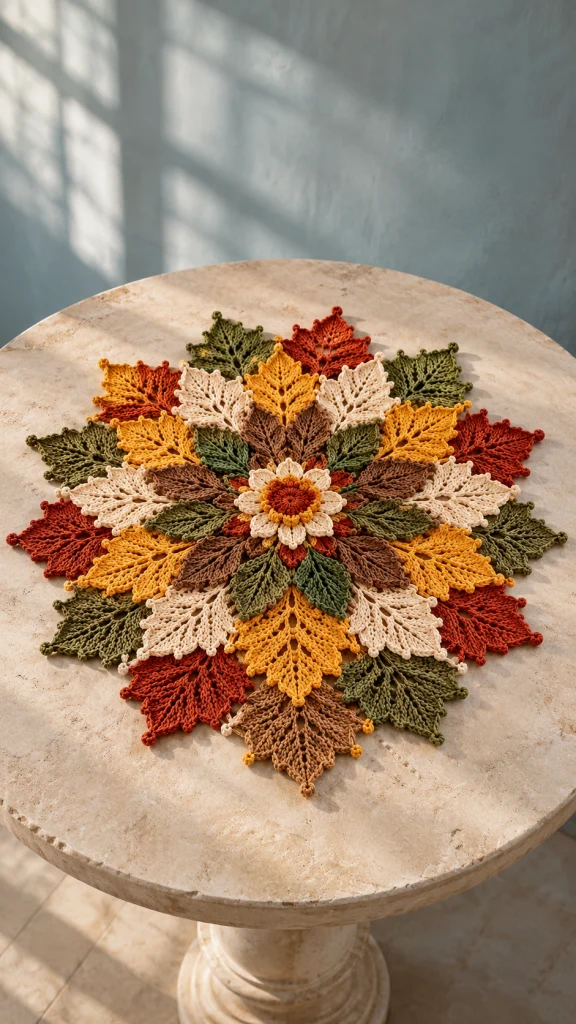
This autumn leaf mandala crochet pattern brings rust, mustard, olive, cream, and chestnut leaves together around a raised flower. Three overlapping rings give the centerpiece its full outline, while open central veins, embroidered branches, and small picots add definition to each leaf.
The photographed project is a decorative table centerpiece. This original interpretation combines separate shaped leaves with a concealed circular backing and a lightly stuffed flower center. Its sculptural construction draws on amigurumi techniques, with flat foliage replacing the usual character parts.
Allow approximately 25–35 hours for crocheting, surface embroidery, blocking, and careful assembly. This advanced project suits crocheters comfortable with shaping around chain spaces, working into row ends, and arranging multiple pieces. Finished measurements are estimates and depend on your blocked motifs.
Materials
- Fine / sport weight cotton in rust: approximately 150 m.
- Fine / sport weight cotton in mustard: approximately 150 m.
- Fine / sport weight cotton in olive: approximately 180 m.
- Fine / sport weight cotton in cream: approximately 120 m.
- Fine / sport weight cotton in chestnut: approximately 180 m, including the backing.
- 2.5 mm crochet hook.
- Optional 2.25 mm hook for a firmer flower center.
- A small pinch of polyester stuffing for the flower center.
- Tapestry needle for joining and surface embroidery.
- Removable stitch markers.
- Scissors.
- Blocking mat, rustproof pins, and a ruler.
- Plain paper and pencil for marking twelve equally spaced assembly positions.
Abbreviations
MRmagic ringchchainsl stslip stitchscsingle crochethdchalf double crochetdcdouble crochetinc2 single crochet in one stitchdecsingle crochet 2 stitches togetherhdc2toghalf double crochet 2 stitches togetherststitchpicotchain 3, slip stitch in the first chainConcealed Circular Backing
- Round 1, chestnut: Make an MR, ch 2, work 12 dc into the ring, and join with a sl st to the first dc. Close the ring firmly. (12 dc)
- Round 2: Ch 2, work 2 dc in every st, and join. (24 dc)
- Round 3: Ch 2, repeat [dc in next st, 2 dc in next st] 12 times, and join. (36 dc)
- Round 4: Ch 2, repeat [dc in next 2 st, 2 dc in next st] 12 times, and join. (48 dc)
- Round 5: Ch 2, repeat [dc in next 3 st, 2 dc in next st] 12 times, and join. (60 dc)
- Round 6: Ch 2, repeat [dc in next 4 st, 2 dc in next st] 12 times, and join. (72 dc)
- Round 7: Ch 2, repeat [dc in next 5 st, 2 dc in next st] 12 times, and join. (84 dc)
- Round 8: Ch 2, repeat [dc in next 6 st, 2 dc in next st] 12 times, and join. Fasten off and weave in the end. (96 dc)
Block the backing flat to approximately 12–13 cm across. Mark twelve positions around its edge, with eight stitches between successive markers.
Large Outer Leaves — Make 12
Make four olive, four rust, two mustard, one cream, and one chestnut. Start each leaf at its narrow base.
- Row 1: Ch 2; in the second ch from the hook work [hdc, ch 1, hdc]. Turn. (2 hdc and one ch-1 space)
- Row 2: Ch 1, hdc in the first st, [hdc, ch 1, hdc] in the central space, hdc in the last st. Turn. (4 hdc and one ch-1 space)
- Row 3: Ch 1, hdc in next 2 st, [hdc, ch 1, hdc] in the space, hdc in next 2 st. Turn. (6 hdc and one ch-1 space)
- Row 4: Ch 1, hdc in next 3 st, [hdc, ch 1, hdc] in the space, hdc in next 3 st. Turn. (8 hdc and one ch-1 space)
- Row 5: Ch 1, hdc in next 4 st, [hdc, ch 1, hdc] in the space, hdc in next 4 st. Turn. (10 hdc and one ch-1 space)
- Row 6: Ch 1, hdc in next 5 st, [hdc, ch 1, hdc] in the space, hdc in next 5 st. Turn. (12 hdc and one ch-1 space)
- Row 7: Ch 1, hdc in next 6 st, [hdc, ch 1, hdc] in the space, hdc in next 6 st. Turn. (14 hdc and one ch-1 space)
- Row 8: Ch 1, hdc in next 7 st, [hdc, ch 1, hdc] in the space, hdc in next 7 st. Turn. (16 hdc and one ch-1 space)
- Row 9: Ch 1, hdc in next 8 st, [hdc, ch 1, hdc] in the space, hdc in next 8 st. Turn. (18 hdc and one ch-1 space)
- Row 10: Ch 1, hdc in next 9 st, [hdc, ch 1, hdc] in the space, hdc in next 9 st. Turn. (20 hdc and one ch-1 space)
- Row 11: Ch 1, hdc in next 10 st, [hdc, ch 1, hdc] in the space, hdc in next 10 st. Turn. (22 hdc and one ch-1 space)
- Row 12: Ch 1, hdc2tog, hdc in next 9 st, ch 1 across the central space, hdc in next 9 st, hdc2tog. Turn. (20 hdc and one ch-1 space)
- Row 13: Ch 1, hdc2tog, hdc in next 8 st, ch 1 across the space, hdc in next 8 st, hdc2tog. Turn. (18 hdc and one ch-1 space)
- Row 14: Ch 1, hdc2tog, hdc in next 7 st, ch 1 across the space, hdc in next 7 st, hdc2tog. Turn. (16 hdc and one ch-1 space)
- Row 15: Ch 1, hdc2tog, hdc in next 6 st, ch 1 across the space, hdc in next 6 st, hdc2tog. Turn. (14 hdc and one ch-1 space)
- Row 16: Ch 1, hdc2tog, hdc in next 5 st, ch 1 across the space, hdc in next 5 st, hdc2tog. Turn. (12 hdc and one ch-1 space)
- Row 17: Ch 1, hdc2tog, hdc in next 4 st, ch 1 across the space, hdc in next 4 st, hdc2tog. Turn. (10 hdc and one ch-1 space)
- Row 18: Ch 1, hdc2tog, hdc in next 3 st, ch 1 across the space, hdc in next 3 st, hdc2tog. Turn. (8 hdc and one ch-1 space)
- Row 19: Ch 1, hdc2tog, hdc in next 2 st, ch 1 across the space, hdc in next 2 st, hdc2tog. Turn. (6 hdc and one ch-1 space)
- Row 20: Ch 1, hdc2tog, hdc in next st, ch 1 across the space, hdc in next st, hdc2tog. Turn. (4 hdc and one ch-1 space)
- Row 21: Ch 1, hdc2tog, ch 1 across the space, hdc2tog. Turn. (2 hdc and one ch-1 space)
- Row 22: Ch 1, hdc2tog across the two remaining hdc, leaving the central space unworked. Do not turn or fasten off. (1 hdc)
Medium Middle Leaves — Make 12
Make four cream, four mustard, two olive, one rust, and one chestnut.
- Row 1: Ch 2; in the second ch work [hdc, ch 1, hdc]. Turn. (2 hdc and one ch-1 space)
- Row 2: Ch 1, hdc in next st, [hdc, ch 1, hdc] in the space, hdc in next st. Turn. (4 hdc and one ch-1 space)
- Row 3: Ch 1, hdc in next 2 st, [hdc, ch 1, hdc] in the space, hdc in next 2 st. Turn. (6 hdc and one ch-1 space)
- Row 4: Ch 1, hdc in next 3 st, [hdc, ch 1, hdc] in the space, hdc in next 3 st. Turn. (8 hdc and one ch-1 space)
- Row 5: Ch 1, hdc in next 4 st, [hdc, ch 1, hdc] in the space, hdc in next 4 st. Turn. (10 hdc and one ch-1 space)
- Row 6: Ch 1, hdc in next 5 st, [hdc, ch 1, hdc] in the space, hdc in next 5 st. Turn. (12 hdc and one ch-1 space)
- Row 7: Ch 1, hdc in next 6 st, [hdc, ch 1, hdc] in the space, hdc in next 6 st. Turn. (14 hdc and one ch-1 space)
- Row 8: Ch 1, hdc in next 7 st, [hdc, ch 1, hdc] in the space, hdc in next 7 st. Turn. (16 hdc and one ch-1 space)
- Row 9: Ch 1, hdc in next 8 st, [hdc, ch 1, hdc] in the space, hdc in next 8 st. Turn. (18 hdc and one ch-1 space)
- Row 10: Ch 1, hdc2tog, hdc in next 7 st, ch 1 across the space, hdc in next 7 st, hdc2tog. Turn. (16 hdc and one ch-1 space)
- Row 11: Ch 1, hdc2tog, hdc in next 6 st, ch 1 across the space, hdc in next 6 st, hdc2tog. Turn. (14 hdc and one ch-1 space)
- Row 12: Ch 1, hdc2tog, hdc in next 5 st, ch 1 across the space, hdc in next 5 st, hdc2tog. Turn. (12 hdc and one ch-1 space)
- Row 13: Ch 1, hdc2tog, hdc in next 4 st, ch 1 across the space, hdc in next 4 st, hdc2tog. Turn. (10 hdc and one ch-1 space)
- Row 14: Ch 1, hdc2tog, hdc in next 3 st, ch 1 across the space, hdc in next 3 st, hdc2tog. Turn. (8 hdc and one ch-1 space)
- Row 15: Ch 1, hdc2tog, hdc in next 2 st, ch 1 across the space, hdc in next 2 st, hdc2tog. Turn. (6 hdc and one ch-1 space)
- Row 16: Ch 1, hdc2tog, hdc in next st, ch 1 across the space, hdc in next st, hdc2tog. Turn. (4 hdc and one ch-1 space)
- Row 17: Ch 1, hdc2tog, ch 1 across the space, hdc2tog. Turn. (2 hdc and one ch-1 space)
- Row 18: Ch 1, hdc2tog across the two hdc, leaving the space unworked. Do not turn or fasten off. (1 hdc)
Small Inner Leaves — Make 12
Make six olive and six chestnut.
- Row 1: Ch 2; in the second ch work [hdc, ch 1, hdc]. Turn. (2 hdc and one ch-1 space)
- Row 2: Ch 1, hdc in next st, [hdc, ch 1, hdc] in the space, hdc in next st. Turn. (4 hdc and one ch-1 space)
- Row 3: Ch 1, hdc in next 2 st, [hdc, ch 1, hdc] in the space, hdc in next 2 st. Turn. (6 hdc and one ch-1 space)
- Row 4: Ch 1, hdc in next 3 st, [hdc, ch 1, hdc] in the space, hdc in next 3 st. Turn. (8 hdc and one ch-1 space)
- Row 5: Ch 1, hdc in next 4 st, [hdc, ch 1, hdc] in the space, hdc in next 4 st. Turn. (10 hdc and one ch-1 space)
- Row 6: Ch 1, hdc in next 5 st, [hdc, ch 1, hdc] in the space, hdc in next 5 st. Turn. (12 hdc and one ch-1 space)
- Row 7: Ch 1, hdc in next 6 st, [hdc, ch 1, hdc] in the space, hdc in next 6 st. Turn. (14 hdc and one ch-1 space)
- Row 8: Ch 1, hdc2tog, hdc in next 5 st, ch 1 across the space, hdc in next 5 st, hdc2tog. Turn. (12 hdc and one ch-1 space)
- Row 9: Ch 1, hdc2tog, hdc in next 4 st, ch 1 across the space, hdc in next 4 st, hdc2tog. Turn. (10 hdc and one ch-1 space)
- Row 10: Ch 1, hdc2tog, hdc in next 3 st, ch 1 across the space, hdc in next 3 st, hdc2tog. Turn. (8 hdc and one ch-1 space)
- Row 11: Ch 1, hdc2tog, hdc in next 2 st, ch 1 across the space, hdc in next 2 st, hdc2tog. Turn. (6 hdc and one ch-1 space)
- Row 12: Ch 1, hdc2tog, hdc in next st, ch 1 across the space, hdc in next st, hdc2tog. Turn. (4 hdc and one ch-1 space)
- Row 13: Ch 1, hdc2tog, ch 1 across the space, hdc2tog. Turn. (2 hdc and one ch-1 space)
- Row 14: Ch 1, hdc2tog across the two hdc, leaving the space unworked. Do not turn or fasten off. (1 hdc)
Leaf Edging — Work on All 36 Leaves
Work with the leaf color already attached. For these instructions, a side position means one row end. Count positions anew on each side, beginning at the tip on the first side and at the base on the second.
- Edging round 1, large leaf: Ch 1, work [sc, picot, sc] into the final tip st; work 1 sc into each of 22 row ends down the first side, adding a picot after positions 3, 6, 9, 12, 15, 18, and 21. Work 1 sc into the foundation ch at the base. Work 1 sc into each of 22 row ends up the second side, adding a picot after positions 3, 6, 9, 12, 15, 18, and 21. Join to the first sc. Fasten off with a 45 cm sewing tail. (47 sc and 15 picots)
- Edging round 1, medium leaf: Ch 1, work [sc, picot, sc] into the tip st; work 1 sc into each of 18 row ends down the first side, adding a picot after positions 3, 6, 9, 12, and 15. Work 1 sc into the foundation ch. Work 1 sc into each of 18 row ends up the second side, adding a picot after positions 3, 6, 9, 12, and 15. Join and fasten off with a 40 cm tail. (39 sc and 11 picots)
- Edging round 1, small leaf: Ch 1, work [sc, picot, sc] into the tip st; work 1 sc into each of 14 row ends down the first side, adding a picot after positions 3, 6, 9, and 12. Work 1 sc into the foundation ch. Work 1 sc into each of 14 row ends up the second side, adding a picot after positions 3, 6, 9, and 12. Join and fasten off with a 35 cm tail. (31 sc and 9 picots)
The edging counts exclude the chains and slip stitches forming each picot. Distribute stitches into the row ends without splitting the central vein.
Embroidered Branch Veins
- Surface pass 1, each large leaf: With a separate strand of chestnut on mustard or cream, mustard on rust, and cream on olive or chestnut, embroider six diagonal branches on each side. Start branches beside the central space at rows 3, 6, 9, 12, 15, and 18; angle each toward the tip and finish one stitch inside the edge two rows farther along. Use short backstitches through the fabric. (12 branches per leaf)
- Surface pass 1, each medium leaf: Use the same contrast-color rule. Start branches at rows 3, 6, 9, 12, and 15 on both sides, finishing two rows nearer the tip and one stitch inside the edge. Secure the ends on the underside. (10 branches per leaf)
- Surface pass 1, each small leaf: Use cream sparingly. Start branches at rows 3, 6, 9, and 12 on both sides, finishing one row nearer the tip and one stitch inside the edge. Secure the ends underneath. (8 branches per leaf)
Leave every central chain space open. Keep embroidery loose enough that the leaf remains flat.
Raised Flower Center
Work in a continuous spiral with rust. Mark the first stitch of each round.
- Round 1: Work 6 sc in an MR. Close the ring. (6 sc)
- Round 2: Inc in every st. (12 sc)
- Round 3: Repeat [sc in next st, inc] 6 times. (18 sc)
- Round 4: Repeat [sc in next 2 st, inc] 6 times. (24 sc)
- Round 5: Sc in every st. (24 sc)
- Round 6: Repeat [sc in next 2 st, dec] 6 times. Add a small pinch of stuffing, shaping a shallow dome. (18 sc)
- Round 7: Repeat [sc in next st, dec] 6 times. (12 sc)
- Round 8: Dec 6 times. Fasten off with a 30 cm tail, thread through the front loops of the remaining stitches, pull closed, and retain the tail for assembly. (6 sc before closure)
Cream Flower Petals — Make 12
- Foundation: With cream, ch 9. (9 ch)
- Round 1: Starting in the second ch from the hook, sc in next 2 ch, hdc in next 2 ch, dc in next 3 ch, and 5 dc in the last ch. Along the unused foundation loops on the opposite side, dc in next 3 ch, hdc in next 2 ch, and sc in next 2 ch. Join to the first sc and fasten off with a 25 cm sewing tail. (19 st: 4 sc, 4 hdc, and 11 dc)
The narrow starting end is the petal base; the five-double-crochet end is the rounded tip. Do not stuff the petals.
Mustard Flower Collar
- Foundation: With mustard, ch 24 and join with a sl st to the first ch without twisting. (24 ch)
- Round 1: Ch 1, sc in every ch, and join to the first sc. (24 sc)
- Round 2: Repeat [sc in next st, picot, sc in next st] 12 times. Join to the first sc and fasten off with a 35 cm tail. (24 sc and 12 picots)
Finishing
Wet-block the backing and embroidered leaves separately. Open the central spaces gently and pin each tip and picot into position. Keep leaves of the same size consistent, and let every piece dry completely before sewing.
Draw twelve radial lines, 30 degrees apart, on paper and place the backing over their center. Arrange the large leaves with their narrow bases approximately 5 cm from the center and their tips pointing outward. Use this clockwise color sequence: olive, rust, olive, mustard, rust, olive, chestnut, rust, olive, mustard, rust, cream. Overlap neighboring sides slightly. Sew the basal 2 cm of each leaf securely to the backing with its matching tail.
Place the medium leaves above the first ring, with their bases approximately 3 cm from the center. Rotate this ring 15 degrees so its tips fall between the outer tips. Use this sequence: cream, mustard, cream, mustard, olive, cream, mustard, chestnut, cream, mustard, olive, rust. Sew each basal 2 cm to the backing, lifting the large leaves as needed to keep the stitches concealed.
Arrange the small leaves with their bases approximately 1 cm from the center, alternating olive and chestnut. Align this ring with the large leaves. Sew each basal 1.5 cm through to the backing. Add two small concealed tacks between each leaf and the layer immediately beneath it, approximately halfway along its length. Leave the pointed ends free.
Arrange six cream petals around the center with their bases touching. Sew their bases through to the backing. Add the remaining six above them, rotated so each lies between two lower petals. Secure the inner half of each petal while leaving its rounded tip free.
Place the rust dome over the petal bases with its closed underside facing down. Sew around its underside through the petal bases and backing. Fit the mustard collar around the dome with its picots facing outward; sew the collar’s foundation edge to the dome and tack its lower edge to the petal bases. Add seven small mustard French knots to the top of the rust dome for pollen detail.
Check the underside, secure all sewing ends, and weave them through several stitches. Set the centerpiece flat and adjust the leaves by hand. The finished piece should feel supported through the center, with relaxed, slightly raised leaf tips.
Tips for Success
- Place a marker on each side of the central space while learning the leaf construction; increasing rows add one stitch to each half.
- On decreasing rows, chain across the central opening without working into it. This keeps the vein open while the outer edges taper.
- Block one completed leaf before making the full set. A tight edging can shorten the leaf even when its row count is correct.
- Keep the embroidery needle clear of the central openings so the contrast branches appear to grow from either side.
- Photograph the pinned arrangement before sewing; use it to preserve the color order and overlap as pieces are lifted.
Common Mistakes to Avoid
- Counting the central chain as an hdc shifts the shaping. Count the two halves separately and record the chain space on its own.
- Working extra stitches into the central space during the decrease section prevents tapering. Only chain 1 across that space.
- Adding two edging stitches to every row end can create a ruffle. Use the specified single stitch per row end and block gently.
- Sewing all leaf edges down flattens the layered effect. Attach the bases and the two support tacks, leaving tips free.
- Overstuffing the flower makes it stand too high. Use only enough filling to hold a shallow dome.
Ways to Customize This Pattern
- Replace rust with burgundy and mustard with ochre while retaining cream and olive for contrast.
- Use a single leaf color and embroider the branches in two nearby shades for a quieter botanical arrangement.
- Make the entire piece in finer cotton with a smaller hook for a smaller centerpiece; sample all three leaf sizes before assembly.
- Omit the stuffing from the flower center for a flatter display, sewing the closed center down gently.
- For subtle two-tone leaves, change color after the widest row by completing the last yarn-over of its final hdc with the new color; edge in the darker shade.
Frequently asked questions
It is a layered crochet centerpiece with a small stuffed flower center. The leaves use shaped rows and open central veins, and the separate pieces are sewn onto a concealed backing. It is intended as decorative table art.
Half double crochet proportions vary with yarn and tension. Check your blocked sample before making the full set. Pin the leaf lengthwise while keeping its center openings clear; if the fabric remains too broad, try a finer yarn and make another sample.
Follow the cotton yarn label. Hand-wash gently, support the whole piece when lifting it, and press out moisture in a towel. Dry flat with the leaves and picots arranged into shape.
This pattern is designed as a decorative centerpiece. Its raised flower and overlapping leaves do not provide a level surface for dishes. Keep hot cookware on a separate purpose-made trivet.
The finished Autumn Leaf Mandala Crochet Centerpiece

