Autumn Leaves Crochet Table Runner Pattern
Beginner Friendly
Perfect for those just starting their crochet journey, with clear instructions and simple techniques
Single-Day Project
A satisfying project you can complete in a single afternoon or evening.
Handmade Gift
A beautiful keepsake — free forever. Read online or print at home.
About This Autumn Leaves Crochet Table Runner Pattern
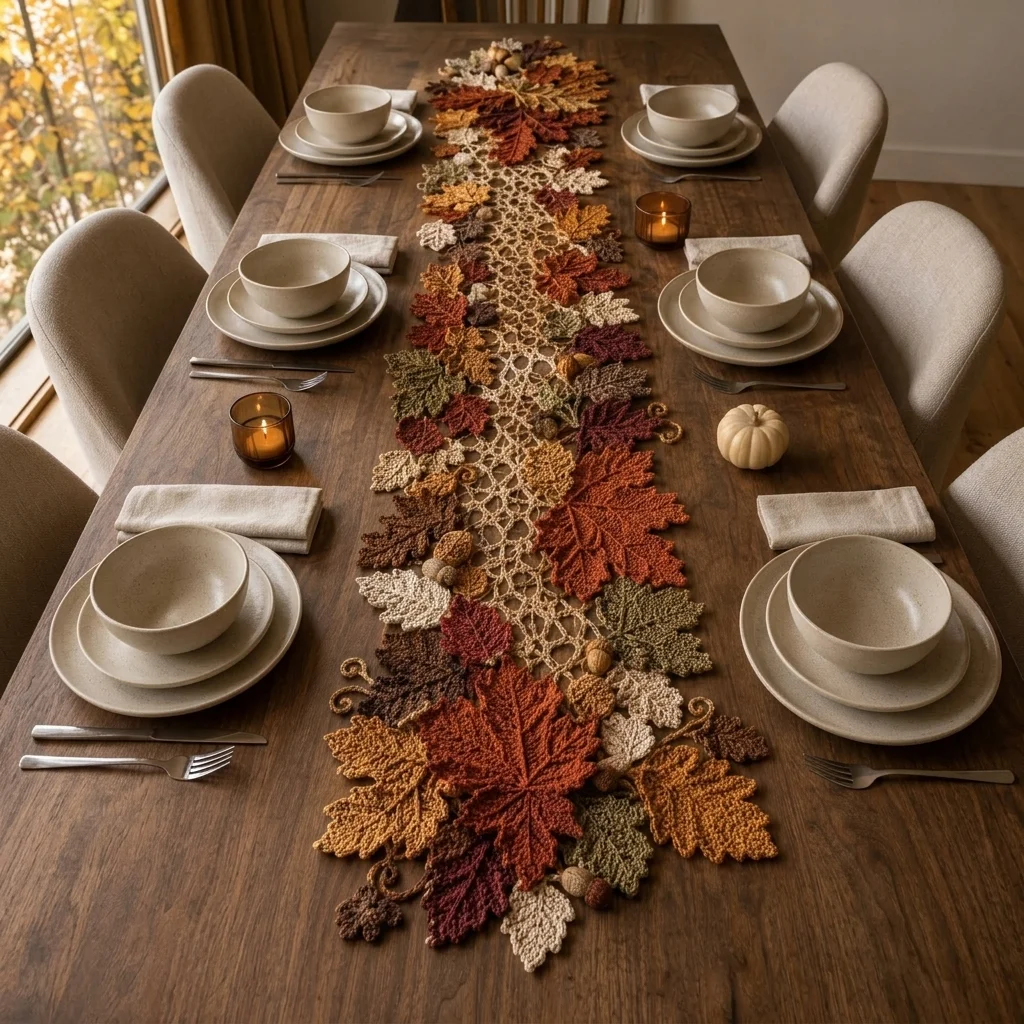
This autumn leaves crochet table runner pattern creates a long openwork centerpiece framed by layered maple leaves, oak-style leaves, small woodland foliage, curled tendrils, and dimensional acorns. Warm cream forms the delicate lace foundation, while rust, burnt orange, mustard, olive, burgundy, chocolate brown, and ivory leaves create the rich autumn palette seen in the reference design.
Unlike a runner made entirely from repeated motifs, this design begins with a continuous irregular lace strip. Individual botanical pieces are then arranged along both sides and across selected sections of the lace. Large maple leaves create the strongest focal points, while medium and small leaves bridge the spaces between them. The acorns and curled stems provide raised details without making the center of the runner too bulky for tableware.
This is an advanced project requiring approximately 24-32 hours for the complete runner. It is designed for crocheters comfortable with open lace, chain-space construction, tall stitches, shaped leaf motifs, surface slip stitches, picots, small stuffed pieces, blocking, color planning, and assembling many separate elements while maintaining a balanced finished shape.
Materials
- Sport / fine DK mercerized cotton in warm cream approximately 250-300 m for the lace center and leaves
- Sport / fine DK cotton in burnt orange approximately 130 m
- Sport / fine DK cotton in deep rust approximately 130 m
- Sport / fine DK cotton in mustard ochre approximately 110 m
- Sport / fine DK cotton in muted olive green approximately 120 m
- Sport / fine DK cotton in burgundy approximately 70 m
- Sport / fine DK cotton in chocolate brown approximately 80 m
- Sport / fine DK cotton in medium acorn brown approximately 40 m
- 2.75 mm crochet hook main runner and leaf hook
- 2.25 mm crochet hook for firm acorns
- Polyester fiberfill small amount for acorns
- Yarn needle for assembly and weaving in ends
- Stitch markers 6-8 recommended
- Rustproof blocking pins for shaping the lace and leaf points
- Large blocking mat or several mats joined together
- Scissors 1 pair
Abbreviations
MRmagic ringchchainsl stslip stitchscsingle crochethdchalf double crochetdcdouble crochettrtreble crochetdtrdouble treble crochetinc2 single crochet in the same stitchdecinvisible single crochet decreaseststitchstsstitchesspspaceskskipRSright sideWSwrong sidepicotch 3, sl st in first chCentral Openwork Lace Foundation
- Foundation: With warm cream yarn, ch 241 loosely. The foundation should measure approximately 135-140 cm before blocking.
- Row 1: Sc in second ch from hook, ch 5, sk next 4 ch, sc in next ch; repeat across. Adjust the final repeat with ch 2 if necessary so both ends finish symmetrically. Ch 5, turn.
- Row 2: Sc in first ch-5 sp, ch 5, sc in next ch-5 sp across. Ch 5, turn.
- Row 3: Sl st into first ch-5 sp, ch 3, 2 dc in same sp, ch 3, sc in next ch-5 sp, ch 3, 3 dc in next ch-5 sp; repeat across. Ch 5, turn.
- Row 4: Sc in center dc of first 3-dc group, ch 5, sc in next sc, ch 5, sc in center dc of next 3-dc group; repeat across. Ch 6, turn.
- Row 5: Sc in first ch-5 sp, ch 7, sc in next ch-5 sp, ch 4, sc in next ch-5 sp; repeat the alternating ch-7 and ch-4 spaces across. Ch 5, turn.
- Row 6: In each ch-7 sp work (sc, ch 5, sc, ch 5, sc). In each ch-4 sp work (sc, ch 4, sc). Continue across. Ch 5, turn.
- Row 7: Sc in first available ch sp, ch 5, sc in next ch sp across, allowing the spaces to alternate naturally in size. Ch 6, turn.
- Row 8: In first ch-5 sp work (sc, ch 3, dc, ch 3, sc), ch 3, then repeat the same shell in next ch-5 sp across. Ch 5, turn.
- Row 9: Sc into center dc of first shell, ch 6, sc into center dc of next shell across. Ch 5, turn.
- Row 10: Work (sc, ch 5, sc) into each ch-6 sp across. Fasten off.
- Turn the foundation so the original chain edge faces you. Join cream yarn at the opposite long edge.
- Repeat Rows 2-10 along the second side of the foundation so the lace grows outward symmetrically from the center line.
- Do not worry if individual openings differ slightly in size. The intended result is an organic net-like lace rather than a rigid geometric filet pattern.
- Block the strip to approximately 145-150 cm long and 14-16 cm wide before adding the botanical motifs.
Irregular Lace Edge
- Join cream yarn at one corner of the blocked central lace.
- Work along the first long edge using (sc in next ch sp, ch 4, sc in next ch sp), alternating occasional ch-5 and ch-6 loops every 3-4 spaces.
- At approximately every fifth loop work a picot at the center: ch 2, picot, ch 2.
- At the short end work larger ch-6 and ch-7 loops to create a softly tapered finish rather than a straight edge.
- Continue along the second long edge using the same irregular sequence.
- Finish the second short end with matching ch-6 and ch-7 loops.
- Join with sl st to the first sc and fasten off.
Large Five-Lobed Maple Leaves – Make 8
- Foundation: Ch 20. This chain forms the main central vein.
- Beginning in second ch from hook, sl st in next 3 ch, sc in next 2 ch, hdc in next 2 ch, dc in next 4 ch, tr in next 4 ch, dtr in next 3 ch, then 5 dc in final ch.
- Rotate to work along the opposite side of the foundation chain. Dtr in next 3 ch, tr in next 4 ch, dc in next 4 ch, hdc in next 2 ch, sc in next 2 ch, sl st in final 3 ch.
- First lower-right lobe: Ch 9. Beginning in second ch from hook work sl st, sc, hdc, dc, tr, dc, hdc, sc. Sl st into the central foundation.
- Second right lobe: Move approximately 3 sts upward along the central foundation. Ch 13. Work back with sl st, sc, hdc, dc, tr, dtr in next 3 ch, tr, dc, hdc, sc. Attach securely to the central foundation.
- Upper-right lobe: Move 3 sts upward. Ch 16. Work back with sl st, sc, hdc, dc, tr, dtr in next 5 ch, tr in next 2 ch, dc, hdc, sc. Attach to the central foundation.
- Repeat the three side-lobe constructions symmetrically along the left side.
- Center lobe: At the top center, ch 18. Beginning in second ch from hook work sl st, sc, hdc, dc, tr, dtr in next 7 ch, tr in next 3 ch, dc, hdc, sc, sl st. Attach to the center vein.
- Outer shaping round: Work around the leaf using sc along dense sections and ch-2 spaces along open sections.
- At each of the five dominant lobe tips work (sc, picot, sc).
- At smaller secondary points work (sc, ch 2, sc).
- At every deep valley between lobes work sl st, ch 1, sl st to draw the valley inward.
- Lace round: Work (sc, ch 3, sc) into each ch-2 sp and (sc, ch 4, sc) along the widest outer portions of each lobe.
- Surface sl st from the leaf base to the tip along the center foundation to create the raised central vein.
- Surface sl st from the center vein outward along each lobe foundation to create branching side veins.
- Stem: Ch 11 from the lower center. Beginning in second ch from hook, sl st in each ch back to the leaf.
- Fasten off and block to approximately 20-22 cm across.
Medium Maple Leaves – Make 12
- Foundation: Ch 16.
- Beginning in second ch from hook work sl st in next 2 ch, sc in next 2 ch, hdc in next 2 ch, dc in next 3 ch, tr in next 4 ch, dc in next ch, then 5 dc in final ch.
- Continue along the opposite side with dc, tr in next 4 ch, dc in next 3 ch, hdc in next 2 ch, sc in next 2 ch, sl st in final 2 ch.
- Lower side lobe: Ch 7. Work back with sl st, sc, hdc, dc, hdc, sc. Attach to central foundation.
- Middle side lobe: Ch 10. Work back with sl st, sc, hdc, dc, tr in next 3 ch, dc, hdc. Attach approximately 2 sts above the lower lobe.
- Upper side lobe: Ch 12. Work back with sl st, sc, hdc, dc, tr in next 4 ch, dc, hdc, sc. Attach approximately 2 sts above the middle lobe.
- Repeat all three lobes symmetrically on the opposite side.
- Center lobe: Ch 14. Work back with sl st, sc, hdc, dc, tr in next 6 ch, dc, hdc, sc, sl st.
- Work around the complete perimeter with alternating ch-2 and ch-3 lace spaces anchored by sc.
- Work one picot at every major lobe tip and sl st into each valley.
- Surface sl st along the center and major side veins.
- Ch 8 for the stem, sl st back along the chain, and fasten off.
- Block to approximately 14-16 cm across.
Small Oak Leaves – Make 14
- Ch 18.
- Beginning in second ch from hook work sl st, sc, hdc, dc, tr, tr, dc, hdc, sc, hdc, dc, tr, dc, hdc, sc, sl st, then 3 sc in final ch.
- Continue along the opposite side of the foundation chain using the same stitch sequence in reverse.
- Outer lobe round: Sl st in next edge st, then work (ch 3, 2 dc in next edge st, ch 2, sl st in next edge st) to create the first rounded lobe.
- Repeat the lobe sequence 4 times along the first side, using tr instead of dc for the two central lobes.
- At the leaf tip work (sc, picot, sc).
- Repeat 5 corresponding lobes down the opposite side.
- Surface sl st from the base to the tip through the original foundation chain.
- Stem: Ch 7, sl st back along the chain, and fasten off.
- Block to approximately 10-12 cm long.
Small Pointed Autumn Leaves – Make 12
- Ch 13.
- Beginning in second ch from hook work sl st, sc, hdc, dc, tr, dtr in next 2 ch, tr, dc, hdc, sc, sl st.
- Work 3 sc into the final chain and continue down the opposite side.
- Work sl st, sc, hdc, dc, tr, dtr in next 2 ch, tr, dc, hdc, sc, sl st.
- Outer round: (Sc in next edge st, ch 2) around, adding a picot at the top point and at two side points.
- Surface sl st along the center foundation from base to tip.
- Ch 6 for the stem and sl st back along the chain.
- Fasten off and block into a narrow pointed shape.
Miniature Filler Leaves – Make 10
- Ch 9.
- Beginning in second ch from hook work sl st, sc, hdc, dc, tr, dc, hdc, sc.
- Work 3 sc in the final chain and continue along the opposite side with sc, hdc, dc, tr, dc, hdc, sc, sl st.
- At the tip work one picot.
- Surface sl st through the center chain to form the vein.
- Ch 5 for the stem, sl st back to the leaf base, and fasten off.
Crochet Acorn Nuts – Make 14
- Round 1: With medium brown and 2.25 mm hook, make 6 sc in MR. Continue in a spiral. (6 sts)
- Round 2: Inc in each st around. (12 sts)
- Round 3: (Sc in next st, inc) 6 times. (18 sts)
- Rounds 4-6: Sc in each st around. (18 sts)
- Round 7: (Sc in next st, dec) 6 times. (12 sts)
- Add a small amount of fiberfill and shape the nut into an oval.
- Round 8: Dec 6 times. (6 sts)
- Fasten off. Thread the tail through the remaining front loops, pull closed, and shape the bottom into a gentle point.
Textured Acorn Caps – Make 14
- Round 1: With chocolate brown, make 6 sc in MR. (6 sts)
- Round 2: Inc in each st around. (12 sts)
- Round 3: (Sc in next st, inc) 6 times. (18 sts)
- Round 4: Working in BLO, sc in each st around. (18 sts)
- Round 5: (Sl st in next st, ch 2, hdc in same st, sl st in next st) 9 times around to create the textured cap edge.
- Fasten off leaving a long sewing tail.
- Fit the cap over the wide end of the stuffed acorn and sew around Round 4.
Acorn Stems – Make 14
- Join chocolate yarn at the center top of an acorn cap.
- Ch 7.
- Beginning in second ch from hook, sl st in all 6 ch back toward the cap.
- Sl st into the cap center and fasten off.
- For paired acorns, sew two stems together approximately 1 cm above the caps while leaving the nuts free to hang at slightly different heights.
Curled Woodland Tendrils – Make 8
- Ch 22 loosely using mustard, rust, olive, or brown.
- Work 3 sc in second ch from hook and 3 sc in each remaining chain.
- The strip will curl naturally into a spiral as you work.
- For a tighter curl, gently twist the finished spiral in the same direction as the crochet.
- Fasten off leaving a long tail for attaching the tendril beneath a leaf cluster.
Color Distribution
- Make 3 large maple leaves in burnt orange.
- Make 2 large maple leaves in deep rust.
- Make 1 large maple leaf in olive green.
- Make 1 large maple leaf in mustard ochre.
- Make 1 large maple leaf in warm cream.
- For the 12 medium maple leaves, make 3 rust, 3 mustard, 2 olive, 2 cream, 1 burgundy, and 1 chocolate brown.
- For the 14 oak leaves, use approximately 4 olive, 3 chocolate brown, 3 cream, 2 mustard, and 2 burgundy.
- Distribute the pointed and miniature leaves among rust, burnt orange, olive, mustard, cream, burgundy, and brown.
- Use medium warm brown for the acorn nuts and darker chocolate brown for most caps.
- Do not arrange colors in a repeating sequence during assembly. The finished runner should look naturally scattered.
Blocking the Botanical Motifs
- Dampen each leaf individually and place it RS upward on a blocking mat.
- Pin the stem base first, then pull the central vein gently straight.
- Pin the center lobe tip before arranging the side lobes.
- For maple leaves, pin every major lobe tip and every deep valley individually.
- For oak leaves, open each rounded side lobe without flattening the central vein.
- Pin picots and lace spaces only enough to reveal their shape; excessive stretching can make the leaves look stiff.
- Allow every motif to dry completely before removing the pins.
Planning the Runner Layout
- Place the blocked cream lace strip flat on a table or blocking mat.
- Position one large burnt-orange maple leaf near one end, angled diagonally across approximately one-third of the lace width.
- Position another large maple leaf approximately 25-30 cm farther along the opposite edge.
- Continue distributing the 8 large maple leaves from one end to the other, alternating which side carries the dominant motif.
- Keep most of the central cream lace visible. Large leaves should overlap its edges and occasionally cross the center, but they should not completely cover the openwork.
- Add the 12 medium maple leaves around the large motifs, allowing some to overlap by 2-4 cm.
- Use oak leaves, pointed leaves, and miniature leaves to fill abrupt gaps along the outer silhouette.
- Position the 14 acorns in irregular groups. Use several singles, several pairs, and one cluster of three if desired.
- Tuck curled tendrils beneath selected leaf clusters and allow the spiral ends to extend onto the bare table.
- Check that cream leaves are distributed along the full runner instead of concentrated in one area.
- Photograph the entire arrangement before sewing so you can reconstruct the placement if motifs move during assembly.
Joining Leaves to the Lace Center
- Begin with the largest central maple leaf. Thread a yarn needle with matching yarn.
- Sew the base of the leaf to a solid junction in the cream lace rather than to a single chain loop.
- Add a second attachment point near the middle of the central vein.
- Add a third discreet attachment beneath one side lobe where it overlaps the lace.
- Leave the outer lobe tips free so the leaf retains a natural layered appearance.
- Attach the remaining large leaves using the same three-point method.
- Attach medium leaves at 2-3 structural points depending on their size.
- Small leaves generally need only one secure stem attachment and one hidden stitch near the center vein.
- After every 5-6 motifs, lift the runner gently. Add another hidden anchor wherever a leaf hangs away from the lace or twists excessively.
Building the Layered End Clusters
- At the first end, position one large rust or orange maple leaf so its center vein follows the length of the runner.
- Place one mustard medium leaf beneath its left side and one olive medium leaf beneath its right side.
- Add one cream oak leaf and one burgundy pointed leaf near the lower edge.
- Attach one acorn pair between the overlapping leaf bases.
- Add one curled tendril so its spiral extends beyond the end of the runner.
- Repeat at the opposite end using a different color arrangement so the two ends coordinate without being identical.
Attaching the Acorns and Tendrils
- Sew each acorn stem to a dense leaf vein or a multi-strand lace junction.
- For an acorn resting on the tabletop, add one tiny stitch between the back of the cap and the neighboring leaf to stop it rolling.
- Leave selected acorns attached only at their stems so they remain dimensional.
- Sew the base of each curled tendril beneath a leaf or acorn cluster.
- Do not sew the spiral portion down. Allow it to curl freely against the table surface.
- Check that no acorn or tendril pulls the central lace sideways. Move heavy embellishments closer to structural junctions if necessary.
Finishing
Weave all joining tails into the backs of the motifs, following dense veins whenever possible. Turn the runner over and inspect the underside. Remove or redo any long visible carrying stitches, and reinforce leaf clusters that move excessively when the runner is lifted. The assembled runner should remain flexible, but the botanical sections should not separate from the central lace.
Give the finished runner a final light blocking. Pin the cream lace first, then arrange the leaves around it without forcing them completely flat. Leave selected lobe tips, acorns, and curled tendrils slightly raised to preserve the layered woodland effect. The finished piece should measure approximately 150 cm long and 32-34 cm at its widest sections. For storage, roll it loosely rather than folding through the large maple leaves.
Tips for Success
- Make and block the cream lace foundation before deciding how many leaves you want to add. Its blocked dimensions determine how dense the botanical border should be.
- Keep the center of the runner relatively open. The visible cream lace is what separates this design from a runner made entirely from overlapping leaves.
- Attach large maple leaves through their central veins rather than around every outer edge. This keeps their points dimensional and prevents the lace foundation from puckering.
- Alternate both leaf size and color. A small cream oak leaf between two dark maple leaves creates more visual depth than another large motif in the same area.
- Place tableware on the runner before permanently attaching the acorns. Move dimensional pieces away from areas where plates, serving dishes, or candles are likely to sit.
Common Mistakes to Avoid
- Do not cover the entire cream lace foundation with leaves. If the center disappears, remove several motifs and concentrate them along the outer edges instead.
- Avoid joining leaves to individual chain loops. Use intersections where several lace strands meet, otherwise the weight of the motif can stretch the openwork.
- Do not skip blocking the large maple leaves. Unblocked lobes can curl together and make an advanced botanical motif look like an undefined circle.
- Avoid arranging every leaf parallel to the runner. Rotate motifs toward and away from the center so the composition appears naturally scattered.
- Do not sew acorns flat across their entire bodies. Attach them through the stem and, when necessary, one hidden point at the cap so they retain their dimensional shape.
Ways to Customize This Pattern
- Create a Thanksgiving version by emphasizing rust, pumpkin orange, mustard, chocolate, and cream while reducing the olive and burgundy motifs.
- Make a softer neutral runner with ivory lace and leaves in camel, oatmeal, mocha, muted sage, and terracotta.
- Extend the runner for a long dining table by adding approximately 25 cm of central lace, 2 large leaves, 3 medium leaves, 3 small leaves, and 2 acorns for each extra section.
- Add a fine metallic copper strand to selected leaf veins for subtle evening sparkle without changing the natural autumn palette.
- Use the same motifs to make matching napkin decorations by joining one miniature leaf, one small oak leaf, and one tiny acorn around a crocheted ring.
Frequently asked questions
Attach each large motif at several structural junctions instead of one point, and distribute the heavier leaves between both sides of the runner. If the lace begins pulling sideways, remove the nearest attachment and reconnect the leaf closer to its central vein. A final light blocking will correct minor distortion.
Use a firmly twisted cotton, work the surface slip-stitch veins carefully, and block every lobe separately. The branching veins and deep valleys between lobes are more important to the realistic maple silhouette than simply adding more outer stitches.
Yes. Shorten the cream foundation in multiples that preserve the ch-5 mesh repeat, then reduce the number of botanical motifs proportionally. A runner around 100 cm long works well with approximately 5 large maple leaves, 8 medium leaves, 12 smaller leaves, and 8 acorns.
The leaf motifs may not be fully blocked, or the joining stitches may be tighter than the lace foundation. Reblock the affected leaves first. If the curling remains, loosen the joins around that section and reconnect the motifs without pulling the sewing yarn tight.
Yes, if all yarn and stuffing are washable, but hand washing is safest. Use cool water, avoid wringing, support the entire runner when lifting it, and press out water between towels. Reshape the lace, leaves, tendrils, and acorns while damp and dry the runner completely flat.
The finished Autumn Leaves Crochet Table Runner Pattern