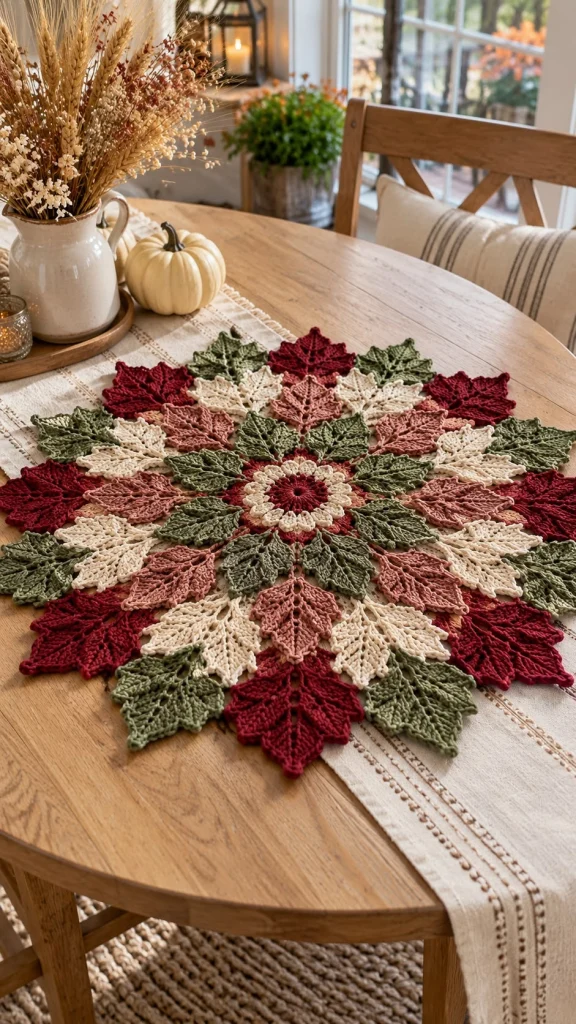
Autumn Maple Leaf Crochet Centerpiece – Free Advanced Fall Crochet Pattern
Bring the beautiful colors of autumn into your home with this elegant Autumn Maple Leaf Crochet Centerpiece. Featuring intricately textured maple leaves in deep burgundy, muted sage green, dusty rose, and warm ivory, this decorative crochet project captures the timeless beauty of falling leaves.
The centerpiece features a circular floral center surrounded by multiple layers of delicate maple leaves. Each leaf is individually crocheted with openwork details, raised veins, pointed lobes, and beautifully shaped edges.
Perfect for Thanksgiving tables, farmhouse dining rooms, and cozy autumn decorating, this advanced crochet project creates a stunning seasonal accent that can be treasured year after year.
Pattern Information
- Skill Level: Advanced
- Finished Diameter: Approximately 55–65 cm
- Construction: Individual maple leaves assembled around a circular floral center
- Yarn Weight: Sport-weight cotton yarn
- Hook Size: 3 mm
- Colors: Burgundy, sage green, dusty rose, and ivory
- Terminology: US crochet terms
- Estimated Time: 18–25 hours
Materials Needed
- Sport-weight cotton yarn in deep burgundy – approximately 250 m
- Sport-weight cotton yarn in sage green – approximately 250 m
- Sport-weight cotton yarn in dusty rose – approximately 200 m
- Sport-weight cotton yarn in warm ivory – approximately 200 m
- 3 mm crochet hook
- 2.5 mm crochet hook for delicate details (optional)
- Tapestry needle
- Scissors
- Stitch markers
- Measuring tape
- Blocking mats and rustproof pins
- Fabric stiffener (optional)
Crochet Abbreviations
- MR: Magic ring
- ch: Chain
- sc: Single crochet
- hdc: Half double crochet
- dc: Double crochet
- tr: Treble crochet
- dtr: Double treble crochet
- sl st: Slip stitch
- st: Stitch
- sp: Space
- inc: Increase
- dec: Decrease
- FPdc: Front post double crochet
- FO: Fasten off
Special Crochet Techniques
This centerpiece uses several advanced techniques to create realistic maple leaf shapes and a delicate lace-like appearance.
- Openwork Lace: Chain spaces and tall stitches create the decorative openings inside each leaf.
- Raised Veins: Surface slip stitches add texture and definition to the leaf structure.
- Pointed Lobes: Carefully placed increases and tall stitches form the characteristic maple leaf silhouette.
- Layered Assembly: Individual leaves are arranged in overlapping circular rows.
- Decorative Edging: Picot stitches create crisp leaf tips and elegant finishing details.
1. Crochet the Circular Floral Center
Begin with deep burgundy yarn and a 3 mm crochet hook.
Round 1: Make a MR. Ch 3 (counts as dc), work 11 dc into the ring. Join with a sl st to the top of the beginning ch-3. (12 dc)
Round 2: Ch 3, dc in the same stitch, work 2 dc in each remaining stitch. Join. (24 dc)
Round 3: Ch 1, sc in the first stitch, *ch 3, skip 1 stitch, sc in the next stitch* repeat around. Join.
Round 4: Join ivory yarn in any ch-3 space. Work *(sc, hdc, 3 dc, hdc, sc)* into each ch-3 space around. Join.
Round 5: Ch 1, sc evenly around the flower petals, placing a picot at the center of each petal.
Fasten off and weave in the ends.
The completed floral center should form a decorative circular medallion with a burgundy middle and soft ivory petals.
2. Crochet the Maple Leaf Foundation
Each maple leaf is worked separately, beginning with a central spine and expanding outward into five pointed lobes.
Choose your preferred yarn color.
Foundation: Ch 16.
Row 1: Sc in the second chain from the hook, sc in the next 3 chains, hdc in the next 3, dc in the next 4, hdc in the next 2, sc in the final 2 chains.
Ch 1 and turn.
Row 2: Sc in the first 2 stitches, hdc in the next 3, dc in the next 5, hdc in the next 3, sc in the final 2 stitches.
Do not fasten off.
3. Create the First Maple Leaf Lobe
Working from the upper section of the foundation:
- Ch 8.
- Sc in the second chain from the hook.
- Hdc in the next chain.
- Dc in the next 2 chains.
- Tr in the next 2 chains.
- Dc in the final chain.
- Sl st into the foundation edge.
This creates the first pointed lobe of the maple leaf.
4. Crochet the Second and Third Lobes
Continue working along the foundation edge.
Second Lobe:
- Ch 10.
- Sc in the second chain from the hook.
- Hdc in the next 2 chains.
- Dc in the next 3 chains.
- Tr in the next 2 chains.
- Dc in the final chain.
- Sl st into the foundation edge.
Center Lobe:
- Ch 12.
- Sc in the second chain from the hook.
- Hdc in the next 2 chains.
- Dc in the next 3 chains.
- Tr in the next 3 chains.
- Dtr in the next chain.
- Dc in the final chain.
- Sl st into the upper center of the foundation.
The center lobe should be slightly longer than the surrounding lobes.
5. Crochet the Remaining Maple Leaf Lobes
Repeat the second-lobe instructions on the opposite side of the center lobe.
Then repeat the first-lobe instructions to complete the fifth point.
Arrange the lobes symmetrically so the leaf resembles a natural maple leaf.
6. Add Decorative Openwork
To create the lace-like texture visible in the finished centerpiece, work decorative chain arches between the leaf lobes.
- Join yarn near the base of the first lobe.
- Ch 4 and sl st into a nearby stitch along the lobe edge.
- Repeat to form small openwork arches.
- Continue around the inner sections of the leaf.
- Maintain consistent spacing between each opening.
- Fasten off and weave in the ends.
The chain arches create an airy, delicate appearance while preserving the recognizable maple leaf silhouette.
7. Add Raised Leaf Veins
Using matching yarn and a 2.5 mm crochet hook:
- Join yarn at the base of the maple leaf.
- Work surface slip stitches along the central spine.
- Continue toward the tip of the center lobe.
- Create smaller diagonal veins branching toward the side lobes.
- Keep the stitches relaxed to avoid puckering.
- Fasten off and secure all yarn ends.
The raised veins add dimension and help emphasize the natural leaf structure.
8. Crochet the Decorative Leaf Edging
Join matching yarn at the base of the leaf.
Work single crochet stitches evenly around the outer edge.
At each pointed lobe, work a picot:
Picot: Ch 3, sl st into the first chain.
Continue around the entire leaf, adding additional stitches where necessary to maintain smooth edges.
Fasten off and weave in the ends.
9. Make the Burgundy Maple Leaves
Using deep burgundy yarn, make 8 maple leaves.
These leaves will form the dramatic outer accents of the centerpiece.
The rich burgundy shade adds warmth and creates a beautiful contrast against the lighter colors.
10. Make the Sage Green Maple Leaves
Using sage green yarn, make 12 maple leaves.
Follow the same instructions for the foundation, lobes, openwork, veins, and edging.
The muted green leaves create a natural botanical appearance and provide visual balance.
11. Make the Dusty Rose Maple Leaves
Using dusty rose yarn, make 8 maple leaves.
These soft pinkish-brown leaves add a gentle transitional color between the burgundy and ivory sections.
12. Make the Warm Ivory Maple Leaves
Using warm ivory yarn, make 8 maple leaves.
The ivory leaves brighten the centerpiece and highlight the delicate openwork details.
Block each leaf before assembly to emphasize its pointed shape.
13. Arrange the Circular Leaf Design
Lay the completed floral center on a flat surface.
Arrange the maple leaves into overlapping circular layers.
Inner Layer: Position 8 sage green leaves around the floral center.
Middle Layer: Alternate 8 dusty rose and 8 ivory leaves around the inner layer.
Outer Layer: Arrange 8 burgundy leaves and the remaining 4 sage green leaves around the perimeter.
Adjust the placement until the overall design forms a balanced circular centerpiece.
Overlap the bases of neighboring leaves slightly to create a connected, lace-like appearance.
14. Join the Maple Leaves
Use a tapestry needle and matching yarn to attach the individual pieces.
- Secure the inner sage green leaves to the floral center.
- Attach the dusty rose leaves between the inner leaves.
- Position the ivory leaves in alternating spaces.
- Add the burgundy leaves around the outer perimeter.
- Fill remaining gaps with the final sage green leaves.
- Stitch overlapping leaf sections together using small, nearly invisible stitches.
- Check that the entire centerpiece lies flat.
For additional stability, connect neighboring leaves at two or three contact points rather than only at their bases.
15. Block and Shape the Centerpiece
- Lightly dampen the completed crochet centerpiece.
- Lay it flat on blocking mats.
- Arrange each leaf into its natural pointed shape.
- Pin the leaf tips carefully.
- Adjust the circular arrangement until symmetrical.
- Allow the centerpiece to dry completely.
For a firmer decorative finish, apply a small amount of fabric stiffener according to the manufacturer’s instructions.
16. Styling Your Autumn Crochet Centerpiece
Place the finished centerpiece on a wooden dining table over a neutral linen table runner to highlight its rich autumn colors.
Pair it with:
- Miniature ivory pumpkins
- Dried wheat arrangements
- Rustic ceramic vases
- Warm candlelight
- Natural wooden table accessories
- Neutral linen napkins
The centerpiece can also be displayed on a coffee table, sideboard, or seasonal entryway console.
Advanced Crochet Tips
- Use mercerized cotton for crisp lace definition.
- Keep the leaf lobes consistent in size.
- Block every leaf individually before joining.
- Use stitch markers to maintain symmetrical placement.
- Avoid pulling the joining stitches too tightly.
- Arrange the entire centerpiece before permanently attaching the leaves.
- Use matching yarn for nearly invisible seams.
- Keep the finished centerpiece flat during storage.
Creative Color Variations
- Classic Autumn: Burnt orange, mustard yellow, rust, and brown.
- Vintage Farmhouse: Burgundy, sage, dusty rose, and ivory.
- Woodland Inspired: Olive green, caramel, cream, and chocolate brown.
- Soft Neutral: Beige, oatmeal, ivory, and taupe.
- Elegant Thanksgiving: Deep wine, copper, gold, and cream.
- Winter Botanical: Forest green, white, silver gray, and burgundy.
Frequently Asked Questions
Is this autumn maple leaf crochet centerpiece suitable for beginners?
This project is best suited to experienced crocheters because it involves multiple shaped pieces, lacework, surface crochet, blocking, and detailed assembly.
Can I make the centerpiece smaller?
Yes. Reduce the number of maple leaves or use thinner yarn and a smaller hook.
What type of yarn works best?
Sport-weight cotton yarn is recommended because it provides excellent stitch definition and helps the leaves maintain their shape.
Can I use acrylic yarn?
Yes, although cotton generally produces a firmer and more defined lace texture.
How do I keep the maple leaves flat?
Block each leaf individually and connect neighboring pieces securely. Optional fabric stiffener can provide additional structure.
Can I use this centerpiece for Thanksgiving?
Absolutely. Its rich autumn palette and botanical design make it an excellent handmade decoration for Thanksgiving tables.
Can I wash the finished centerpiece?
Gentle hand washing is recommended. Reshape and dry flat to preserve the detailed leaf structure.
Final Thoughts
The Autumn Maple Leaf Crochet Centerpiece is a beautiful celebration of seasonal color and traditional crochet craftsmanship.
Its layered maple leaves, intricate openwork details, and harmonious combination of burgundy, sage green, dusty rose, and ivory create a striking decorative accent for any autumn-inspired home.
Whether displayed during Thanksgiving dinner or used throughout the fall season, this elegant handmade centerpiece brings warmth, texture, and timeless charm to your table.
Save this free autumn maple leaf crochet pattern to Pinterest and share it with your crochet-loving friends!

