Autumn Pumpkin Crochet Table Runner Pattern
Beginner Friendly
Perfect for those just starting their crochet journey, with clear instructions and simple techniques
Single-Day Project
A satisfying project you can complete in a single afternoon or evening.
Handmade Gift
A beautiful keepsake — free forever. Read online or print at home.
About This Autumn Pumpkin Crochet Table Runner Pattern
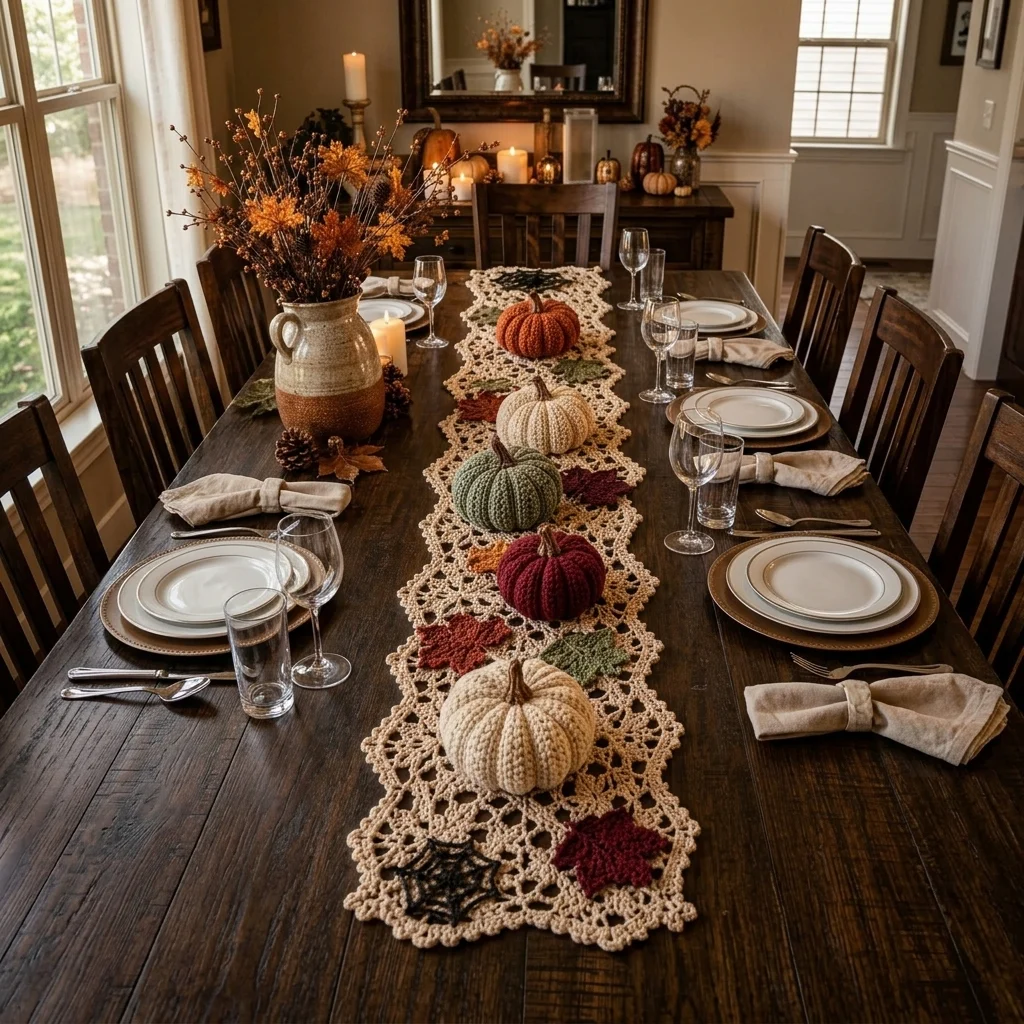
This autumn crochet table runner pattern creates a long cream lace runner decorated with dimensional ribbed pumpkins and maple leaves in burnt orange, sage green, ivory, olive, and burgundy. The open geometric lace and pointed scalloped edging give the runner an heirloom look, while the removable three-dimensional pumpkins turn it into a full autumn centerpiece rather than a flat table mat.
The runner is built from repeating lace medallions joined into one continuous strip. A decorative border is worked around the completed center to create the irregular pointed edge visible in the reference. Four separate pumpkins are made with pronounced vertical ribbing, stuffed and sculpted, then finished with curved brown stems. Maple leaves in several autumn colors fill the spaces between the pumpkins without covering the lace completely.
This is an advanced project requiring approximately 24-32 hours. It is best suited to crocheters comfortable with lace charts translated into written repeats, chain spaces, clusters, picots, joining motifs, ribbed three-dimensional construction, short-row shaping, stuffing, sculpting, surface crochet, color changes, blocking, and arranging separate decorative pieces into a coordinated table display.
Materials
- DK / light worsted cotton in warm cream approximately 700-800 m for runner
- DK / light worsted cotton in burnt pumpkin orange approximately 220 m
- DK / light worsted cotton in muted sage green approximately 120 m
- DK / light worsted cotton in warm ivory approximately 100 m
- DK / light worsted cotton in olive green approximately 50 m
- DK / light worsted cotton in deep burgundy approximately 50 m
- DK / light worsted cotton in dark rust approximately 40 m
- DK / light worsted cotton in chocolate brown approximately 40 m for stems
- 3.5 mm crochet hook runner and pumpkins
- 3.0 mm crochet hook leaves and stems
- Polyester fiberfill approximately 300-350 g
- Yarn needle long needle recommended for pumpkin sculpting
- Stitch markers 8-10
- Rustproof blocking pins for lace and leaves
- Blocking mats large enough for runner sections
- Scissors 1 pair
- Non-slip fabric backing optional for runner ends
Abbreviations
MRmagic ringchchainsl stslip stitchscsingle crochethdchalf double crochetdcdouble crochettrtreble crochetdtrdouble treble crochetinc2 single crochet in same stitchdecsingle crochet 2 stitches togetherCL3-dc clusterspspaceskskipststitchstsstitchesBLOback loop onlyRSright sideWSwrong sidepicotch 3, sl st in first chCentral Lace Medallion – Make 8
- Round 1: With cream, ch 8 and join with sl st to form a ring.
- Round 2: Ch 3, work 2 dc into ring, ch 4; repeat (3 dc into ring, ch 4) 7 more times. Join to top of beginning ch-3. You have 8 groups of 3 dc and 8 ch-4 spaces.
- Round 3: Sl st across to first ch-4 sp. Ch 3, 2 dc, ch 3, 3 dc in same sp; ch 2. Repeat (3 dc, ch 3, 3 dc in next ch-4 sp, ch 2) around. Join.
- Round 4: Sl st to first ch-3 corner sp. Work (3 dc, ch 4, 3 dc) in corner sp, ch 4, sc in next ch-2 sp, ch 4; repeat around. Join.
- Round 5: Sl st to first corner. Work (2 dc, ch 3, 2 dc, ch 3, 2 dc) in corner. Ch 5, sc in next ch-4 sp, ch 5, sc in next ch-4 sp, ch 5; repeat around.
- Round 6: In each corner ch-3 sp work (3 dc, ch 4, 3 dc). Ch 5, sc in next ch-5 sp, ch 5, sc in next ch-5 sp, ch 5, sc in next ch-5 sp, ch 5; repeat around.
- Round 7: Sl st to first corner. Work (3 dc, ch 3, 3 dc) in corner, ch 4, sc in next ch-5 sp, ch 4, 5 dc in next ch-5 sp, ch 4, sc in next ch-5 sp, ch 4; repeat around.
- Round 8: Work (3 dc, ch 4, 3 dc) in each corner. Over each 5-dc group work (dc, ch 1) in each dc, ending with dc. Connect sections with ch 3 and sc in adjacent spaces.
- Round 9: Work sc around each corner ch-4 sp with (sc, ch 3, sc) at the center of the corner. Over each open fan work alternating ch 4 and sc into the ch-1 spaces.
- Round 10: Work ch-5 loops around the motif, anchoring each loop with sc. At each corner work ch 7 instead of ch 5.
- Fasten off the first motif. Block lightly to approximately 18 × 18 cm before making the remaining motifs.
Joining the Lace Medallions
- Arrange the 8 blocked medallions in a straight vertical line with matching corners aligned.
- Beginning with the second medallion, work its final round until reaching the side facing the previous motif.
- Replace the middle chain of each corresponding ch-5 loop with a sl st into the matching loop of the previous medallion.
- At the two closest corner loops, work ch 3, sl st into the neighboring corner loop, ch 3 to form a flexible join.
- Continue the final round normally around the remaining sides.
- Repeat until all 8 motifs form one continuous runner strip.
- Lay the joined strip flat and verify that the center line remains straight before beginning the border.
Runner Side Fill
- Join cream at one outer corner of the first medallion.
- Row 1: Ch 5, sc into next outer ch-loop, repeating along the full side of the runner.
- At each valley between two joined medallions, work ch 3, sc into the joining point, ch 3 to prevent the border from flaring.
- Row 2: Turn. Ch 5, sc in first ch-5 sp; repeat ch 5, sc in next ch-5 sp across.
- Row 3: Turn. In first ch-5 sp work (3 dc, ch 3, 3 dc), sc in next ch-5 sp; repeat across.
- Row 4: Turn. Ch 6, sc in each ch-3 fan center across, using ch 4 at medallion valleys.
- Fasten off.
- Repeat Rows 1-4 along the opposite long side.
Pointed Lace Border
- Join cream at any outer corner.
- Round 1: Ch 1, sc evenly around the entire runner, working 3 sc into prominent outer corners and sc2tog at deep inner valleys where necessary to keep the fabric flat.
- Round 2: Ch 5, sk approximately 2 sts, sc in next st; repeat around, adjusting slightly at corners so the chain loops remain evenly spaced.
- Round 3: Sl st into first ch-5 sp. Work (sc, hdc, 3 dc, hdc, sc) in each ch-5 sp around.
- Round 4: Sl st to center dc of first shell. Ch 7, sc into center dc of next shell; repeat around.
- Round 5: In each ch-7 sp work (sc, hdc, dc, tr, picot, tr, dc, hdc, sc).
- At every fourth ch-7 sp work a larger point: (sc, hdc, dc, tr, dtr, picot, dtr, tr, dc, hdc, sc).
- At the two short ends, position one larger point at the center so each end finishes with a pronounced lace peak.
- Join and fasten off.
Decorative Inner Lace Arches
- Join cream to an open ch-space approximately 4 cm inside the outer border.
- Ch 8 and sc into the next suitable open space.
- Repeat around the runner, keeping each arch approximately equal in size.
- On the next pass, work (sc, ch 3, sc) three times into each ch-8 arch.
- At medallion junctions, shorten the connecting chain to ch 5 if necessary to keep the runner flat.
- Fasten off and weave all lace ends securely.
Blocking the Table Runner
- Soak or thoroughly dampen the completed cream runner according to the yarn manufacturer’s care instructions.
- Remove excess water without wringing.
- Lay the runner RS upward on blocking mats.
- Pin the central medallions first, keeping the long center line straight.
- Pin each major outer border point individually.
- Measure the width at several locations and adjust until it remains approximately 32 cm throughout.
- Stretch the runner lengthwise to approximately 150 cm or to the natural dimensions produced by your gauge.
- Allow it to dry completely before removing any pins.
Large Burnt Orange Pumpkin
- With burnt orange and 3.5 mm hook, ch 29.
- Row 1: Hdc in second ch from hook and across. Ch 1, turn. (28 sts)
- Row 2: BLO hdc in each st across. Ch 1, turn. (28 sts)
- Row 3: BLO hdc in next 24 sts, leaving 4 sts unworked. Ch 1, turn. (24 sts)
- Row 4: BLO hdc in each of the 24 sts. Ch 1, turn. (24 sts)
- Row 5: BLO hdc in next 26 sts, leaving 2 sts unworked. Ch 1, turn. (26 sts)
- Row 6: BLO hdc in each of the 26 sts. Ch 1, turn. (26 sts)
- Row 7: BLO hdc across all 28 sts. Ch 1, turn. (28 sts)
- Row 8: BLO hdc across all 28 sts. Ch 1, turn. (28 sts)
- Rows 9-72: Repeat Rows 3-8 until 12 shaped rib repeats have been completed.
- Bring first and last rows together. Add or remove one complete 6-row shaping repeat if needed for a plump cylinder.
- Fasten off leaving a 120 cm tail.
Second Burnt Orange Pumpkin
- Repeat the Large Burnt Orange Pumpkin instructions exactly.
- For slight handmade variation, stuff this pumpkin approximately 5-10% less firmly than the first.
- During final sculpting, compress it slightly more from top to bottom to create a broader profile.
Sage Green Pumpkin
- With sage green, ch 27.
- Row 1: Hdc in second ch from hook and across. Ch 1, turn. (26 sts)
- Row 2: BLO hdc across. Ch 1, turn. (26 sts)
- Row 3: BLO hdc in next 22 sts, leaving 4 sts unworked. Ch 1, turn. (22 sts)
- Row 4: BLO hdc across 22 sts. Ch 1, turn. (22 sts)
- Row 5: BLO hdc in next 24 sts, leaving 2 sts unworked. Ch 1, turn. (24 sts)
- Row 6: BLO hdc across 24 sts. Ch 1, turn. (24 sts)
- Row 7: BLO hdc across all 26 sts. Ch 1, turn. (26 sts)
- Row 8: BLO hdc across all 26 sts. Ch 1, turn. (26 sts)
- Rows 9-66: Repeat the shaping sequence until 11 complete rib repeats have been made.
- Fasten off leaving a 120 cm tail.
Ivory Pumpkin
- With warm ivory, ch 25.
- Row 1: Hdc in second ch from hook and across. Ch 1, turn. (24 sts)
- Row 2: BLO hdc across. Ch 1, turn. (24 sts)
- Row 3: BLO hdc in next 20 sts, leaving 4 sts unworked. Ch 1, turn. (20 sts)
- Row 4: BLO hdc across 20 sts. Ch 1, turn. (20 sts)
- Row 5: BLO hdc in next 22 sts, leaving 2 sts unworked. Ch 1, turn. (22 sts)
- Row 6: BLO hdc across 22 sts. Ch 1, turn. (22 sts)
- Row 7: BLO hdc across all 24 sts. Ch 1, turn. (24 sts)
- Row 8: BLO hdc across all 24 sts. Ch 1, turn. (24 sts)
- Rows 9-60: Repeat the shaping sequence until 10 complete rib repeats have been made.
- Fasten off leaving a 100 cm tail.
Seaming and Stuffing the Pumpkins
- For each pumpkin, fold the ribbed panel so the first and final rows meet with RS inward.
- Whip stitch the two short edges together through corresponding loops.
- Turn RS outward.
- Run a long matching yarn strand in and out around the lower opening.
- Pull firmly to close and reinforce the gathered center with several crossing stitches.
- Add fiberfill in small portions, concentrating stuffing around the outer circumference before filling the center.
- Keep the center slightly softer so the pumpkin can be compressed vertically.
- Continue stuffing until firm but still sculptable.
- Run yarn around the upper opening and gather almost completely closed.
- Add a final small amount of fiberfill if necessary, then close and secure the opening.
Sculpting the Pumpkins
- Thread a long strand of matching pumpkin yarn through the top center and out through the bottom center.
- Carry the yarn externally along a natural valley between two raised BLO ribs.
- Insert through the top center again and bring the needle through the bottom center.
- Pull gradually until the groove deepens.
- Repeat around the pumpkin to form 8 evenly spaced primary lobes.
- After all lobes are formed, pass the yarn directly between top and bottom centers 2-3 times.
- Pull gently to compress the pumpkin vertically and create the squat shape shown in the reference.
- Knot securely inside the upper indentation.
- Massage the stuffing into each lobe until the shape is balanced.
Curved Brown Pumpkin Stems – Make 4
- Round 1: With chocolate brown and 3.0 mm hook, work 6 sc in MR. (6 sts)
- Round 2: Inc in each st around. (12 sts)
- Round 3: BLO sc in each st around. (12 sts)
- Rounds 4-5: Sc in each st around. (12 sts)
- Round 6: (Sc in next 4 sts, dec) twice. (10 sts)
- Round 7: Sc in next 6 sts, sl st in next 4 sts. (10 sts)
- Round 8: Sc in next 5 sts, sl st in next 5 sts. (10 sts)
- Round 9: Sc in each st around. (10 sts)
- Round 10: (Sc in next 3 sts, dec) twice. (8 sts)
- Round 11: Sc in each st around. (8 sts)
- Stuff only the lower two-thirds lightly.
- Round 12: Dec around. (4 sts)
- Fasten off and close the tip.
- Leave a long yarn tail at the base for attachment.
Attaching the Pumpkin Stems
- Position one stem over the upper indentation of each pumpkin.
- Angle the stem slightly rather than keeping it perfectly upright.
- Sew through every stitch around the stem base and through dense pumpkin stitches beneath it.
- Make a second reinforcing pass around the base.
- Pull slightly more firmly on the inside of the desired curve.
- Secure and hide all yarn tails inside the pumpkin.
Large Crochet Maple Leaves – Make 5
- Use burgundy for 2 leaves, olive for 2 leaves, and dark rust for 1 leaf.
- Foundation: Ch 16.
- Beginning in second ch from hook work sl st, sc, hdc, dc in next 2 ch, tr in next 4 ch, dc in next 3 ch, hdc, sc, sl st.
- At the upper end, work 5 dc into the final foundation point to begin the central tip.
- Continue symmetrically along the opposite side of the foundation chain.
- Lower-right lobe: Ch 7. Work back with sl st, sc, hdc, dc, tr, dc. Attach to the central vein.
- Middle-right lobe: Ch 10. Work back with sl st, sc, hdc, dc, tr in next 3 ch, dc, hdc, sc. Attach above the first lobe.
- Upper-right lobe: Ch 12. Work back with sl st, sc, hdc, dc, tr in next 5 ch, dc, hdc, sc. Attach above the middle lobe.
- Repeat all three lobes symmetrically along the left side.
- Center lobe: Ch 14. Beginning in second ch work sl st, sc, hdc, dc, tr in next 6 ch, dc in next 2 ch, hdc, sc, sl st.
- Work sc evenly around the complete outer silhouette.
- At each of the five major lobe tips work (sc, picot, sc).
- At each deep valley work sl st to sharpen the indentation.
- Surface sl st from the base to the center tip to form the main vein.
- Surface sl st along each major side lobe foundation to form branching veins.
- Stem: Ch 7, sl st back along the chain, then fasten off.
Small Crochet Maple Leaves – Make 4
- Use burgundy, rust, olive, and sage for one leaf each.
- Foundation: Ch 11.
- Beginning in second ch work sl st, sc, hdc, dc, tr in next 3 ch, dc, hdc, sc.
- Work 5 sc in the final chain and continue down the opposite side symmetrically.
- First side lobe: Ch 5 and work back sl st, sc, hdc, dc. Attach to center.
- Second side lobe: Ch 7 and work back sl st, sc, hdc, dc, tr, sc. Attach above first lobe.
- Repeat both lobes on the opposite side.
- Center lobe: Ch 9 and work back sl st, sc, hdc, dc, tr, dc, hdc, sc.
- Sc around the complete edge, adding picots to the five main tips.
- Surface sl st along the center vein.
- Ch 5 for stem and sl st back along chain.
- Fasten off leaving a short tail.
Blocking the Maple Leaves
- Dampen each completed leaf.
- Place RS upward on a blocking mat.
- Pin the base and central vein first.
- Pin the center lobe tip.
- Pull each side lobe gently outward and pin its point.
- Push each valley inward and secure it with a separate pin.
- Straighten the surface-crocheted veins.
- Allow the leaves to dry completely before removing the pins.
Arranging the Autumn Display
- Place the blocked runner along the center of the table.
- Position one large orange pumpkin approximately 20 cm from the near end.
- Place the sage pumpkin around the lower-middle section.
- Position the ivory pumpkin slightly above the center of the runner.
- Place the second orange pumpkin toward the far end.
- Rotate the pumpkins so their stems point in slightly different directions.
- Place the large burgundy, olive, and rust maple leaves between the pumpkins.
- Use the small leaves to fill remaining spaces without covering the central lace medallions completely.
- Keep some motifs partly underneath pumpkin edges to create the layered look visible in the reference.
- Do not permanently attach the pumpkins unless the runner will be used only as a fixed display.
Optional Motif Anchoring Loops
- If you want the decorations to remain positioned while still removable, cut four 20 cm lengths of cream yarn.
- At each pumpkin position, pass one yarn strand through a sturdy lace junction on the runner.
- Tie the strand loosely around one lower pumpkin sculpting groove.
- Hide the knot beneath the pumpkin.
- For leaves, use a short cream strand through the leaf stem and a nearby lace junction.
- Tie with a removable bow on the WS rather than a permanent knot.
Finishing
Weave all remaining yarn tails into the backs of the lace motifs and leaves. Inspect the border and reopen any picots that folded during handling. The runner should lie flat before the pumpkins are added; if any medallion junction rises from the table, lightly dampen that section and pin it again until completely dry.
Shape each pumpkin by pressing gently downward on the top while supporting the sides. Arrange the maple leaves at different angles between the pumpkins, leaving some lace visible around every decoration. Because the pumpkins and leaves are separate, the entire display can be rearranged, removed for laundering, or changed throughout the autumn season.
Tips for Success
- Block the lace runner before making final decisions about pumpkin placement. Unblocked lace can be substantially shorter and narrower than its finished measurements.
- Keep all medallion joining chains relaxed. Tight joins will pull the runner inward at regular intervals and create an hourglass shape.
- Stuff the pumpkins firmly around their outer circumference but slightly softer through the center. This makes the vertical sculpting much easier and creates deeper grooves.
- Use the same cream yarn for every runner medallion and border round. Even small differences in cream shades become obvious across a long lace piece.
- Block the maple leaves individually before placing them on the runner. Crisp pointed lobes provide an important contrast to the soft rounded pumpkins.
Common Mistakes to Avoid
- Do not sew the pumpkins permanently to the open lace. Their weight can distort the medallions, and permanent attachment makes washing and blocking much harder.
- Avoid adding or removing random rows from a pumpkin panel. If its circumference needs adjustment, add or remove one complete shaping repeat so the rib structure remains consistent.
- Do not pull the runner border tightly around inner valleys. Shorten chains or use decreases at those points so the border follows the medallion outline without buckling.
- Avoid overstuffing the pumpkins. If the crochet ribs flatten out, remove some fiberfill before closing and sculpting.
- Do not crowd every lace opening with leaves. The cream openwork is a major part of this design and should remain visible between the autumn motifs.
Ways to Customize This Pattern
- Create a Thanksgiving version with pumpkins in terracotta, mustard, cream, and chocolate and maple leaves in cranberry and burnt orange.
- For a longer dining table, add additional central lace medallions before working the outer border. Each blocked motif adds approximately 17-18 cm to the finished length.
- Make a minimalist version using only cream pumpkins and sage leaves for a softer neutral farmhouse palette.
- Add small crocheted acorns between the maple leaves for a fuller woodland-style centerpiece.
- Use only the cream lace runner outside autumn by removing all pumpkins and leaves, making the base design useful throughout the year.
Frequently asked questions
It is better to leave them removable. The three-dimensional pumpkins are heavier than the lace and can stretch it during storage or washing. If you need them secured temporarily, use the removable anchoring loops described in the pattern.
Add more central lace medallions before beginning the side fill and outer border. With the suggested yarn and gauge, each additional blocked motif adds roughly 17-18 cm. Add the same border only after the full desired length has been assembled.
Rippling usually means the border contains too many stitches or chains for the available edge length. Reduce chain lengths at inner medallion valleys and avoid adding unnecessary stitches during the first border round. Blocking can correct mild rippling but not a significantly oversized border.
Yes. Reduce the starting chain to make a shorter pumpkin and use fewer complete shaping repeats for a smaller circumference. For larger pumpkins, increase both dimensions proportionally. Always adjust by complete shaping repeats rather than adding random rows.
The runner is easiest to care for when the pumpkins and leaves are removed first. Wash and block the lace according to the yarn label, reshape the maple leaves separately, and spot-clean or gently hand wash the stuffed pumpkins as needed. Reassemble the display only after every piece is completely dry.
The finished Autumn Pumpkin Crochet Table Runner Pattern