Autumn Sunflower Crochet Table Runner Pattern
Beginner Friendly
Perfect for those just starting their crochet journey, with clear instructions and simple techniques
Single-Day Project
A satisfying project you can complete in a single afternoon or evening.
Handmade Gift
A beautiful keepsake — free forever. Read online or print at home.
About This Autumn Sunflower Crochet Table Runner Pattern
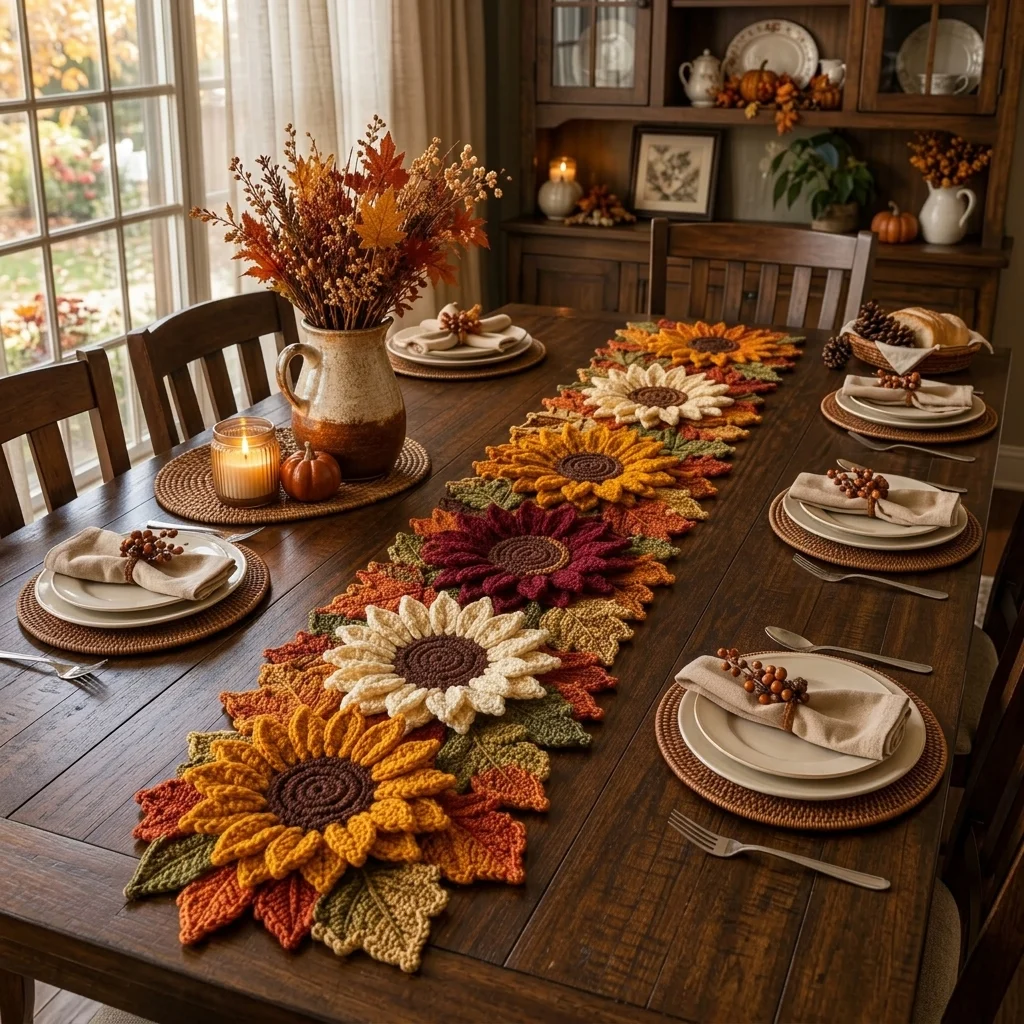
This sunflower crochet table runner pattern creates a richly textured autumn centerpiece with large dimensional flowers layered over pointed crochet leaves. Mustard, cream, burgundy, and burnt-orange petals alternate along the runner, while chocolate-brown spiral centers and leaves in olive, sage, rust, ochre, and cream give the piece the warm botanical look shown in the reference.
Instead of crocheting one flat rectangular panel, this design is assembled from individual advanced motifs. Each flower has a structured circular center, two layers of shaped petals, and subtle surface detailing. The leaves are worked separately with pointed tips, sculpted edges, and raised veins, then overlapped around and between the flowers to create a continuous organic runner.
Allow approximately 28-36 hours for the full project, including assembly and blocking. This pattern is intended for experienced crocheters comfortable with circular shaping, front- and back-loop work, post stitches, layered motifs, surface crochet, color changes, shaped rows, joining separate pieces, careful blocking, and arranging dimensional crochet so the finished runner remains stable on a dining table.
Materials
- Worsted / medium cotton yarn in dark chocolate brown approximately 180 m
- Worsted / medium cotton yarn in golden mustard approximately 300 m
- Worsted / medium cotton yarn in warm cream approximately 260 m
- Worsted / medium cotton yarn in deep burgundy approximately 180 m
- Worsted / medium cotton yarn in burnt orange approximately 200 m
- Worsted / medium cotton yarn in olive green approximately 180 m
- Worsted / medium cotton yarn in muted sage approximately 120 m
- Worsted / medium cotton yarn in ochre approximately 100 m
- 4.0 mm crochet hook main flowers and leaves
- 3.5 mm crochet hook surface veins and joining
- Yarn needle long blunt-tip needle recommended
- Stitch markers 12
- Rustproof blocking pins for flowers and individual leaves
- Blocking mats large enough for assembled runner
- Scissors 1 pair
- Flexible measuring tape for motif spacing
Abbreviations
MRmagic ringchchainsl stslip stitchscsingle crochethdchalf double crochetdcdouble crochettrtreble crochetdtrdouble treble crochetinc2 single crochet in same stitchFPdcfront post double crochetBPdcback post double crochetFLOfront loop onlyBLOback loop onlyspspaceskskipststitchstsstitchesRSright sideWSwrong sidepicotch 3, sl st in first chChocolate Flower Center – Make 6
- Round 1: With chocolate brown and 4.0 mm hook, work 6 sc in MR. (6 sts)
- Round 2: Inc in each st around. (12 sts)
- Round 3: (Sc in next st, inc) 6 times. (18 sts)
- Round 4: (Sc in next 2 sts, inc) 6 times. (24 sts)
- Round 5: (Sc in next 3 sts, inc) 6 times. (30 sts)
- Round 6: (Sc in next 4 sts, inc) 6 times. (36 sts)
- Round 7: Working in BLO, (sc in next 5 sts, inc) 6 times. (42 sts)
- Round 8: Sc in each st around. (42 sts)
- Join with sl st and fasten off, leaving the unused front loops from Round 7 visible for surface texture.
Raised Spiral Flower Center Detail – Make 6
- With chocolate brown and 3.5 mm hook, insert the hook into the center of the completed flower disk.
- Surface sl st around Round 1 in a continuous spiral.
- Continue spiraling outward between each completed round of the disk.
- Keep the surface stitches relaxed and evenly spaced.
- At Round 7, work the spiral through the unused FLO to create the pronounced outer ridge visible in the reference.
- Fasten off on the WS and weave in both ends securely.
Inner Mustard Petal Layer – Make 2 Sets
- Join golden mustard into any stitch of Round 8 on a brown center.
- Petal 1: Ch 8.
- Beginning in second ch from hook work sl st, sc, hdc, dc, tr, dc, hdc.
- Sl st into the next center stitch.
- Sl st into the following center stitch.
- Repeat the petal sequence 20 more times around, using 2 center stitches per petal. (21 petals)
- Join behind the first petal.
- Fasten off leaving a 25 cm tail.
Outer Mustard Petal Layer – Make 2 Sets
- Turn the flower so the WS is facing and join mustard around the base of any inner petal.
- Ch 10.
- Beginning in second ch from hook work sl st, sc, hdc, dc in next 2 ch, tr in next 3 ch, dc, hdc.
- Sl st around the base between the next two inner petals.
- Repeat around to create 21 longer petals positioned behind the first layer.
- Turn to RS and pull every outer petal forward into position.
- Fasten off and weave the tail into the brown center.
Inner Cream Petal Layer – Make 2 Sets
- Join warm cream to Round 8 of one brown center.
- Petal 1: Ch 8.
- Beginning in second ch from hook work sl st, sc, hdc, dc, tr, dc, hdc.
- Sl st into the next center stitch.
- Sl st into the following center stitch.
- Repeat around until 21 petals are complete.
- Join behind the first petal and fasten off.
Outer Cream Petal Layer – Make 2 Sets
- Join cream behind the inner petal layer.
- Ch 10.
- Beginning in second ch work sl st, sc, hdc, dc in next 2 ch, tr in next 3 ch, dc, hdc.
- Sl st securely between the next two inner petals.
- Repeat until 21 outer petals surround the center.
- Fasten off and shape the longer petals between the shorter inner petals.
Inner Burgundy Petal Layer – Make 1 Set
- Join deep burgundy to Round 8 of one brown center.
- Petal 1: Ch 8.
- Beginning in second ch work sl st, sc, hdc, dc, tr, dc, hdc.
- Sl st into the next center stitch and again into the following stitch.
- Repeat until 21 petals have been made.
- Join and fasten off.
Outer Burgundy Petal Layer – Make 1 Set
- Join burgundy behind the inner petals.
- Ch 10.
- Beginning in second ch work sl st, sc, hdc, dc in next 2 ch, tr in next 3 ch, dc, hdc.
- Sl st between the next two inner petals.
- Repeat until 21 outer petals are complete.
- Fasten off and arrange the petals evenly.
Inner Burnt Orange Petal Layer – Make 1 Set
- Join burnt orange to the remaining brown center.
- Petal 1: Ch 8.
- Beginning in second ch work sl st, sc, hdc, dc, tr, dc, hdc.
- Sl st into each of the next 2 center stitches.
- Repeat around to form 21 petals.
- Join and fasten off.
Outer Burnt Orange Petal Layer – Make 1 Set
- Join burnt orange behind the inner petal layer.
- Ch 10.
- Beginning in second ch work sl st, sc, hdc, dc in next 2 ch, tr in next 3 ch, dc, hdc.
- Sl st between the next two inner petals.
- Repeat until 21 outer petals are complete.
- Fasten off and weave in all petal tails.
Petal Surface Ridge – Work on All 6 Flowers
- Using the matching petal color and 3.5 mm hook, insert the hook at the base of one outer petal.
- Surface sl st along the center of the petal toward its tip.
- Stop one stitch before the point.
- Fasten off on the WS.
- Repeat for every outer petal.
- For stronger definition, repeat on every second inner petal.
- Keep the ridge loose enough that the petal does not curl tightly inward.
Large Pointed Autumn Leaf – Make 18
- Make 5 in olive, 4 in burnt orange, 3 in mustard, 3 in sage, 2 in burgundy, and 1 in cream.
- Ch 18.
- Row 1: Beginning in second ch from hook work sl st, sc, hdc, dc in next 2 ch, tr in next 7 ch, dc in next 3 ch, hdc, sc, sl st.
- Work 3 sc into the final foundation point to turn around the leaf tip.
- Continue along the opposite side of the chain: sl st, sc, hdc, dc in next 3 ch, tr in next 7 ch, dc in next 2 ch, hdc, sc, sl st.
- Join at the base.
- Round 2: Ch 1, sc evenly around the first side.
- At approximately one-third of the leaf length work (hdc, dc, hdc) in one stitch to create a subtle side tooth.
- At approximately two-thirds of the leaf length repeat (hdc, dc, hdc).
- At the tip work (sc, ch 3, sl st in first ch, sc).
- Mirror the two side teeth along the opposite edge.
- Join at the base and fasten off leaving a 35 cm sewing tail.
Medium Pointed Autumn Leaf – Make 16
- Make 4 in rust, 4 in olive, 3 in mustard, 2 in sage, 2 in burgundy, and 1 in cream.
- Ch 14.
- Beginning in second ch work sl st, sc, hdc, dc in next 2 ch, tr in next 5 ch, dc in next 2 ch, hdc, sc.
- Work 3 sc at the tip.
- Continue down the opposite side symmetrically.
- Join at the base.
- Sc evenly around the complete leaf.
- Work (hdc, dc, hdc) approximately halfway along each side to create a gentle point.
- At the tip work (sc, ch 3, sl st in first ch, sc).
- Join and fasten off leaving a sewing tail.
Small Filler Leaves – Make 14
- Use a balanced mixture of olive, rust, mustard, sage, cream, and burgundy.
- Ch 10.
- Beginning in second ch work sl st, sc, hdc, dc, tr in next 3 ch, dc, hdc.
- Work 3 sc in the final chain.
- Continue down the opposite side with hdc, dc, tr in next 3 ch, dc, hdc, sc, sl st.
- Join at the base.
- Work one round of sc around, adding a ch-2 point at the leaf tip.
- Fasten off leaving a 25 cm sewing tail.
Raised Leaf Veins
- Work this detail on every large and medium leaf.
- Using matching yarn and the 3.5 mm hook, insert the hook at the leaf base.
- Surface sl st along the original foundation chain toward the pointed tip.
- Keep the stitches loose so the leaf remains flat.
- At one-third of the leaf length, work a short diagonal line of surface sl sts toward the outer edge.
- Repeat on the opposite side.
- Add another pair of diagonal veins at approximately two-thirds of the leaf length.
- Fasten off on the WS and weave the tail into the leaf center.
Blocking the Flowers
- Dampen one completed flower at a time.
- Lay the brown center flat on a blocking mat.
- Pin the brown disk at four opposite points without stretching it.
- Pull each outer petal gently away from the center.
- Pin only the tip of each outer petal.
- Arrange the inner petals between the outer petals but do not flatten them completely.
- Allow the petals to dry with a slight upward curve near their bases.
- Repeat for all six flowers.
Blocking the Leaves
- Dampen each leaf lightly.
- Pin the base first.
- Pull the center tip gently outward and pin it.
- Pin each side tooth separately on the large leaves.
- Keep the raised center vein straight.
- Do not stretch the leaf width excessively.
- Allow every leaf to dry completely before assembly.
Flower Layout
- Lay all six blocked flowers on a large flat surface.
- Place one mustard flower at the first end of the runner.
- Position one cream flower approximately 27-30 cm above it.
- Place the burgundy flower next.
- Position the second mustard flower above the burgundy flower.
- Add the second cream flower above it.
- Finish with the burnt-orange flower at the opposite end.
- Rotate each flower slightly so the petals do not form rigid vertical lines.
- Overlap adjacent petal tips by approximately 2-4 cm.
- The complete flower line should measure approximately 155-165 cm before the outer leaves are added.
Joining Adjacent Flowers
- Thread a yarn needle with chocolate brown yarn.
- Where two flowers overlap, identify 3 adjacent outer petals from each flower.
- From the WS, stitch together only the lower halves of the overlapping petals.
- Make 2-3 secure stitches at each connection point.
- Leave the upper half and tips of the petals free for dimension.
- Repeat between every neighboring flower.
- Lift the joined strip carefully to confirm that the connections support the motifs without pulling their centers out of shape.
First Layer of Autumn Leaves
- Turn the joined flower strip WS upward.
- Arrange large leaves around the perimeter with approximately half of each leaf extending beyond the petals.
- Alternate olive, rust, mustard, sage, burgundy, and cream rather than grouping identical colors.
- Angle each leaf away from the center line by approximately 30-60 degrees.
- Place additional large leaves in the spaces between adjacent flowers.
- Overlap the bases beneath the flower petals.
- Pin or temporarily baste all leaves before permanent sewing.
Attaching the Large Leaves
- Using the long yarn tail from each leaf, sew the bottom 4-5 cm of its center vein to the WS of the flower motifs.
- Add 2 small stitches along each side of the leaf base.
- Do not stitch around the full outer edge.
- Leave at least the upper half of each leaf free so it remains dimensional.
- Check the RS after every 3-4 leaves to make sure no attachment stitches are visible through the flower centers.
- Continue until all large leaves are securely attached.
Second Layer of Autumn Leaves
- Turn the runner RS upward.
- Place medium leaves into visible gaps between the large leaves and flowers.
- Slide each leaf base 2-3 cm beneath a flower petal.
- Allow the pointed end to extend beyond the neighboring petals.
- Use small leaves to fill narrow spaces along the center joins.
- Avoid creating a perfectly symmetrical arrangement; the reference uses an organic scattered-leaf effect.
- When satisfied, sew each medium and small leaf by its base and lower center vein only.
Reinforcing the Runner Center
- Turn the completed runner WS upward.
- Cut approximately 3 m of chocolate-brown yarn.
- Beginning beneath the first flower, weave the yarn through the backs of the flower centers along the entire central line.
- At each flower junction, make 3 reinforcing stitches through both adjacent motifs.
- Continue to the opposite end.
- Return along the center using a second line of stitches approximately 2 cm beside the first.
- Do not pull tightly; the runner must remain flat.
- Knot securely and weave both ends into the backs of the brown centers.
Optional Hidden Crochet Support Strip
- For a runner that will be moved frequently, use chocolate-brown yarn and ch 8.
- Row 1: Sc in second ch from hook and across. Ch 1, turn. (7 sts)
- Rows 2 onward: Sc in each st across, ch 1, turn. (7 sts)
- Continue until the strip measures approximately 150 cm or matches the distance between the first and last flower centers.
- Fasten off leaving a long sewing tail.
- Position the strip along the WS center line.
- Sew it only to the backs of the brown flower centers and major leaf junctions.
- Keep the strip completely hidden when viewed from the RS.
Shaping the Finished Runner
- Place the runner RS upward on a large table or blocking surface.
- Straighten the six flower centers into a gentle central line.
- Rotate individual flowers slightly to preserve the natural arrangement.
- Pull large leaves outward until the widest section measures approximately 38 cm.
- Adjust the end leaves to create tapered rather than square ends.
- Lift and separate overlapping petals with your fingers.
- Curve several leaf tips gently upward while leaving their bases flat.
- Allow the assembled runner to rest flat for several hours before final inspection.
Finishing
Weave every remaining yarn tail into the WS of the corresponding flower or leaf. Check the runner from the front and remove any visible joining stitches. The flower centers should sit flat against the table, while the petals and outer portions of the leaves should retain enough movement to create the layered texture shown in the reference.
For the final arrangement, place the runner lengthwise through the center of the table and gently spread the outer leaves. Do not press the flowers completely flat. The contrast between the stable brown centers, raised petals, pointed leaves, and changing autumn colors is what gives this design its dimensional appearance.
Tips for Success
- Block every flower separately before assembly. Trying to block the entire dimensional runner at once makes it much harder to keep the petals evenly shaped.
- Use a smaller hook for the surface ridges and leaf veins so these details remain crisp without making the main motifs bulky.
- Attach leaves only at their bases and lower veins. Free edges create the layered autumn foliage effect and prevent the runner from looking like one flat panel.
- Arrange every flower and leaf before sewing anything permanently. Take a photo of the layout so you can reproduce the placement while attaching pieces from the WS.
- Keep the hidden center reinforcement relaxed. A tight support line will shorten the runner and cause the flowers to overlap too heavily.
Common Mistakes to Avoid
- Do not attach flower petals only at their tips. The connection will be unstable and the runner may separate when lifted; join neighboring motifs through the lower halves of several petals.
- Avoid making every leaf the same color and size. The reference depends on varied autumn foliage to break up the repeated circular flower shapes.
- Do not flatten the petal layers during blocking. Pin the tips while allowing the bases to remain slightly raised.
- Avoid pulling surface crochet too tightly along the leaves. Tight veins cause otherwise flat leaves to curl into tubes.
- Do not place all six flowers at exactly the same rotation. Slightly changing their angles gives the finished runner a more natural botanical flow.
Ways to Customize This Pattern
- Make a shorter centerpiece with four flowers and approximately 24-28 leaves for a small dining or coffee table.
- Create a neutral farmhouse version with cream, beige, camel, brown, and muted olive instead of the brighter autumn palette.
- For a classic sunflower runner, crochet every flower in golden mustard with chocolate centers and use only olive and sage leaves.
- Add crocheted acorns between selected leaves for an even richer woodland harvest theme.
- Extend the runner by adding more complete flower motifs. Each additional flower adds approximately 25-30 cm depending on overlap and gauge.
Frequently asked questions
The reference-inspired version uses six large flowers: two mustard, two cream, one burgundy, and one burnt orange. For a shorter table, four or five flowers work well. For a long dining table, add motifs one at a time until the flower line reaches the desired length before attaching the outer leaves.
First check that the brown center lies flat. Then block only the outer portion of each petal rather than pressing the entire flower. If the petals curl tightly toward the center before blocking, your tension is probably too tight; increase the petal hook size by 0.5 mm.
Yes, if your chosen yarn is washable. Hand washing is safest for the assembled dimensional motifs. Support the runner fully when wet, press out excess water without wringing, reshape every flower and leaf on a flat surface, and allow it to dry completely before moving it.
Use the reinforced center joining method in the pattern. For a runner that will be moved often, add the optional hidden crochet support strip to the WS. It carries much of the lengthwise tension without being visible from the top.
You can, but the result will behave differently. Cotton produces crisp leaves and structured petals like those in the reference. Acrylic usually creates a softer, lighter runner and may require careful steam blocking. Never place a hot iron directly on acrylic yarn.
The finished Autumn Sunflower Crochet Table Runner Pattern